提供: Bright Pattern Documentation
(Created page with "== 手順 == # コンタクトセンター管理者アプリケーションの Contact-center-administrator-guide/CallCenterConfiguration/IntegrationAccounts/Overview|コー...") |
|||
| Line 7: | Line 7: | ||
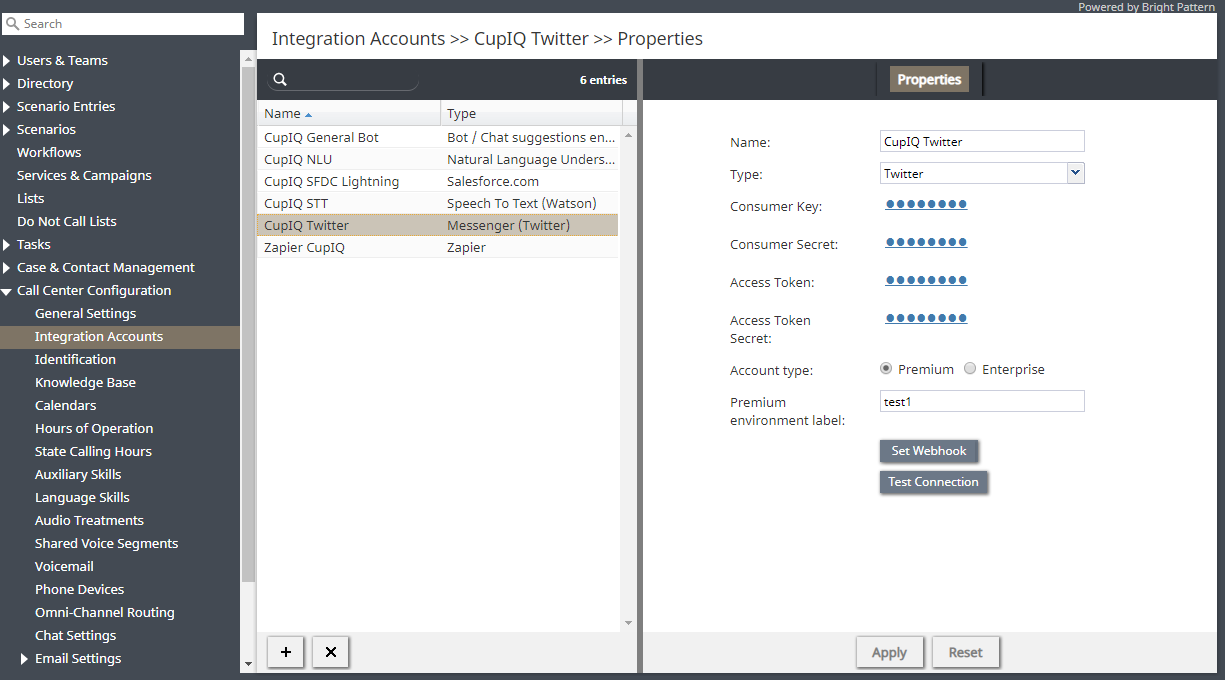
# コンタクトセンター管理者アプリケーションの [[Contact-center-administrator-guide/CallCenterConfiguration/IntegrationAccounts/Overview|コールセンター設定 > 統合アカウント]]で '''+'''をクリックして、新しい統合を作成します。 '''メッセンジャー'''を選択して、ドロップダウンメニューより '''Twitter'''を入力します。<br><br>[[File:Twitter-App-Creation-6-54.PNG|800px|thumb|center|統合アカウントの作成]]<br> | # コンタクトセンター管理者アプリケーションの [[Contact-center-administrator-guide/CallCenterConfiguration/IntegrationAccounts/Overview|コールセンター設定 > 統合アカウント]]で '''+'''をクリックして、新しい統合を作成します。 '''メッセンジャー'''を選択して、ドロップダウンメニューより '''Twitter'''を入力します。<br><br>[[File:Twitter-App-Creation-6-54.PNG|800px|thumb|center|統合アカウントの作成]]<br> | ||
# Fつぐに、以下を入力します:<br>* 統合アカウントの名前<br>* [[Twitter-integration-guide/Configuration/CreateanApp#Keys_and_Tokens_Tab|コンシューマー APIキー]]<br>* [[Twitter-integration-guide/Configuration/CreateanApp#Keys_and_Tokens_Tab|コンシューマー API キーシークレット]]<br>* [[Twitter-integration-guide/Configuration/CreateanApp#Keys_and_Tokens_Tab|アクセストークン]]<br>* [[Twitter-integration-guide/Configuration/CreateanApp#Keys_and_Tokens_Tab|アクセストークンシークレット]]<br>* アカウントタイプ: ''プレミアム'' または ''企業用''<br>* プレミアムタイプの場合、[[Twitter-integration-guide/Configuration/DevEnvironment|開発環境ラベル]]の名前<br><br> | # Fつぐに、以下を入力します:<br>* 統合アカウントの名前<br>* [[Twitter-integration-guide/Configuration/CreateanApp#Keys_and_Tokens_Tab|コンシューマー APIキー]]<br>* [[Twitter-integration-guide/Configuration/CreateanApp#Keys_and_Tokens_Tab|コンシューマー API キーシークレット]]<br>* [[Twitter-integration-guide/Configuration/CreateanApp#Keys_and_Tokens_Tab|アクセストークン]]<br>* [[Twitter-integration-guide/Configuration/CreateanApp#Keys_and_Tokens_Tab|アクセストークンシークレット]]<br>* アカウントタイプ: ''プレミアム'' または ''企業用''<br>* プレミアムタイプの場合、[[Twitter-integration-guide/Configuration/DevEnvironment|開発環境ラベル]]の名前<br><br> | ||
| − | # | + | #'''適用''' をクリックし入力された情報を保存した後 、'''接続テスト'''をクリックします。その結果、 "アカウントの認証情報は確認されました。"というメッセージが表示されます。<br><br> |
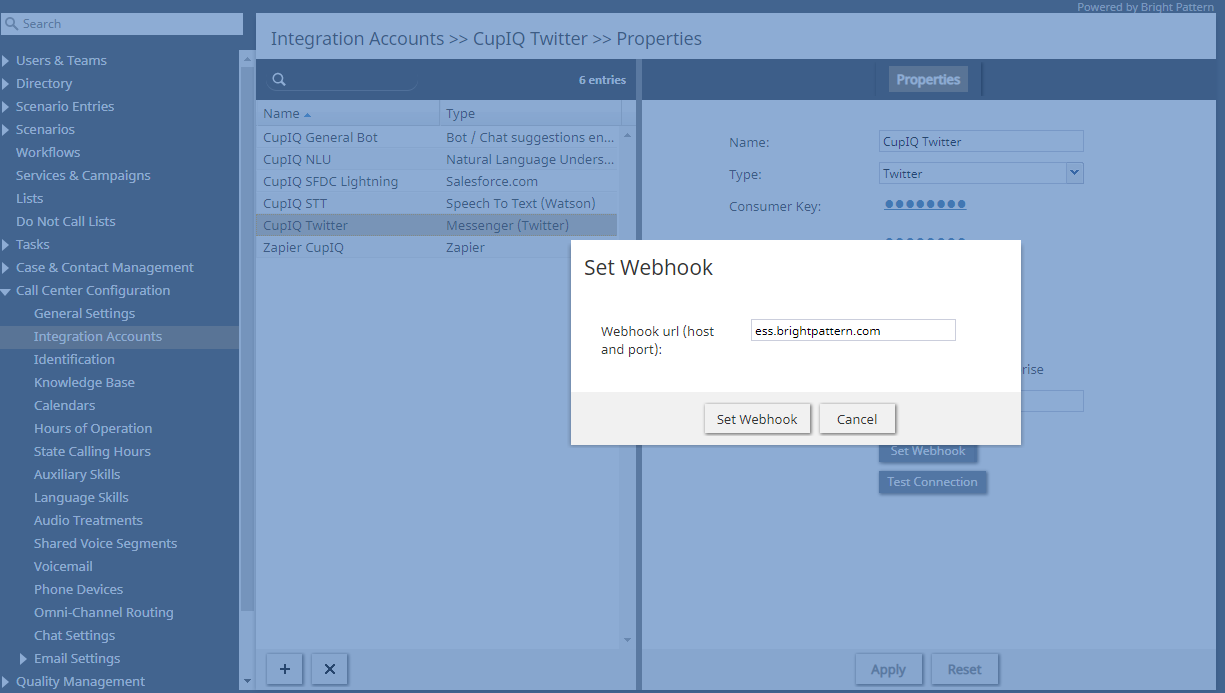
| − | # | + | # 次に'''Webhook設定'''ボタンをクリックします。これにより、コンタクトセンターの名前がwebhook URLとして設定されます (例えば、 your_contact_center.brightpattern.com)。"Webhookが正常に設定されました。"というメッセージが表示されます。 '''Note''': This step should be done once for newly configured Twitter integration accounts or when there is a [[Twitter-integration-guide/Configuration/Troubleshooting|problem receiving messages from Twitter]]. |
# NOTE: this step might not work because of Twitter API issue. Please try this [[Twitter-integration-guide/Configuration/WebHookWorkAround | manual workaround]]. | # NOTE: this step might not work because of Twitter API issue. Please try this [[Twitter-integration-guide/Configuration/WebHookWorkAround | manual workaround]]. | ||
<br><br>[[File:Twitter-App-Creation-8-54.PNG|800px|thumb|center|Set the webhook]] | <br><br>[[File:Twitter-App-Creation-8-54.PNG|800px|thumb|center|Set the webhook]] | ||
Revision as of 21:10, 13 June 2020
• English
統合アカウントの設定
ご注意: Twitter APIの問題のため、2020年2月18日以降、この手順は使用できません。この問題が解決するまで、Twitter Webhook の手動設定の手順に従ってください。引き続き問題が発生する場合は、 サポートチームへお問い合わせください。
アプリの作成 と テスト用の開発環境作りの後、これらの情報を統合アカウントが設定されたBright Patternコンタクトセンター 環境に接続しなければなりません。
手順
- コンタクトセンター管理者アプリケーションの コールセンター設定 > 統合アカウントで +をクリックして、新しい統合を作成します。 メッセンジャーを選択して、ドロップダウンメニューより Twitterを入力します。
- Fつぐに、以下を入力します:
* 統合アカウントの名前
* コンシューマー APIキー
* コンシューマー API キーシークレット
* アクセストークン
* アクセストークンシークレット
* アカウントタイプ: プレミアム または 企業用
* プレミアムタイプの場合、開発環境ラベルの名前 - 適用 をクリックし入力された情報を保存した後 、接続テストをクリックします。その結果、 "アカウントの認証情報は確認されました。"というメッセージが表示されます。
- 次にWebhook設定ボタンをクリックします。これにより、コンタクトセンターの名前がwebhook URLとして設定されます (例えば、 your_contact_center.brightpattern.com)。"Webhookが正常に設定されました。"というメッセージが表示されます。 Note: This step should be done once for newly configured Twitter integration accounts or when there is a problem receiving messages from Twitter.
- NOTE: this step might not work because of Twitter API issue. Please try this manual workaround.


