From Bright Pattern Documentation
• 日本語
How to Enable Natural Language Understanding
Natural Language Understanding (NLU) is used to determine the sentiment of a given interaction; sentiment may be displayed as a number or as a happy, neutral, or angry face icon. Whether a number or an icon, sentiment lets you analyze how your customer acted and reacted during the course of an interaction, allowing you to fine-tune agent training.
NLU is enabled in section Call Center Configuration > Integration Accounts. For voice and chat, the integration account is defined per service; for email, the integration account is set per scenario entry. Sentiment results may be used as an interaction search condition or may be seen in search results.
In this section, you will learn how to enable NLU.

Procedure
- In the Contact Center Administrator application, go to Configuration > Call Center Configuration > Integration Accounts.
- Click the add account (“+”) button, and select account type Watson Natural Language Understanding.
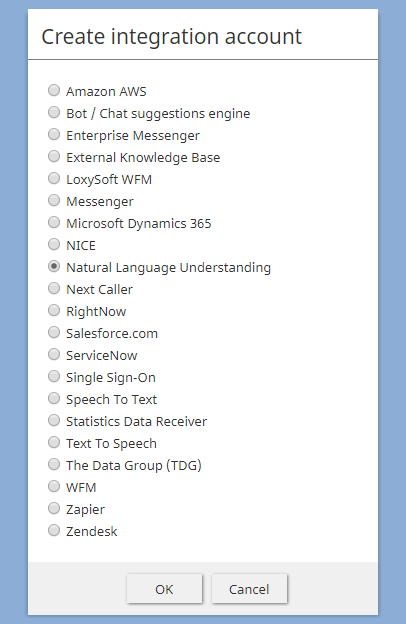
Select the NLU account type - In Properties, fill in your credentials (basic authentication) for the IBM Watson Natural Language Understanding API. For property descriptions, see the Contact Center Administrator Guide, section Natural Language Understanding Integration.
- Click Apply to save your changes.
- If utilizing NLU for voice or chat:
- In Contact Center Administrator, go to Configuration > Services & Campaigns, and select a voice or chat service from the list.
- In the service Properties, from the Natural Language Understanding drop-down menu, select the NLU integration account you just configured.
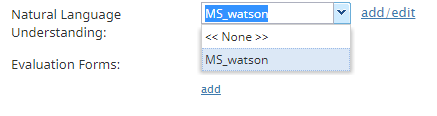
Be sure to select the desired NLU integration account - Click Apply to save your changes.
- In Contact Center Administrator, go to Configuration > Services & Campaigns, and select a voice or chat service from the list.
- If utilizing NLU for email:
- In Contact Center Administrator, go to Configuration > Scenario Entries > Email, and select an email service from the list.
- Click on the Services tab.
- From the Natural Language Understanding drop-down menu, select the NLU integration account you just configured.
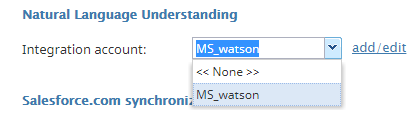
Be sure to select the desired NLU integration account - Click Apply to save your changes.
< Previous | Next >
- In Contact Center Administrator, go to Configuration > Scenario Entries > Email, and select an email service from the list.


