How to Create a Voice Scenario Survey
Surveys are useful tools to get feedback from customers about your company, targeted topics, and so forth.
This article explains how to create a voice scenario survey for the purpose of collecting customer satisfaction information. Note that this scenario is slightly different from the Customer Survey template provided in the Contact Center Administrator application.
Scenario Example
Click the following link to download an annotated version of this voice scenario example.
File:App Voice Scenario Survey.zip
For instructions on how to import this file into your contact center, see the Contact Center Administrator Guide, section Scenarios Overview > How to Export and Import Scenarios.
For general information about scenarios, refer to section Scenario Builder Overview.
Scenario Flow
The purpose of this scenario is to solicit customer satisfaction feedback from a voice interaction and collect this information for reporting purposes. This is accomplished by using the following scenario blocks:
Designer's note: This scenario is triggered when the Start Another Scenario block is invoked from the Target Disconnected conditional exit of a Connect Call block in a different scenario. That is, the agent must be the one who ends the call, so it is advisable to have her ask the caller if they would like to participate in a survey and then instruct the caller to stay on the line.
Please note this is an example scenario only and not intended for production use. All conditional exits should be defined with actions for production use.
Scenario Overview
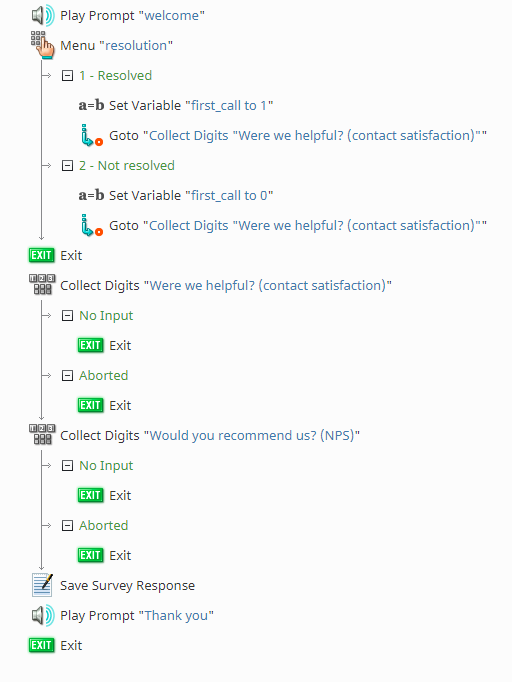
The diagram shown illustrates what the complete scenario looks like when designed in the Scenario Builder application.
1. Tell the Customer They Are Taking a Survey
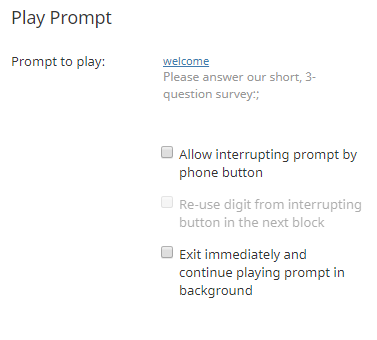
This scenario begins after interaction with the agent ends, so you will want to inform the customer they have been directed to take a survey. In our example, the survey contains three questions, and we use the Play Prompt block to convey this point.
2. Begin Collecting Information with the "Menu" Block
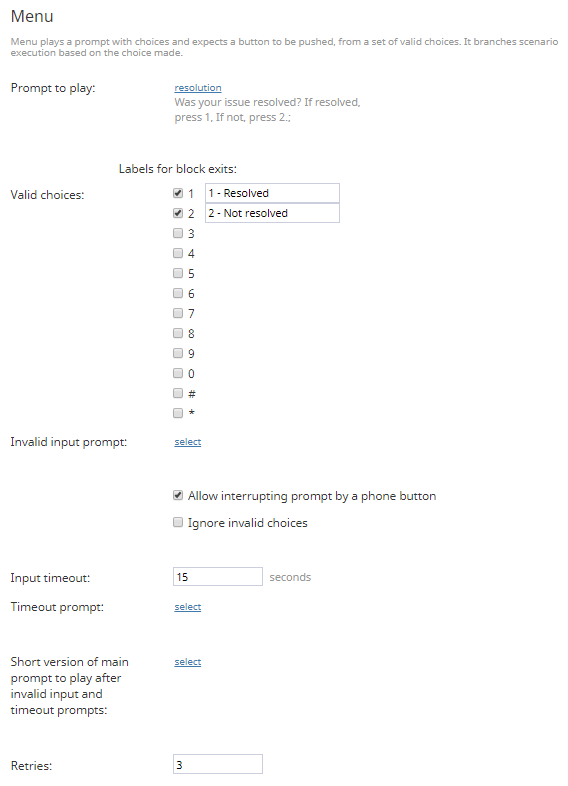
Next, you will configure a Menu block. In our example, we first configure the Prompt to play, which asks the customer if the problem they experienced was resolved and then instructs them to press a telephone key for their answer.
Next, we configure the telephone key valid options, which are actually conditional exits. In our example, we configure 1 to mean Resolved and 2 to be Not resolved.
Finally, we configure an Input timeout for 15 seconds, and the number of Retries to three. Doing this allows the scenario to proceed to the Exit block that follows the Menu block in the flow if no input happens within 45 seconds (i.e., the scenario will end).
2a. Use the "Set Variable" Block to Pass Menu Values
If the customer has pressed either of the telephone key valid options, we want two things to happen:
- We want to collect the information about which key was pressed.
- We want the customer to answer the remaining two questions from our three-question survey.
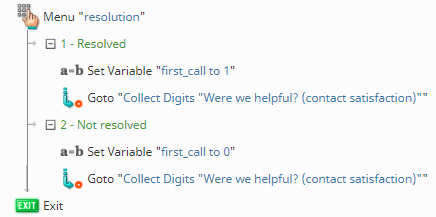
In order to collect key information for each of the valid options, we use the Set Variable block. In both instances, we create a variable named first_call. On valid option 1, we set the value of first_call to 1, and on valid option 2, we set the value to 0. The variable first_call ultimately is passed to the Save Survey Response block and will collect the value corresponding to the option the customer choses.
After collecting the key information, we want the scenario to progress to the remaining two questions. This is accomplished by using Goto blocks to jump past the Exit block to the first of the two Collect Digits blocks.
3. Use "Collect Digits" to Gather More Feedback
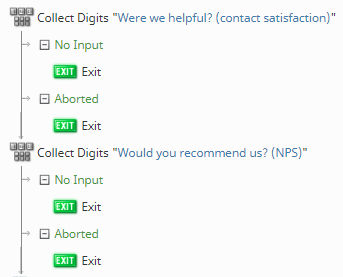
You will configure the remaining two questions in two separate Collect Digits blocks; in the scenario flow, these blocks execute consecutively.
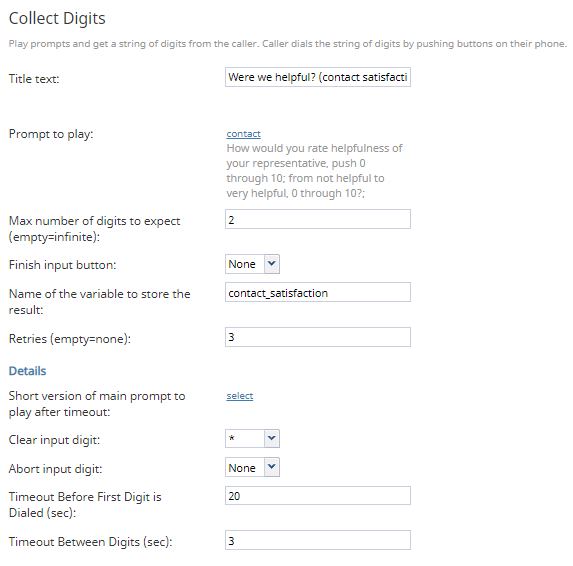
Each Collect Digits block plays a prompt that asks a different question. In our example, the first Collect Digits block prompt asks the customer about the helpfulness of the agent and the second asks how likely they are to recommend our service.
Both blocks instruct the customer to enter numbers ranging from zero to 10 in order to answer the questions, so for each block, we configure the Max number of digits to expect to 2. Then, for the first block, we configure the Name of the variable to store the result as contact_satisfaction; for the second block, we configure the Name of the variable to store the result as NPS_raw.
Depending on the numbers the customer enters, both the contact_satisfaction variable and the NPS_raw variable pass the values to the Save Survey Response block.
Although the Collect Digits block does not allow you to configure conditional exits per configured option, like with the Menu block, it does contain regular conditional exits and timeout options that you can adjust to your liking.
4. Collect All Responses in a "Save Survey Response" Block
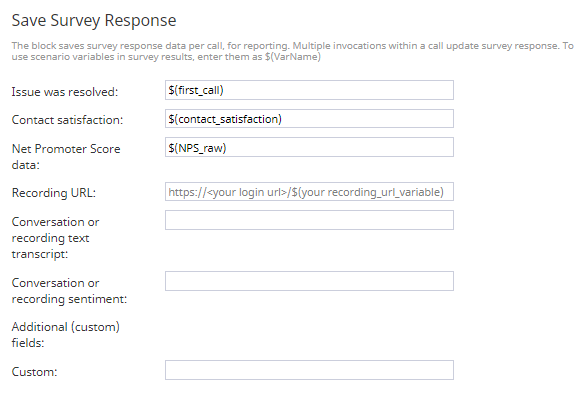
Before ending the scenario, you will want all values collected in the variables you created to be saved; this is accomplished by entering the variable names in a Save Survey Response block. In our example, we enter the variables as follows:
- In the Issue was resolved field, we enter the variable from the Menu block, first_call.
- In the Contact satisfaction field, we enter the variable from the first Collect Digits block, contact_satisfaction.
- In the Net Promoter Score data field, we enter the variable from the second Collect Digits block, NPS_raw.
From here, the numbers the customer entered will be available for reports.
5. Play a Prompt to Thank the Customer
Finally, after the customer answers all questions and the answers are recorded in the Save Survey Response block, we use the Play Prompt to thank them for participating in the survey then end the scenario with an Exit block.
Suggested Reading
In order to better understand the blocks and variables used in this scenario, we recommend reading the following articles:
- Scenario Builder Basics
- How to Create a Basic Scenario
- How to Create a Voice Scenario That Distributes Surveys to a Percentage of Random Customers
And finally, don't forget to save your work early and often!

