Pizza Flowchart Chat Scenario
Starting from Bright Pattern Contact Center version 5.8.0, it is possible for agents, bots, or the Scenario Builder application to present preconfigured chat responses to customers. The responses appear to customers as quick reply buttons in the chat interaction, which, when selected, allow customers to respond quickly to questions your contact center frequently receives. Quick reply buttons can be used in a variety of situations but are ideal for quickly navigating through flowcharts (e.g., identifying an item’s make and model, locating specific item parts or pieces, creating an item to order, etc.).
This example uses a simple flowchart to help a customer order a pizza via chat. The chat scenario for ordering the pizza illustrates how to:
- Create the flowchart using the Switch block.
- Use quick reply buttons in the Send Message+ block to guide the customer through the flowchart.
- After guiding the customer through the flowchart, connect the customer to an agent.
As a reminder, this scenario is an example for testing purposes only and is NOT intended for production use.
Scenario Example
Click the following link to download an annotated version of this chat scenario example.
Media:App_Pizza_Parameters_Flowchart.zip
For instructions on how to import this file into your contact center, see the Contact Center Administrator Guide, section Scenarios Overview > How to Export and Import Scenarios.
For general information about scenarios, refer to section Scenario Builder Overview.
Procedure
1. Greet the customer
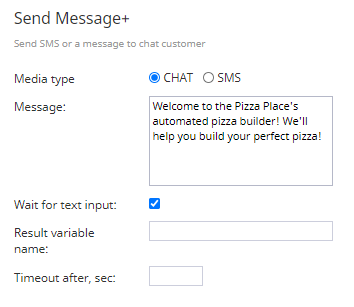
Our first Send Message+ block introduces our pizza company and informs the customer they will be navigating through an automated menu.
Note: When using Send Message+ blocks with Switch blocks, it is necessary to select the Wait for text input box to ensure the scenario does not proceed without customer input.
2. Introduce the first quick reply button responses
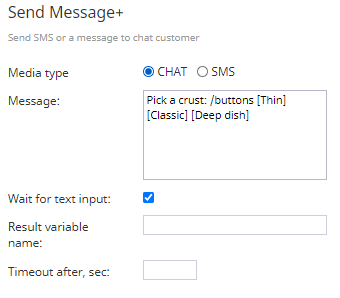
The next Send Message+ block presents the customer with the first group of quick reply buttons. When configuring quick reply buttons, use the following format:
<Question or statement here> /buttons [Button 1] [Button 2] [Button 3]
For example:
Pick a crust: /buttons [Thin] [Classic] [Deep dish]
The customer's response will dictate whether the scenario will take a defined Switch block exit or take the "natural exit (i.e., pass through to the Find Agent block). When the customer selects a quick reply button, it will be received by the agent as text.
3. Create a flowchart
The Switch block allows you to create branches and alter the control flow for your scenario, based on specific variable values.
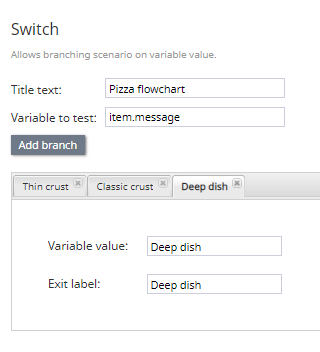
When the customer responds to the pizza crust question from the previous Send Message+ block, the response will be passed in the variable item.message.
For the Switch block, we add the variable item.message to the Variable to test field, then create branches to match each of the answers from the previous Send Message+ block (i.e., "Thin," "Classic," "Deep dish").
If the customer's response to the question from the previous Send Message+ block is to select a quick reply button, the text of that button will cause the scenario to pass through one of the matching Switch block's branches. If the customer types something else, the scenario takes the "natural exit" (i.e., it will pass through to the Find Agent block).
As a reminder, when using Send Message+ blocks with Switch blocks, it is necessary to select the Wait for text input box to ensure the scenario does not proceed without customer input.
3a. Flesh out the flowchart’s branches
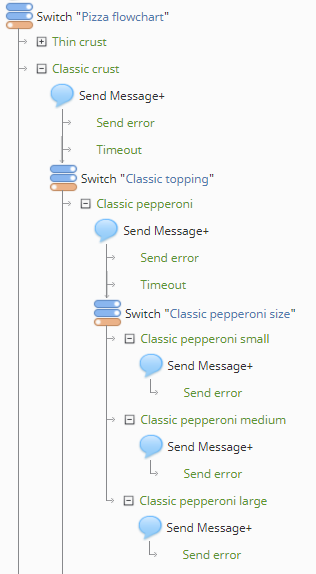
If the customer selected one of the three possible buttons from the scenario's second Send Message+ block, the scenario will exit through the matching branch.
As soon as one branch is taken, the customer is presented with another Send Message+ block with quick reply buttons.
The pattern repeats until the customer has selected a pizza crust, topping, and size. At that point, the scenario sends a final Send Message+ block confirming what the customer selected, and then the scenario passes to the Find Agent block.
As a reminder, when using Send Message+ blocks with Switch blocks, it is necessary to select the Wait for text input box to ensure the scenario does not proceed without customer input.
4. "Find Agent" + "Connect Chat"
Finally, we are ready to pass the customer to an agent. To do this, configure your scenario with the two most basic chat scenario blocks: Find Agent and Connect Chat. As a reminder, please define all conditional exits.


