How to Configure Last-Agent Routing Using the Internal Database
Sometimes, a customer will need to make several calls to your contact center. In the interest of good service and continuity, you can configure last-agent routing, which makes it possible for the customer to continue speaking with the same agent (i.e., if they are available) when they call back.
This tutorial describes how to route a returning, identified caller to the last agent the caller previously spoke with. Note: This scenario is designed to work with the internal database.
You will learn how to:
- Configure the correct identification settings for your contact center
- Identify the returning caller by finding their contact information in the internal database
- Locate the agent that last spoke with the returning caller, then route the call to this agent
As a reminder, please save your scenarios early and often!
Scenario Example
Click the following link to download an annotated version of this voice scenario example.
Media:App_Last-Agent_Routing.zip
For instructions on how to import this file into your contact center, see the Contact Center Administrator Guide, section Scenarios Overview > How to Export and Import Scenarios.
For general information about scenarios, refer to section Scenario Builder Overview.
As a reminder, this scenario is an example for testing purposes only and is NOT intended for production use.
Procedure
1. Configure your contact center’s identification settings
- In the Contact Center Administrator application, go to section Call Center Configuration > Identification.
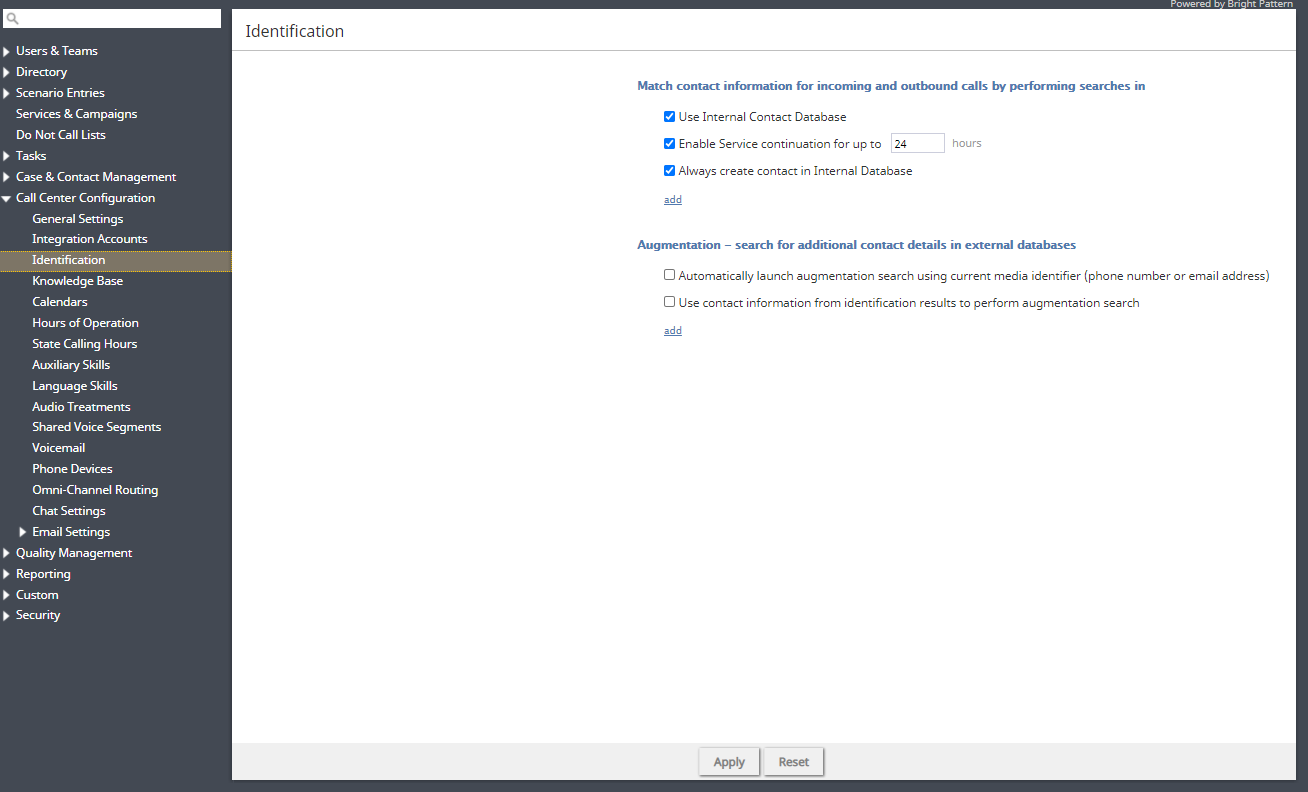
Call Center Configuration > Identification - If you have not already done so, enable the setting Enable Service continuation for up to __ hours, and define the appropriate number of hours.
Enable service continuation - Next, if you have not already done so, enable the setting Use Internal Contact Database. This specifies the system will use the internal database only. Optionally, you may choose to enable the setting Always create contact in Internal Database. When enabled, this setting automatically creates a contact in your internal database for inbound interactions.
Note: If you are using an external database, the setting Always create contact in Internal Database allows you to define Salesforce.com or Zendesk integration accounts. - When you are finished, click Apply to save your settings.


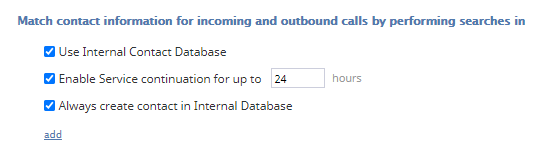
2. Greet the caller
- Next, go to section Scenario > Voice, and click + to create a new voice scenario; this will launch the Scenario Builder application.
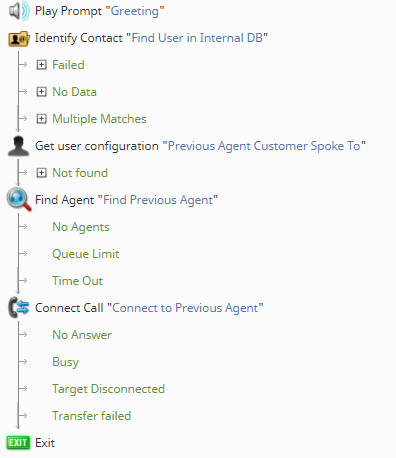
- The first block we add to this scenario is the Play Prompt block. The block will not only greet the caller, but it will inform them they must wait until an appropriate agent is located.
Adding this block at the beginning of the scenario is especially useful for allowing the system time to find and retrieve the caller's contact information and/or the previous agent the caller spoke with.
Note that contacts in external databases might require slightly more wait time. In this instance, you can add an additional audio treatment to fill any time gaps. For example, you may add another Play Prompt block with a "please wait" message and/or music.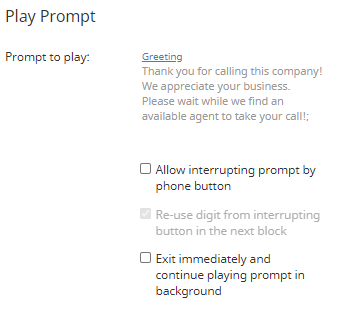
Greet your caller

3. Identify the returning caller
- The next block you will add to your scenario is the Identify Contact block; it allows you to search an internal or external database for a matching saved contact.
- In our example, we will search for a contact with a phone number matching the phone being used for the incoming call; this is passed along the system using the variable $(item.from).
- Note: If the incoming caller’s phone number does not match a saved contact, you can add Goto blocks on the conditional exits that redirect the caller to another agent.

Identify Contact can search in internal or external databases

3. Identify the previous agent
- Next, you will add the block Get User Configuration. When configured, it will identify the last agent the returning caller spoke with.
- In order to do this, configure the Find user by setting to User ID, and the Value field to contain the variable $(item.continuationUserId). This variable finds the user ID of the agent the caller previously spoke with.
- Then, for the User properties to return setting, we will set it to return the found User ID, and then name the return results variable UserID (i.e., you can put any text in this field). This variable will be used in the Find Agent block.
Use the variable $(item.continuationUserId)

4. Route the returning caller to the previous agent
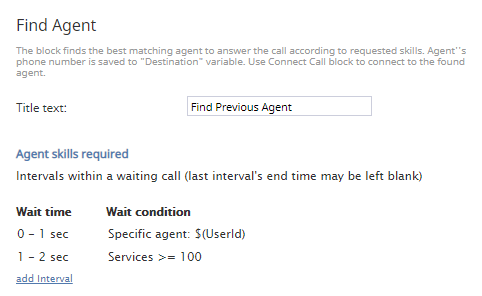
- The next block to add is the Find Agent block. In the Agent skills required setting, you will select the Specific agent wait condition, then add the variable UserId from the Get User Configuration block. Note that this condition is available for the first interval only (e.g., 0 - 1 sec). This configuration ensures that if both the saved contact and the previous agent are found and available, they will be connected first.
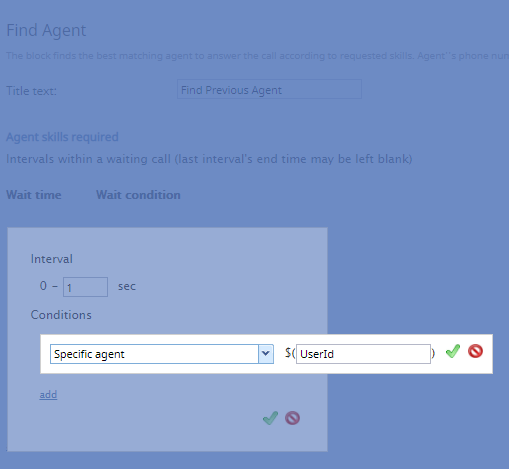
Route the call to the specific agent - In the event that neither the contact nor the agent is found/available, you will need to define an additional Agent skills required option (e.g., Services >= 100). This ensures the caller will be routed to the next most appropriate and available agent.
Ensure your caller is routed to an available agent


5. Connect the caller to the agent
- Finally, once an available agent is found with the Find Agent block, the caller will be connected to them with the Connect Call block; note that these two blocks should be arranged in consecutive order with no other scenario blocks between them. As a reminder, please define all conditional exits.
- After the Connect Call block, you may add an Exit block to end this scenario.
Scenario overview < Previous | Next >
