Configuration
To configure a virtual queue (VQ) for your existing inbound voice services, follow these steps:
Step 1: Select the scenario that will distribute calls to the services that will have VQ enabled
- Log in as Admin to the Contact Center Administrator application.
- Navigate to Scenarios > Voice.
- Select the scenario that is used for the distribution of calls to the services for which you would like to enable VQ. In the example shown, the scenario selected is called "Inbound Service."

Step 2: Rename the scenario
- Double-click the scenario name or click the Edit button to open the scenario in the Scenario Builder application.
- Using the Save As button, save this scenario under a new, unique name. This name can be anything you like.

Step 3: Locate the Find Agent block in Scenario Builder
- Double-click the scenario name, or click the Edit scenario
 button to open the scenario in the Scenario Builder application.
 - Within this new scenario, select the Find Agent block that is used to distribute calls to the particular service for which you would like to enable VQ.

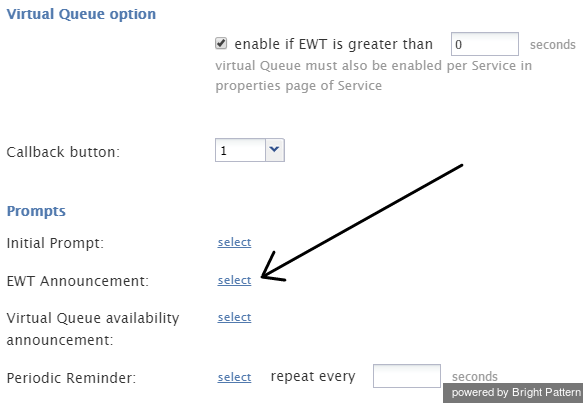
Step 4: Enable VQ and specify the Estimated Wait Time Threshold
- In the Virtual Queue option section of this Find Agent block, select the checkbox to enable VQ.
- Then specify the estimated wait time (EWT) threshold, in seconds. The VQ option will be offered only if the EWT of a given call exceeds the threshold value entered here. In the example shown, the threshold value is zero (0) seconds.

Step 5: Enable callback
In the Callback button drop-down menu, select a number. This number is the dial pad digit that the caller will press to accept the VQ option.

Step 6: Record the EWT announcement to play for callers
- Create the EWT Announcement. For example, an EWT announcemnt might include The estimated waiting time is <number of minutes or seconds> where "Estimated Waiting Time" is a voice segment of the EWT type.
Note: If you have already created one, skip this step and proceed to Step 7. - To create a new prompt/announcement, find EWT Announcement in the Prompts list and click select.
Select the desired announcement to use - In the Prompts list window that appears, click Add new.
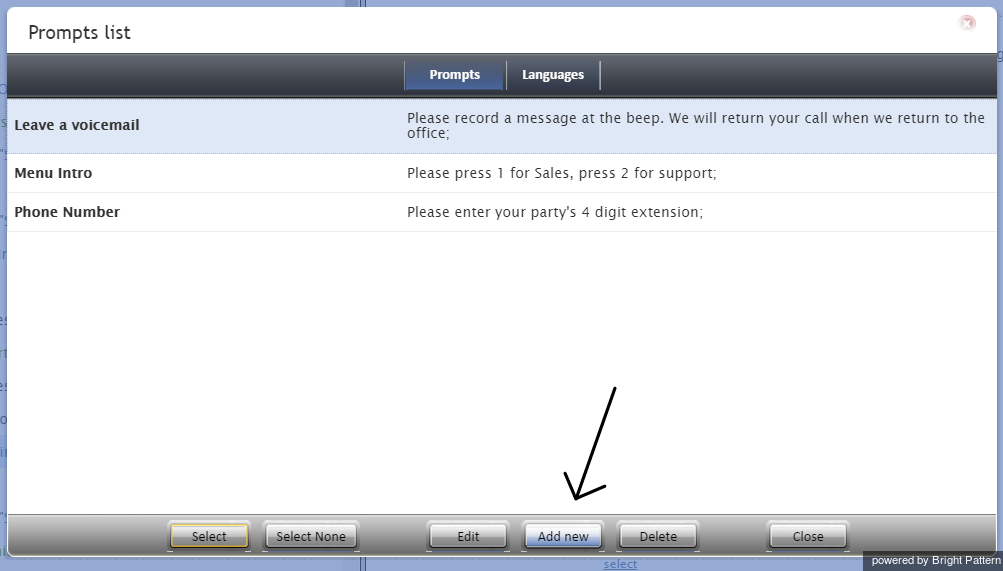
If you do not already have an EWT announcement, you must add a new one - In the New prompt window that appears, type the name of the announcement.
- Click Add voice segment.
- In the drop-down menu the appears, select EWT and click the green checkmark.

Select the segment to add to the announcement - Click Add voice segment again.
- In the drop-down menu the appears, select Voice and type the text that you wish to be spoken in the announcement. Typically, the text is The estimated waiting time is. This describes the spoken announcement that the caller will hear on the phone.
- Click upload to add a voice recording of your announcement text.
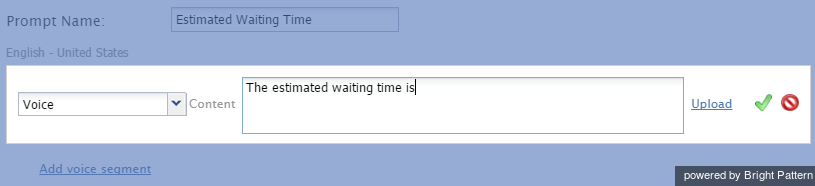
Select the Voice segment to add to the announcement - You now have two segments in your EWT Announcement. Click Apply to save your changes.
- In the Prompts list that appears again, select the EWT Announcement you just created, and click Select.


Step 7: Create the Virtual Queue availability announcement
The Virtual Queue availability announcement will be used to offer the VQ option to the caller. For example, the announcement might include To hang up now and have us call you back once a representative is available, press [digit] at any time, where digit is the digit selected in Step 5. To create this announcement, follow the instructions given in Step 6 of this procedure:
- Beside Virtual Queue availability announcement:, click select.
- In the Prompts list that appears, click Add new.
- Add a voice segment, naming it "Virtual Queue availability announcement" and typing "To hang up now and have us call you back once a representative is available, press 1 at any time." in the content box.
- Upload the voice recording that will be played to callers.
- Click Apply to save your changes.
- In the Prompts list that appears again, select the new announcement you just created, and click Select.
Your Prompts section of the Find Agent block now includes the two announcements you created.

Step 8: Define Request Callback block properties
For the Callback exit of the Find Agent block, insert a Request Callback block and define its parameters.

Parameters
The parameters are described as follows:
- Title text - The name of this block
- Confirmation prompt - Confirms the callback request (e.g., “Thank you. We will call you back.”)
- Callback phone - Specifies the phone number for the callback. If callbacks will always be made to the phone that was used to make the original call, you can use the $(item.from) variable here, which is the caller ID of the original call. If, however, you want to give the customer a choice of providing another phone number for callback, you should use a combination of scenario blocks Set Variable, Menu, and Collect Digits as illustrated in the example offered in this tutorial. In this case, set the Callback phone to the new variable that you define in the Set Variable block.
- Cancel request after - Specifies the amount of time (in seconds) after which the virtual calls will be terminated if no matching agents are found
- Wait for agent to become available - If checked, a callback will be made after explicit agent reservation; otherwise the EWT-based callback mechanism will be used. See How It Works for more information.
- Start dialing - For the EWT-based callback mechanism, this parameter specifies how far in advance (in seconds) of the EWT expiration moment the callback attempt will be made; note that if an agent becomes available earlier for the given call, the callback will be placed at that moment.
- No Answer Timeout - Specifies how long (in seconds) the block will wait for the customer to answer the callback attempt before taking the No Answer exit

Step 9: Use an IVR prompt to inform the customer that he/she is receiving a callback
The normal exit of the Request Callback block is taken when the callback attempt is answered before the specified No Answer Timeout expires. Instead of connecting the answered call directly to the Find Agent block for immediate distribution to an agent, it is good practice to use an IVR prompt to announce to the customer that this is the requested callback. This explains the purpose of the call to the customer and, more importantly, prepares the caller for a possible short waiting time in case an agent is not immediately available.
In the Scenario Example given in this guide, the Menu block is used to make such an announcement and to wait for customer’s confirmation before passing this call to the Find Agent block for distribution.
Step 10: Define when conditional exits should be taken
Use the conditional exits of the Request Callback block to define what happens when the callback attempt meets various "abnormal" conditions, such as No Answer or Busy. In the Scenario Example given in this guide, the call is terminated under any such conditions, which is shown via the Exit blocks placed beneath each conditional exit.

Step 11: Enable VQ for any other services and save your work
- Repeat Step 3 through Step 10 for other Find Agent blocks of this scenario that are used to distribute calls to other services for which you would like to enable VQ.
- Save the new scenario by clicking the Save button at the bottom of Scenario Builder.
Step 12: Complete remaining VQ configuration steps in Contact Center Administrator
- To complete the remaining VQ configuration steps, open the Contact Center Administration application.
- Log in as Admin.
Step 13: Activate the VQ function for the service desired
The configured VQ will not be operational until it is explicitly activated for the desired services.
- To activate the VQ function for a particular service for which it was configured as described above, select the Enable callback functionality checkbox in the Properties tab of that service.
- Before you activate the VQ function for all other services where it may have been configured, consider using the Virtual Queue Report to monitor VQ performance within the service where it has been activated and to adjust its parameters if necessary. See the Reporting Reference Guide for more information on reports. See also section Reporting for more information.
Step 14: Test the scenario
As with any other significant service configuration change, the new scenario should be tried in a test environment.
- Create a test dial-in scenario entry, associate it with your new scenario and make some test calls imitating various VQ conditions to make sure everything works as you expect.
- Pick a time when your call center is closed for business and replace your current production scenario with the VQ-enabled scenario in the dial-in scenario entries where the current scenario is used. (These scenario entries will appear in the Scenario Entries tab when you select your current scenario in the Scenarios > Voice list view. To make the replacement, click one of the listed dial-in scenario entries and select the new scenario from the Scenario drop-down list.)
Notes
- When configured, virtual queue callback is attempted only once. If you would like to offer virtual queue during specific times, you may use an If block to inspect time of day. If the call occurs during a time that you would want to offer virtual queue, use a Find Agent block with the virtual queue option enabled. If the call time occurs outside of the desired time, use a Find Agent block that does not offer virtual queue.
< Previous | Next >