How to Configure Softphone Solo for Remote Desktop
This article describes how to configure Softphone Solo for remote desktop use. Softphone Solo is an application (Windows) that installs the softphone functions of Bright Pattern’s Agent Desktop Helper Application component (i.e., bpclient.exe) outside of a user’s main client machine.
When Softphone Solo is set up, contact center users are able to have softphone functionality on Agent Desktop through a remote session—without having to download and install the Agent Desktop Helper Application component.
Procedure
In this procedure, we treat Softphone Solo as a default hardphone, and we assign it to each Agent Desktop user with a specific number.
Step 1: Configure a hardphone for your contact center
- Log in to the Contact Center Administrator application and go to section Configuration > Directory > Hardphones.
- Click Add hardphone (“+”) to add a new hardphone.
- In the Properties tab, set the following:
- Number - The number (e.g., “5001”) that will be used for users who log in to Agent Desktop with a remote session; choose a number that is different than the number range of users’ extensions
- Caller ID - Optional; OK to leave empty
- MAC address - Leave empty
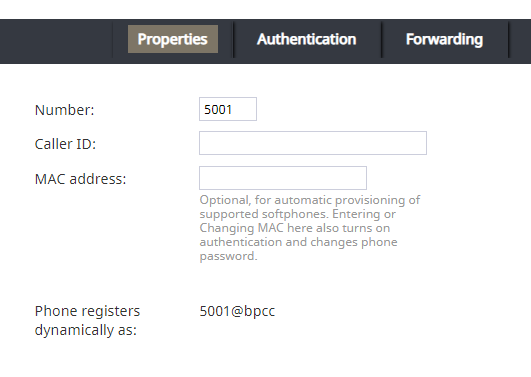
Hardphone Properties
- Number - The number (e.g., “5001”) that will be used for users who log in to Agent Desktop with a remote session; choose a number that is different than the number range of users’ extensions
- In the Authentication tab, set:
- Username - Set the hardphone number (e.g., “5001”)
- Password - Set any, but follow the rules of your contact center’s password policy
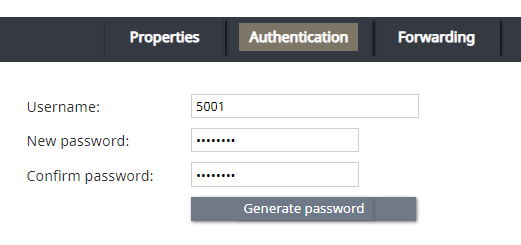
Hardphone Authentication
- Username - Set the hardphone number (e.g., “5001”)
- Click Apply at the bottom of the screen to save your changes.


Step 2: Set the agent’s default hardphone number
As a best practice, set the agent’s default hardphone number. This is the number that the agent will use for placing calls in Agent Desktop. Note that this step is not required for using Softphone Solo, but it is recommended. The agent can choose a number manually at a later time.
- Go to section Configuration > Users & Teams > Users.
- From the Users list, select the agent who will be using Softphone Solo.
- In the agent’s Contacts tab, set the Default hardphone number to the same number you configured for the hardphone in Step 1 of this procedure.

The Users > Contacts properties for the agent - Click Apply at the bottom of the screen to save your changes.

Step 3: Configure Softphone Solo
- Download and install the Softphone Solo for Windows application (SoftphoneSolo_5.x.x.xxxxx.msi). Please contact Customer Success Management for the file.
- Launch the application after installation is complete, or right-click the Softphone Solo tray icon (phone icon) and select Configure to launch it.
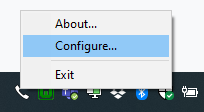
Softphone Solo tray icon, right-clicked - The Softphone Solo configuration dialog will open.
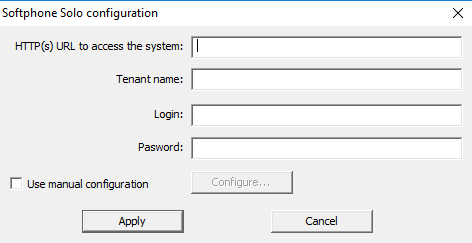
Softphone Solo configuration settings - Set the following:
- HTTP(s) URL to access the system - The URL of the contact center (e.g., “http://company.brightpattern.com”)
- Tenant name - The contact center domain (e.g., “company.brightpattern.com”)
- Login - The agent’s username (e.g., “christy.borden”)
- Password - The user’s password
- HTTP(s) URL to access the system - The URL of the contact center (e.g., “http://company.brightpattern.com”)
- Click Apply.
- If you see an error message, go back and check your configuration, as you may have set the wrong username/password or the wrong URL. The Troubleshooting section describes some common errors you may encounter.

Step 4: Check that the agent can use the phone in Agent Desktop
- Go to the Agent Desktop application, and log in as the agent, using the same Authentication user name and password as set in the Softphone Solo configuration dialog.
- Go to Settings > Phone Device and set Internal hardphone, my default number. You will have to log out and log in again for the change to take effect.
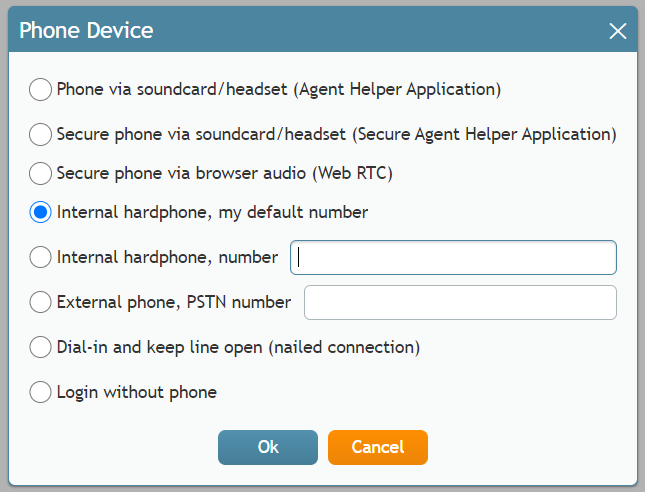
Selecting the phone device in Agent Desktop
Note that if the agent (or an administrator) has configured Softphone Solo manually, the agent has the option to use the Internal hardphone, number setting, with the number of their choice, as shown.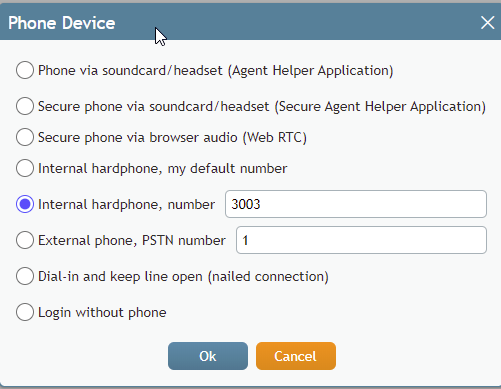
Selecting the "Internal hardphone, number" setting - After logging in again, if you hover your cursor over the agent’s Settings, you will see that the agent’s phone number is the default hardphone number (e.g., “5001”).

Hover text over agent's profile/Settings shows the agent's phone number - Configuration is now complete. Try placing a call.


Troubleshooting
This section describes error messages and what they mean.
Unable to access the system

This error could mean that you may have set the wrong URL in configuration. Make sure that in the field HTTP(s) URL to access the system, that you have set the correct URL of your contact center, including the leading “http://” (e.g., “http://company.brightpattern.com”).
You can quickly check the status of both configuration options (automatic and manual) by looking at Softphone Solo's Windows tray icon (phone icon) color at the bottom of your desktop screen: green = OK, gray = fail.
Unable to obtain phone configuration. Error: HTTP error: 401 Unauthorized

This likely means that you did not set the user’s default hardphone number to the correct number, and because of that, the configuration could not be completed.
Or, it means that some other values have not been configured. If this is the case:
- Right-click the Softphone Solo tray icon and select Configure.
Configure Softphone Solo - Select the checkbox for Use manual configuration and click Configure.
- In the Advanced SIP configuration dialog that opens, if you see that the Advanced SIP configuration is empty, fill in the blank fields. These settings are normally filled in by the system automatically during manual configuration. However, these settings could be affected if the default number was not set correctly, or some other setting was wrong.
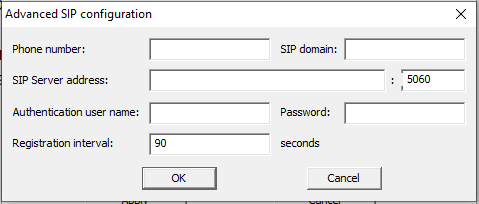
Advanced SIP configuration, empty
- Phone number - The hardphone number you configured in Step 1 of this procedure (e.g., “5001”); this will be filled in for you once you enter the Authentication user name and password (see below)
- SIP domain - Your SIP domain; this will be filled in for you once you enter the Authentication user name and password (see below)
- SIP Server address - Your SIP Server address (e.g., “<tenant_url>.brightpattern.com”); this will be filled in for you once you enter the Authentication user name and password (see below)
- Port - 5060 (default)
- Authentication user name - The username of the agent (e.g., “christy.borden”) who was assigned the hardphone in Step 2 of this procedure
- Password - The agent’s password
- Registration interval - 90 seconds (default)
- Phone number - The hardphone number you configured in Step 1 of this procedure (e.g., “5001”); this will be filled in for you once you enter the Authentication user name and password (see below)
- When done, the settings should look like this:
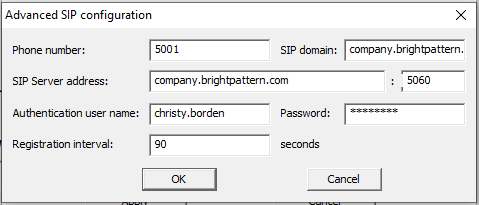
Advanced SIP configuration settings completed - Click OK.
- Back in the Softphone Solo configuration dialog, click Apply.
< Previous | Next >

