Outbound - General
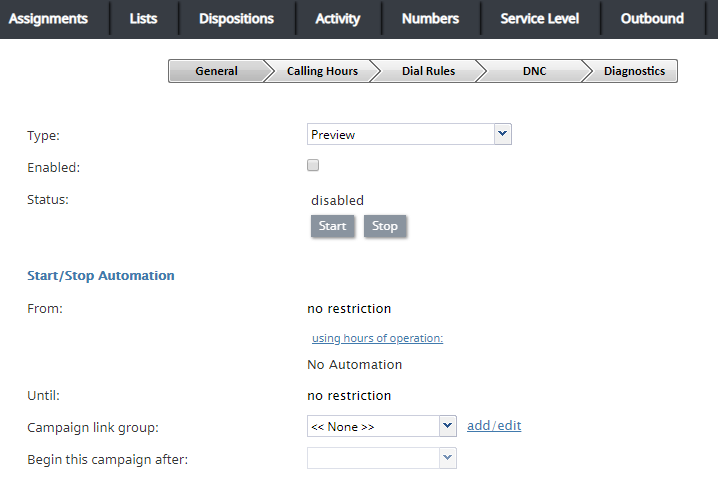
The following general campaign settings are configured in the General section of the Services and Campaigns Outbound tab.
General Settings
Type
This is the type of campaign. There are four different campaign types from which to choose.
- In campaigns of the Preview type, the calling records are submitted to the agents participating in the campaign. The agents review record information, dial destination numbers, and monitor call progress. Additionally, this type of campaign allows agents to be reserved for a requested callback without indication to the agent.
- In campaigns of the Progressive type, the system automatically dials numbers from list records according to a fixed (preconfigured) dialing rate, monitors call progress, and connects successful (answered) call attempts to available agents.
- In campaigns of the Predictive type, the system automatically dials numbers from list records according to currently optimal dialing rates, monitors call progress, and connects successful (answered) call attempts to available agents. The dialing rate is optimized to maintain the desired agent occupancy based on the statistical analysis of outcomes of most recent dialing attempts.
- In campaigns of the Automatic (IVR) type, the system automatically dials numbers from list records, monitors call progress, and connects successful (answered) call attempts to a prerecorded interactive voice response (IVR) message. Note that because agents are not involved in campaigns of this type, it may require different kind of license and may have to be explicitly enabled for you by your service provider.
Note that the definition of some of the subsequent campaign properties will depend on the selected campaign type.
Enabled
Enabled indicates the current state of the campaign. By default, the campaign is disabled and normally it should remain in this state until it is completely configured. Completeness of campaign configuration can be verified via the Diagnostics page. After the campaign has been completely configured, select the Enabled checkbox to indicate that it is ready to run.
Campaigns can be disabled again when they are no longer active but have to remain in configuration to ensure availability of campaign results. Note that disabling of campaigns is always a manual operation.
Note: For blended services, you should keep the outbound portion of a service enabled at all times, even during the periods without any outbound activity. If you disable the outbound portion, dispositions of the possible callbacks made to the campaign caller ID may not be processed correctly. This may result in repeated attempts to contact customers who are not supposed to be contacted again within the given campaign (e.g., accepted the campaign offer or requested not to be called again). If you need to prevent the outbound portion of a blended service from making calls, remove all of its calling hours.
Status
Status shows whether the outbound campaign has started or if it is stopped (i.e., ready to run). Click Start or Stop to change the status of the outbound campaign.
Start / Stop Automation
After the campaign has been enabled, it can be started and stopped manually at any time using these buttons.
Note that a campaign also can be started and stopped manually form the Agent Desktop application by a user designated as an operator for this campaign.
The campaign can be started and stopped automatically using the combination of the From/Until and using hours of operation settings as described below.
From
From indicates the moment from which this campaign can be started automatically based on the service hours of operation defined in the Properties tab.
If specified, the campaign will start automatically at the specified time provided that this time is within the specified service hours of operation. If the specified time is outside of the service hours, the campaign will start automatically at the nearest service opening time following the specified campaign start time.
Note that this parameter controls automatic campaign start only. Even if it is defined, the campaign can still be started earlier manually.
using hours of operation
By default, the campaign will be run automatically according to the hours of operation specified in the Properties tab for the given outbound service. If you click this link, you will be taken to the tab where you can modify the service hours.
Note that this schedule reflects the time when the agents of the associated teams will be expected to handle interactions of the given campaign. This schedule is normally defined for the time zone where your contact center is located. The actual calling schedules for various types of phones and other possible time-related calling restrictions are defined in the Calling Hours page relative to the time zone of destination phone numbers.
Until
Until indicates the moment when this campaign will be terminated automatically even if processing of some of the calling records has not been finished or attempted. This setting will not affect the campaign-related calls that may be in progress at the specified time.
Note that this parameter controls automatic campaign termination only. Even if it is defined, the campaign can still be started or resumed manually later.
Campaign link group
Campaigns of the same type with the same hours of operation, and same assigned agent teams can be linked together so that, when processing of all records of one campaign is finished, the next campaign in the group will be started automatically.
To associate this campaign with an existing group select the group from the list. If there are other campaigns associated with the selected list, the system will ask you to confirm that the type of this campaign, its hours of operation, assigned teams, and skills will be redefined to match the corresponding settings of campaigns already in the group.
The service parameters whose settings are controlled by the link group membership will be highlighted with orange dots.
To remove the campaign from a link group it was previously assigned to, select None from the drop-down menu.
Begin this campaign after
By default, the order in which campaigns in the link group will be activated is determined by the order those campaign were added to the group. You can redefine this order for the given campaign by selecting the preceding campaign from the drop-down menu. If the given campaign shall be processed first, select none (1st).
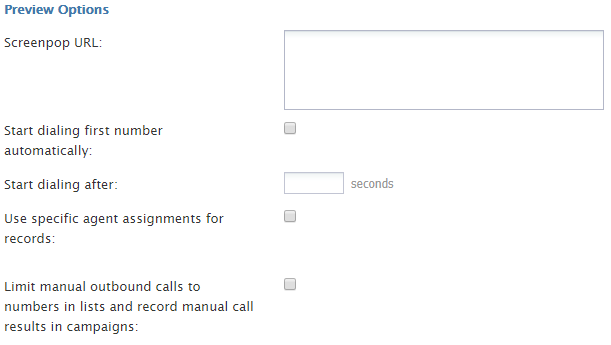
Preview Options
Screenpop URL
Screenpop URL is the URL of the web page that will be displayed by the Agent Desktop application when the agent receives a preview record. Normally this is a web page that might contain further information about the calling record. A query string can be added to supply variables for the screen pop. See the group of variables Outbound Target Work Item Parameters in the Scenario Builder Reference Guide.
This parameter is optional. If it is not set, only the customer name and phone number to be dialed will be displayed in the contact panel of the Agent Desktop application.
Note that you can display information from calling records using Activity forms.
The specified web page will be displayed in the Context Information Area of Agent Desktop. This area is not shown when Agent Desktop is run minimized using the Pop-out function. Thus, when using URL screen pop, consider disabling agents' privilege Force pop-out phone window.
Screen-popping CRM URLs
When configuring the general properties of your preview campaign, you can enable specific Salesforce or Zendesk URLs to be screen-popped to the Agent Desktop.
For Salesforce Classic, Salescloud, and Lightning:
- In the Screenpop URL field of Preview Options, enter the object ID (e.g., $(workitem.otherInfo.SalesforceID)).
- Learn more about object ID and screen-pop configuration in the Salesforce.com Integration Guide.
For Zendesk:
- In the Screenpop URL field of preview service, enter the ticket URL with the Zendesk ID (e.g., tickets/$(workitem.otherInfo.ZendeskID)).
- Learn more about screen-pop configuration in the Zendesk Integration Guide.
Start dialing first number automatically
By default, agents dial numbers from list records manually. Select this checkbox if the first number of the list record shall be dialed automatically after the amount of time allocated for record preview (see option Start dialing after).
Start dialing after
Start dialing after is the amount of time allocated for list record preview. This parameter is essential only if option Start dialing first number automatically is enabled.
Use specific agent assignments for records
Records of the calling lists associated with the given campaign may be assigned to specific agents. If you select this option, any such records will be distributed only to the agents assigned to handle them. For more information, see the description of field type Agent Login ID in section Lists.
Limit manual outbound calls to numbers in lists and record manual call results in campaigns
When enabled, this setting allows manually dialed phone numbers to be included in outbound or blended campaigns, should the phone number match one of the campaign’s dialable phone numbers; click-to-call numbers are also included. Once included in a campaign, manually dialed calls will be counted toward related campaign metrics.
Additionally, when this setting is selected, the following applies:
- Calls adhere to Do Not Call (DNC) lists and safe-calling hours
- Calls count toward dial attempts
- Dial rules by disposition are allowed
- Calls on closed records are prevented
Note that this checkbox is unchecked by default and this setting is not currently available for use with hardphones.
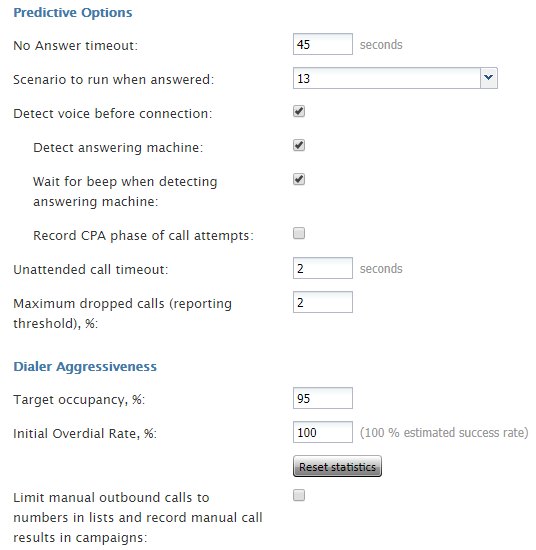
Predictive Options
No Answer timeout
If the ring back tone is received, No Answer timeout specifies for how long the system shall wait for an answer before abandoning the call attempt with the disposition No Answer.
Scenario to run when answered
Scenario to run when answered indicates which scenario should be run upon answer. The Default scenario will provide a simple connect to the longest available agent while the calls that are not connected to agents within the specified Unattended call timeout (see below) will be terminated.
Bright Pattern Contact Center provides a scenario template called Predictive Telemarketing Campaign that serves as an example of how unattended calls can be treated in a compliant manner (according to the current FCC regulations).
Detect voice before connection
This indicates whether, upon answer, the system shall wait to detect voice before connecting this call to an agent. Deselect this checkbox if the calls should be connected to agents immediately upon answer.
Detect answering machine
Detect answering machine indicates whether upon voice detection the system shall try to distinguish live voice from an answering machine greeting or other prerecorded announcement. This setting is essential only if the Detect voice before connection setting is enabled (see above). Deselect this checkbox if the calls should be connected to agents immediately upon detection of a voice.
Wait for beep when detecting answering machine
This indicates whether the “announcement vs. answering machine” decision shall be based on detection of a beep sound after the speech segment. (If disabled, disposition Announcement will be used for all long speech messages.) It is essential only if the Detect answering machine setting is enabled (see above).
Record CPA phase of call attempts
Record CPA phase of call attempts indicates whether the Call Progress Analysis (CPA) phase of the campaign calls shall be recorded. Such recordings are stored in separate audio files and can be used to verify reaction of the system to various call attempt outcomes. CPA recordings can be checked using the Quality Management playback function and also exported for offline analysis.
This option is visible and available to you only if specifically activated for your contact center at the service provider level.
Unattended call timeout
Unattended call timeout specifies for how long, from the moment a call is answered by the called party, the default scenario will wait until terminating this call. Note that this setting only applies if the <<Default scenario>> is selected as the scenario to run when answered.
If you apply any other scenario to process answered call attempts (i.e., select anything other than <<Default scenario>> as the scenario to run when answered), you should set the unattended call timeout as the last interval of the Find Agent block of the given scenario. You should also define the action applied to such unattended calls when the timeout expires as the conditional Time Out exit of the given block.
Bright Pattern Contact Center provides a scenario template called Predictive Telemarketing Campaign that serves as an example of how unattended calls can be treated in a compliant manner (according to the current FCC regulations). In this scenario template, the interval of the Find Agent block is set to 0-2 seconds and its Time Out conditional exit starts an IVR script that introduces the caller and provides the called party with an opt-out option.
Maximum dropped calls (reporting threshold), %
This setting is reserved for future use.
Dialer Aggressiveness
Target occupancy, %
This setting is used in Predictive mode only.
Target occupancy specifies the target occupancy for the agents participating in this campaign that will be used by the predictive algorithm to calculate the dialing frequency. Occupancy is defined as the time spent handling calls relative to the time total working time--that is, (Busy Time + ACW Time) / (Busy Time + ACW Time + Ready Time) * 100.
Changes in the target occupancy of a running campaign will take effect immediately. Such changes may be necessary in order to observe compliance with the telemarketing law for maximum percentage of unattended calls (also known as abandonment rate). The percentage of unattended calls can be monitored in real time (see section General Campaign Metrics View of the Supervisor Guide) and/or historically (see section Telemarketing Compliance Report of the Reporting Reference Guide).
Initial Overdial Rate, %
This setting is used in Predictive mode only.
Initial Overdial Rate, % specifies the percentage of call attempts that will be made for this campaign relative to call attempts that are expected to be answered. This configured value will determine the dialing frequency at the start of this campaign. For example, if you expect only every second attempt to be successful, you can set the initial overdial rate to 200%, and the system will initially make twice as many call attempts as there are agents in the Ready state.
Note that this setting is an inversion of the Estimated Success Rate (ESR), which was used in the product prior to Bright Pattern Contact Center version 3.10 for the same purpose. The ESR is defined as the expected percentage of call attempts that will be answered relative to all call attempts that will be made for this campaign; thus, if you upgrade from a previous version of Bright Pattern Contact Center and the ESR for a particular campaign was set to 50%, you will see the Initial Overdial Rate for this campaign set to 200%. (The ESR is displayed as a read-only value next to it.)
Once the system has accumulated enough statistics for dial frequency prediction, the configured Initial Overdial Rate value will be replaced with the actual overdial rate calculated and constantly updated in real time.
You can reset statistics used in calculation of the actual success rate and reapply the configured Initial Overdial Rate value at any time during campaign operation by clicking the Reset statistics button.
Limit manual outbound calls to numbers in lists and record manual call results in campaigns
When enabled, this setting allows manually dialed phone numbers to be included in outbound or blended campaigns, should the phone number match one of the campaign’s dialable phone numbers; click-to-call numbers are also included. Once included in a campaign, manually dialed calls will be counted toward related campaign metrics.
Additionally, when this setting is selected, the following applies:
- Calls adhere to Do Not Call (DNC) lists and safe-calling hours
- Calls count toward dial attempts
- Dial rules by disposition are allowed
- Calls on closed records are prevented
Note that this checkbox is unchecked by default and this setting is not currently available for use with hardphones.
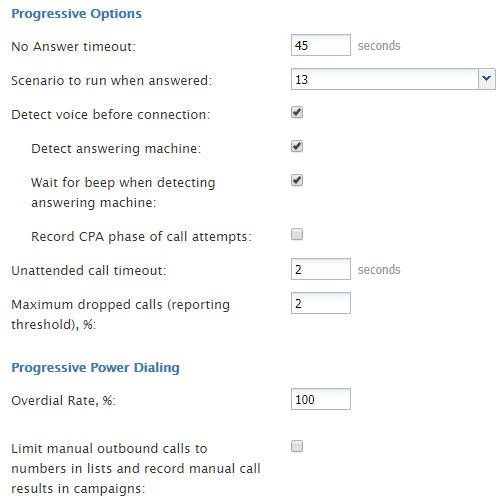
Progressive Options
No Answer timeout
If the ring back tone is received, No Answer timeout specifies for how long the system shall wait for an answer before abandoning the call attempt with the disposition No Answer.
Scenario to run when answered
Scenario to run when answered indicates which scenario should be run upon answer. The Default scenario will provide a simple connect to the longest available agent while the calls that are not connected to agents within the specified Unattended call timeout (see below) will be terminated.
Bright Pattern Contact Center provides a scenario template called Predictive Telemarketing Campaign that serves as an example of how unattended calls can be treated in a compliant manner (according to the current FCC regulations).
Detect voice before connection
This indicates whether, upon answer, the system shall wait to detect voice before connecting this call to an agent. Deselect this checkbox if the calls should be connected to agents immediately upon answer.
Detect answering machine
Detect answering machine indicates whether upon voice detection the system shall try to distinguish live voice from an answering machine greeting or other prerecorded announcement. This setting is essential only if the Detect voice before connection setting is enabled (see above). Deselect this checkbox if the calls should be connected to agents immediately upon detection of a voice.
Wait for beep when detecting answering machine
This indicates whether the “announcement vs. answering machine” decision shall be based on detection of a beep sound after the speech segment. (If disabled, disposition Announcement will be used for all long speech messages.) It is essential only if the Detect answering machine setting is enabled (see above).
Record CPA phase of call attempts
Record CPA phase of call attempts indicates whether the Call Progress Analysis (CPA) phase of the campaign calls shall be recorded. Such recordings are stored in separate audio files and can be used to verify reaction of the system to various call attempt outcomes. CPA recordings can be checked using the Quality Management playback function and also exported for offline analysis.
This option is visible and available to you only if specifically activated for your contact center at the service provider level.
Unattended call timeout
Unattended call timeout specifies for how long, from the moment a call is answered by the called party, the Find Agent block of the applied scenario (see Scenario to run when answered above) will wait for an available agent before processing it in the manner defined by the conditional exit Time Out.
Note that the Default scenario will terminate such calls.
Bright Pattern Contact Center provides a scenario template called Predictive Telemarketing Campaign that serves as an example of how unattended calls can be treated in a compliant manner (according to the current FCC regulations).
Maximum dropped calls (reporting threshold), %
Enter the maximum percentage of allowable dropped calls.
Progressive Power Dialing
Overdial Rate, %
This setting is used in Progressive mode only.
Overdial Rate, % specifies the percentage of call attempts that will be made for this campaign relative to call attempts that are expected to be answered. This configured value will determine dialing frequency for the duration of the campaign. For example, if you expect only every second attempt to be successful, you can set the initial overdial rate to 200%, and the system will make twice as many call attempts as there are agents in the Ready state.
Setting the Overdial Rate to 100% (default) practically means that for any answered call, there will be an agent available to accept it.
Limit manual outbound calls to numbers in lists and record manual call results in campaigns
When enabled, this setting allows manually dialed phone numbers to be included in outbound or blended campaigns, should the phone number match one of the campaign’s dialable phone numbers; click-to-call numbers are also included. Once included in a campaign, manually dialed calls will be counted toward related campaign metrics.
Additionally, when this setting is selected, the following applies:
- Calls adhere to Do Not Call (DNC) lists and safe-calling hours
- Calls count toward dial attempts
- Dial rules by disposition are allowed
- Calls on closed records are prevented
Note that this checkbox is unchecked by default and this setting is not currently available for use with hardphones.
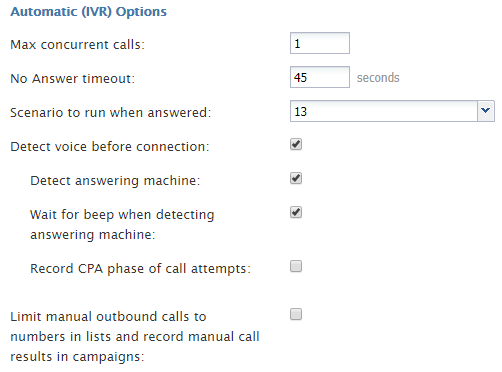
Automatic (IVR) options
Max concurrent calls
This option specifies how many calls can be in progress simultaneously. The maximum number of calls that can run at the same time is 100.
In order to run multiple IVR campaigns at the same time and run more than 100 calls simultaneously, the calling lists must be unique.
No Answer timeout
If the ring back tone is received, No Answer timeout specifies for how long the system shall wait for an answer before abandoning the call attempt with disposition No Answer.
Scenario to run when answered
Scenario to run when answered indicates which scenario should be run upon answer. Note that for Automatic (IVR) mode, the scenario containing a recorded IVR message should be explicitly defined.
Detect voice before connection
This option indicates whether upon answer the system shall wait to detect a voice before connecting this call to an agent. Deselect this checkbox if the calls should be connected to agents immediately upon answer.
Detect answering machine
Detect answering machine indicates whether, upon voice detection, the system shall try to distinguish the voice from an answering machine greeting. It is essential only if the Detect voice before connection setting is enabled (see above). Deselect this checkbox if the calls should be connected to agents immediately upon detection of a voice.
Wait for beep when detecting answering machine
This option indicates whether the “announcement vs. answering machine” decision shall be based on detection of a beep sound after the speech segment. (If disabled, the disposition Announcement will be used for all long speech messages.) It is essential only if the Detect answering machine setting is enabled (see above).
Record CPA phase of call attempts
Record CPA phase of call attempts indicates whether the Call Progress Analysis (CPA) phase of the campaign calls shall be recorded. Such recordings are stored in separate audio files and can be used to verify the reaction of the system to various call attempt outcomes. CPA recordings can be checked using the Quality Management playback function and also exported for off-line analysis.
This option is visible and available to you only if specifically activated for your contact center at the service provider level.
Limit manual outbound calls to numbers in lists and record manual call results in campaigns
When enabled, this setting allows manually dialed phone numbers to be included in outbound or blended campaigns, should the phone number match one of the campaign’s dialable phone numbers; click-to-call numbers are also included. Once included in a campaign, manually dialed calls will be counted toward related campaign metrics.
Additionally, when this setting is selected, the following applies:
- Calls adhere to Do Not Call (DNC) lists and safe-calling hours
- Calls count toward dial attempts
- Dial rules by disposition are allowed
- Calls on closed records are prevented
Note that this checkbox is unchecked by default and this setting is not currently available for use with hardphones.
Messaging Options
Note that your account-wide message sending speed shared by all running messaging campaigns is displayed here. Please take this rate into account when estimating the duration of the campaign and timeliness of message delivery.
Message to send
This field allows you to configure the text message to send to each calling list record. The message sent will be the same for every record, and the message may include calling list record fields added as variables for personalization. When including record fields, you may use the following variables:
- contactInfo
- firstName
- fullInfo (e.g., $(fullInfo.Status))
- lastName
- otherInfo
- suggestedPhone
Note that this field does not have a character limit; however, SMS carriers may limit the length of the messages. If the message is too long, the carrier may either truncate it or fail the request completely. For more information, contact your service provider.

