Microsoft Azure Active Directory SSO Configuration
Microsoft Azure Active Directory (AD) single sign-on (SSO) enables users to sign in just one time to applications in the Microsoft Azure AD in order to access integrated applications.
With Azure AD SSO, users can sign in with one account to launch applications from the Office 365 portal, Dynamics 365, or the Azure AD MyApps access panel. Moreover, administrators can control user account management, and automatically add or remove user access to applications based on group membership. Without SSO, users have to remember passwords and sign in to each application separately.
Bright Pattern supports Azure AD SSO using the SAML (Security Assertion Markup Language) SSO method, which works for applications that authenticate using a SAML protocol like SAML 2.0 or WS-Federation.
With SAML SSO, Azure AD authenticates to the application by using the user's Azure AD account. Azure AD communicates the credentials to the application through a connection protocol. With SAML-based SSO, you can map users to specific application roles based on rules defined in your SAML claims.
This article will show you how to configure Azure AD SSO for your organization.
You will learn how to:
- Create an enterprise application
- Assign owner, users, and user groups to the application
- Configure the application for SAML-based SSO
- Configure application-specific domain and URLs
- Configure user attributes
- Get a SAML signing certificate
- Validate settings
- Add an SSO integration account in Bright Pattern
- Use Azure AD credentials in integration account properties
Prerequisites
Before configuring Azure AD SSO, you will need the following:
- Microsoft Office 365 account. If you are unable to log into Microsoft directly, please contact your Microsoft system administrator to review permission and access level settings.
- Microsoft Azure account/subscription (free trial OK). Without this, you will have no directory and will not be able to access any data in Azure AD.
- Bright Pattern Contact Center version 5.3 or later
Configuration in Azure Portal
This procedure generally follows Microsoft’s tutorial, Configure SAML-based single sign-on for an application with Azure Active Directory. For more information on SSO, see Microsoft Azure documentation.
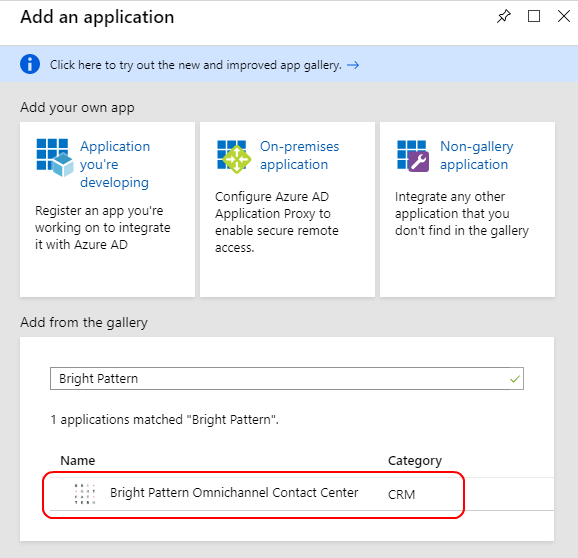
Step 1: Add the Bright Pattern application from the Gallery
- Sign in to the Microsoft Azure portal.
- Go to Azure Active Directory > Enterprise applications and click + New application.

Create new enterprise application - In the Add from the gallery section, type "Bright Pattern" in the search box.
- Select Bright Pattern Omnichannel Contact Center from the results panel and then add the app.
Application properties


Then you will see the overview page for the application.
Step 2: Add owner and users
Adding yourself, the admin, as a user allows you to configure and test the Bright Pattern Omnichannel Contact Center application. Adding other users allows others to use it as well.
- On the overview page for the application, go to Manage > Owners and then click add.
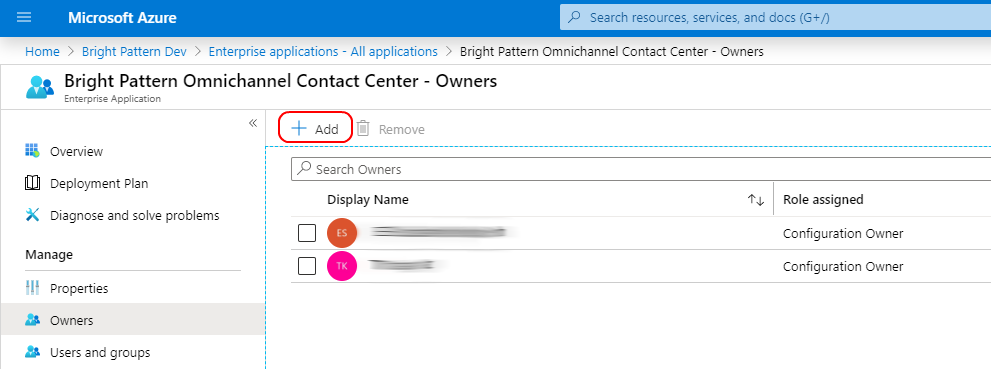
Add owners - In Select Owners, add yourself as the owner of the application so that you can modify the application. Then click Select.
- Then go to Manage > Users and groups and click Add user.
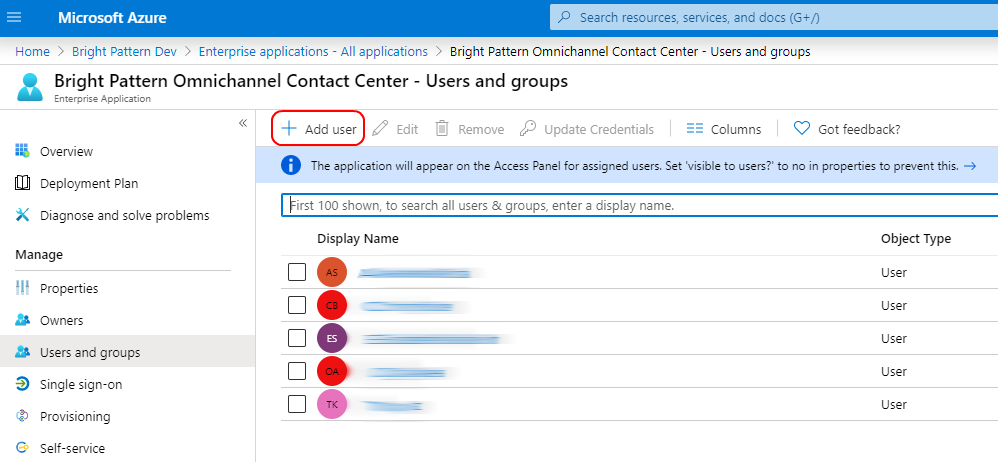
Add users - Click Users and groups, select the users with rights to use this application, and click Assign. Assigning allows the user to use Azure AD SSO.
- After you add the users, you can repeat these steps to add the group, if desired.


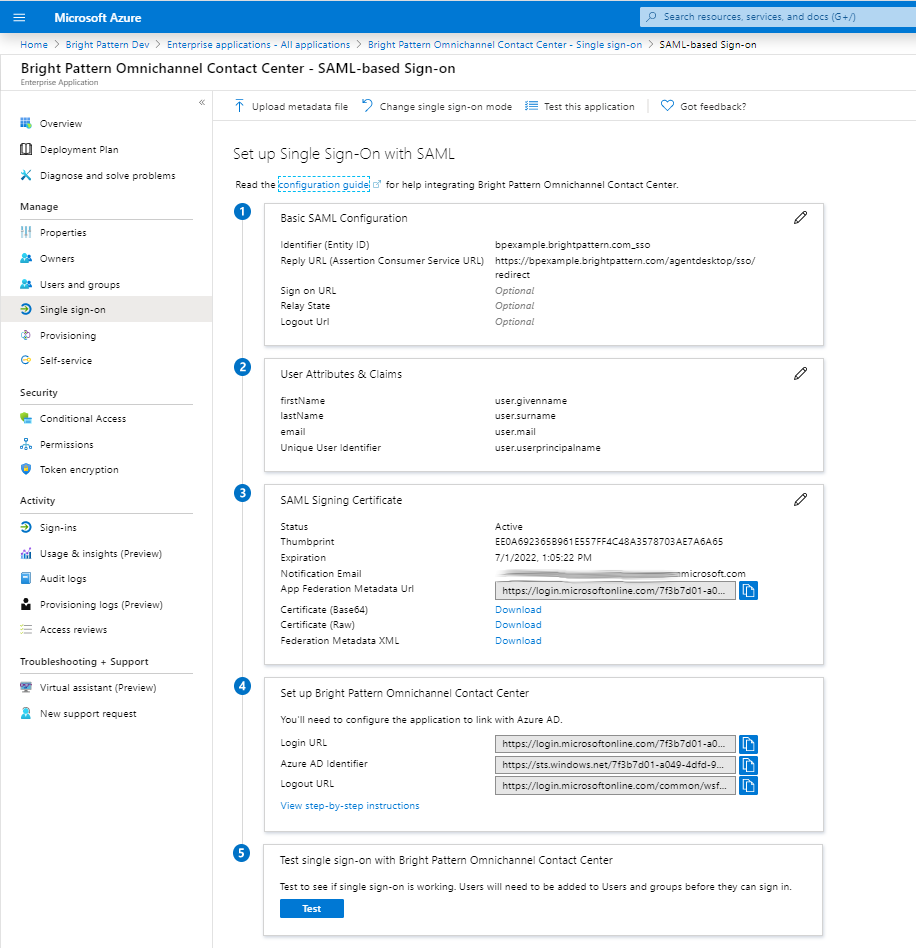
Step 3: Configure Azure AD SSO
- On the Bright Pattern Omnichannel Contact Center application integration page, go to Manage > Single sign-on and select SAML as the single sign-on method.
- The Set up SSO with SAML Preview page will open with the following boxes.
SSO configuration page

Basic SAML Configuration
In Basic SAML Configuration, you will name the application being configured for SSO and specify the source of the SAML token.

In this section, if you wish to configure the application in IDP initiated mode, enter the values for the following fields:
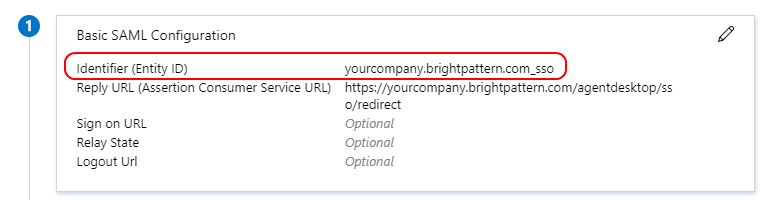
- Identifier (Entity ID) - Identifies the application for which SSO is being configured. This is also known as the Entity ID. Set the Identifier in the following pattern: <subdomain>_sso (e.g., "mycompany.brightpattern.com_sso").
- Reply URL - Specifies where the application expects to receive the SAML token. Set https://<subdomain>.brightpattern.com/agentdesktop/sso/redirect and be sure to replace “<subdomain>” with your contact center name.
For example:
https://mycompany.brightpattern.com/agentdesktop/sso/redirect - Click Save.
Click Set additional URLs and perform the following step if you wish to configure the application in SP initiated mode:
- In the Sign-on URL text box, set a URL using the following pattern: https://<subdomain>.brightpattern.com/
- Click Save.
User Attributes & Claims
In User Attributes & Claims, you will specify what information (e.g., user's name, email, etc.) Azure AD sends to the application in the SAML token when a user signs in.
- Click Edit to set attributes for the identity provider to identify your system. You will see the following list of claims and values.
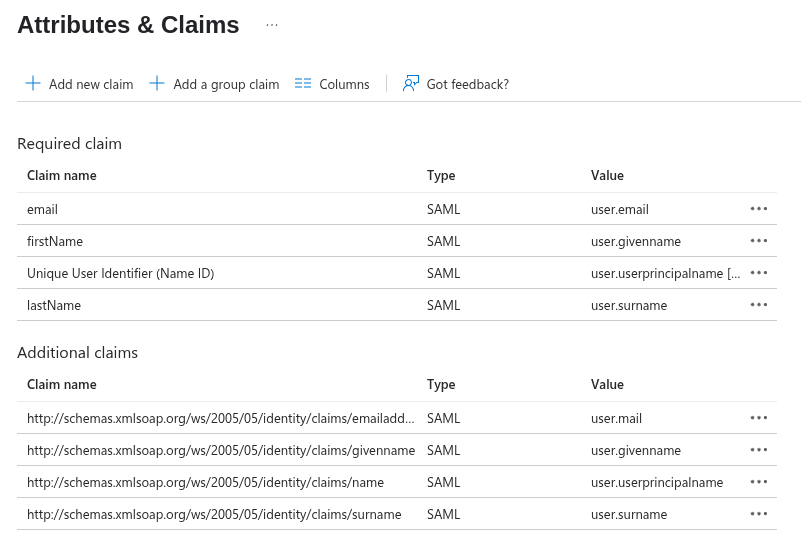
User Attributes & Claims - Edit the claim attributes for Just-in-time (JIT) user provisioning as indicated:
- Remove
user.mailfrom Required claims and Additional claims: Select and delete from both the Required claims and Additional claims lists. This integration does not support email mapping.

- Configure Additional claims. Clicking on a claim allows you to edit its properties. Ensure that the Additional claims properties are configured with the values indicated in the following table.
- Remove


| Name | Namespace | Source | Source attribute |
|---|---|---|---|
| givenname | http://schemas.xmlsoap.org/ws/2005/05/identity/claims | Attribute | user.givenname |
| name | http://schemas.xmlsoap.org/ws/2005/05/identity/claims | Attribute | user.userprincipalname |
| User.userprincipalname | http://schemas.xmlsoap.org/ws/2005/05/identity/claims/nameidentifier | Attribute | user.userprincipalname |
| surname | http://schemas.xmlsoap.org/ws/2005/05/identity/claims | Attribute | user.surname |
When done, your list must contain (in any order) these exact claims:

Note: Bright Pattern does not map claims to email; Bright Pattern maps claims to the same user account name only. This means that existing users logging in with their username will be logged in only if their username matches an existing user account in Bright Pattern Contact Center. If JIT is enabled, if a user logs in, and if their username does not match an existing account name, a new user account will be created.
SAML Signing Certificate
In the SAML Signing Certificate section, you will create and download a SAML certificate, which Azure AD uses to sign the SAML tokens that it sends to the application.
- Click Edit and select New Certificate.
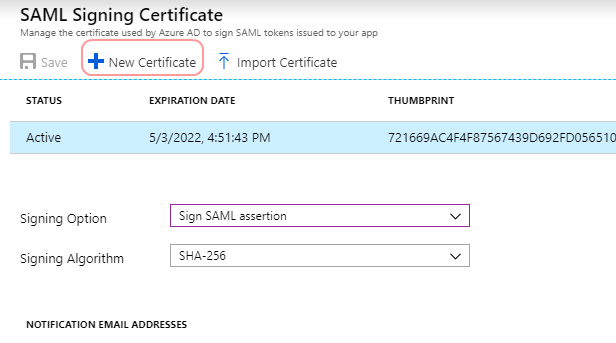
Create new certificate - In the new certificate row that appears, set the desired Signing Option and Signing Algorithm, and then click Save. In this example, we selected “Sign SAML response and assertion” and “SHA-256”.
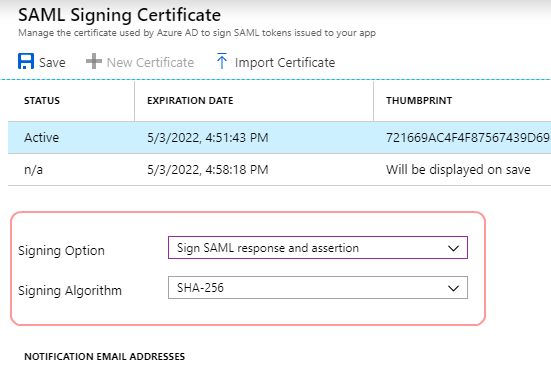
Signing Option and Signing Algorithm - Click download for the Certificate (Base64). The contents of this certificate will pasted into our configuration in later steps.
- After it downloads, open it and Install Certificate.


Set up
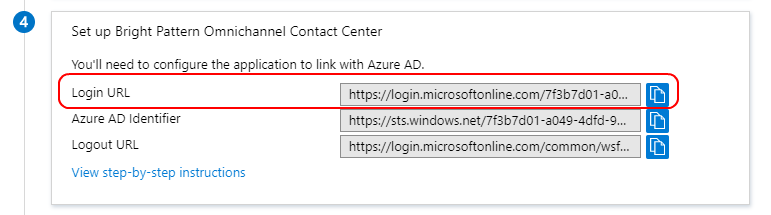
Next you will set up the application to use Azure AD as a SAML identity provider. This is needed for your app to connect to Azure AD.
Copy the Log in URL value and paste it into a separate text doc. When configuring your SSO integration account in later steps, you will paste this into the Identity Provider Single Sign-On URL property in your Bright Pattern SSO integration account.
Validate single sign-on
After configuration is done on the Azure portal, you should validate the settings to make sure that sign-in works correctly.
- Click Test.
- Click Sign in as current user. This lets you see if SSO works for you.
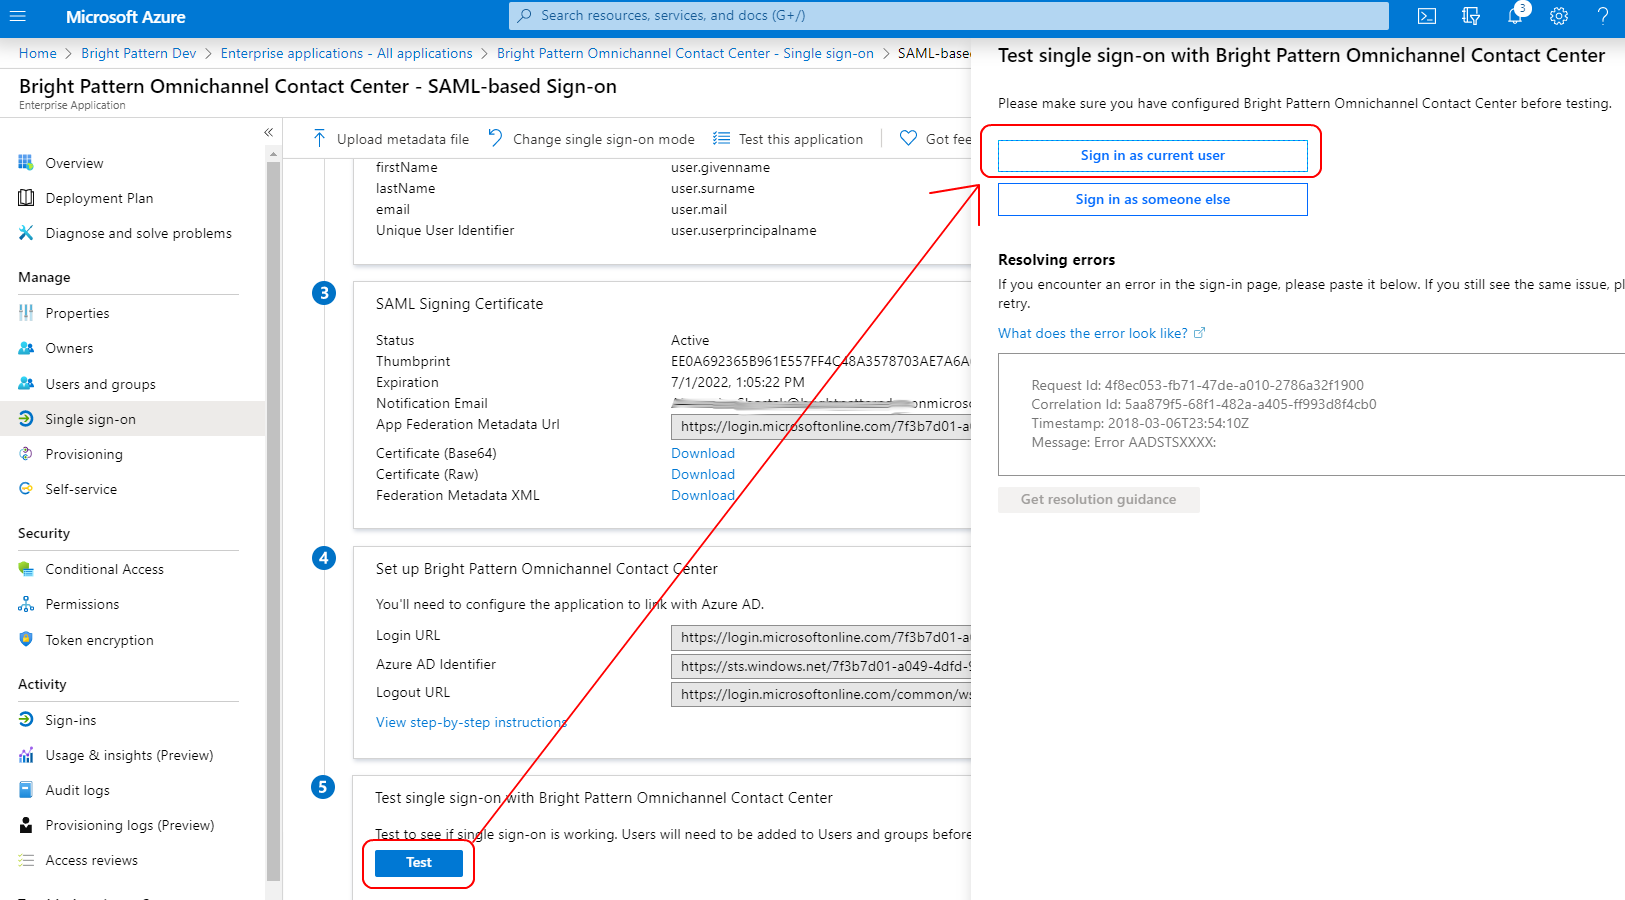
Validate SSO - If it works, you should see the Bright Pattern Agent Desktop login page. If it doesn't work, you will see an error message (see next section, Errors).
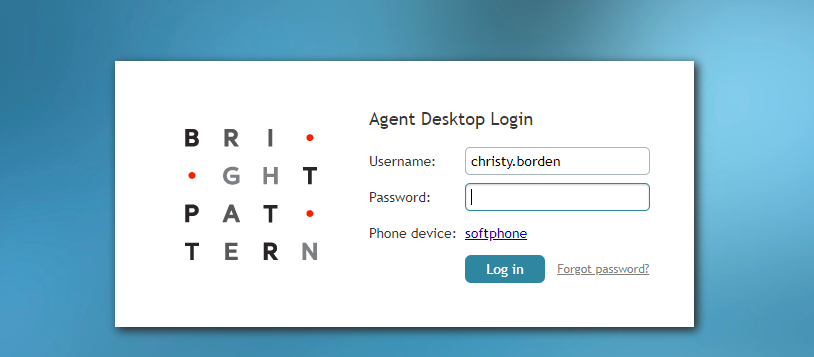
Agent Desktop login


Errors and How to Fix Them
Application with identifier was not found
This error means that you are unable to sign in because the application for which SSO is being configured cannot be identified; that is, the Identifier (Entity ID) that you set in Basic SAML configuration is incorrect. Go back to Step 3 of this procedure and make sure that your Identifier is set in the following pattern: <subdomain>_sso (e.g., "mycompany.brightpattern.com_sso").

HTTP Error 404
This likely means that the Reply URL is incorrect, and your tenant’s Agent Desktop cannot be found. Go back to Basic SAML Configuration and check that the Reply URL is https://<subdomain>.brightpattern.com/agentdesktop/sso/redirect

Redirects to Microsoftonline with HTTP Error 404
This error could mean one of the following:
- In Basic SAML Configuration, you tried to set a value for Relay State, which is unsupported. Go back and leave all optional URLs blank, and Save.
- More than one Azure AD application has a Reply URL that is pointing to the same tenant. Try checking other registered applications and enterprise applications in your Active Directory. Check their Reply URLs and remove any extraneous app Reply URLs that have a callback to your tenant.

Configuration in Bright Pattern
Next you will set up the integration account that enables your contact center to work with Azure AD.
Step 1: In Bright Pattern, add SSO integration account
In the Bright Pattern Contact Center Administrator application, go to Call Center Configuration > Integration Accounts and add a new Single Sign-On integration account. This is a general type of SSO account that Bright Pattern uses for various integrations.

Step 2: Edit properties with your Azure AD app credentials
You will see an empty SSO integration account:

Properties
Set the account properties as indicated:
- Name - Any descriptive name that conveniently identifies the account, such as "Azure SSO Integration"
- Enable Single Sign-On - Select the checkbox to enable SSO
- Use SSO for administrator portal login - Select the checkbox in order to enable SSO for users of the Contact Center Administrator application (i.e., the "administrator portal") who have the admin role.
- Identity Provider Single Sign-On URL - The “Login URL”, which is taken from Setup in Azure AD SAML SSO configuration (e.g., “https://login.microsoftonline.com/1f2b3d04-a056-7dfd-8dbd-d910e111c2a0/saml2")
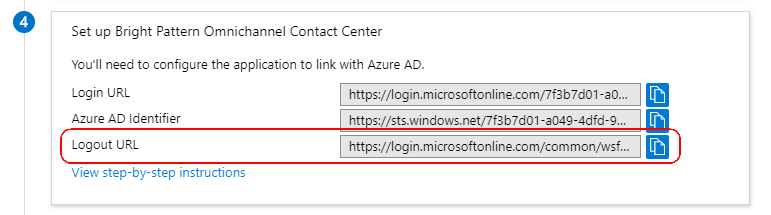
Where to find Login URL - Identity Provider Single Sign-On Logout URL - The “Logout URL”, is also taken from the Setup in Azure AD SAML SSO configuration.
Where to find Logout URL - Identity Provider Issuer - The “Identifier (Entity ID)”, as set in the Basic SAML Configuration section of Azure AD SAML SSO configuration (e.g., “<subdomain>_sso”). The Identifier (Entity ID) set in Azure must match the Identity Provider Issuer in the Bright Pattern Configuration.
Where to find the Identifier (Entity ID) - Identity Provider Certificate - The Base 64 certificate that you downloaded from Azure AD. Copy and paste the entire contents, including the “BEGIN” and “END” tags.
Copy certificate contents - Enable Just-in-time user provisioning - Select the checkbox to enable just-in-time (JIT) user provisioning. JIT user provisioning automatically creates call center users on the first SSO login attempt authorized by the identity provider. If you enable JIT, you must also use a template (see next property).
- Use Template - Select this checkbox to copy assignments (e.g., username format, email, roles, teams, skills, etc.) from a specific user with the agent role, and apply them to new call center users created by JIT user provisioning.


Lastly, click Apply to save your changes.
This completes Azure AD SSO configuration.