(Marked this version for translation) |
|||
| Line 1: | Line 1: | ||
<translate> | <translate> | ||
| − | = How to Create a Chat Scenario That Uses Bots = | + | = How to Create a Chat Scenario That Uses Bots = <!--T:1--> |
To use a bot such as Watson Assistant in Bright Pattern chat interactions, you simply need to modify a chat scenario to include bot-specific scenario blocks such as Chat Bot Select Account and Ask a Bot. | To use a bot such as Watson Assistant in Bright Pattern chat interactions, you simply need to modify a chat scenario to include bot-specific scenario blocks such as Chat Bot Select Account and Ask a Bot. | ||
| + | <!--T:2--> | ||
This article will show you how to create a general chat scenario that uses a bot to: | This article will show you how to create a general chat scenario that uses a bot to: | ||
* Automatically accept the customer’s chat request | * Automatically accept the customer’s chat request | ||
| Line 10: | Line 11: | ||
* Provide suggested replies to the agent during the chat | * Provide suggested replies to the agent during the chat | ||
| − | == Prerequisites == | + | == Prerequisites == <!--T:3--> |
If you have not already done so, please complete these steps before proceeding: | If you have not already done so, please complete these steps before proceeding: | ||
* [[Tutorials-for-admins/HowtoCreateWatsonAssistant#How_to_Create_a_Watson_Assistant | Create a Watson Assistant]] or an Alterra Answer Bot | * [[Tutorials-for-admins/HowtoCreateWatsonAssistant#How_to_Create_a_Watson_Assistant | Create a Watson Assistant]] or an Alterra Answer Bot | ||
| + | <!--T:4--> | ||
* [[Contact-center-administrator-guide/IntegrationAccounts/BotChatSuggestionsEngine | Add a bot/chat suggestions engine integration account]] | * [[Contact-center-administrator-guide/IntegrationAccounts/BotChatSuggestionsEngine | Add a bot/chat suggestions engine integration account]] | ||
| + | <!--T:5--> | ||
* Download and [[5.3:Contact-center-administrator-guide/ScenariosOverview | | * Download and [[5.3:Contact-center-administrator-guide/ScenariosOverview | | ||
import]] our bot scenario template: [[File:App_Example_Bot_Scenario.zip|App_Example_Bot_Scenario.zip]] | import]] our bot scenario template: [[File:App_Example_Bot_Scenario.zip|App_Example_Bot_Scenario.zip]] | ||
| − | == Scenario Flow == | + | == Scenario Flow == <!--T:6--> |
Scenarios are made up of ''scenario blocks'' that specify how interactions are processed. Detailed descriptions of Bright Pattern scenario blocks are available in this guide's ''Scenario Block Definitions'' section. | Scenarios are made up of ''scenario blocks'' that specify how interactions are processed. Detailed descriptions of Bright Pattern scenario blocks are available in this guide's ''Scenario Block Definitions'' section. | ||
| + | <!--T:7--> | ||
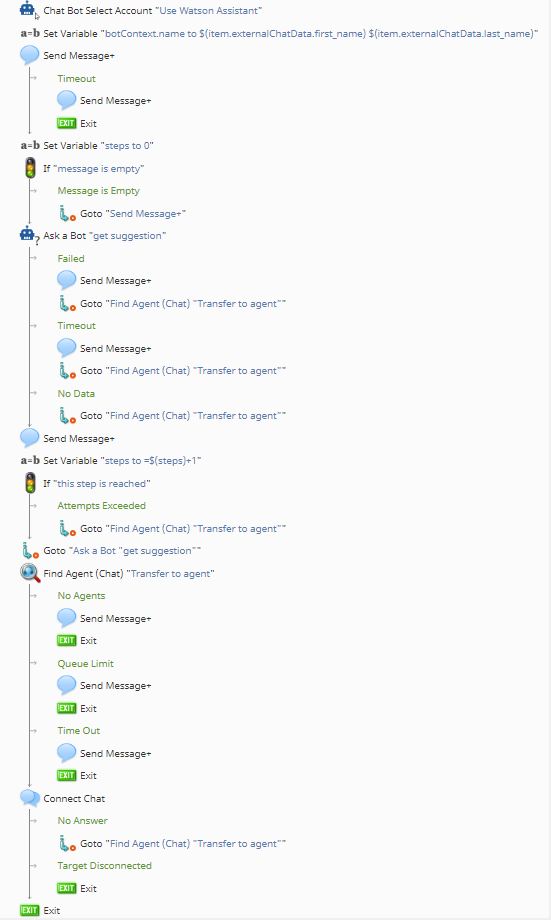
The following sequence of actions illustrates how scenario blocks function in a bot-driven chat scenario. This example scenario uses an integrated Watson Assistant. | The following sequence of actions illustrates how scenario blocks function in a bot-driven chat scenario. This example scenario uses an integrated Watson Assistant. | ||
| + | <!--T:8--> | ||
[[File:Example-Bot-Scenario-No-Com-53.PNG|thumb|800px|center|Example chat scenario in Scenario Builder]] | [[File:Example-Bot-Scenario-No-Com-53.PNG|thumb|800px|center|Example chat scenario in Scenario Builder]] | ||
| − | ==== Action 1: "Chat Bot Select Account" specifies the integration account for your bot ==== | + | ==== Action 1: "Chat Bot Select Account" specifies the integration account for your bot ==== <!--T:9--> |
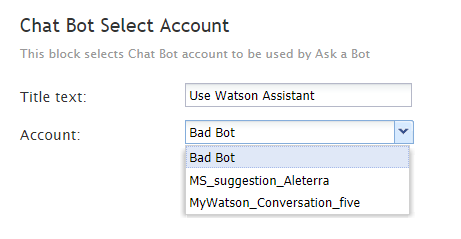
All chat scenarios that incorporate bots will include the [[5.3:Scenario-builder-reference-guide/ChatBotSelectAccount | | All chat scenarios that incorporate bots will include the [[5.3:Scenario-builder-reference-guide/ChatBotSelectAccount | | ||
Chat Bot Select Account]] block. In this block, you are selecting a bot/chat suggestions engine integration account. | Chat Bot Select Account]] block. In this block, you are selecting a bot/chat suggestions engine integration account. | ||
| + | <!--T:10--> | ||
It's possible for your contact center to have many integration accounts, so it's important to specify which one will be used for this scenario. If you do not see the desired account listed, go back and add an integration account. | It's possible for your contact center to have many integration accounts, so it's important to specify which one will be used for this scenario. If you do not see the desired account listed, go back and add an integration account. | ||
| + | <!--T:11--> | ||
[[File:BotScenario1.PNG|thumb|800px|center|Select an integration account]] | [[File:BotScenario1.PNG|thumb|800px|center|Select an integration account]] | ||
| − | ==== Action 2: "Set Variable" personalizes the chat with customer data ==== | + | ==== Action 2: "Set Variable" personalizes the chat with customer data ==== <!--T:12--> |
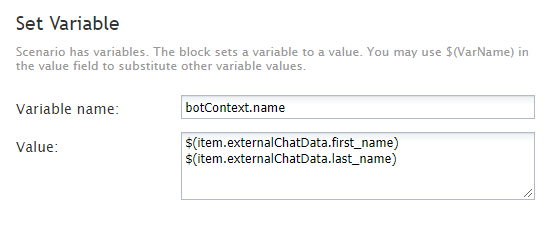
In this example, the [[Scenario-builder-reference-guide/SetVariable | Set Variable]] block is used to get the customer's first name and last name. | In this example, the [[Scenario-builder-reference-guide/SetVariable | Set Variable]] block is used to get the customer's first name and last name. | ||
| + | <!--T:13--> | ||
Variable ''$(item.externalChatData)'' gets the customer's data from the pre-chat form that the customer completed before launching the chat. It's called external chat data because it comes from outside of the chat interaction. | Variable ''$(item.externalChatData)'' gets the customer's data from the pre-chat form that the customer completed before launching the chat. It's called external chat data because it comes from outside of the chat interaction. | ||
| + | <!--T:14--> | ||
To specify what type of external chat data you want, append ''.first_name'' or ''.last_name'' to the variable, like this: | To specify what type of external chat data you want, append ''.first_name'' or ''.last_name'' to the variable, like this: | ||
| + | <!--T:15--> | ||
[[File:ChatScenario2.PNG|thumb|800px|center|Use a variable to get the customer's name from the pre-chat form and use it in the chat interaction]] | [[File:ChatScenario2.PNG|thumb|800px|center|Use a variable to get the customer's name from the pre-chat form and use it in the chat interaction]] | ||
| − | ==== Action 3: Send Message puts the customer's name into a message ==== | + | ==== Action 3: Send Message puts the customer's name into a message ==== <!--T:16--> |
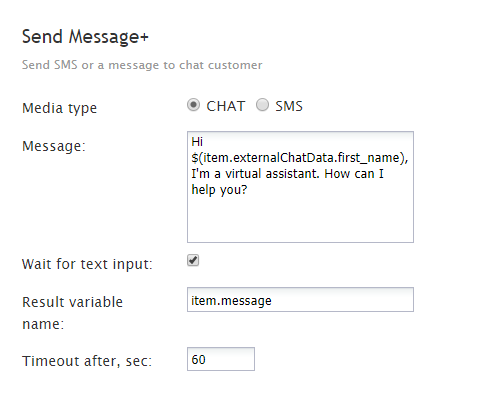
Now that you have a method to collect the customer's name, you can use the [[Scenario-builder-reference-guide/SendMessage | Send Message]] block to incorporate the name into a personalized chat message. | Now that you have a method to collect the customer's name, you can use the [[Scenario-builder-reference-guide/SendMessage | Send Message]] block to incorporate the name into a personalized chat message. | ||
| + | <!--T:17--> | ||
For example, "Hi ''first_name'', how can I help you today?" becomes "Hi Jane, how can I help you today?" | For example, "Hi ''first_name'', how can I help you today?" becomes "Hi Jane, how can I help you today?" | ||
| + | <!--T:18--> | ||
[[File:BotScenario3.PNG|thumb|800px|center|Have the bot send a message to the customer, addressing him/her by name]] | [[File:BotScenario3.PNG|thumb|800px|center|Have the bot send a message to the customer, addressing him/her by name]] | ||
| − | ==== Action 4: "Set Variable" defines scenario steps and tells the bot what to do at each step ==== | + | ==== Action 4: "Set Variable" defines scenario steps and tells the bot what to do at each step ==== <!--T:19--> |
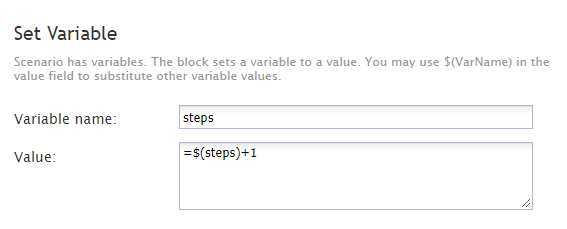
We want the bot to respond to the customer two times before connecting to the agent. Using Set Variable blocks, we can define each bot's reply as a step, and tell the scenario what happens after each step. | We want the bot to respond to the customer two times before connecting to the agent. Using Set Variable blocks, we can define each bot's reply as a step, and tell the scenario what happens after each step. | ||
| + | <!--T:20--> | ||
The first bot reply is specified as "step 0" and the second is specified as "step 1." The scenario will run through both steps. If the customer's issue is not resolved by step 1, the customer is transferred to the agent for help. | The first bot reply is specified as "step 0" and the second is specified as "step 1." The scenario will run through both steps. If the customer's issue is not resolved by step 1, the customer is transferred to the agent for help. | ||
| + | <!--T:21--> | ||
[[File:BotScenario4.PNG|thumb|800px|center|Use a variable to define this part as the first in a series of steps]] | [[File:BotScenario4.PNG|thumb|800px|center|Use a variable to define this part as the first in a series of steps]] | ||
| − | ==== Action 5: "If" tells the bot to send a message if the customer did not write a pre-chat form message ==== | + | ==== Action 5: "If" tells the bot to send a message if the customer did not write a pre-chat form message ==== <!--T:22--> |
Most web chats are set up to begin with a pre-chat form that collects information from the customer (e.g., name, email address, phone number, reason for chatting, etc.) The [[Scenario-builder-reference-guide/If | If block]] specifies what happens if the customer did not write a message in the pre-chat form's Message field. If that field is empty, the scenario tells the bot to send a message. | Most web chats are set up to begin with a pre-chat form that collects information from the customer (e.g., name, email address, phone number, reason for chatting, etc.) The [[Scenario-builder-reference-guide/If | If block]] specifies what happens if the customer did not write a message in the pre-chat form's Message field. If that field is empty, the scenario tells the bot to send a message. | ||
| + | <!--T:23--> | ||
The message aligns with what you have configured your Watson Assistant to say. We call the bot's messages suggestions. | The message aligns with what you have configured your Watson Assistant to say. We call the bot's messages suggestions. | ||
| + | <!--T:24--> | ||
[[File:If-Properties-53.PNG|thumb|800px|center|If there's no customer message, send a message]] | [[File:If-Properties-53.PNG|thumb|800px|center|If there's no customer message, send a message]] | ||
| − | ==== Action 6: "Ask a Bot" lets the bot talk to the customer ==== | + | ==== Action 6: "Ask a Bot" lets the bot talk to the customer ==== <!--T:25--> |
The [[Scenario-builder-reference-guide/AskaBot | Ask a Bot]] block allows the bot to automate the conversation before an agent is connected. It delivers the bot's raw response (i.e., suggestions) to the customer. A raw response is configured in your Watson Assistant dialog flow or in your Alterra Answer Bot settings; it's unrelated to Bright Pattern. | The [[Scenario-builder-reference-guide/AskaBot | Ask a Bot]] block allows the bot to automate the conversation before an agent is connected. It delivers the bot's raw response (i.e., suggestions) to the customer. A raw response is configured in your Watson Assistant dialog flow or in your Alterra Answer Bot settings; it's unrelated to Bright Pattern. | ||
| + | <!--T:26--> | ||
[[File:BotScenario6.PNG|thumb|800px|center|Get suggestions from the bot]] | [[File:BotScenario6.PNG|thumb|800px|center|Get suggestions from the bot]] | ||
| − | ==== Action 7: "Send Message" sends a custom or system-wide message ==== | + | ==== Action 7: "Send Message" sends a custom or system-wide message ==== <!--T:27--> |
Another message can be optionally sent to the customer at this time (e.g., "Do you want to talk to a real live person now?"). | Another message can be optionally sent to the customer at this time (e.g., "Do you want to talk to a real live person now?"). | ||
| + | <!--T:28--> | ||
[[File:BotScenario7.PNG|thumb|800px|center|Send another message if you want]] | [[File:BotScenario7.PNG|thumb|800px|center|Send another message if you want]] | ||
| − | ==== Action 8: "Set Variable" sets the next scenario step ==== | + | ==== Action 8: "Set Variable" sets the next scenario step ==== <!--T:29--> |
This time, we are defining "step 1." Remember, bots are useful for self-service and routing, but they become annoying if they do not help your customer or meet expectations. Setting these scenario steps ensures that a customer is connected to an agent if the bot has not answered the customer's question by now. | This time, we are defining "step 1." Remember, bots are useful for self-service and routing, but they become annoying if they do not help your customer or meet expectations. Setting these scenario steps ensures that a customer is connected to an agent if the bot has not answered the customer's question by now. | ||
| + | <!--T:30--> | ||
[[File:BotScenario8.PNG|thumb|800px|center|Define this part as step 1]] | [[File:BotScenario8.PNG|thumb|800px|center|Define this part as step 1]] | ||
| − | ==== Action 9: "If" sets conditions that determine when the chat connects to agent ==== | + | ==== Action 9: "If" sets conditions that determine when the chat connects to agent ==== <!--T:31--> |
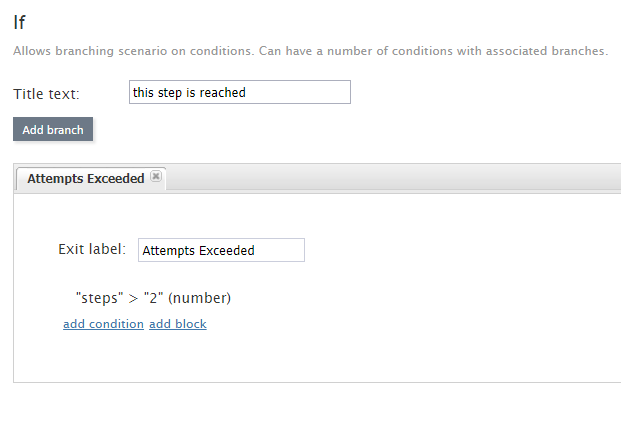
In this If block, a condition is set to make sure that if the scenario takes more than two steps to resolve the customer's issue, then it will transfer the chat from the bot to the agent. | In this If block, a condition is set to make sure that if the scenario takes more than two steps to resolve the customer's issue, then it will transfer the chat from the bot to the agent. | ||
| + | <!--T:32--> | ||
[[File:If-Properties2-53.PNG|thumb|800px|center|If the bot is unhelpful, connect to agent]] | [[File:If-Properties2-53.PNG|thumb|800px|center|If the bot is unhelpful, connect to agent]] | ||
| − | ==== Action 10: "Find Agent" looks for a skilled agent ==== | + | ==== Action 10: "Find Agent" looks for a skilled agent ==== <!--T:33--> |
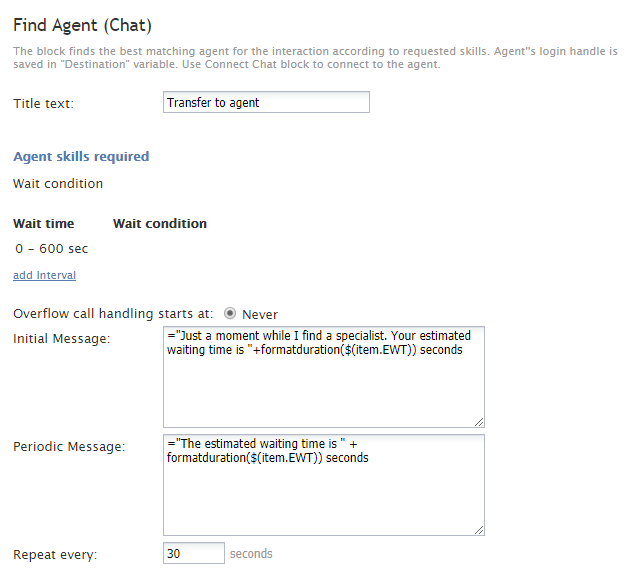
The [[Scenario-builder-reference-guide/FindAgent | Find Agent]] block looks for the next available skilled agent to accept the chat. You can use Find Agent to set wait times and send the customer messages about estimated waiting time (EWT). | The [[Scenario-builder-reference-guide/FindAgent | Find Agent]] block looks for the next available skilled agent to accept the chat. You can use Find Agent to set wait times and send the customer messages about estimated waiting time (EWT). | ||
| + | <!--T:34--> | ||
[[File:BotScenario10.PNG|thumb|800px|center|The bot couldn't resolve the customer in two steps, so the scenario looks for an agent]] | [[File:BotScenario10.PNG|thumb|800px|center|The bot couldn't resolve the customer in two steps, so the scenario looks for an agent]] | ||
| − | ==== Action 11: "Connect Chat" always comes after "Find Agent" ==== | + | ==== Action 11: "Connect Chat" always comes after "Find Agent" ==== <!--T:35--> |
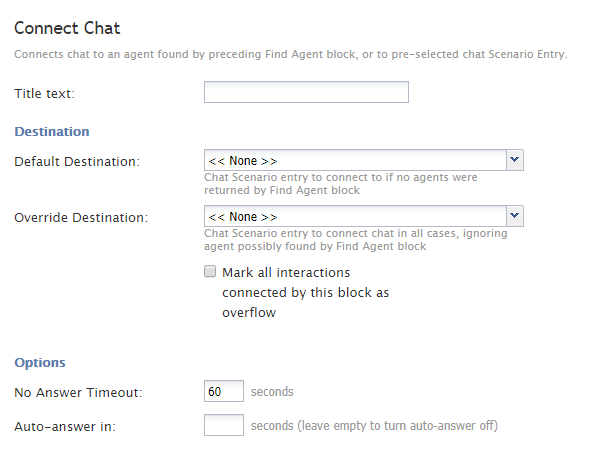
Although Find Agent uses criteria to identify the proper agent to receive an interaction, it does not have a "delivery" mechanism. [[Scenario-builder-reference-guide/ConnectChat | Connect Chat]] is the delivery mechanism for the interaction. | Although Find Agent uses criteria to identify the proper agent to receive an interaction, it does not have a "delivery" mechanism. [[Scenario-builder-reference-guide/ConnectChat | Connect Chat]] is the delivery mechanism for the interaction. | ||
| + | <!--T:36--> | ||
[[File:BotScenario11.PNG|thumb|800px|center|You can either specify a destination for the chat or let the system find the next available agent]] | [[File:BotScenario11.PNG|thumb|800px|center|You can either specify a destination for the chat or let the system find the next available agent]] | ||
| − | ==== Action 12: "Exit" ends the scenario ==== | + | ==== Action 12: "Exit" ends the scenario ==== <!--T:37--> |
The [[Scenario-builder-reference-guide/Exit | Exit]] block completes the scenario. Without it, the scenario will loop through this configured flow until the customer ends the chat. | The [[Scenario-builder-reference-guide/Exit | Exit]] block completes the scenario. Without it, the scenario will loop through this configured flow until the customer ends the chat. | ||
| − | ==== Last Action: Save! ==== | + | ==== Last Action: Save! ==== <!--T:38--> |
Be sure to click '''Save''' to apply your changes. Note that closing your web browser window or tab will close Scenario Builder without saving, and you will lose your work. | Be sure to click '''Save''' to apply your changes. Note that closing your web browser window or tab will close Scenario Builder without saving, and you will lose your work. | ||
| + | <!--T:39--> | ||
Then go try it! | Then go try it! | ||
| − | === Recommended Reading === | + | === Recommended Reading === <!--T:40--> |
For more information on chat configuration and bot setup, see these Bright Pattern tutorials: | For more information on chat configuration and bot setup, see these Bright Pattern tutorials: | ||
| + | <!--T:41--> | ||
* [[Contact-center-administrator-guide/HowtoConfigureWebChat#How_to_Configure_Web_Chat | How to Configure Web Chat]] | * [[Contact-center-administrator-guide/HowtoConfigureWebChat#How_to_Configure_Web_Chat | How to Configure Web Chat]] | ||
| + | <!--T:42--> | ||
* [[Tutorials-for-admins/HowtoCreateWatsonAssistant#How_to_Create_a_Watson_Assistant | How to Create a Watson Assistant]] | * [[Tutorials-for-admins/HowtoCreateWatsonAssistant#How_to_Create_a_Watson_Assistant | How to Create a Watson Assistant]] | ||
| + | <!--T:43--> | ||
* [[Scenario-builder-reference-guide/ScenarioBuilderBasics | Scenario Builder Basics]] | * [[Scenario-builder-reference-guide/ScenarioBuilderBasics | Scenario Builder Basics]] | ||
| + | <!--T:44--> | ||
* [[Tutorials-for-admins | Tutorials for Admins > Chat Tutorials]] | * [[Tutorials-for-admins | Tutorials for Admins > Chat Tutorials]] | ||
Revision as of 17:13, 28 October 2019
<translate>
How to Create a Chat Scenario That Uses Bots
To use a bot such as Watson Assistant in Bright Pattern chat interactions, you simply need to modify a chat scenario to include bot-specific scenario blocks such as Chat Bot Select Account and Ask a Bot.
This article will show you how to create a general chat scenario that uses a bot to:
- Automatically accept the customer’s chat request
- Greet the customer
- Provide up to two answers to the customer
- Connect to an agent when it’s determined that the bot is not being helpful
- Provide suggested replies to the agent during the chat
Prerequisites
If you have not already done so, please complete these steps before proceeding:
- Create a Watson Assistant or an Alterra Answer Bot
- Download and import our bot scenario template: File:App Example Bot Scenario.zip
Scenario Flow
Scenarios are made up of scenario blocks that specify how interactions are processed. Detailed descriptions of Bright Pattern scenario blocks are available in this guide's Scenario Block Definitions section.
The following sequence of actions illustrates how scenario blocks function in a bot-driven chat scenario. This example scenario uses an integrated Watson Assistant.
Action 1: "Chat Bot Select Account" specifies the integration account for your bot
All chat scenarios that incorporate bots will include the Chat Bot Select Account block. In this block, you are selecting a bot/chat suggestions engine integration account.
It's possible for your contact center to have many integration accounts, so it's important to specify which one will be used for this scenario. If you do not see the desired account listed, go back and add an integration account.
Action 2: "Set Variable" personalizes the chat with customer data
In this example, the Set Variable block is used to get the customer's first name and last name.
Variable $(item.externalChatData) gets the customer's data from the pre-chat form that the customer completed before launching the chat. It's called external chat data because it comes from outside of the chat interaction.
To specify what type of external chat data you want, append .first_name or .last_name to the variable, like this:
Action 3: Send Message puts the customer's name into a message
Now that you have a method to collect the customer's name, you can use the Send Message block to incorporate the name into a personalized chat message.
For example, "Hi first_name, how can I help you today?" becomes "Hi Jane, how can I help you today?"
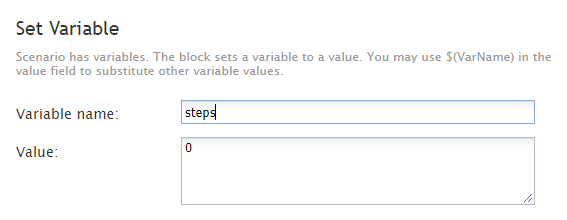
Action 4: "Set Variable" defines scenario steps and tells the bot what to do at each step
We want the bot to respond to the customer two times before connecting to the agent. Using Set Variable blocks, we can define each bot's reply as a step, and tell the scenario what happens after each step.
The first bot reply is specified as "step 0" and the second is specified as "step 1." The scenario will run through both steps. If the customer's issue is not resolved by step 1, the customer is transferred to the agent for help.
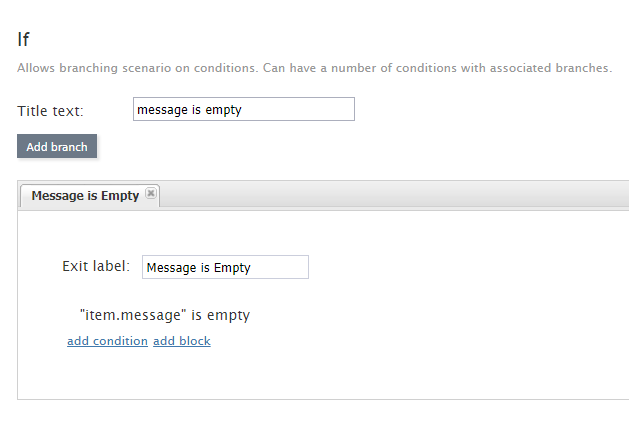
Action 5: "If" tells the bot to send a message if the customer did not write a pre-chat form message
Most web chats are set up to begin with a pre-chat form that collects information from the customer (e.g., name, email address, phone number, reason for chatting, etc.) The If block specifies what happens if the customer did not write a message in the pre-chat form's Message field. If that field is empty, the scenario tells the bot to send a message.
The message aligns with what you have configured your Watson Assistant to say. We call the bot's messages suggestions.
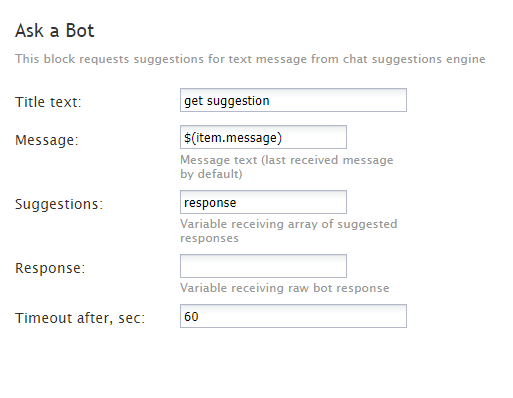
Action 6: "Ask a Bot" lets the bot talk to the customer
The Ask a Bot block allows the bot to automate the conversation before an agent is connected. It delivers the bot's raw response (i.e., suggestions) to the customer. A raw response is configured in your Watson Assistant dialog flow or in your Alterra Answer Bot settings; it's unrelated to Bright Pattern.
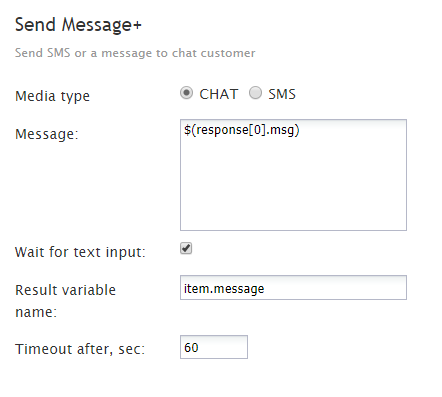
Action 7: "Send Message" sends a custom or system-wide message
Another message can be optionally sent to the customer at this time (e.g., "Do you want to talk to a real live person now?").
Action 8: "Set Variable" sets the next scenario step
This time, we are defining "step 1." Remember, bots are useful for self-service and routing, but they become annoying if they do not help your customer or meet expectations. Setting these scenario steps ensures that a customer is connected to an agent if the bot has not answered the customer's question by now.
Action 9: "If" sets conditions that determine when the chat connects to agent
In this If block, a condition is set to make sure that if the scenario takes more than two steps to resolve the customer's issue, then it will transfer the chat from the bot to the agent.
Action 10: "Find Agent" looks for a skilled agent
The Find Agent block looks for the next available skilled agent to accept the chat. You can use Find Agent to set wait times and send the customer messages about estimated waiting time (EWT).
Action 11: "Connect Chat" always comes after "Find Agent"
Although Find Agent uses criteria to identify the proper agent to receive an interaction, it does not have a "delivery" mechanism. Connect Chat is the delivery mechanism for the interaction.
Action 12: "Exit" ends the scenario
The Exit block completes the scenario. Without it, the scenario will loop through this configured flow until the customer ends the chat.
Last Action: Save!
Be sure to click Save to apply your changes. Note that closing your web browser window or tab will close Scenario Builder without saving, and you will lose your work.
Then go try it!
Recommended Reading
For more information on chat configuration and bot setup, see these Bright Pattern tutorials:
</translate>

