From Bright Pattern Documentation
(Marked this version for translation) |
|||
| Line 8: | Line 8: | ||
== Procedure == <!--T:3--> | == Procedure == <!--T:3--> | ||
| − | # In the Contact Center Administrator application, go to | + | # In the Contact Center Administrator application, go to [[Contact-center-administrator-guide/CallCenterConfiguration/IntegrationAccounts/SpeechToText | Configuration > Call Center Configuration > Integration Accounts]] and select the Speech to Text (STT) option. Then enter in your account details. Note that if you do not see Speech to Text as an option when adding a new integration account, that option has not been enabled for your contact center. See your service provider for more information.<br /><br /> |
| − | #Click the '''add account''' (“'''+'''”) button, and select account type '''Speech To Text (STT)'''.<br /><br />[[File:STT-integration-5310.PNG|center|thumb| | + | #Click the '''add account''' (“'''+'''”) button, and select account type '''Speech To Text (STT)'''.<br /><br />[[File:STT-integration-5310.PNG|center|thumb|650px|Create integration account]]<br /><br /> |
| − | # Then select your speech-to-text account type: Watson, Google synchronous STT, or GoVivace.<br /><br />[[File: STT- | + | # Then select your speech-to-text account type: Watson, Google synchronous STT, or GoVivace.<br /><br />[[File:CCA-CCC-IA-STT-New-Integration-Window-5599may2021.PNG|center|thumb|800px|Speech-to-text account type]]<br /><br /> |
# In ''Properties'', fill in the credentials for your instance type. For property descriptions, see the ''Contact Center Administrator Guide'', section [[Contact-center-administrator-guide/CallCenterConfiguration/IntegrationAccounts/SpeechToText | Speech To Text Integration (STT)]].<br /><br /> | # In ''Properties'', fill in the credentials for your instance type. For property descriptions, see the ''Contact Center Administrator Guide'', section [[Contact-center-administrator-guide/CallCenterConfiguration/IntegrationAccounts/SpeechToText | Speech To Text Integration (STT)]].<br /><br /> | ||
# Click '''Apply''' to save your changes.<br /><br /> | # Click '''Apply''' to save your changes.<br /><br /> | ||
Revision as of 23:51, 26 July 2021
• 日本語
<translate>
How to Configure Speech to Text
You may utilize a Speech to Text (STT) integration account to transcribe calls into text for evaluation purposes; transcripts can be seen in Eval Console's transcript display.
In this section, you will learn how to configure an STT integration account.
Procedure
- In the Contact Center Administrator application, go to Configuration > Call Center Configuration > Integration Accounts and select the Speech to Text (STT) option. Then enter in your account details. Note that if you do not see Speech to Text as an option when adding a new integration account, that option has not been enabled for your contact center. See your service provider for more information.
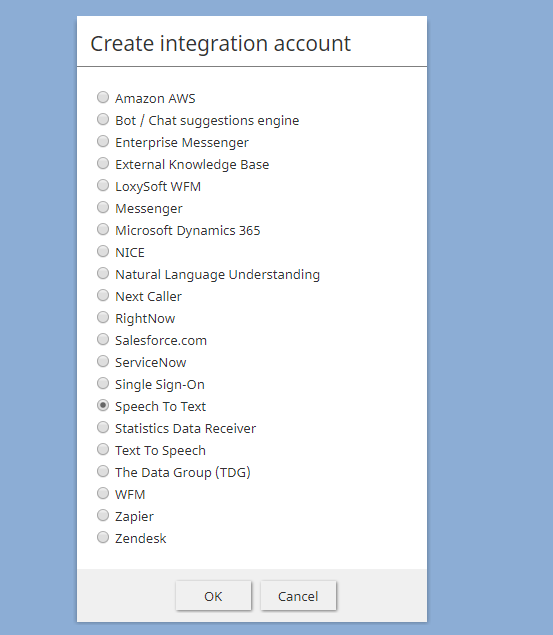
- Click the add account (“+”) button, and select account type Speech To Text (STT).
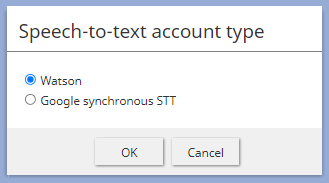
- Then select your speech-to-text account type: Watson, Google synchronous STT, or GoVivace.
- In Properties, fill in the credentials for your instance type. For property descriptions, see the Contact Center Administrator Guide, section Speech To Text Integration (STT).
- Click Apply to save your changes.
- Now you will be able to use STT for quality management purposes.
</translate>


