How to Configure Conversational IVR
In this article, you will learn how to configure conversational IVR for your inbound voice service. Because Bright Pattern’s conversational IVR is the front end to a bot, most of the configuration will be done on the bot side (i.e., through Google, GoVivace, or IBM in your workspace), outside of Bright Pattern. This procedure will guide you through the steps to take after you have set up STT and TTS engines through your service provider.
For more information, see the Contact Center Administrator Guide, section What Is Conversational IVR?
Prerequisites
If you have not already done so, please complete these steps before proceeding:
- Create a Watson Assistant or Amazon Lex bot
- Download and import our conversational IVR scenario template: File:App Conversational IVR Example.zip
Procedure
Step 1: Set up a Speech-to-Text engine through your service provider
- If using IBM Watson: In IBM Cloud, add Speech-to-Text as a service.
- If using Google: Enable Google Cloud Speech API.
- If using GoVivace: Enable Speech to Text API.
Step 2: Add Speech To Text Integration Account
A Speech To Text integration account uses your credentials to connect Bright Pattern Contact Center to a third-party STT engine. Integration accounts are configured in the Contact Center Administrator application.
- In Contact Center Administrator > Call Center Configuration > Integration Accounts, add a new Speech to Text integration account. For property descriptions, see the Contact Center Administrator Guide, section Speech To Text Integration (STT).
- Note that if you do not see Speech to Text as an option when adding a new integration account, that option has not been enabled for your contact center. See your service provider for more information.
Step 3: Set up a Text-to-Speech engine through your service provider
- If using IBM Watson: In IBM Cloud, add Speech-to-Text as a service.
- If using Google: Enable Google Cloud Speech API.
Step 4: Add Text To Speech Integration Account
Likewise, a Text to Speech integration account uses your credentials to connect Bright Pattern Contact Center to a third-party TTS engine. TTS integration lets you create voice prompts in numerous supported languages to automate bot responses.
- In Contact Center Administrator > Call Center Configuration > Integration Accounts, add a new Text to Speech integration account. For property descriptions, see the Contact Center Administrator Guide, section Text To Speech Integration (TTS).
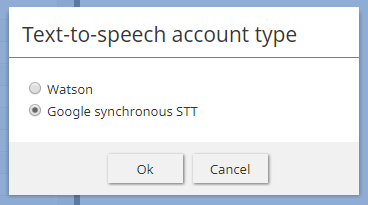
Select the type of TTS integration account - See the Load Voices property. If this is a Google TTS integration account, load voices by completing an additional step in Google. See How to Load Voices from Google Cloud Text-to-Speech API.
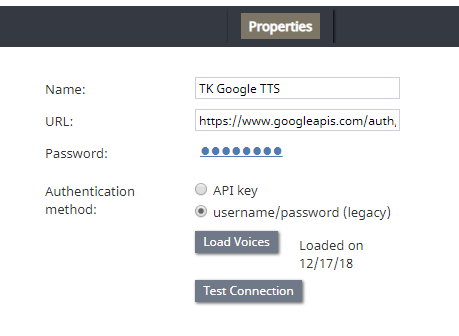
Google TTS integration account properties - Then click Load Voices. This may take a few minutes. When the voices are loaded, a message will display the date they were added: “Loaded on XX/XX/XX.”
- Click Apply to save your changes.


Step 5: Add a Voice Scenario That Includes Play-Listen and Bot Scenario Blocks
The Play-Listen scenario block is a key part of conversational IVR. This block uses the integrated TTS and STT accounts that you just set up to play voice prompts to the caller and to listen for the caller’s response.
Chat Bot Select Account and Ask a Bot blocks allow you to choose which integrated bots will be used for interacting with callers.
- In Contact Center Administrator, go to Scenarios > Voice and import our conversational IVR scenario template: File:App Conversational IVR Example.zip.
- Work through our scenario-building exercise, How to Use Conversational IVR in a Scenario.
- Modify the scenario to suit your needs, being sure to select the correct bot and STT account in the scenario blocks.

Step 6: Add or Select a Scenario Entry
The scenario entry is the entry point for the caller. For more information, see the Contact Center Administrator Guide, section Scenario Entries Overview.
- Go to Scenario Entries > Dial-in and add a new scenario entry.
- At the most basic level, add Name, Scenario, Service, Internal numbers, External numbers, and Transcribe calls (if no STT account is configured, this will be greyed out).
- Click Apply.
You're Done
This completes your conversational IVR configuration. Next, you should try it out by calling your contact center's access number and interacting with the IVR and bot. You can always come back to your scenario and entry point for further editing.
Recommended Reading
For more information on inbound voice configuration, bots, integrations, and scenarios, see these Bright Pattern tutorials: