(Redirected from latest:Contact-center-administrator-guide/HowtoIntegrateBotswithChat)
How to Integrate Bots with Chat
Bright Pattern Contact Center integrates with providers like IBM Watson to enable chatbots to be used in your contact center services. In this article, you will learn how to integrate an IBM Watson Assistant (i.e., a conversational bot) with your configured chat service.
In How to Configure Web Chat, you learned how to set up a chat scenario, chat service, and chat scenario entry point to work together to display a chat widget on your website. A working chat widget connects a customer on a website to a live agent in your contact center.
When a bot is integrated with your chat services, customers can be connected to the bot, which can answer questions, provide assisted self-service, and connect to a live agent if needed. Even if the chat is routed to an agent, the integrated bot still runs in the background, ready to assist the agent by providing suggestions (i.e., suggested responses for the agent to select and use).
Prerequisites
This article assumes that you have:
- Read and understand How to Configure Web Chat
- Access to your company’s IBM Cloud account
- Some understanding of how Watson Assistant works
Procedure
This procedure consists of the following concepts:
- Create a bot in IBM Watson
- Add an IBM Watson integration account
- Create or choose a chat scenario that incorporates bot interactions
- Create or choose a chat service for your bot
- Link the chat scenario and service to your integration account
- Test the chat
Step 1: Create a Watson Assistant in IBM Cloud
- If you haven’t already done so, sign up for an IBM account and launch IBM Cloud. IBM Cloud is the application where you will be developing and managing resources like Watson Assistant chatbots.
- Follow all the steps in IBM’s Getting Started tutorial in order to create a Watson Assistant instance. The Watson Assistant will be your bot, and you will be adding intents, entities, and a dialog to it in a workspace. For more information on Watson Assistant, see IBM’s API Reference.
- You can also read our basic guidelines in How to Create a Watson Assistant.
Step 2: Get Your Watson Credentials
Your credentials are necessary for integrating Bright Pattern Contact Center with your Watson Assistant. You will be using these credentials in later steps to add an integration account.
- In your IBM Cloud console, get your Watson Assistant credentials from either of these two places:
- Watson Services > Assistant > Manage (for credentials in plain text)
- Watson Services > Assistant > Service Credentials (for JSON snippet)
- Watson Services > Assistant > Manage (for credentials in plain text)
- Copy the Url, Username, and Password for your Watson Assistant to a separate doc, such as a text file.

Step 3: Add an Integration Account
Integration accounts are what allow your contact center to operate with third-party services.
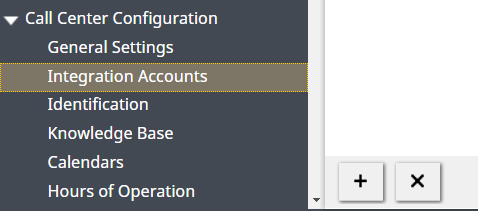
- In the Contact Center Administrator application, go to Call Center Configuration > Integrations Accounts.
- Click the Add account (+) button to add a new integration account.
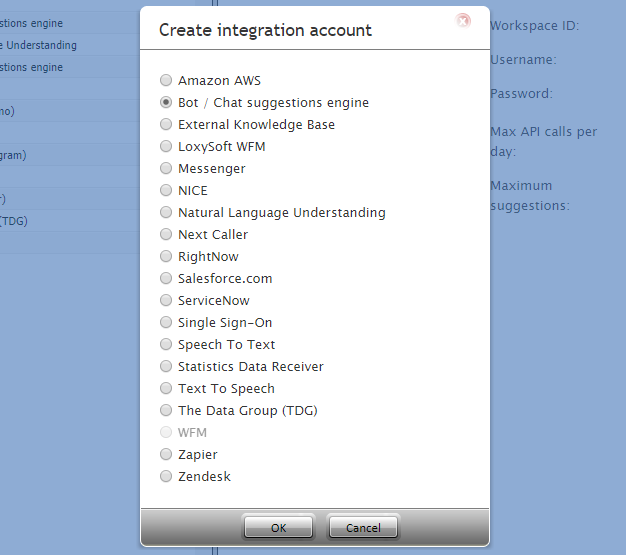
Add new integration account - Select account type Bot / Chat suggestions engine and click OK.
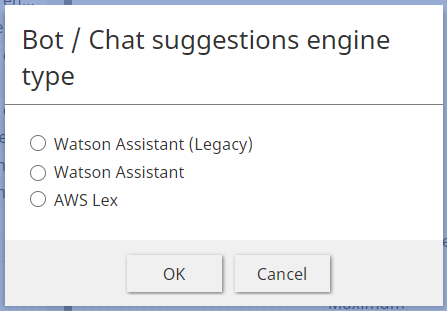
Select "Bot / Chat suggestions engine" - In the Bot / Chat suggestions engine type dialog, select your Watson Assistant type and click OK.
Select "Watson Conversation"


Properties

Fill in all Watson Assistant properties or Watson Assistant (Legacy) properties.
Click Apply at the bottom of the screen to save your account properties.
Step 4: Create or Select a Chat Scenario
Note that this step is the same as Web Chat Configuration Step 1.
- Go to Configuration > Scenarios > Chat.
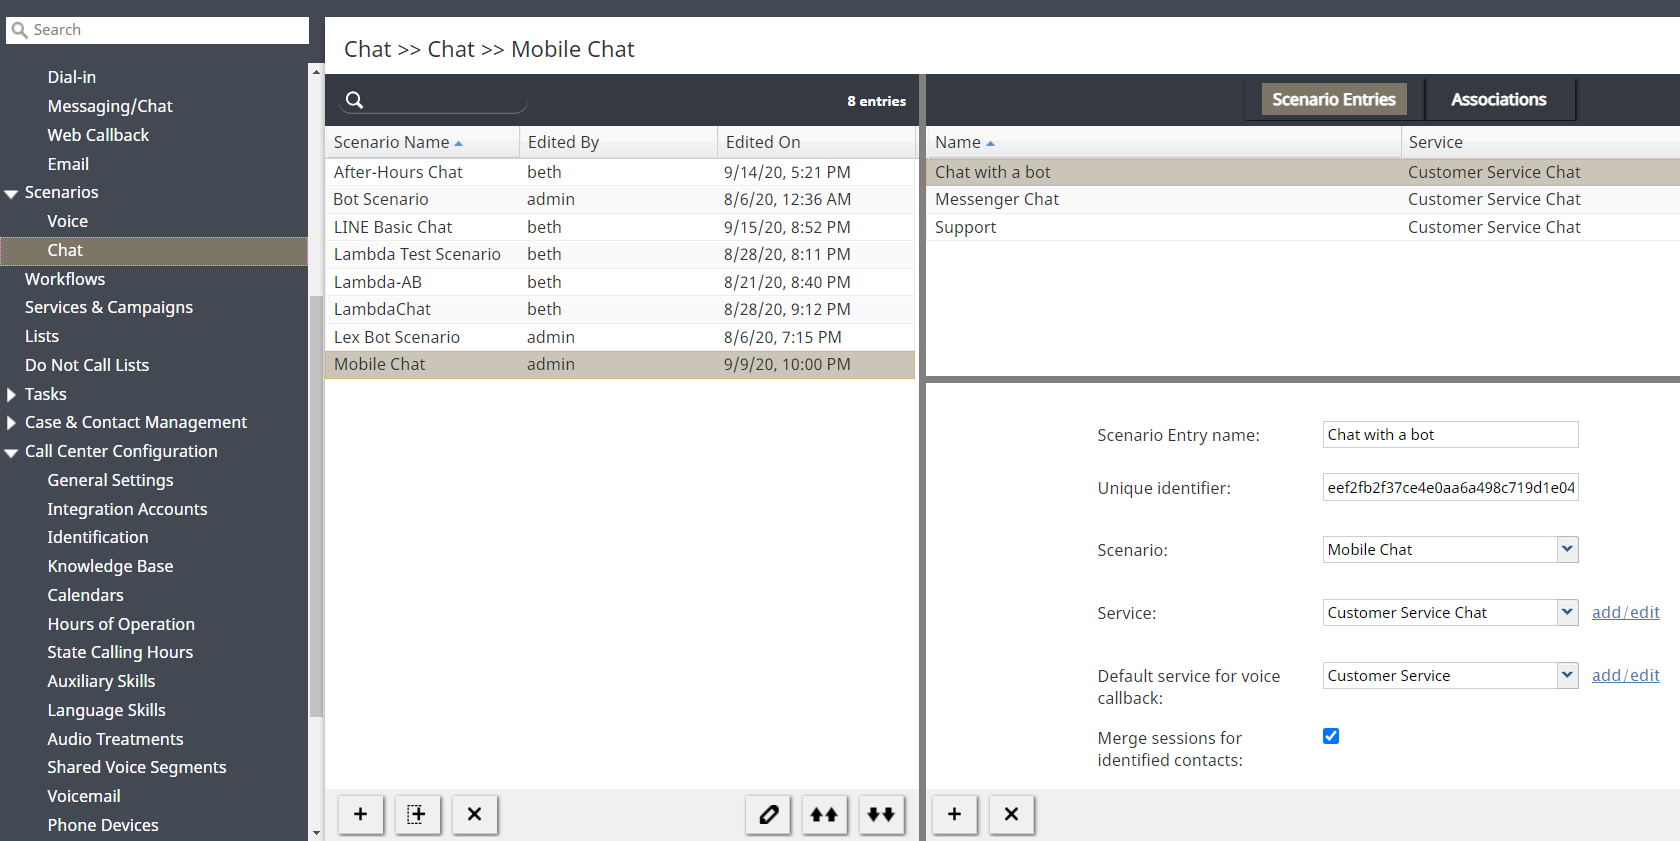
Configuration > Scenarios > Chat - Either select an existing Chat Scenario from the list, or click the Add from template
 button at the bottom of the screen to create a new chat scenario from the “Mobile Chat” template.
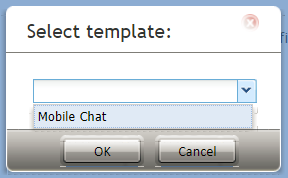
Select the "Mobile Chat" template - Creating a new chat scenario from a template will open the Scenario Builder application in a new browser tab or window. For the purpose of this simple setup, leave the scenario as-is and click Save.

Name the scenario - Give the scenario a unique name (e.g., "Bot Scenario") and click Save. Your new scenario will appear in the list of scenarios.


Step 5: Edit the Scenario to Work with Your Bot
To use the Watson Assistant in live web chat interactions, you’ll have to edit the basic Mobile Chat scenario template to allow the bot to interact with the customer. For more information about scenarios, see the Scenario Builder Reference Guide.
There are many ways to construct such a bot-enabled scenario; the instructions given in this step are provided as just one example of how to use your Watson Assistant in chat.
In this scenario-building exercise, you will be configuring the system to use the bot to:
- Automatically accept the customer’s chat request
- Greet the customer
- Provide answers to the customer
- Provide suggested replies to the agent
- Connect to an agent when it’s determined that the bot is not being helpful

- Download File:App Example Bot Scenario.zip and import it to your Contact Center Administrator application.
- Select the imported scenario and click EDIT to open it.
The following scenario blocks (with comments) are included in this example scenario. Be sure to read the comments that explain each scenario block's properties.
- Chat Bot Select Account: This block tells the system which integrated bot will be used for this scenario.

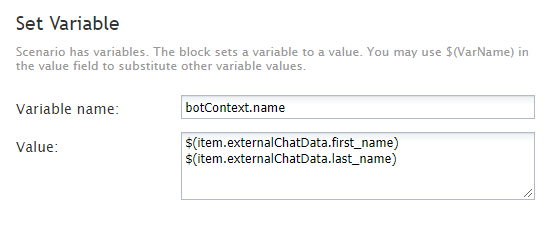
Select an integration account - Set Variable: This establishes the customer's first name and last name. Setting this context helps to personalize the conversation.
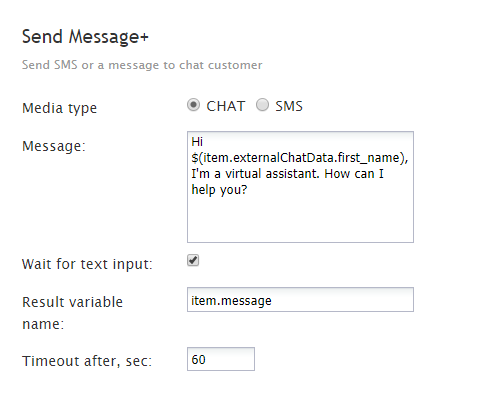
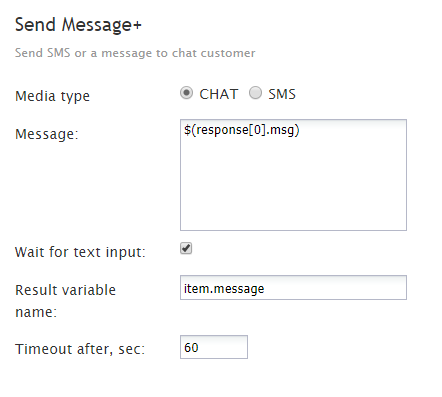
Use a variable to get the customer's name from the pre-chat form and use it in the chat interaction - Send Message+: This block delivers a chat message to the customer, incorporating the customer's name.
Have the bot send a message to the customer, addressing him/her by name - Set Variable: This time, we are defining a step. In this example scenario, we want the bot to respond to the customer two times before connecting to the agent. The first time is specified as "step 0" and the second time is specified as "step 1." The scenario will run through both steps. If the customer's issue is not resolved by step 1, the customer is transferred to the agent for help.

Use a variable to define this part as the first in a series of steps - If: The If block specifies what happens if the customer did not write a message in the pre-chat form's Message field. If that field is empty, the scenario tells the bot to send a message. The message aligns with what you have configured your Watson Assistant to say. We call the bot's messages suggestions.
- Add a branch
- Give it a condition of item.message is empty
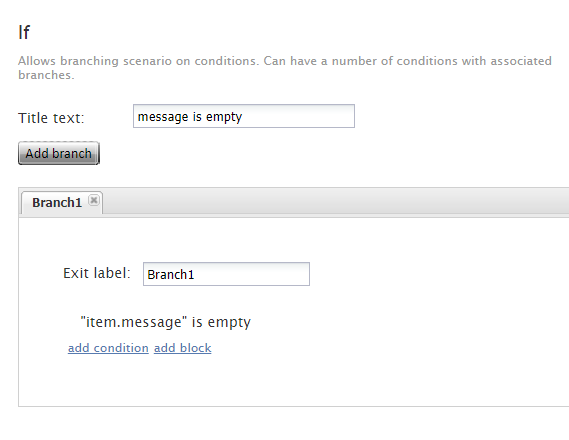
If the customer's message is empty, have the bot send a message to the customer
- Add a branch
- Ask a Bot: The scenario uses this block to get suggestions (i.e., some response from the Watson Assistant) to deliver to the customer. For each of the conditional exits (Failed, Timeout, or No Data), the scenario will send a message and then connect to the agent.

Get suggestions from the bot - Send Message+: This is used to send a message to the customer via either chat or SMS. In this example, the message is sent in the active chat interaction. If a specific message is not defined here, the standard system-wide message is sent to the customer.
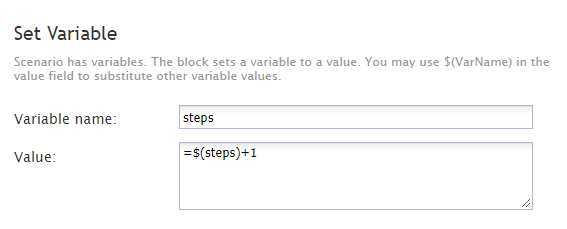
Send another message if you want - Set Variable: This time, we are defining "step 1." Remember, we want the bot to respond to the customer two times before connecting to the agent. The first time is specified as "step 0" and the second time is specified as "step 1." The scenario will run through both steps. If the customer's issue is not resolved by step 1, the customer is transferred to the agent for help.
Define this part as step 1 - If: In this If block, a condition is set to make sure that if the scenario takes more than two steps to resolve the customer's issue, then it will transfer the chat from the bot to the agent.
- Add a branch
- Give it a condition of “steps” > “2”
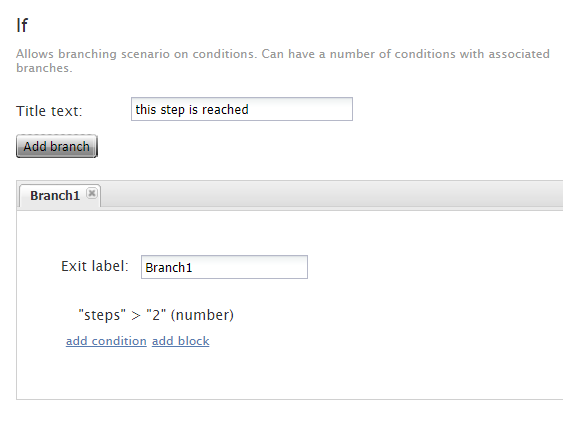
If the scenario takes more than two steps to resolve the customer's issue, then the agent steps in
- Add a branch
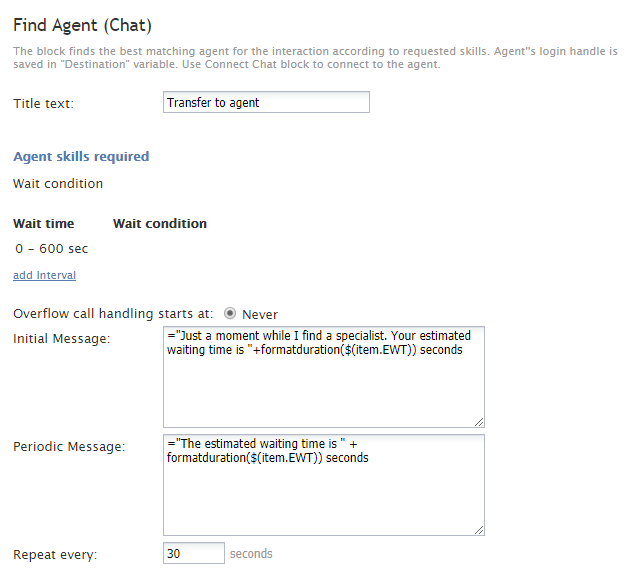
- Find Agent: The Find Agent block looks for the next available skilled agent to accept the chat. You can use Find Agent to set wait times and send the customer messages about estimated waiting time (EWT).
The bot couldn't resolve the customer in two steps, so the scenario looks for an agent - Connect Chat: Connect Chat is for setting the destination of the chat. If you leave the destination fields empty, the Find Agent block will find the first available agent.
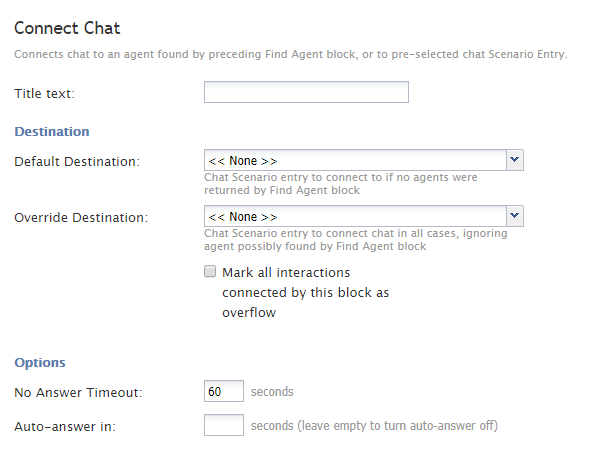
You can either specify a destination for the chat or let the system find the next available agent - Exit: The Exit block completes the scenario. Without it, the scenario will loop through this configured flow until the customer ends the chat.


Step 6: Create or Select a Chat Service
See Web Chat Configuration Step 2.
Step 7: Create or Choose a Chat Scenario Entry
Note that this step is basically the same as Web Chat Configuration Step 3, with the addition of another important property.
- Go to Configuration > Scenario Entries > Messaging/Chat and select a scenario entry point to use with your chat scenario. The entry point is what starts the scenario.
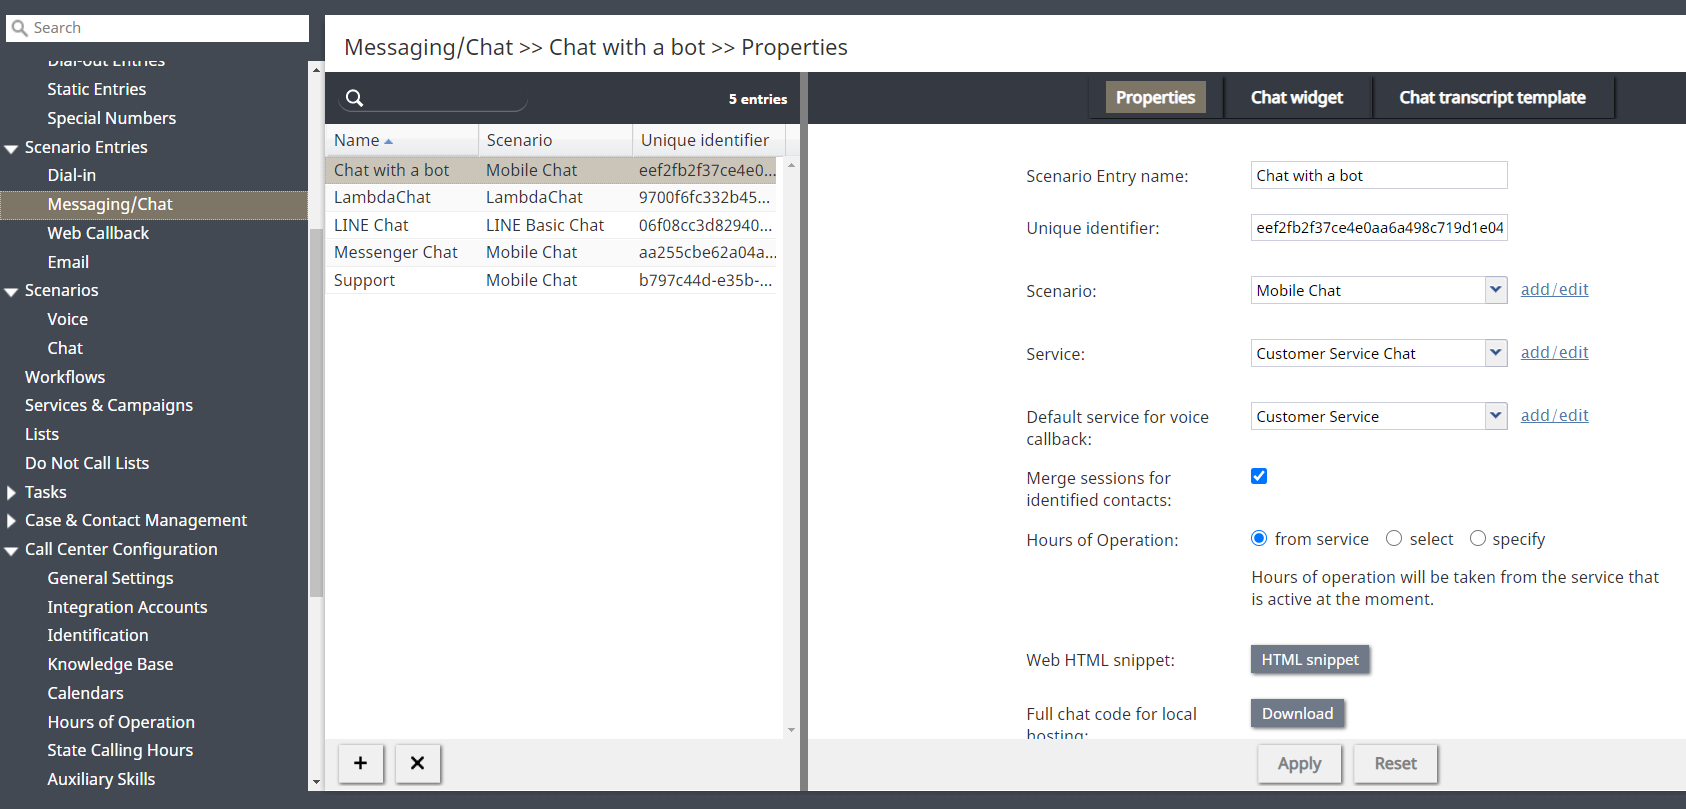
Messaging/Chat scenario entries list - If there are no existing chat scenario entries shown, you have to create one.

How to Add a New Chat Scenario Entry
- Click the Add chat scenario entry button.
- In the Properties tab, fill in the properties as appropriate (see below for required and optional properties). For definitions, see the Contact Center Administrator Guide, section Messaging/Chat.
Required Properties
In the Properties tab, make sure to address the following fields right now. These are critical to chat configuration.

- Name - The unique name (any) of the chat scenario entry (e.g., "Redwood Chat")
- Unique identifier - A long string of characters that identifies the chat entry. It is recommended that you change it to something short and unique (e.g., "1234").
- Scenario - Choose the Chat Scenario you selected or created earlier in this procedure (e.g., "Super Chat"). This is where the parts come together to make chat possible.
- Service - Choose the Chat Service you selected or created earlier in this procedure (e.g., "Pacific Chat"). This is where the parts come together to make chat possible.
- Bot / Chat suggestions engine - The engine that will provide suggested replies to the agent during chat. Note that in order to use a bot/chat suggestions engine, you must have an integration account configured for your contact center.
Other Properties
The other remaining properties are optional at this time. You can come back to them later.
Step 8: Edit Chat Widget Style
See Web Chat Configuration Step 4
Step 9: Add a Contact Tab
In order for this chat scenario entry to work, you must add a contact tab for the chat widget. See How to Add a Contact Tab.
Step 10: Get the HTML
See Web Chat Configuration Step 6
Final Step: Test the Chat
You have now successfully set up your contact center service, scenario, and chat widget to work in an integrated manner with your Watson Assistant. You should test it to make sure that the:
- Customer's name entered on the pre-chat form comes through during the chat
- Bot is able to automate the conversation with the customer
- Customer is connected to an agent if the bot couldn't help within two tries
- Agent is able to see the bot's suggestions during the active chat
The following screenshot shows a service chat (on the Agent Desktop side) where the bot provides two responses to the customer and then connects to an agent. You can see the bot's suggestion below the agent's text input field.

And the following is how the chat looks to the customer:
