| Line 1: | Line 1: | ||
| − | <translate>= How to | + | <translate>= How to Remove Sensitive Data from Emails = <!--T:1--> |
| − | Depending on the type of services that your contact center provides, incoming emails may contain | + | Depending on the type of services that your contact center provides, incoming emails may contain sensitive data or images that people not familiar with Internet security risks can include in their messages. Examples of such data include payment card numbers, access codes, and clients’ personal health information. |
<!--T:2--> | <!--T:2--> | ||
| − | Handling of such data may be governed by various laws, industry security standards, as well as internal policies of your organization. | + | Handling of such data may be governed by various laws, industry security standards, as well as internal policies of your organization. You may be expected to identify such data and make sure it is masked or deleted before the email is further processed and stored. |
| + | |||
<!--T:3--> | <!--T:3--> | ||
| − | + | '''Notes''': | |
| + | * All operations described below require the [[Contact-center-administrator-guide/UsersandTeams/Privileges#Mask_original_email_content|''Mask original email content'']] privilege; for more information, contact your system administrator. | ||
| + | * The results of all operations described as follows are permanent and cannot be undone. | ||
<!--T:4--> | <!--T:4--> | ||
| − | + | == Remove Sensitive Text in the Email Body == | |
| + | At times it may be necessary to remove sensitive text in the body of an email. | ||
| − | + | <!--T:5--> | |
| − | + | [[File:2021.10.07_AD_MaskingCCInfo.01.png|650px|thumb|center|A contact may send sensitive information such as their credit card information through an email.]] | |
<!--T:6--> | <!--T:6--> | ||
| − | + | * To mask a fragment of an email, highlight the image with your cursor. | |
<!--T:7--> | <!--T:7--> | ||
| − | + | [[File:2021.10.07_AD_MaskingCCInfo.02.png|650px|thumb|center|Highlight the sensitive information]] | |
<!--T:8--> | <!--T:8--> | ||
| − | + | * The options ''Mask'' and ''Search'' will appear. Choose '''Mask'''. | |
<!--T:9--> | <!--T:9--> | ||
| − | + | [[File:2021.10.07_AD_MaskingCCInfo.03.png|650px|thumb|center|Apply mask to original email content window will open]] | |
<!--T:10--> | <!--T:10--> | ||
| − | [[File: | + | * The ''Apply mask to original email content'' window will open with the information you indicated highlighted. Click '''Ok''' to accept the highlighted area to mask. |
| + | * You will be brought back to the original case/email where the masked information will now appear as a series of asterisks within the body of the email. Repeat the process for any further sensitive information that may need to be obfuscated. | ||
| + | |||
| + | |||
| + | <!--T:11--> | ||
| + | [[File:2021.10.07_AD_MaskingCCInfo.04.png|650px|thumb|center|The masked information now appears as a series of asterisks.]] | ||
| + | |||
| + | |||
| + | <!--T:12--> | ||
| + | == Remove Sensitive Images in the Email Body == | ||
| + | Agent Desktop allows the option to remove sensitive images within the email body without deleting the email itself. To do this, take the following steps: | ||
| + | * Highlight an image directly in the body of the email (selecting the image the same way you would select a text fragment). | ||
| + | * Once the image is selected, option ''Mask'' will appear. | ||
| + | * Click the '''Mask''' option. | ||
| + | |||
| + | |||
| + | <!--T:13--> | ||
| + | [[File:2021.10.08_AD_Email.MaskingIndividualInBodyImages.png|650px|thumb|center]] | ||
| + | |||
| + | |||
| + | <!--T:14--> | ||
| + | * The window ''Apply mask to original email content'' will appear. | ||
| + | |||
| + | |||
| + | <!--T:15--> | ||
| + | [[File:2021.10.08_AD_Email.MaskingImagesInBody.ApplyMaskToOritinalContent.png|650px|thumb|center]] | ||
| + | |||
| + | |||
| + | <!--T:16--> | ||
| + | * Click '''Ok''' to confirm masking the in-body image. | ||
| + | * Selecting '''Ok''' deletes the attachment. Pressing '''Cancel''' will cancel the attachment deletion. | ||
| + | |||
| + | |||
| + | <!--T:17--> | ||
| + | [[File:2021.10.07_AD_Email.DeleteAttachments_NOPE.png|650px|thumb|center]] | ||
| + | |||
| + | |||
| + | <!--T:18--> | ||
| + | * After your confirmation, the image in the email is replaced with an '''X''' deletion image, the attachment text is struck-through, and a record including the user and timestamp is provided. | ||
| + | * Hovering over or clicking on a deleted attachment will show a tooltip with the deletion info: "Attachment was deleted on <Date> by <UserName> with the reason entered for the deletion listed under 'Note'." | ||
| + | |||
| + | |||
| + | <!--T:19--> | ||
| + | [[File:2021.10.07_AD_Email.AttachmentDeletionInfoHover.png|650px|thumb|center]] | ||
| + | |||
| + | |||
| + | <!--T:20--> | ||
| + | == Removing Email Attachments == | ||
| + | Agent Desktop has the option to delete email attachments without deleting the email itself. To do this, take the following steps: | ||
| + | |||
| + | |||
| + | <!--T:21--> | ||
| + | [[File:2021.10.07_AD_Email.DeleteMultipleAttachments.jpg|650px|thumb|center|Individual attachments may be deleted one at a time]] | ||
| + | |||
| + | |||
| + | <!--T:22--> | ||
| + | * Hover over the attachment name. | ||
| + | * A red '''X''' will appear to the right of the attachment name at the top of the email. | ||
| + | * Click the red '''X'''. A warning message window will appear that says, "Are you sure you want to delete the attachment <Name>? This operation cannot be undone." | ||
| + | * This is followed by a text box labeled ''Erase reason'', which allows you to note the reason why you chose to delete the attachment. | ||
| + | |||
| + | |||
| + | <!--T:23--> | ||
| + | [[File:2021.10.07_AD_Email.DeleteAttachment.ConfirmationImage.png|650px|thumb|center]] | ||
| + | |||
| + | |||
| + | <!--T:24--> | ||
| + | * After your confirmation, the attachment name is struck-through, and a record including the user and timestamp is provided upon hovering over the item. | ||
| + | * Hovering over or clicking on a deleted attachment will show a tooltip with the deletion info: "Attachment was deleted on <Date> by <UserName> with the reason entered for the deletion listed under 'Note'." | ||
| + | * You can repeat this process until all sensitive attachments have been deleted. | ||
Revision as of 21:18, 13 October 2021
<translate>= How to Remove Sensitive Data from Emails = Depending on the type of services that your contact center provides, incoming emails may contain sensitive data or images that people not familiar with Internet security risks can include in their messages. Examples of such data include payment card numbers, access codes, and clients’ personal health information.
Handling of such data may be governed by various laws, industry security standards, as well as internal policies of your organization. You may be expected to identify such data and make sure it is masked or deleted before the email is further processed and stored.
Notes:
- All operations described below require the Mask original email content privilege; for more information, contact your system administrator.
- The results of all operations described as follows are permanent and cannot be undone.
Remove Sensitive Text in the Email Body
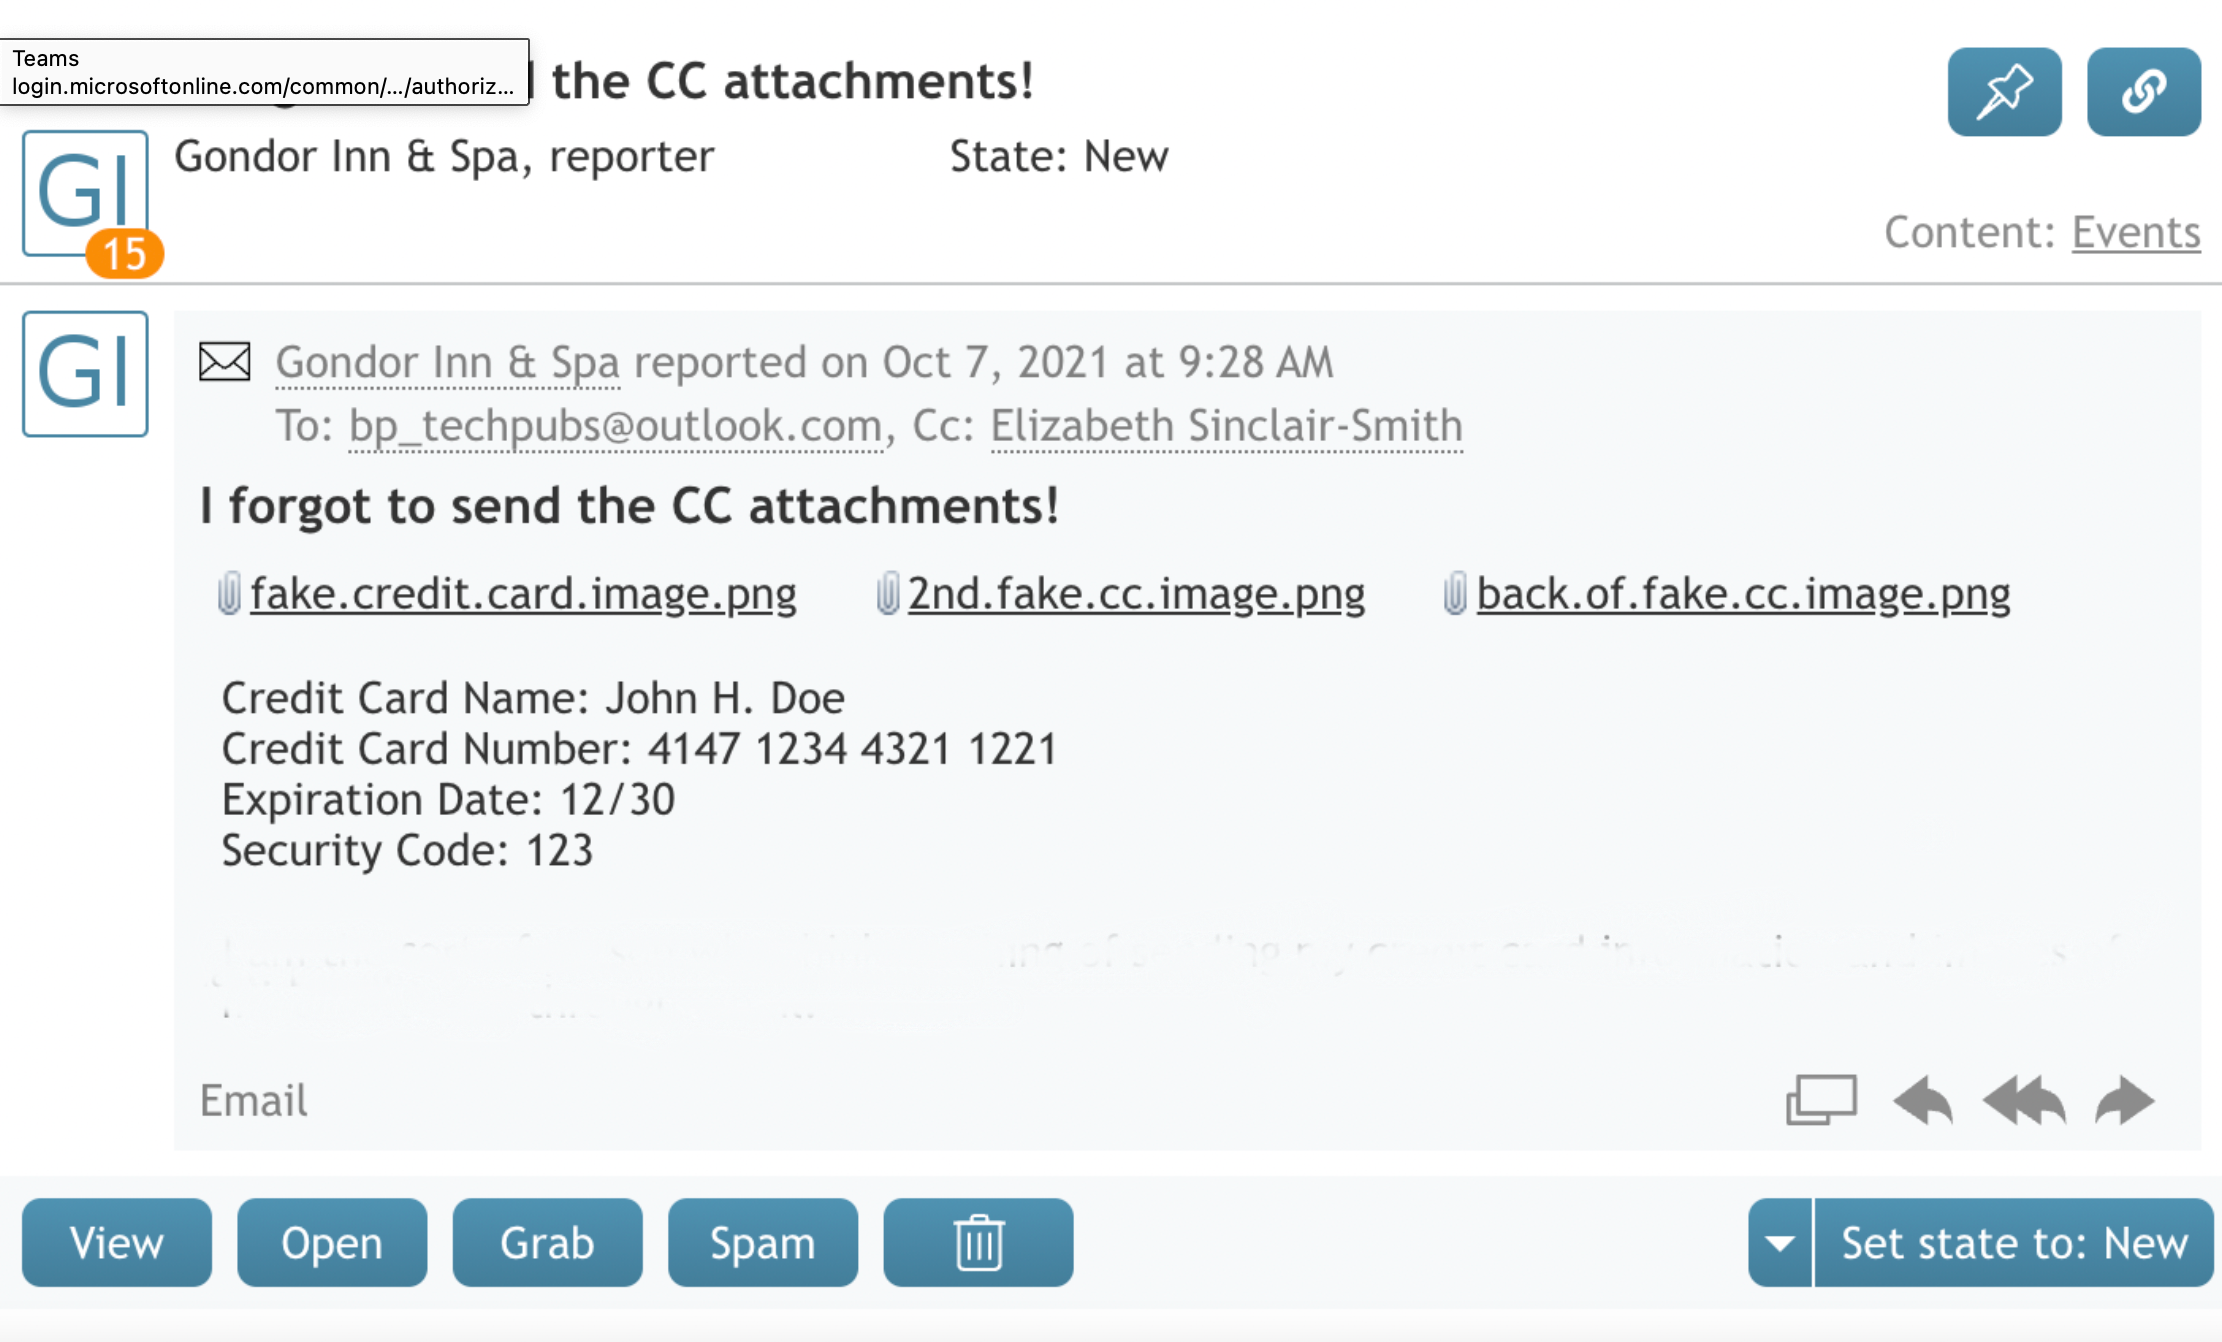
At times it may be necessary to remove sensitive text in the body of an email.
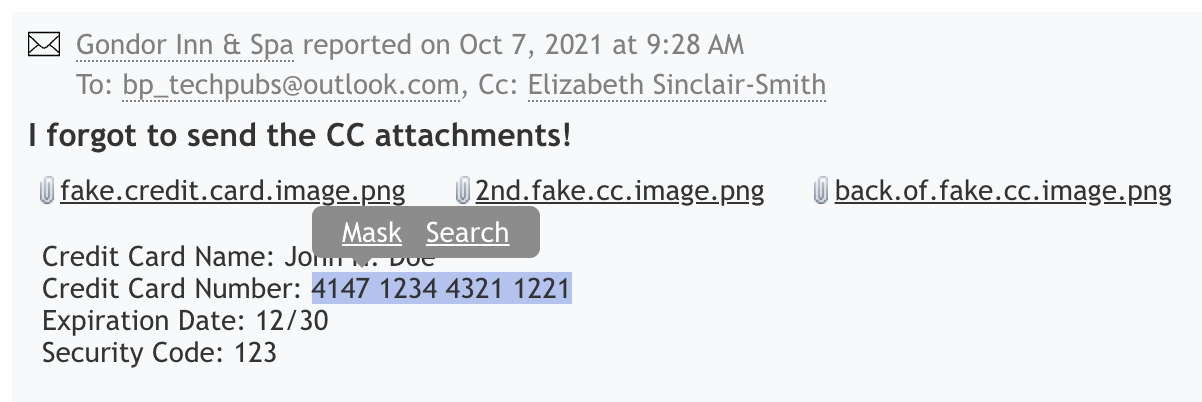
- To mask a fragment of an email, highlight the image with your cursor.
- The options Mask and Search will appear. Choose Mask.
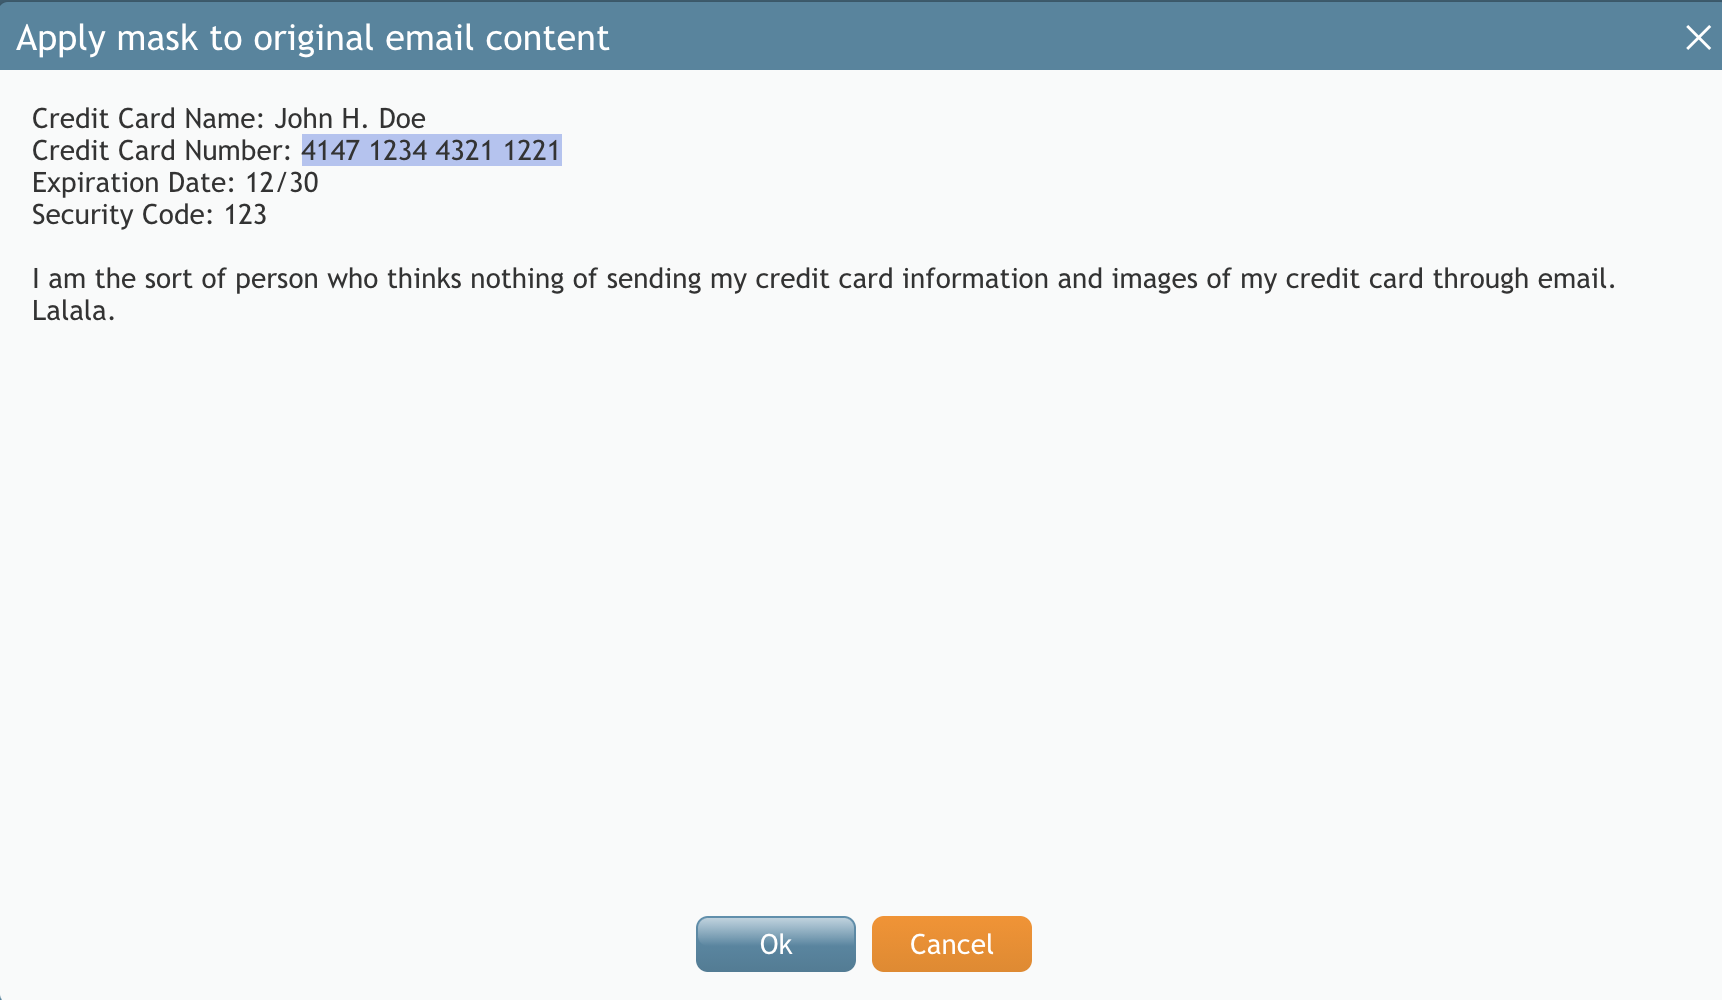
- The Apply mask to original email content window will open with the information you indicated highlighted. Click Ok to accept the highlighted area to mask.
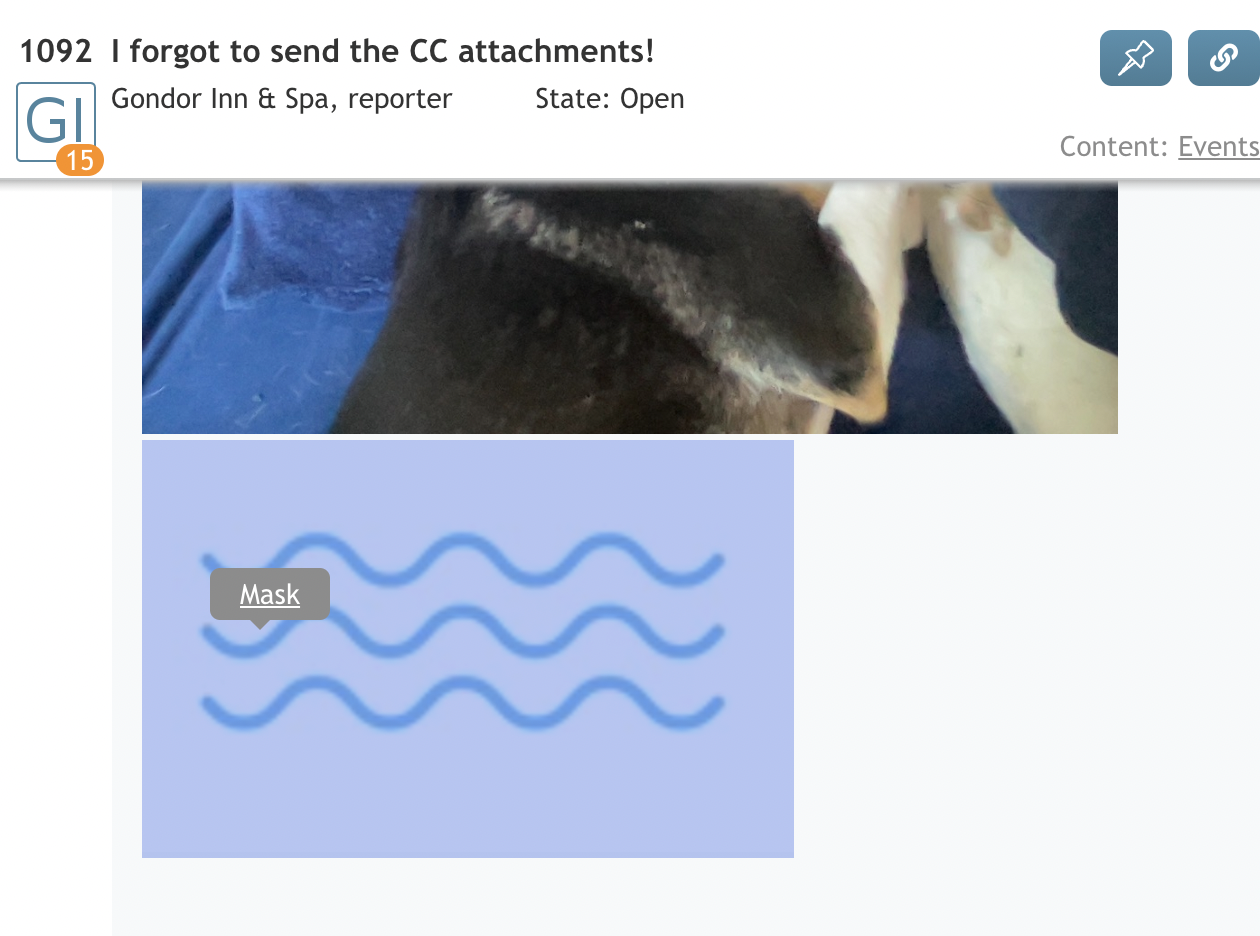
- You will be brought back to the original case/email where the masked information will now appear as a series of asterisks within the body of the email. Repeat the process for any further sensitive information that may need to be obfuscated.
Remove Sensitive Images in the Email Body
Agent Desktop allows the option to remove sensitive images within the email body without deleting the email itself. To do this, take the following steps:
- Highlight an image directly in the body of the email (selecting the image the same way you would select a text fragment).
- Once the image is selected, option Mask will appear.
- Click the Mask option.
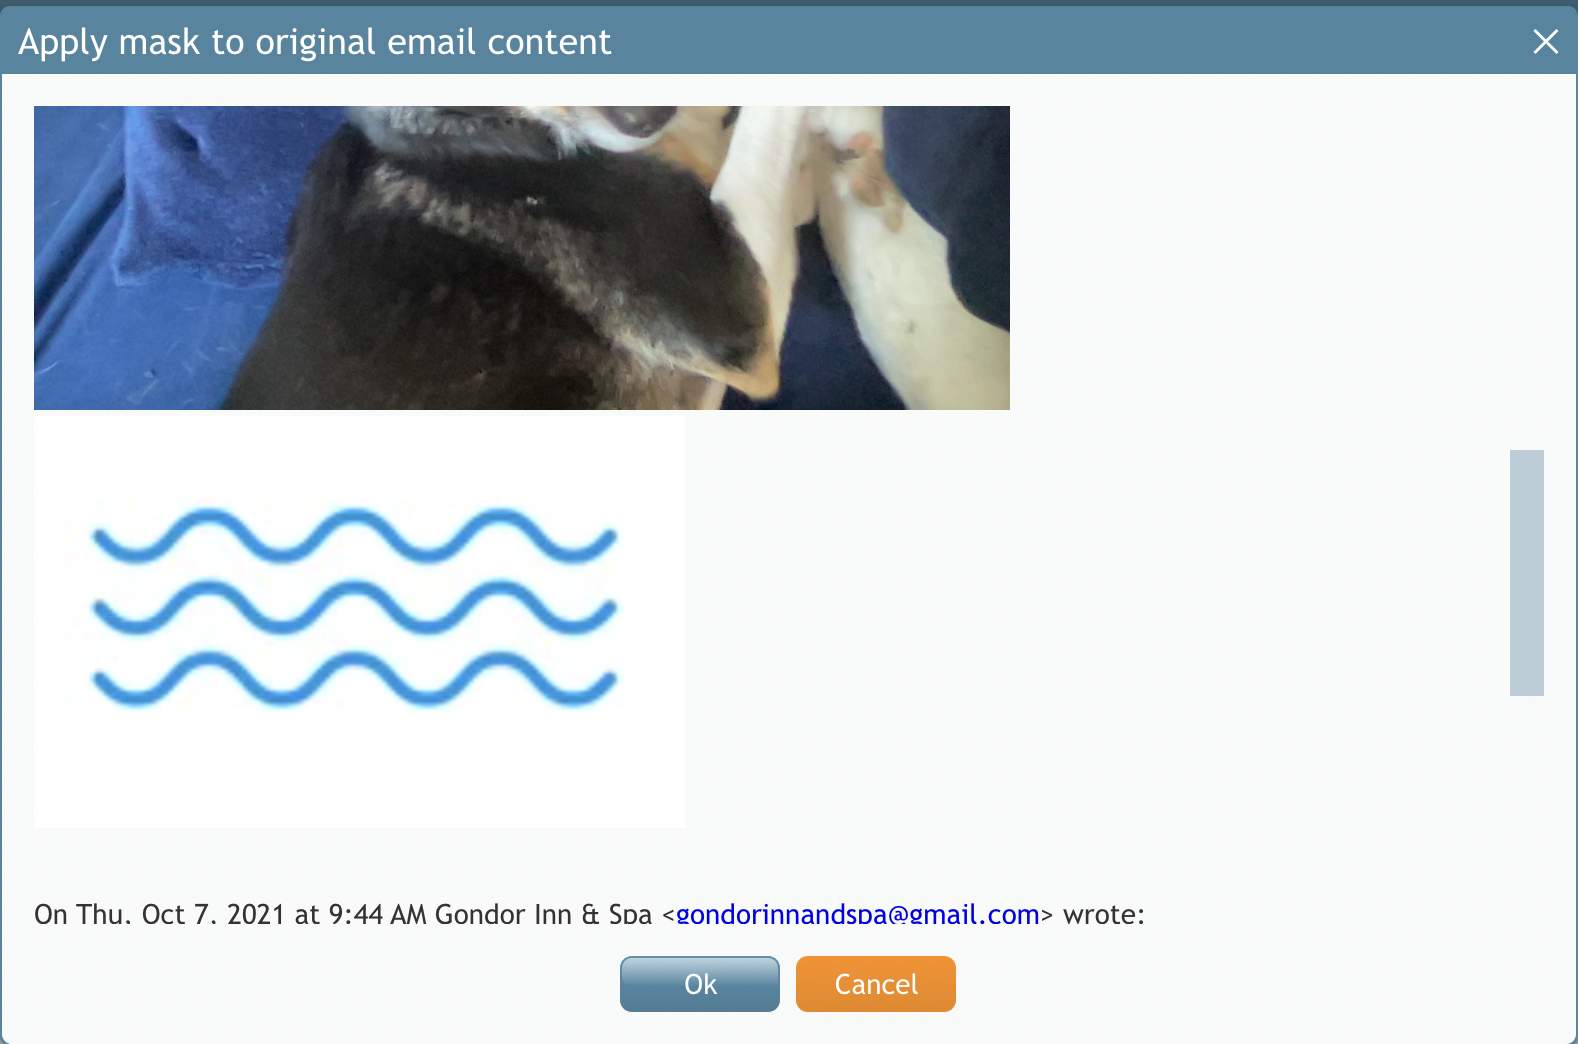
- The window Apply mask to original email content will appear.
- Click Ok to confirm masking the in-body image.
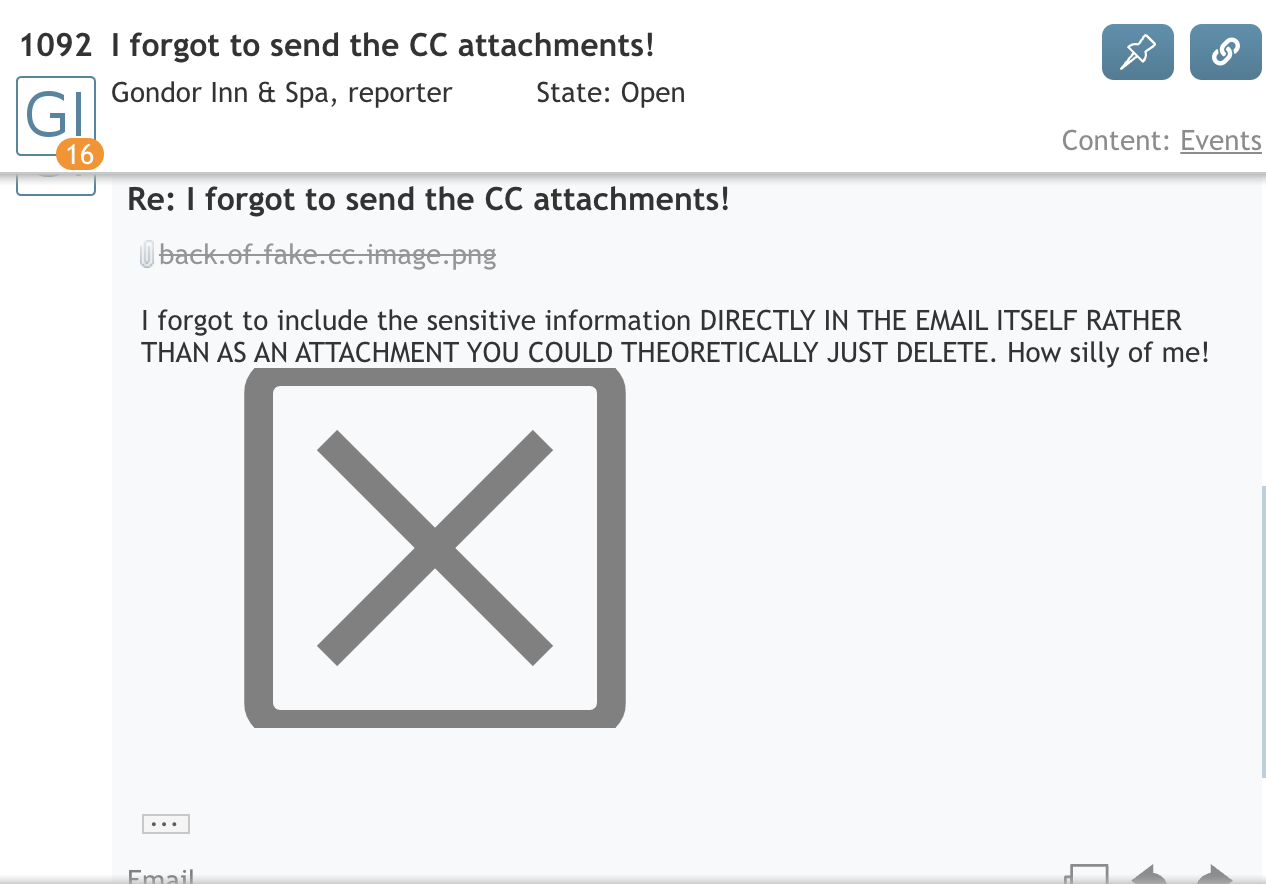
- Selecting Ok deletes the attachment. Pressing Cancel will cancel the attachment deletion.
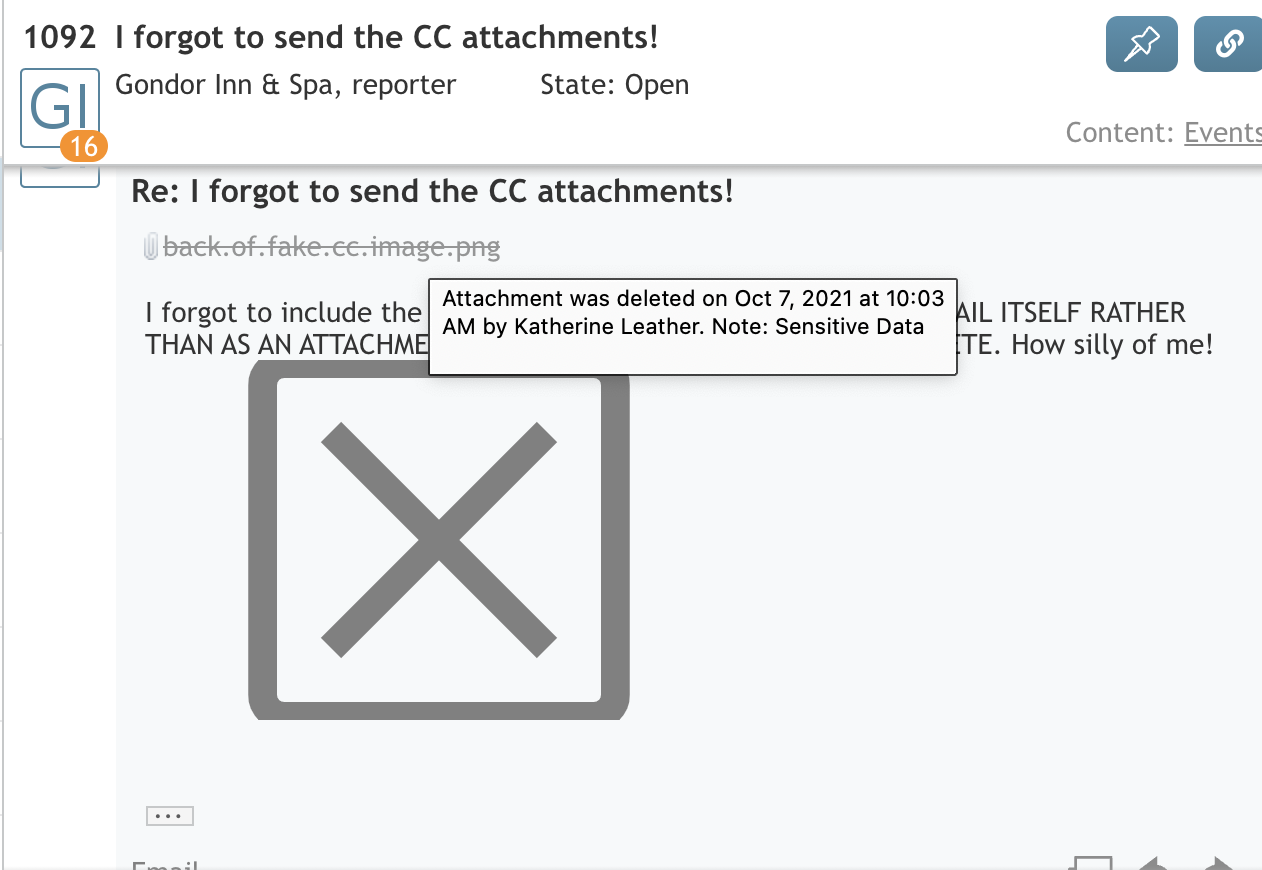
- After your confirmation, the image in the email is replaced with an X deletion image, the attachment text is struck-through, and a record including the user and timestamp is provided.
- Hovering over or clicking on a deleted attachment will show a tooltip with the deletion info: "Attachment was deleted on <Date> by <UserName> with the reason entered for the deletion listed under 'Note'."
Removing Email Attachments
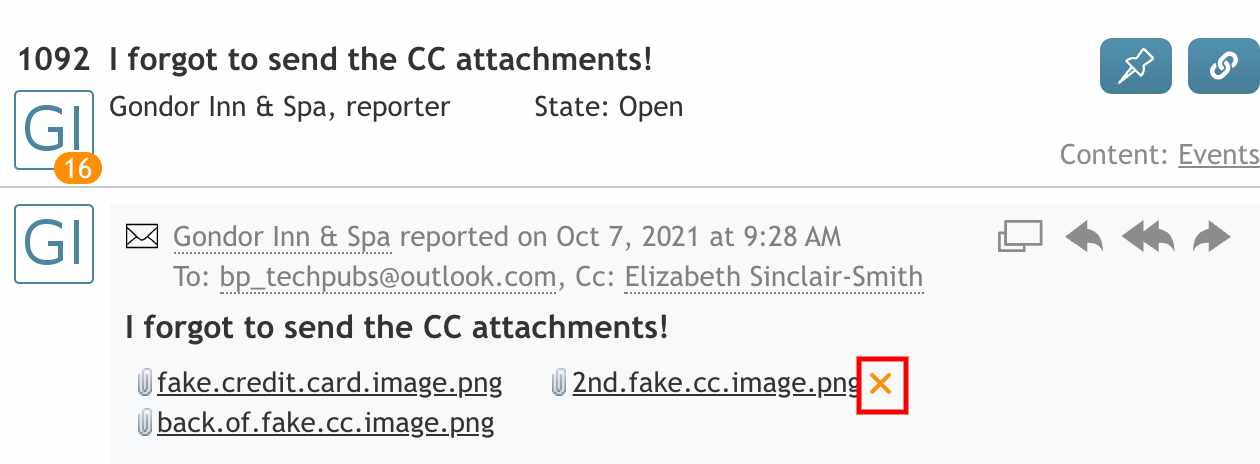
Agent Desktop has the option to delete email attachments without deleting the email itself. To do this, take the following steps:
- Hover over the attachment name.
- A red X will appear to the right of the attachment name at the top of the email.
- Click the red X. A warning message window will appear that says, "Are you sure you want to delete the attachment <Name>? This operation cannot be undone."
- This is followed by a text box labeled Erase reason, which allows you to note the reason why you chose to delete the attachment.
- After your confirmation, the attachment name is struck-through, and a record including the user and timestamp is provided upon hovering over the item.
- Hovering over or clicking on a deleted attachment will show a tooltip with the deletion info: "Attachment was deleted on <Date> by <UserName> with the reason entered for the deletion listed under 'Note'."
- You can repeat this process until all sensitive attachments have been deleted.
</translate>

