(Created page with "<translate>= Sending Automatic Email Replies to Customers Who Use the "Leave a Message" Chat Form = If your contact center offers chat services within a set of operating hours...") |
(Updated via BpDeleteTranslateTags script) |
||
| (2 intermediate revisions by one other user not shown) | |||
| Line 1: | Line 1: | ||
| − | + | = Sending Automatic Email Replies to Customers Who Use the "Leave a Message" Chat Form = | |
If your contact center offers chat services within a set of operating hours, the [[Chat-widget-configuration-guide/ContactTab#Leave_a_Message_Form_Configuration|Leave a Message Form]] option allows customers to use the chat widget to send you email messages outside of these hours of operation. | If your contact center offers chat services within a set of operating hours, the [[Chat-widget-configuration-guide/ContactTab#Leave_a_Message_Form_Configuration|Leave a Message Form]] option allows customers to use the chat widget to send you email messages outside of these hours of operation. | ||
| Line 8: | Line 8: | ||
| − | == Prerequisites == | + | == Prerequisites == |
Note that this scenario requires you to have configured [[Contact-center-administrator-guide/ServicesandCampaigns/ServicesandCampaignsOverview|chat and email services]], configured [[Contact-center-administrator-guide/ScenarioEntries/MessagingChat|chat and email scenario entries]], as well as a working [[Contact-center-administrator-guide/CallCenterConfiguration/EmailSettings#SMTP_Configuration|SMTP configuration]]. | Note that this scenario requires you to have configured [[Contact-center-administrator-guide/ServicesandCampaigns/ServicesandCampaignsOverview|chat and email services]], configured [[Contact-center-administrator-guide/ScenarioEntries/MessagingChat|chat and email scenario entries]], as well as a working [[Contact-center-administrator-guide/CallCenterConfiguration/EmailSettings#SMTP_Configuration|SMTP configuration]]. | ||
| Line 15: | Line 15: | ||
For more information about configuring the chat widget, see ''Administration Tutorials'', section [[Tutorials-for-admins/Chat/Overview|Chat]], as well as the [[5.3:Chat-widget-configuration-guide/Purpose|''Chat Widget Configuration Guide'']]. | For more information about configuring the chat widget, see ''Administration Tutorials'', section [[Tutorials-for-admins/Chat/Overview|Chat]], as well as the [[5.3:Chat-widget-configuration-guide/Purpose|''Chat Widget Configuration Guide'']]. | ||
| − | == Scenario Example == | + | == Scenario Example == |
'''Click the following link to download an annotated version of this chat scenario example.'''<br> | '''Click the following link to download an annotated version of this chat scenario example.'''<br> | ||
[[File:App_After-Hours_Send_an_Email_Reply_to_a_Chat_Customer.zip]] | [[File:App_After-Hours_Send_an_Email_Reply_to_a_Chat_Customer.zip]] | ||
| Line 23: | Line 23: | ||
For general information about scenarios, refer to section [[Scenario-builder-reference-guide/ScenarioBuilderOverview|Scenario Builder Overview]]. | For general information about scenarios, refer to section [[Scenario-builder-reference-guide/ScenarioBuilderOverview|Scenario Builder Overview]]. | ||
| − | == Example Flow == | + | == Example Flow == |
This example illustrates how to configure the [[Chat-widget-configuration-guide/ContactTab#Leave_a_Message_Form_Configuration|Leave a Message]] form in the Chat Widget Configuration application, focusing on field variables. Then, in the Scenario Builder application, we configure an [[Scenario-builder-reference-guide/ScenarioBlocks/If|If]] block to perform an after-hours check. If messages are received outside of the configured hours of operation, we use the [[Scenario-builder-reference-guide/ScenarioBlocks/EMail|EMail]] block with the chat widget's field variables to send email replies to customers. | This example illustrates how to configure the [[Chat-widget-configuration-guide/ContactTab#Leave_a_Message_Form_Configuration|Leave a Message]] form in the Chat Widget Configuration application, focusing on field variables. Then, in the Scenario Builder application, we configure an [[Scenario-builder-reference-guide/ScenarioBlocks/If|If]] block to perform an after-hours check. If messages are received outside of the configured hours of operation, we use the [[Scenario-builder-reference-guide/ScenarioBlocks/EMail|EMail]] block with the chat widget's field variables to send email replies to customers. | ||
| Line 37: | Line 37: | ||
| − | ==== Action 1: Configure the "Leave a Message" Chat Form in the Chat Widget Configuration Application ==== | + | ==== Action 1: Configure the "Leave a Message" Chat Form in the Chat Widget Configuration Application ==== |
In order for our scenario to work, we must configure the [[Chat-widget-configuration-guide/ContactTab#Leave_a_Message_Form_Configuration|Leave a Message]] form in the Chat Widget Configuration application first. To launch the application, in the Contact Center Administrator application, go to section [[Contact-center-administrator-guide/ScenarioEntries/MessagingChat#Chat_widget|Scenario Entries > Messaging/Chat > Chat Widget tab]], and click '''add''' under [[Chat-widget-configuration-guide/ContactTab|Chat Initiation via Contact Tabs]]. | In order for our scenario to work, we must configure the [[Chat-widget-configuration-guide/ContactTab#Leave_a_Message_Form_Configuration|Leave a Message]] form in the Chat Widget Configuration application first. To launch the application, in the Contact Center Administrator application, go to section [[Contact-center-administrator-guide/ScenarioEntries/MessagingChat#Chat_widget|Scenario Entries > Messaging/Chat > Chat Widget tab]], and click '''add''' under [[Chat-widget-configuration-guide/ContactTab|Chat Initiation via Contact Tabs]]. | ||
| Line 48: | Line 48: | ||
| − | ==== Action 2: Configure an If Block to Perform an After-Hours Check ==== | + | ==== Action 2: Configure an If Block to Perform an After-Hours Check ==== |
After configuring the chat form, in the Scenario Builder application, we want the system to check if the chat is received outside of the service's hours of operation. To do this, add an [[Scenario-builder-reference-guide/ScenarioBlocks/If|If]] block, add a new [[Scenario-builder-reference-guide/ScenarioBlocks/If#Branches_and_Conditions|branch]], enter an exit label, then add a [[Scenario-builder-reference-guide/ScenarioBlocks/If#Branches_and_Conditions|condition]] that specifically looks at hours of operation. The condition is configured like so: | After configuring the chat form, in the Scenario Builder application, we want the system to check if the chat is received outside of the service's hours of operation. To do this, add an [[Scenario-builder-reference-guide/ScenarioBlocks/If|If]] block, add a new [[Scenario-builder-reference-guide/ScenarioBlocks/If#Branches_and_Conditions|branch]], enter an exit label, then add a [[Scenario-builder-reference-guide/ScenarioBlocks/If#Branches_and_Conditions|condition]] that specifically looks at hours of operation. The condition is configured like so: | ||
* "The current date and time" | * "The current date and time" | ||
| Line 60: | Line 60: | ||
| − | ==== Action 3: Add the EMail Block to the If Block's After-Hours Check Branch ==== | + | ==== Action 3: Add the EMail Block to the If Block's After-Hours Check Branch ==== |
If the chat is received outside of the specified hours of operation, we want the system to send out an automatic email reply; this is done by adding the [[Scenario-builder-reference-guide/ScenarioBlocks/EMail|EMail]] block to the after-hours branch we created with the [[Scenario-builder-reference-guide/ScenarioBlocks/If|If]] block. | If the chat is received outside of the specified hours of operation, we want the system to send out an automatic email reply; this is done by adding the [[Scenario-builder-reference-guide/ScenarioBlocks/EMail|EMail]] block to the after-hours branch we created with the [[Scenario-builder-reference-guide/ScenarioBlocks/If|If]] block. | ||
| Line 71: | Line 71: | ||
| − | ==== Action 4: Configure Find Agent / Connect Chat ==== | + | ==== Action 4: Configure Find Agent / Connect Chat ==== |
If the chat is received during normal hours of operation, the customer will need to be connected to an agent. To do this, configure your scenario with the two most basic chat scenario blocks: [[Scenario-builder-reference-guide/FindAgent|Find Agent]] and [[Scenario-builder-reference-guide/ConnectChat|Connect Chat]]. ''Find Agent'' is where the system finds the most appropriate agent to route the chat to; ''Connect Chat'' opens the chat channel between the found agent and the customer. All chat scenarios will contain the Find Agent block and Connect Chat block; note that they should be arranged in consecutive order. | If the chat is received during normal hours of operation, the customer will need to be connected to an agent. To do this, configure your scenario with the two most basic chat scenario blocks: [[Scenario-builder-reference-guide/FindAgent|Find Agent]] and [[Scenario-builder-reference-guide/ConnectChat|Connect Chat]]. ''Find Agent'' is where the system finds the most appropriate agent to route the chat to; ''Connect Chat'' opens the chat channel between the found agent and the customer. All chat scenarios will contain the Find Agent block and Connect Chat block; note that they should be arranged in consecutive order. | ||
| − | For more information about these blocks, see [[Scenario-builder-reference-guide/HowtoCreateaBasicScenario|How to Create a Basic Scenario]]. As a reminder, define all [[Scenario-builder-reference-guide/ScenarioBuilderOverview#Conditional_Exits|conditional exits]]. | + | For more information about these blocks, see [[Scenario-builder-reference-guide/HowtoCreateaBasicScenario|How to Create a Basic Scenario]]. As a reminder, define all [[Scenario-builder-reference-guide/ScenarioBuilderOverview#Conditional_Exits|conditional exits]]. |
| − | |||
| − | |||
| − | |||
| − | |||
Latest revision as of 04:03, 29 May 2024
Sending Automatic Email Replies to Customers Who Use the "Leave a Message" Chat Form
If your contact center offers chat services within a set of operating hours, the Leave a Message Form option allows customers to use the chat widget to send you email messages outside of these hours of operation.
Using the Scenario Builder application, you can configure the system to send automatic email replies to customers who send after-hours messages. This ensures you're providing great customer service even when your contact center is closed.
Prerequisites
Note that this scenario requires you to have configured chat and email services, configured chat and email scenario entries, as well as a working SMTP configuration.
Because a key part of this example is based on hours of operation, it is helpful to understand how to configure them in your contact center. And finally, you may find it helpful to review the variable $(item.externalChatData) as it refers specifically to fields in the chat widget.
For more information about configuring the chat widget, see Administration Tutorials, section Chat, as well as the Chat Widget Configuration Guide.
Scenario Example
Click the following link to download an annotated version of this chat scenario example.
File:App After-Hours Send an Email Reply to a Chat Customer.zip
For instructions on how to import this file into your contact center, see the Contact Center Administrator Guide, section Scenarios Overview > How to Export and Import Scenarios.
For general information about scenarios, refer to section Scenario Builder Overview.
Example Flow
This example illustrates how to configure the Leave a Message form in the Chat Widget Configuration application, focusing on field variables. Then, in the Scenario Builder application, we configure an If block to perform an after-hours check. If messages are received outside of the configured hours of operation, we use the EMail block with the chat widget's field variables to send email replies to customers.
Designer's note: The same scenario blocks can be used to route the chat message directly to your contact center's email address, for troubleshooting purposes.
Note that this is an example scenario only and not intended for production use. All conditional exits should be defined with actions for production use.
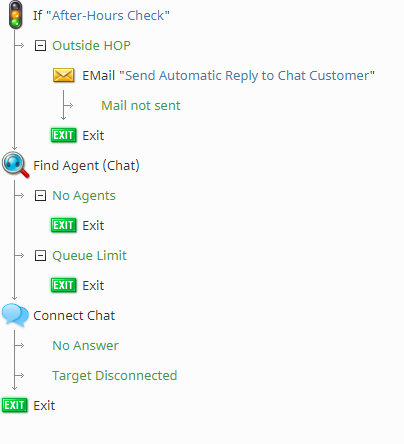
Scenario Overview
The diagram shown illustrates what the complete scenario looks like when designed in the Scenario Builder application.
Action 1: Configure the "Leave a Message" Chat Form in the Chat Widget Configuration Application
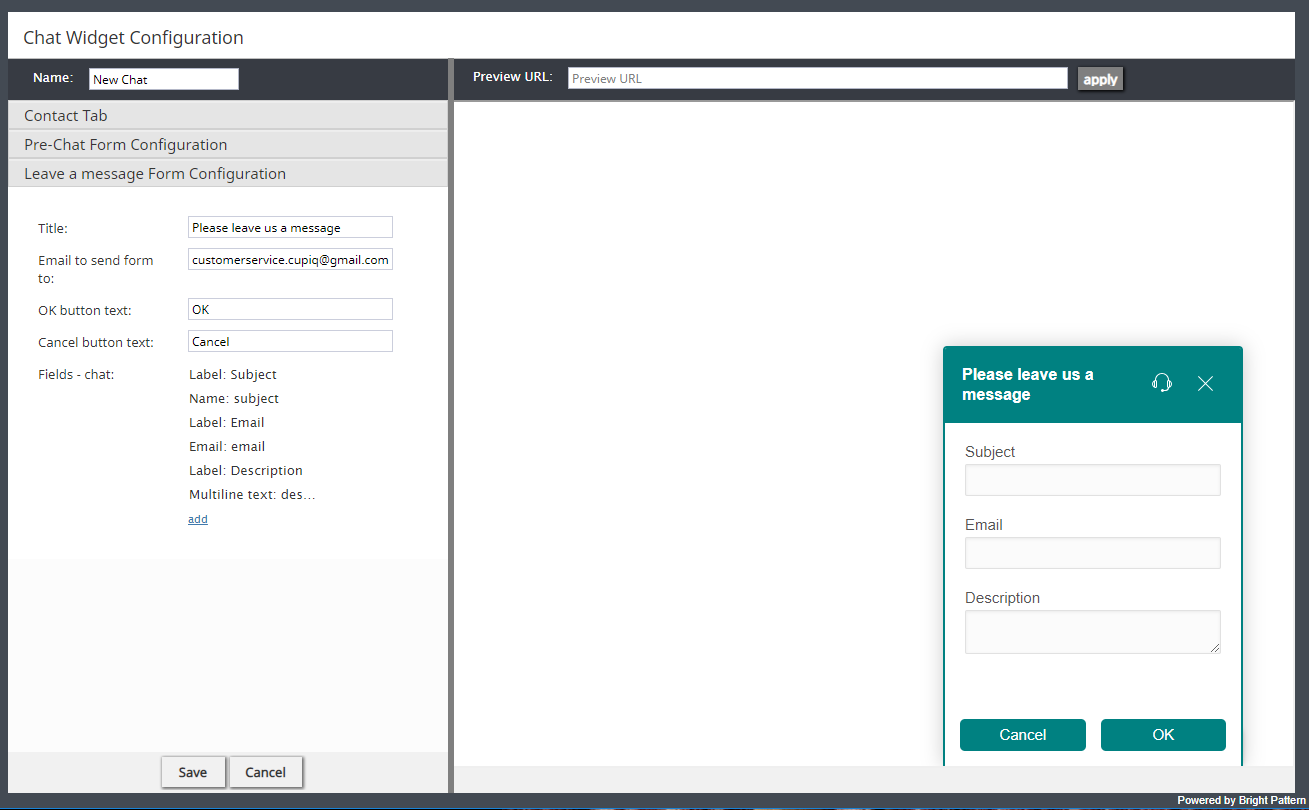
In order for our scenario to work, we must configure the Leave a Message form in the Chat Widget Configuration application first. To launch the application, in the Contact Center Administrator application, go to section Scenario Entries > Messaging/Chat > Chat Widget tab, and click add under Chat Initiation via Contact Tabs.
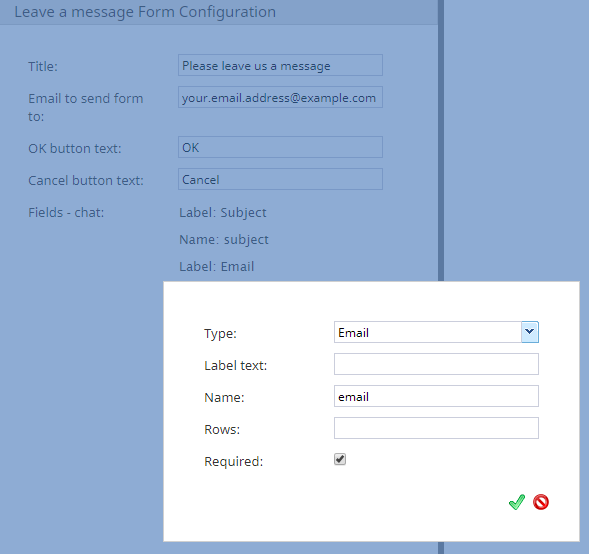
In the application, configure the fields you want your Leave a Message form to have. Note that the Email to send form to field should contain the email address you want to receive the results of these forms.
When adding fields to your form, note that the name can be added to the end of the variable $(item.externalChatData) as a way to reference back to a specific field (e.g., the field named subject can be added like so: $(item.externalChatData.subject)).
Action 2: Configure an If Block to Perform an After-Hours Check
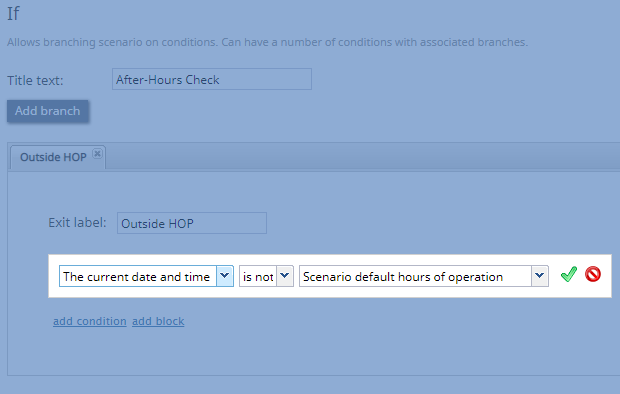
After configuring the chat form, in the Scenario Builder application, we want the system to check if the chat is received outside of the service's hours of operation. To do this, add an If block, add a new branch, enter an exit label, then add a condition that specifically looks at hours of operation. The condition is configured like so:
- "The current date and time"
- "is not"
- "Scenario default hours of operation"
Additionally, note that you may configure specific hours of operation entries in the final field.
Action 3: Add the EMail Block to the If Block's After-Hours Check Branch
If the chat is received outside of the specified hours of operation, we want the system to send out an automatic email reply; this is done by adding the EMail block to the after-hours branch we created with the If block.
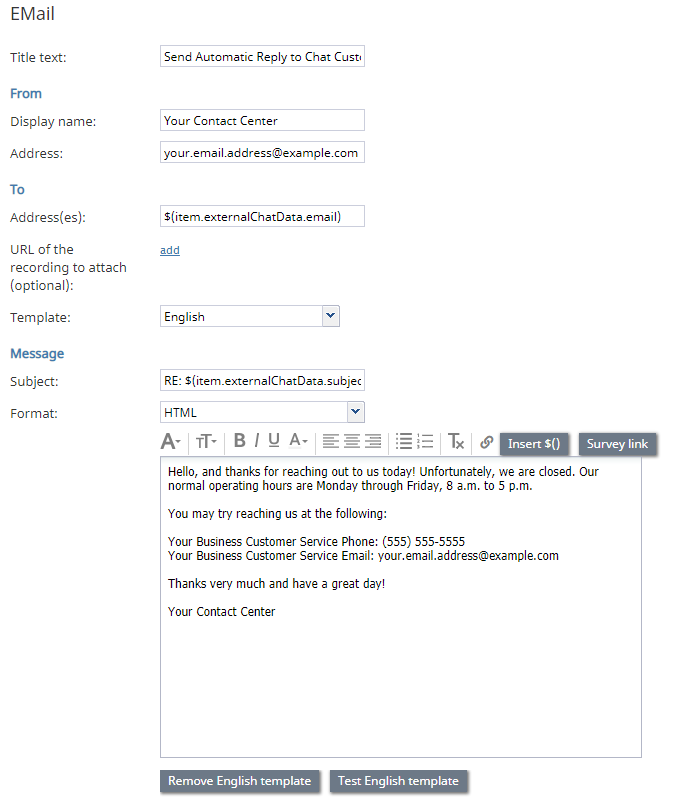
When configuring the EMail block, and to ensure the email populates with information the customer entered in the widget, use the variable $(item.externalChatData) where applicable.
The field names from the widget should be added to the end of the variable to pull the correct information, for example, if the widget's email field is named email, the variable would be $(item.externalChatData.email).
Action 4: Configure Find Agent / Connect Chat
If the chat is received during normal hours of operation, the customer will need to be connected to an agent. To do this, configure your scenario with the two most basic chat scenario blocks: Find Agent and Connect Chat. Find Agent is where the system finds the most appropriate agent to route the chat to; Connect Chat opens the chat channel between the found agent and the customer. All chat scenarios will contain the Find Agent block and Connect Chat block; note that they should be arranged in consecutive order.
For more information about these blocks, see How to Create a Basic Scenario. As a reminder, define all conditional exits.

