From Bright Pattern Documentation
(Created page with "<translate>= Assign the Integration to a Service = After your integration account is configured, you will need t...") |
(Updated via BpDeleteTranslateTags script) |
||
| (One intermediate revision by one other user not shown) | |||
| Line 1: | Line 1: | ||
| − | + | = Assign the Integration to a Service = | |
After your [[Twitter-integration-guide/Configuration/IntegrationAccount|integration account]] is configured, you will need to assign it to a configured [[Contact-center-administrator-guide/ServicesandCampaigns/ServicesandCampaignsOverview|chat service]] and configured [[Contact-center-administrator-guide/ScenarioEntries/MessagingChat|chat scenario entry]]. For more information, see ''Administration Tutorials'', section [[Tutorials-for-admins/Chat/ChatServiceConfiguration|Chat Service Configuration]]. | After your [[Twitter-integration-guide/Configuration/IntegrationAccount|integration account]] is configured, you will need to assign it to a configured [[Contact-center-administrator-guide/ServicesandCampaigns/ServicesandCampaignsOverview|chat service]] and configured [[Contact-center-administrator-guide/ScenarioEntries/MessagingChat|chat scenario entry]]. For more information, see ''Administration Tutorials'', section [[Tutorials-for-admins/Chat/ChatServiceConfiguration|Chat Service Configuration]]. | ||
Once the integration account is assigned to a service and scenario entry, you may [[#Test_the_Integration|test the integration]]. | Once the integration account is assigned to a service and scenario entry, you may [[#Test_the_Integration|test the integration]]. | ||
| − | == Steps == | + | == Steps == |
# In section ''Services & Campaigns > Properties tab'', select your Twitter integration for the setting [[Contact-center-administrator-guide/ServicesandCampaigns/PropertiesTab#Outbound_chat_accounts|Outbound chat accounts]].<br><br>[[File:Twitter-App-Creation-9-54.PNG|800px|thumb|center|Assign the integration to a chat service]]<br><br> | # In section ''Services & Campaigns > Properties tab'', select your Twitter integration for the setting [[Contact-center-administrator-guide/ServicesandCampaigns/PropertiesTab#Outbound_chat_accounts|Outbound chat accounts]].<br><br>[[File:Twitter-App-Creation-9-54.PNG|800px|thumb|center|Assign the integration to a chat service]]<br><br> | ||
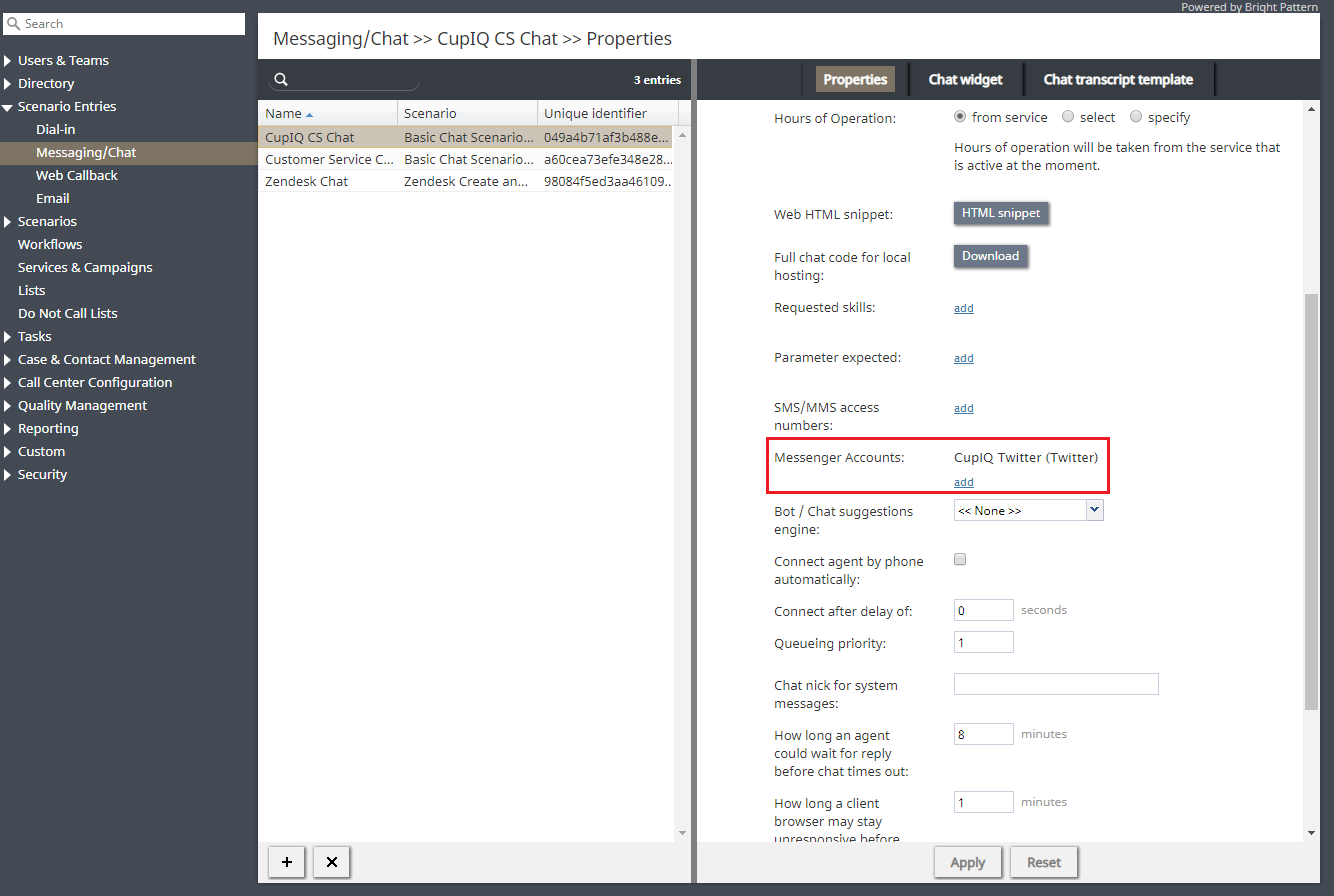
#Then, in section ''Scenario Entries > Messenger Accounts > Properties tab'', select your Twitter integration for the [[Contact-center-administrator-guide/ScenarioEntries/MessagingChat#Messenger_Accounts|Messenger Accounts]] setting.<br><br>[[File:Twitter-App-Creation-10-54.PNG|800px|thumb|center|Assign the integration account to a chat scenario entry]] | #Then, in section ''Scenario Entries > Messenger Accounts > Properties tab'', select your Twitter integration for the [[Contact-center-administrator-guide/ScenarioEntries/MessagingChat#Messenger_Accounts|Messenger Accounts]] setting.<br><br>[[File:Twitter-App-Creation-10-54.PNG|800px|thumb|center|Assign the integration account to a chat scenario entry]] | ||
| − | == Test the Integration == | + | == Test the Integration == |
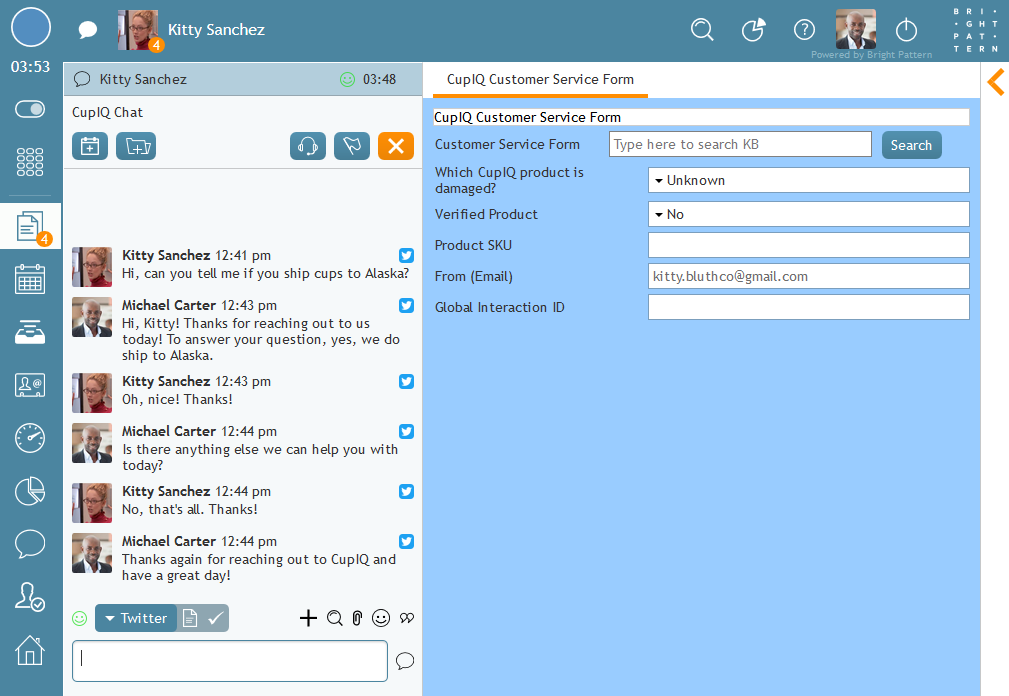
Using the [[Twitter-integration-guide/Prerequisites|separate regular Twitter account]] you created for test purposes, send a DM to your regular/developer Twitter account. In Agent Desktop, the Twitter DMs will arrive as chat messages and will have the Twitter logo next to each message in the interaction panel. Note that agents may switch between messenger types (e.g., SMS, MMS, Twitter) depending on the contact information available for a customer. | Using the [[Twitter-integration-guide/Prerequisites|separate regular Twitter account]] you created for test purposes, send a DM to your regular/developer Twitter account. In Agent Desktop, the Twitter DMs will arrive as chat messages and will have the Twitter logo next to each message in the interaction panel. Note that agents may switch between messenger types (e.g., SMS, MMS, Twitter) depending on the contact information available for a customer. | ||
[[File:Twitter-App-Creation-12-54.PNG|800px|thumb|center|DMs as they appear in Agent Desktop]] | [[File:Twitter-App-Creation-12-54.PNG|800px|thumb|center|DMs as they appear in Agent Desktop]] | ||
| − | |||
| − | |||
| − | |||
| − | |||
| − | |||
Latest revision as of 04:04, 29 May 2024
• 日本語
Assign the Integration to a Service
After your integration account is configured, you will need to assign it to a configured chat service and configured chat scenario entry. For more information, see Administration Tutorials, section Chat Service Configuration.
Once the integration account is assigned to a service and scenario entry, you may test the integration.
Steps
- In section Services & Campaigns > Properties tab, select your Twitter integration for the setting Outbound chat accounts.
- Then, in section Scenario Entries > Messenger Accounts > Properties tab, select your Twitter integration for the Messenger Accounts setting.
Test the Integration
Using the separate regular Twitter account you created for test purposes, send a DM to your regular/developer Twitter account. In Agent Desktop, the Twitter DMs will arrive as chat messages and will have the Twitter logo next to each message in the interaction panel. Note that agents may switch between messenger types (e.g., SMS, MMS, Twitter) depending on the contact information available for a customer.


