提供: Bright Pattern Documentation
(Created page with "= 自然言語理解の有効化 = 自然言語理解 (NLU) は、対話のセンチメントを特定するために使用されます。 センチメントは数字として...") |
|||
| (5 intermediate revisions by the same user not shown) | |||
| Line 2: | Line 2: | ||
自然言語理解 (NLU) は、対話のセンチメントを特定するために使用されます。 センチメントは数字として、または肯定的・中立・否定的な顔のアイコンとして表示されます。 数字でもアイコンでも、センチメントを使うと、対話進行中にお客様がどのように行動し、反応したかを分析でき、エージェント訓練を微調整できます。 | 自然言語理解 (NLU) は、対話のセンチメントを特定するために使用されます。 センチメントは数字として、または肯定的・中立・否定的な顔のアイコンとして表示されます。 数字でもアイコンでも、センチメントを使うと、対話進行中にお客様がどのように行動し、反応したかを分析でき、エージェント訓練を微調整できます。 | ||
| − | + | NLUの有効化は[[Contact-center-administrator-guide/CallCenterConfiguration/IntegrationAccounts/NaturalLanguageUnderstanding | コールセンターの設定 > 統合アカウント]]で行われます。音声とチャットの場合、統合アカウントはサービスごとに設定されます。メールの場合、統合アカウントはシナリオエントリーごとに設定されます。 センチメントの結果は、対話の [[QM/EvalHome/HowtoUseEvalSearch#sentiment | 検索条件]]として使用でき、[[QM/EvalHome/Search#Sentiment | 検索結果]]で表示されます。 | |
| − | + | ここではNLUを有効する方法について説明します。 | |
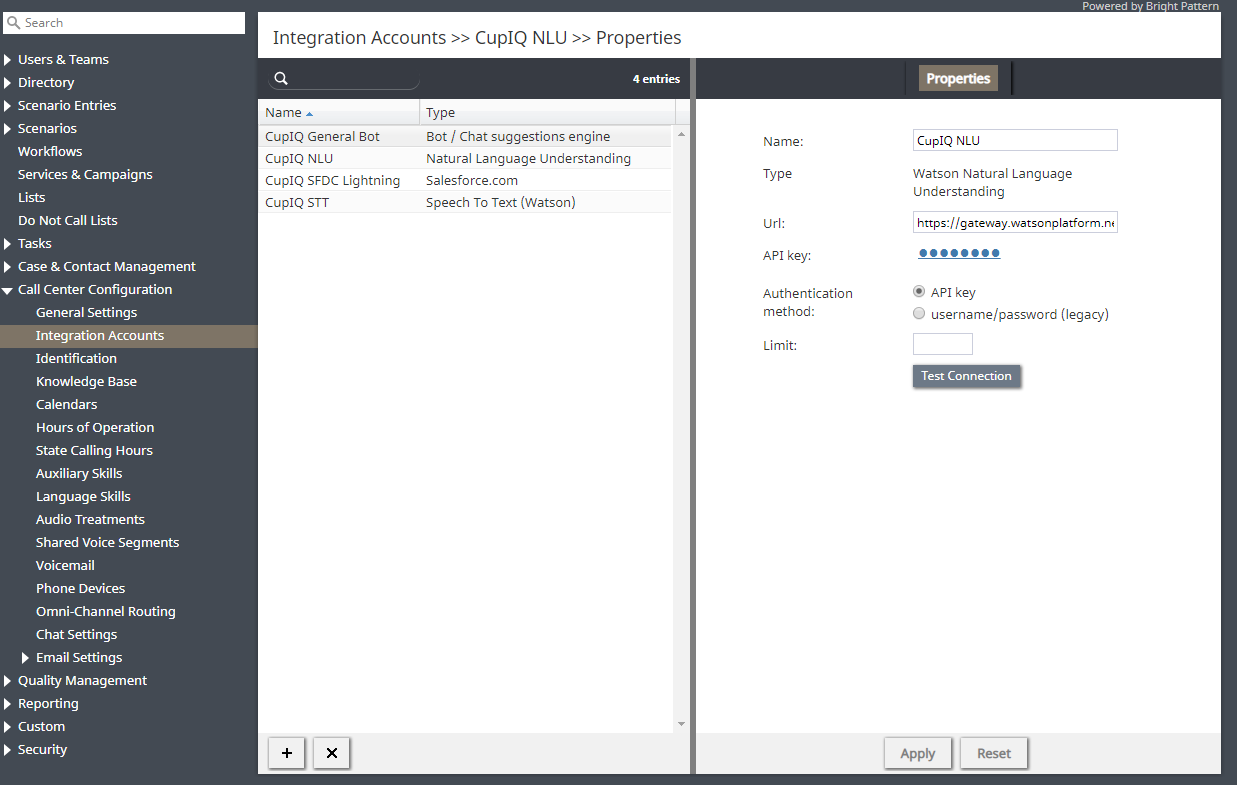
| − | [[File:QM-Config-8-54.PNG|center|thumb|800px| | + | [[File:QM-Config-8-54.PNG|center|thumb|800px|統合アカウントの設定プロパティ]] |
| − | == | + | == 手順 == |
| − | # | + | #コンタクトセンター管理者アプリケーションの''設定 > [[Contact-center-administrator-guide/CallCenterConfiguration/IntegrationAccounts/NaturalLanguageUnderstanding | コールセンターの設定 > 統合アカウント]]''へ移動します。<br /><br /> |
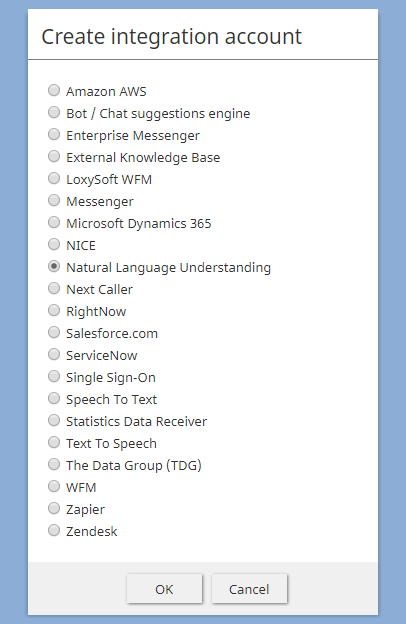
| − | # | + | # '''アカウントの追加''' (“'''+'''”) ボタンをクリックし、'''Watson 自然言語理解'''というアカウントタイプを選択します。<br /><br />[[File:NLU-Integration-5310.PNG|center|thumb|800px|NLUアカウントタイプの選択 ]]<br /><br /> |
| − | # | + | # ''プロパティ''で IBM Watson 自然言語理解APIの認証情報 (基本認証)を入力します。プロパティ詳細については、''コンタクトセンター管理者ガイド''の[[Contact-center-administrator-guide/CallCenterConfiguration/IntegrationAccounts/NaturalLanguageUnderstanding | 自然言語理解統合]]をご覧ください。<br /><br /> |
| − | # | + | # '''適用'''をクリックし、変更を保存します。<br /><br /> |
| − | # ''' | + | # ''' NLUを音声またはチャットサービスに使う場合:'''<br /><br /> |
| − | ## | + | ## コンタクトセンター管理者アプリケーションの''設定 > サービス & キャンペーン''へ移動し、リストから音声またはチャットサービスを選択します。<br /><br /> |
| − | ## | + | ## サービスの''プロパティ''で、'''自然言語理解'''のドロップダウンメニュから先ほど設定したNLU統合アカウントを選択します。<br /><br />[[File:NLU-Voice-Chat-5310.PNG|center|thumb|800px|正しいNLU統合アカウントが選択されたかどうかご確認ください]]<br /><br /> |
| − | ## | + | ## '''適用'''をクリックし、変更を保存します。<br /><br /> |
| − | # ''' | + | # '''NLUをメールサービスに使う場合 :'''<br /><br /> |
| − | ## | + | ## コンタクトセンター管理者アプリケーションの''設定 > シナリオエントリー > メール''へ移動し、リストからメールサービスを選択します<br /><br /> |
| − | ## | + | ##'''サービス'''タブをクリックします。<br /><br /> |
| − | ## | + | ## '''自然言語理解'''のドロップダウンメニュから先ほど設定したNLU統合アカウントを選択します。<br /><br />[[File:NLU-Email-5310.PNG|center|thumb|800px|正しいNLU統合アカウントが選択されたかどうかご確認ください]]<br /><br /> |
| − | ## | + | ## '''適用'''をクリックし、変更を保存します。<br /><br /> |
Latest revision as of 11:32, 19 February 2020
• English
自然言語理解の有効化
自然言語理解 (NLU) は、対話のセンチメントを特定するために使用されます。 センチメントは数字として、または肯定的・中立・否定的な顔のアイコンとして表示されます。 数字でもアイコンでも、センチメントを使うと、対話進行中にお客様がどのように行動し、反応したかを分析でき、エージェント訓練を微調整できます。
NLUの有効化は コールセンターの設定 > 統合アカウントで行われます。音声とチャットの場合、統合アカウントはサービスごとに設定されます。メールの場合、統合アカウントはシナリオエントリーごとに設定されます。 センチメントの結果は、対話の 検索条件として使用でき、 検索結果で表示されます。
ここではNLUを有効する方法について説明します。
手順
- コンタクトセンター管理者アプリケーションの設定 > コールセンターの設定 > 統合アカウントへ移動します。
- アカウントの追加 (“+”) ボタンをクリックし、Watson 自然言語理解というアカウントタイプを選択します。
- プロパティで IBM Watson 自然言語理解APIの認証情報 (基本認証)を入力します。プロパティ詳細については、コンタクトセンター管理者ガイドの 自然言語理解統合をご覧ください。
- 適用をクリックし、変更を保存します。
- NLUを音声またはチャットサービスに使う場合:
- コンタクトセンター管理者アプリケーションの設定 > サービス & キャンペーンへ移動し、リストから音声またはチャットサービスを選択します。
- サービスのプロパティで、自然言語理解のドロップダウンメニュから先ほど設定したNLU統合アカウントを選択します。
- 適用をクリックし、変更を保存します。
- コンタクトセンター管理者アプリケーションの設定 > サービス & キャンペーンへ移動し、リストから音声またはチャットサービスを選択します。
- NLUをメールサービスに使う場合 :


