ウェブチャットの設定
この手順では、チャットシナリオ、チャットサービス、およびチャットシナリオエントリーポイントが連携してウェブサイトでチャットウィジェットを表示するための設定方法について説明します。この操作を完了させると、ウェブページでお客様をコンタクトセンターに接続するチャットウィジェットが利用可能になります。
ステップ 1: チャットシナリオw作成または選択します。
- 設定 > シナリオ > チャットへ移動します。
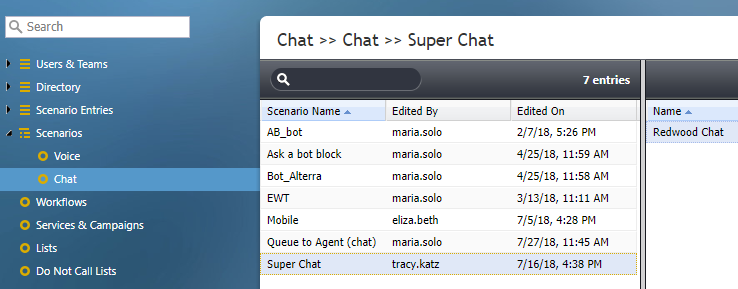
設定 > シナリオ > チャット - リストから既存のチャットシナリオを選択するか、画面の下部にある テンプレートから追加
 ボタンをクリックして、“モバイルチャット“テンプレートから新しいチャットシナリオを作成します。
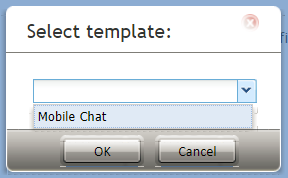
"モバイルチャット"テンプレートを選択します。 - テンプレートから新しいチャットシナリオを作成すると、新しいブラウザタブまたはウィンドウでシナリオビルダーアプリケーションが開きます。設定を複雑にしないために、シナリオをそのままにして、 保存 をクリックします。

シナリオに名前を付けます。 - シナリオにユニークな名前(例:"Super Chat")を付け、保存をクリックします。新しいシナリオは シナリオリストに表示されます。


ステップ2: チャットサービスを作成または選択します。
- 設定 > サービス & キャンペーンへ移動し、チャットシナリオと一緒に使うチャットサービスを選択します。
- 既存の“チャット”サービスがない場合、新しく作ってください。
チャットサービスの追加方法
- サービス追加ボタンをクリックし、チャットを選択します。
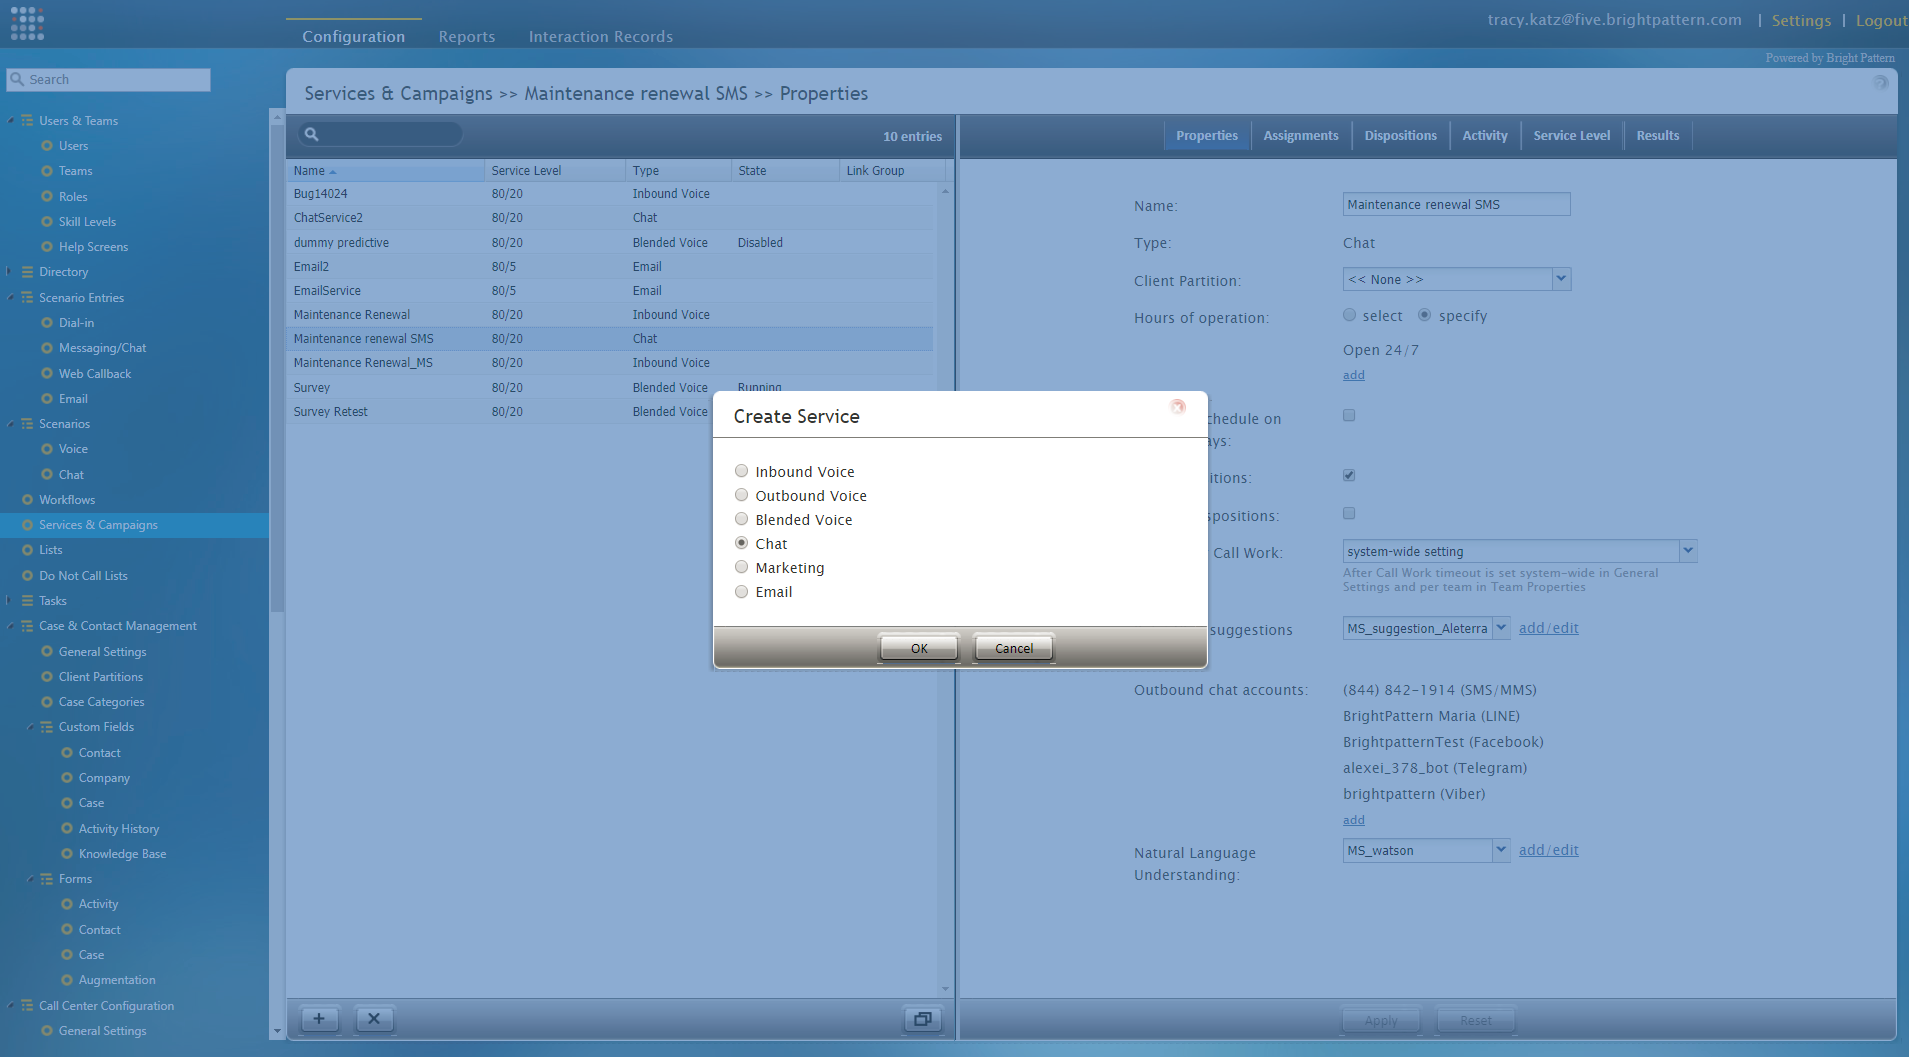
"チャット"サービスの選択 - プロパティタブでは、必要に応じてサービスプロパティを指定し、適用をクリックします。
- 少なくとも新しいチャットサービスに名前を付けてください(例:"Pacific Chat")。各プロパティの定義については、コンタクトセンター管理者ガイドのプロパティタブをご覧ください。
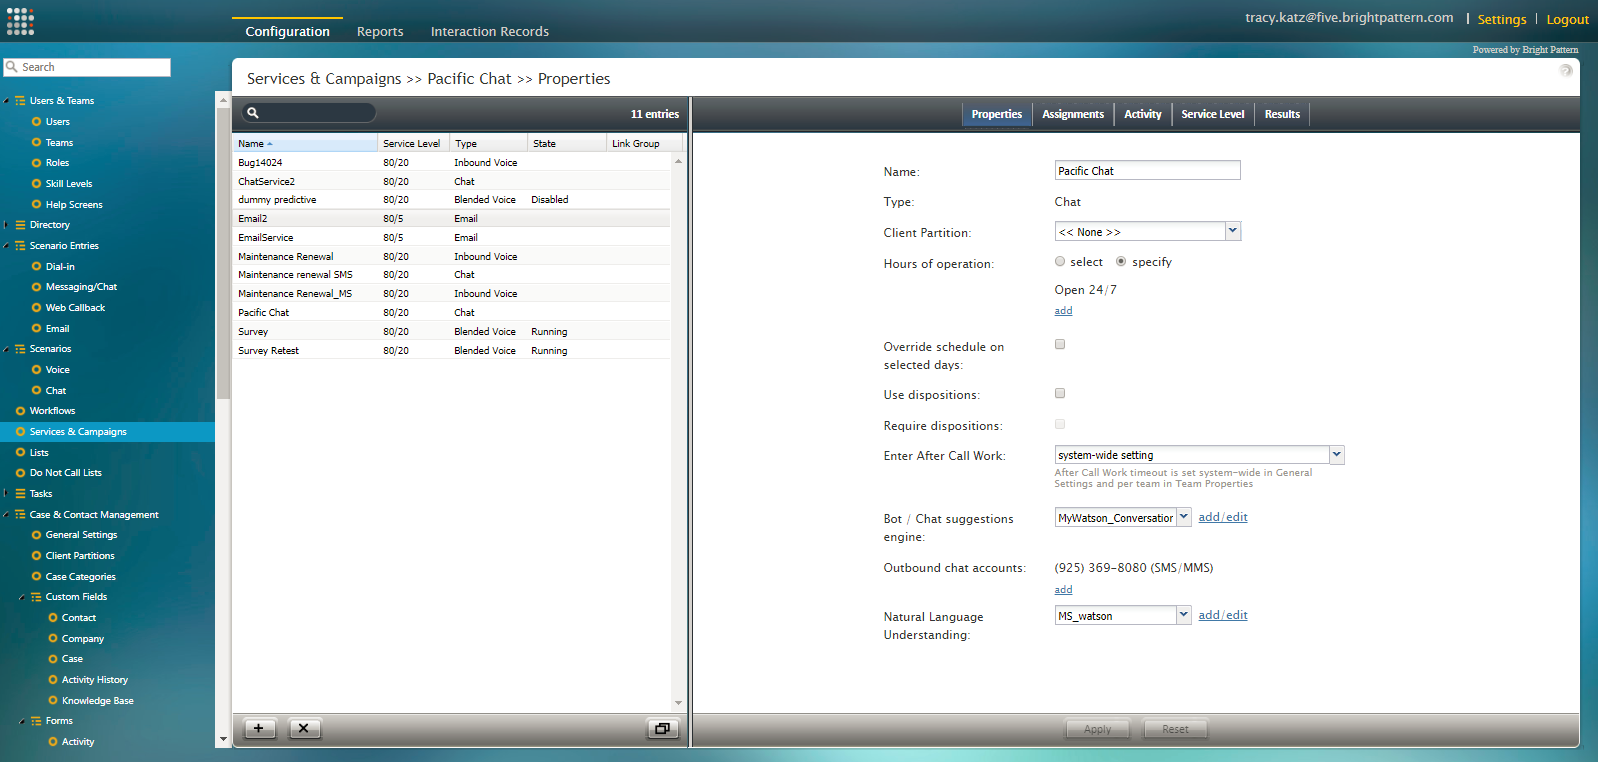
サービス & キャンペーン > プロパティ - 次に、サービスにチーム・管理者・レビュアー を割り当てます (オプション)。この操作を割り当てタブで行います。
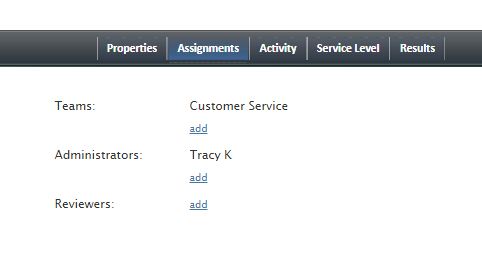
サービスにチームと管理者を割り当てます。


ステップ3: チャットシナリオエントリーを作成または選択します。
- 設定 > シナリオエントリー > メッセージ送信/チャット へ移動し、チャットシナリオと一緒に使うシナリオエントリーポイントを選択します。エントリーポイントとは、シナリオを開始するものです。

メッセージ送信/チャットシナリオエントリーリスト - 既存のチャットシナリオエントリーが表示されない場合、新しいチャットシナリオエントリーを作ります。

新しいチャットシナリオエントリーの追加方法
- チャットシナリオエントリーの追加ボタンをクリックします。
- プロパティタブでは、必要なプロパティを指定します(必須と任意プロパティについて以下を参照)。各プロパティの定義については、コンタクトセンター管理者ガイドのメッセージ送信/チャットをご覧ください。
必須プロパティ
プロパティタブで、次のフィールドにすぐにアクセスします。これらは、チャット設定プロセスに不可欠です。

- 名前:チャットシナリオエントリーのユニークな名前です (例: "Redwood Chat")
- ユニークな識別子 :チャットエントリーを識別する自動生成の長い文字列 (例:"1f03f4090e4b4ffe8bb55365812e7a06")
- シナリオ:この手順のステップ1で選択または作成されたチャットシナリオを選択します(例: "Super Chat")。このプロパティは、チャットを可能にするのに必要な要素を集めます。
- サービス :この手順のステップ2で選択または作成されたチャットサービスを選択します(例: "Pacific Chat")。このプロパティは、チャットを可能にするのに必要な要素を集めます。
その他プロパティ
その他のプロパティは任意です。後でも入力できます。
- 音声コールバックの既定サービス - エージェントが電話をかける必要がある場合、音声サービスを選択します (注: 音声サービスでなければなりません)。
- 特定コンタクトを対象とするセッションの統合 - このチェックボックスを選択することによって、オムニチャネル機能が利用可能になります (つまり、認識されたフェイスブックメッセンジャーのチャットセッションまたは電話番号が統合できます)。
- Web HTML スニペット - 全てのプロパティ設定を完了・保存してからこのボタンを使います。HTMLスニペットは、チャットが利用できるためにウェブページに埋め込むものです。
- ローカルホスティング用の完全チャットコード - チャットをカスタマイズしウェブサイトでホスティングする場合、このオプションをクリックします。Bright Patternは、 Bright Patternチャットと統合しないウェブサイトを運営するお客様に対してこのコードを提供します。
- 必要なスキル - エージェントがチャットを受け入れるために必要な補助スキルを意味します。
- SMS/MMSアクセス番号 - SMS/MMSメッセージを送受信するのに使う電話番号を意味します。このアカウントで受信されるメッセージは、チャットシナリオを開始します。このアカウントが選択されていない場合、シナリオはウェブチャットとなります。
- メッセンジャーアカウント - 顧客との間でメッセージの送受信に使用されるソーシャルメッセンジャーアカウントを意味します。このアカウントで受信されるメッセージは、チャットシナリオを開始します。メッセンジャーアカウントを使用するには、貴社のコンタクトセンターでメッセンジャーと統合するアカウントを設定する必要があります。このようなアカウントが選択されていない場合、シナリオはウェブチャットとなります。
- ボット/ チャットのサジェスト機能エンジン - チャット中にエージェントに対して返信文の候補を提供するエンジンを意味します。ボット/チャットのサジェスト機能エンジンを使用するには、貴社のコンタクトセンターで統合アカウントを設定する必要があります。
- 電話の自動接続 - このオプションを選択すると、お客様が送信した電話番号への自動接続が可能になります。選択しないと、エージェントは電話をかける前に電話番号を手動で入力します。
- 接続するまでの時間 - 上記の「電話の自動接続」を選択することによって、エージェントとお客様との接続を延長できます(秒単位)。
- 優先キューイング - キューイングを行う際の顧客優先度を意味します (例えば、“1” は優先度が高く、 “3”は優先度が低いなど)。発信者の優先度を変更する必要がない限り、キューイングの優先度を初期のままにします。
- システムメッセージ専用のチャットニックネーム - チャット内でお客様へ送信されるシステムメッセージと一緒に表示されるシナリオエントリー名を意味します (例えば、“Redwood カスタマーサービスはチャットに追加されました!”)
- チャットがタイムアウトするまでエージェントが返信を待つ時間 - セッションがタイムアウトになるまでの返信待ち時間(分単位)を意味します。
- チャットがタイムアウトするまでブラウザーの無応答状態が続く時間 - セッションがタイムアウトするまでブラウザの無応答状態が続く時間を意味します(分単位)。ご注意: 接続が悪い環境にいる場合、タイムアウトの時間を延長することができます。
- エージェントディレクトリに表示 - このチェックボックスが選択されている場合、当該のシナリオエントリーは新しいチャットセッションおよびチャット転送のエントリーとして表示されます (つまり、エージェントはチャットを別のサービスから受信できます)。これらのサービスは、ディレクトリフォルダーに追加されます。
- シナリオパラメータ - このセクションは廃止予定です。
- チャットセッションアイコン - シナリオエントリーに画像のアップロードを可能にするプロパティです (その場合、チャットウィジェットのエージェントの画像が上書きされます)。このプロパティは廃止予定です。チャットセッションアイコンは、チャットウィジェット設定に追加できます。チャットウィジェットタブ > チャットスタイル > エージェント画像の表示をご覧ください。
ステップ 4: チャットウィジェットスタイルを編集します。
チャットウィジェットの外観(色、フォントサイズ、位置など)を編集するには、チャットスタイルをご覧ください。必ずこの操作を行って下さい。そうしないと、コンタクトタブ (ステップ5参照)がプレビューモードで表示できません。
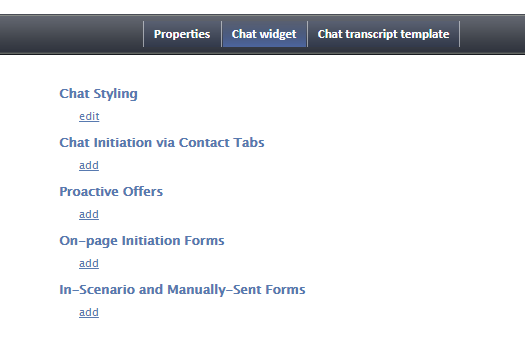
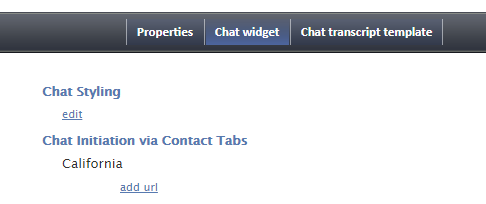
- チャットウィジェット タブをクリックします。
- チャットスタイルの下にある編集をクリックします。
チャットスタイル > 編集 - チャットウィジェット設定エディタは新しいブラウザタブまたはウィンドウで開きます。チャットウィジェットスタイルプロパティ とフィールドを編集します。最も基本的な設定として、現状のままにし、変更を保存できます。後で再設定が可能です。
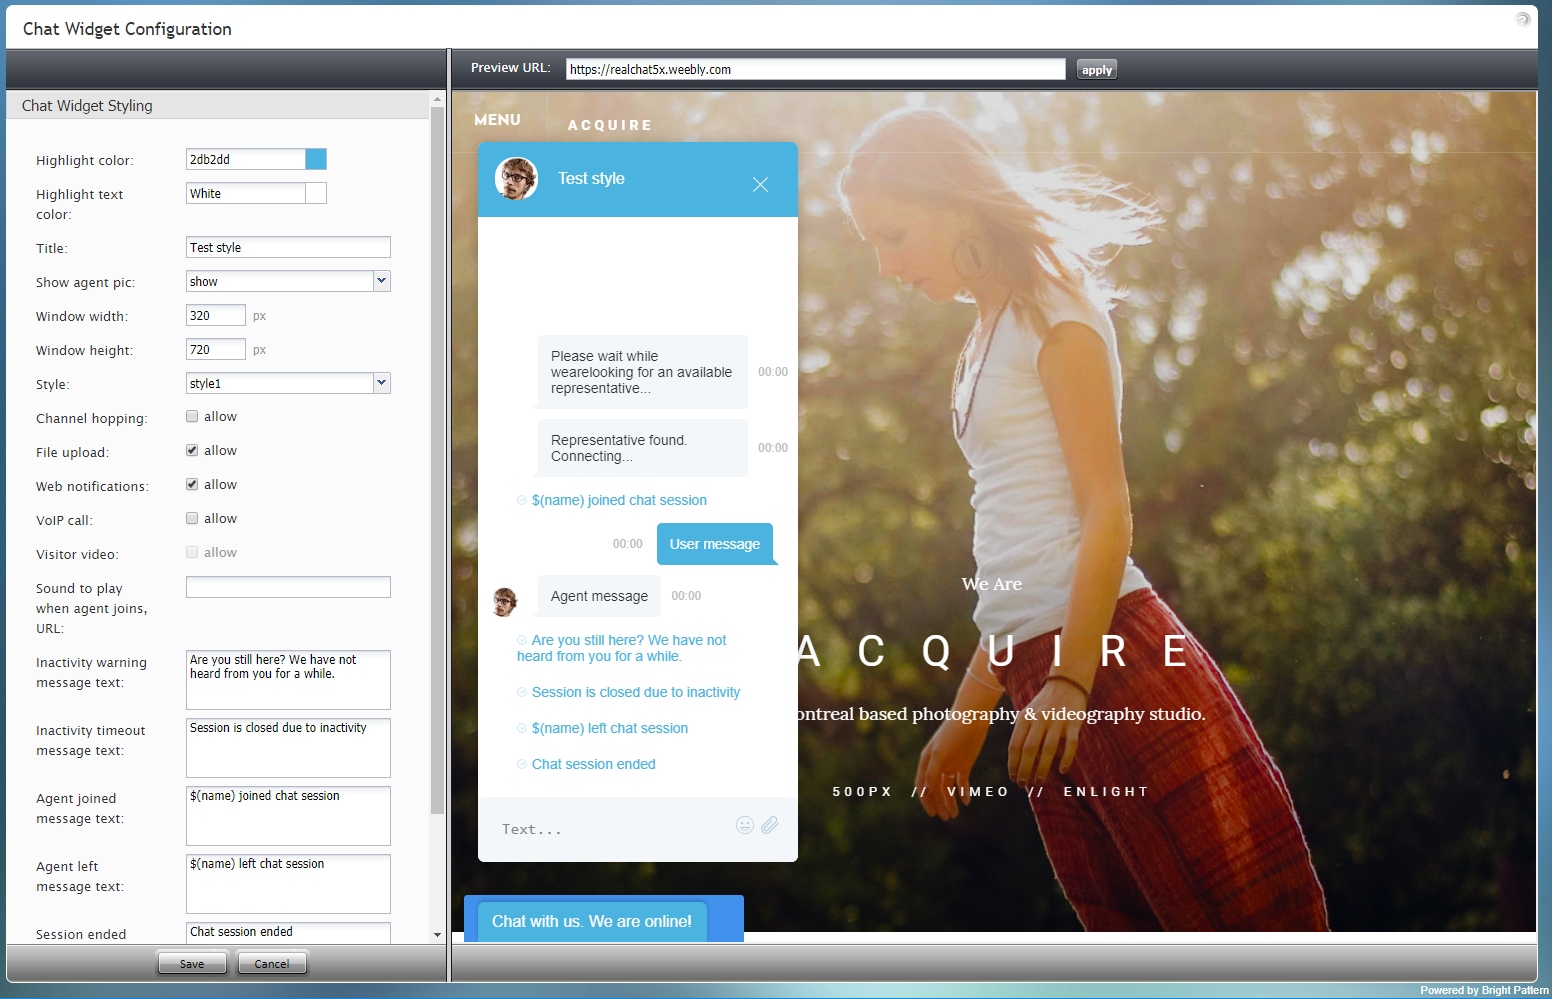
新しいブラウザタブ/ウィンドウで開くチャットウィジェット設定エディター - 画面の下にある保存をクリックします。


ステップ 5: 問い合わせタブを追加します。
このチャットシナリオエントリーを有効にするには、問い合わせタブをチャットウィジェットに追加します。そうしないと、ウェブページにはチャットウィジェットが表示されません。
- チャットウィジェットタブをクリックします。
- 問い合わせタブを使用してチャット開始の下にある追加をクリックします。
新しい問い合わせタブの追加 - チャットウィジェット設定エディタは新しいブラウザタブまたはウィンドウで開きます。必要に応じてプロパティ およびフィールドを変更します。
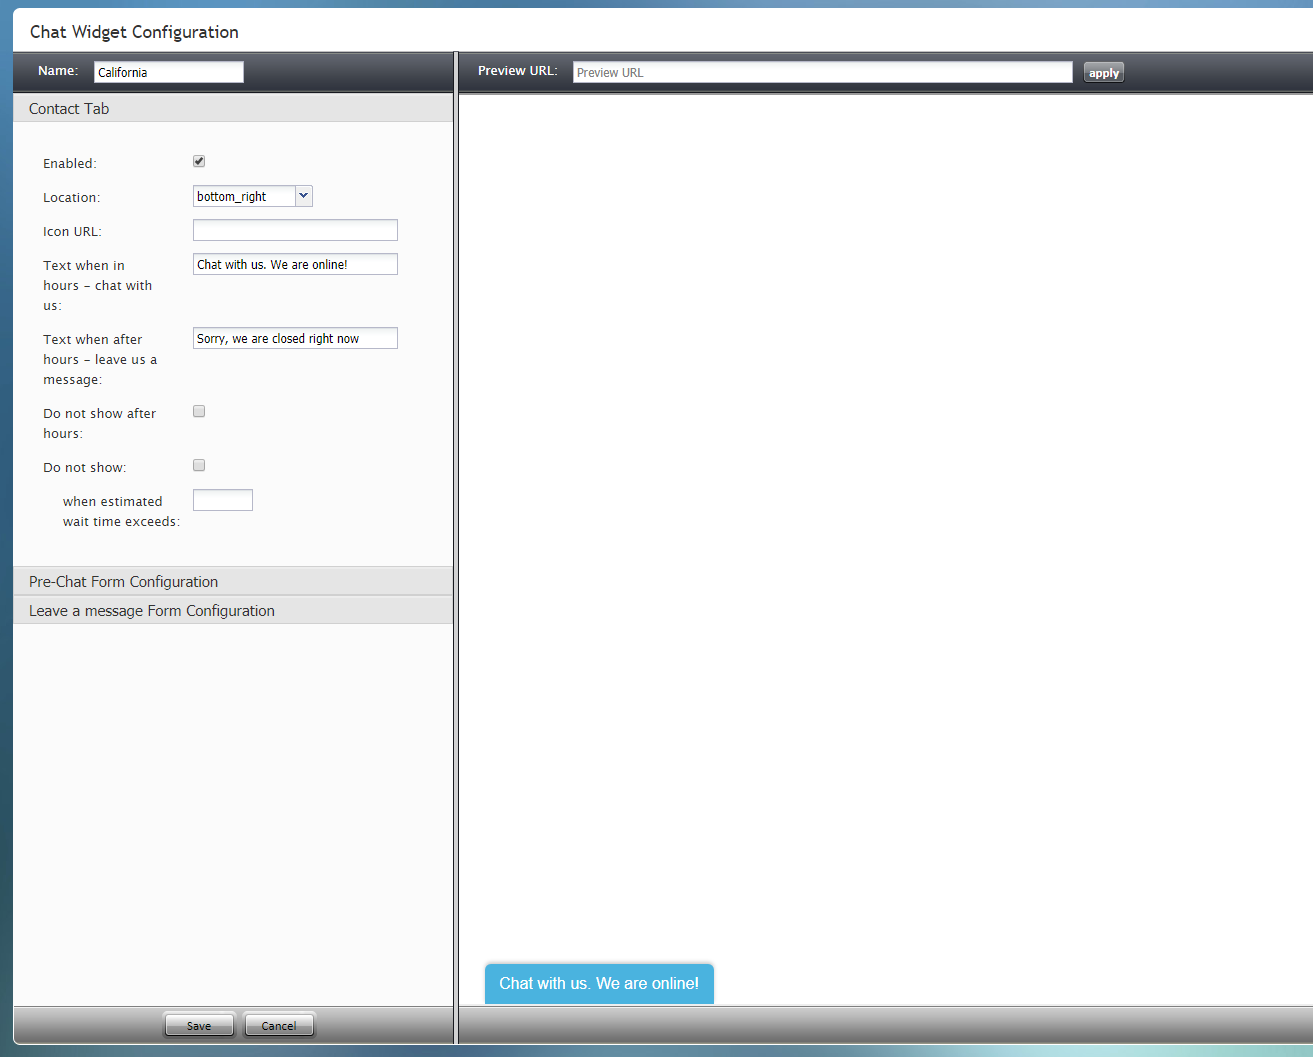
新しいブラウザタブ/ウィンドウで開くチャットウィジェット設定エディター - オプション: ウェブページでの問い合わせタブのプレビューを表示するには、URLプレビュー フィールドにURLを入力して適用をクリックします。問い合わせタブが表示されたウェブページと、コンテンツの表示について確認メッセージが表示されます。
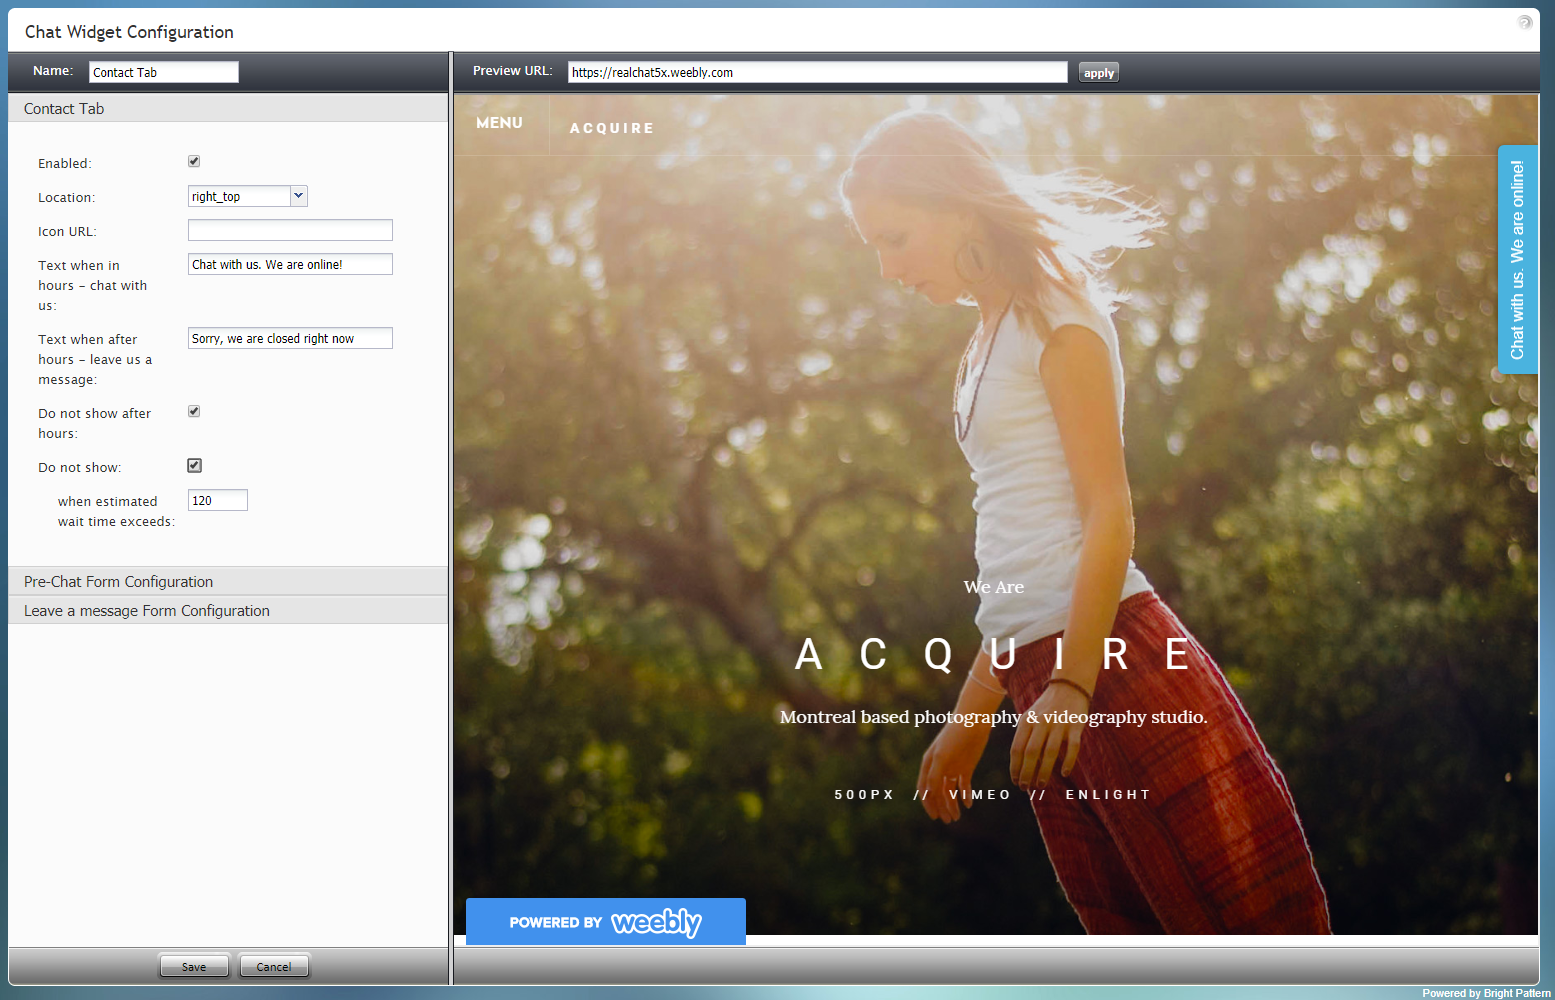
URLプレビュー例にはウェブページが表示されますが、チャットウィジェットが表示されません。
一部のウェブサイトは、別のサイトに不正に埋め込まれないように保護されています。その場合、 “チャットウィジェットが見つかりません!” という赤い文字のメッセージが表示されます。ウェブページを表示せず問い合わせタブのみをプレビューするには、URLプレビューフィールドを空白のままにします。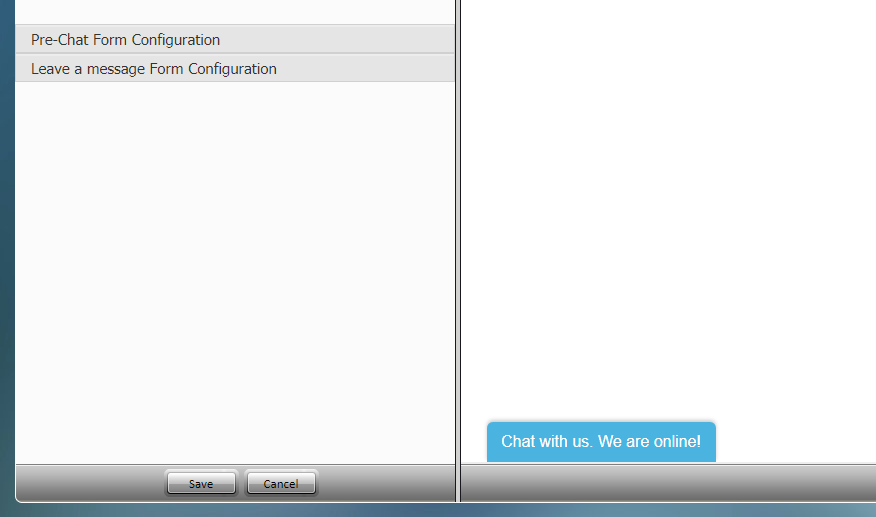
フィールドが空白である場合、URLプレビューでウェブページのコンテンツが表示されません。 - 必須項目: 少なくとも、以下の操作が必要です:
* 名前 - 新しい問い合わせタブにユニークな名前を付けます。
* 保存 -クリックし、変更を保存します。 - チャットウィジェット タブに戻り、 問い合わせタブを使用してチャット開始へ進みます。
- 先ほど追加した問い合わせタブに下にあるurlの追加をクリックします。
ウェブページのURLを必ず追加します。 - ポート・ドメイン・プロトコルを除いてルートに関連するパスを入力します。例えば、 https://mysite.com:8443/folder/folder/page.htmlの場合、 /folderまたは /folder/folder または/folder/folder/page.htmlを入力できます。 緑色のチェックマークをクリックし、変更を確定します。
- オプション: この時点で、他のチャットウィジェットタブセクションを追加または変更できます。後でも変更が可能です。
- 画面の下にある適用をクリックし、変更を保存します。


ステップ 6: HTMLを取得します。
- プロパティタブ > Web HTML スニペットへ戻ります。
- HTMLスニペット ボタンをクリックします。HTMLスニペットとは、先ほど設定したチャットウィジェットのコードを意味します。

プロパティタブの"HTMLスニペット"をクリックします。 - Webページ専用のHTML スニペットダイアログボックスが表示されます。
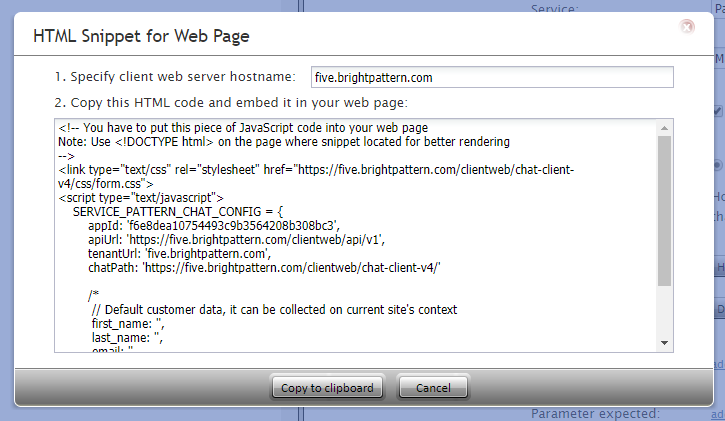
Webページ専用のHTMLスニペットダイアログボックス。 - クライアントWebサーバーホスト名を指定しますというフィールドに、貴社のコンタクトセンター名(例えば、 “five.brightpattern.com”)を入力します。コンタクトセンター名が分からない場合、コンタクトセンター管理者アプリケーションのURLをウェブブラウザでご確認ください。 “/admin”の前に並べてある文字は、ホストネームです。

ブラウザアドレスフィールドで表示されるクライアントWebサーバーホストネームの例。 - クリップボードにコピーをクリックし、HTMLをコピーします。これは、チャットウィジェットのコードになります。
- ウェブページに適切な場所にHTMLを貼り付け、公開します。チャットウィジェットコンタクトタブ (およびチャットウィジェットに追加したエレメント)は、ページに表示されます。
ウェブページでのチャットウィジェット。


ウェブページにあるコンタクトタブをクリックすると、ウィジェットが展開表示されます。

ページにはチャットウィジェットが表示されない場合、この手順の全てのステップを再確認してやり直してください。
チャットウィジェット設定に関する詳しい情報は、チャットウィジェット設定ガイドをご覧ください。
チャットウィジェットの自動開始
ウェブページの読み込み中にチャットセッションを自動的に開始するには、チャットウィジェットの設定が必要です。その設定を行うことによって、ウィジェットを開始する手間が省きます。ウェブページがロードされたら、チャットはエージェントまたはキューに自動的に接続します。
以下のステップに従って設定を行います。
- Webページ専用のHTMLスニペットを開きます。
- コピーされたHTMLをテキスト編集アプリケーション (例えば、 Notepad++) に貼り付け、編集します。
- "Service Pattern Chat Config" オブジェクトに、 true値に属するautostartChatを追加します。既定値が falseです。
- 全てをコピーし、ウェブページに編集されたHTMLを貼り付けます。
- ウェブページを公開し、アクティブなチャットを更新します。
ウェブページ専用のHTMLスニペットの例は以下の通りです。
SERVICE_PATTERN_CHAT_CONFIG = {
        ...
        autostartChat: true,
        ...
};