(Created page with "== ステップ2: Webhookを許可する == LINE@ アカウントのMessaging APIを有効にしてから、Webhookを有効にする必要があります。Enabling webhooks...") |
(Created page with "LINEは以下のオプション設定を提供します: * ''ボットをグループチャットに参加させる:'' Bright Pattern LINE インテグレーションは現在...") |
||
| Line 26: | Line 26: | ||
# ''リクエストの設定''の “Webhookを利用する” において'''許可する''' をクリックしてください。LINEユーザからのメッセージが受信できるため、必ず上記の設定を行ってください。 | # ''リクエストの設定''の “Webhookを利用する” において'''許可する''' をクリックしてください。LINEユーザからのメッセージが受信できるため、必ず上記の設定を行ってください。 | ||
| − | + | LINEは以下のオプション設定を提供します: | |
| − | * '' | + | * ''ボットをグループチャットに参加させる:'' Bright Pattern LINE インテグレーションは現在、グループチャットをサポートしていません。 '''参加させる'''を選択しても、ボットがグループチャットに参加できませんので、ご了承ください。 |
| − | * '' | + | * ''自動応答メッセージ:'' このオプションは、LINEユーザがインテグレーションアカウントシナリオからのチャットメッセージのみを受信できるように、 '''許可しない'''に設定するか、削除しなければなりません 。 |
| − | * '' | + | * ''グリーティングメッセージ:'' このオプションは、LINEユーザに送信されるカスタマイズされたグリーティングメッセージがシナリオでのみ設定できるように、 '''許可しない'''に設定するか、削除しなければなりません 。 |
Revision as of 13:10, 28 July 2018
統合構成
==ステップ1:ビジネスのLINE @アカウントにサインインし、メMessaging APIを有効にします。
==
LINEをビジネスで利用するには、登録済みのLINE @アカウントが必要です。
LINE@ アカウントをお持ちでない場合, アカウントを作成し、Messaging APIを有効にしてください:
- LINEビジネスセンター > サービスへ進み, サービスメニュから Messaging API を選択してください。
- Messaging APIを利用するを選択してください。
- LINE@ アカウントの情報を入力し、確定してください。
- 確定ページの最下部にある LINE@ MANAGER ボタンをクリックすると、 LINE@ Managerボット設定ページへ移動します。
- ボット設定ページの APIを有効にするをクリックしてください。
LINE@ アカウントを既にお持ちの場合, LINE@ アカウントのMessaging APIを有効にしてください:
- LINE ビジネスセンター へ進み、LINE@ アカウントページをご確認ください。
- ページの最下部にある Messaging APIを利用する ボタンをクリックし、ご利用条件に同意してから OKをクリックしてください。
- 確定ページの最下部にあるLINE@ MANAGER ボタンをクリックすると, LINE@ Manager ボット設定ページへ移動します。
- ボット設定 ページの APIを有効にするをクリックしてください。
上記の手順は、 LINE Developersページでもご覧いただけます。
ステップ2: Webhookを許可する
LINE@ アカウントのMessaging APIを有効にしてから、Webhookを有効にする必要があります。Enabling webhooks for your LINE@ account on the LINE@ ManagerにおけるLINE@ アカウントのWebhookを有効にすると、 LINE ユーザーからのメッセージが受信できます。
- LINE@ Manager のサイドメニュより 設定 > ボット設定へ進んでください。
- リクエストの設定の “Webhookを利用する” において許可する をクリックしてください。LINEユーザからのメッセージが受信できるため、必ず上記の設定を行ってください。
LINEは以下のオプション設定を提供します:
- ボットをグループチャットに参加させる: Bright Pattern LINE インテグレーションは現在、グループチャットをサポートしていません。 参加させるを選択しても、ボットがグループチャットに参加できませんので、ご了承ください。
- 自動応答メッセージ: このオプションは、LINEユーザがインテグレーションアカウントシナリオからのチャットメッセージのみを受信できるように、 許可しないに設定するか、削除しなければなりません 。
- グリーティングメッセージ: このオプションは、LINEユーザに送信されるカスタマイズされたグリーティングメッセージがシナリオでのみ設定できるように、 許可しないに設定するか、削除しなければなりません 。
Step 3: Get a Channel access token and set a webhook URL on the Channel Console.
Your bot application requires a Channel access token to call APIs, along with a webhook URL to receive webhook payloads. Channel access tokens are issued from LINE’s Channel Console. The webhook URL is the endpoint of your bot application’s server where webhook payloads are sent.
- In the LINE Business Center, go to your LINE@ account page.
- In the Messaging API section, select the LINE Developers button to go to the Channel Console.
- To issue a Channel access token for accessing APIs, click ISSUE for the “Channel access token” item.
- Click EDIT and set a webhook URL for your Channel.
Note the following:
For troubleshooting purposes, you should verify that the webhook is set properly by using the Verify button. (See Step 5 of this procedure, after the integration account is added.)
The webhook URL must refer to the BP client web server used by the contact center in the following form:
https://<host name>/clientweb/line/webhook/<url-encoded access token>
The host name is the host name of the BP client web server used by your contact center.
Step 4: Create a new integration account in Contact Center Administrator.
- Log in as Admin to the Contact Center Administrator application.
- Navigate to Configuration > Integration Accounts.
- Click the Add "+" button to add a new account.
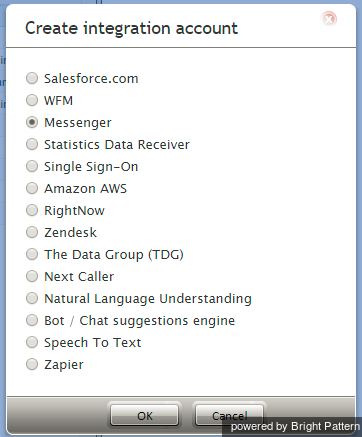
- In the Create integration account window that appears, select Messenger and click OK.
Step 5: Specify LINE integration account properties.
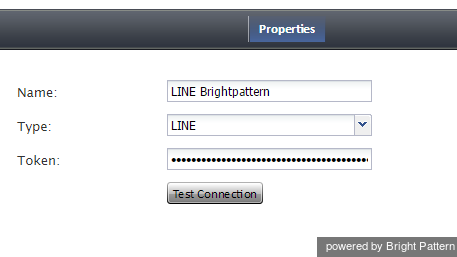
Using the credentials for your LINE@ account, enter values for the following screen properties. (If you do not know your credentials, ask your system administrator.)
- Name - The name of your integration account (this does not need to be your LINE@ account name)
- Type - For this integration account, select LINE as the type of integration.
- Token - The access token for your LINE@ account
- Test Connection - This button tests the credentials and confirms whether the connection is valid.
Click Apply to save your changes.
Your integration account is now configured for LINE. Next, you can do a real test of your connection by setting up a messenger chat scenario and responding to chat interactions from within the Agent Desktop application.


