(Created page with "このシナリオでは、お客様が内線番号へ直接かけるオプション(つまり、"自動アテンダント")を使って基本的なスキルベースル...") |
(Created page with "=== アクション4:電話を接続します。=== エージェントが見つかった後、電話は電話の接続 ブロ...") |
||
| (30 intermediate revisions by the same user not shown) | |||
| Line 1: | Line 1: | ||
| − | = | + | = 自動応答とスキルベースのコールルーティング= |
Bright Patternコンタクトセンターでは、''スキル''とはコンタクトセンター管理者アプリケーションで定義できるユーザーの様々な能力です。スキルは、コンタクトセンターに関連するトピックまたは言語(例えば、経理、アラビア語、ITなど)として定義できます。スキルの評価については、 [[Contact-center-administrator-guide/UsersandTeams/SkillLevels|スキルレベル]]をご覧ください。スキルはユーザごとに 0 から 100まで評価されます (つまり、0は最低レベル、100は最高レベルを意味します)。さらに、スキルが[[Contact-center-administrator-guide/ServicesandCampaigns/AssignmentsTab|サービスまたはキャンペーン]]に基づいて付与されます。 | Bright Patternコンタクトセンターでは、''スキル''とはコンタクトセンター管理者アプリケーションで定義できるユーザーの様々な能力です。スキルは、コンタクトセンターに関連するトピックまたは言語(例えば、経理、アラビア語、ITなど)として定義できます。スキルの評価については、 [[Contact-center-administrator-guide/UsersandTeams/SkillLevels|スキルレベル]]をご覧ください。スキルはユーザごとに 0 から 100まで評価されます (つまり、0は最低レベル、100は最高レベルを意味します)。さらに、スキルが[[Contact-center-administrator-guide/ServicesandCampaigns/AssignmentsTab|サービスまたはキャンペーン]]に基づいて付与されます。 | ||
シナリオを通して、スキルレベルの低いエージェントではなく、スキルレベルの高いエージェントに対話をルーティングできます。これにより、お客様は知識レベルが最も高いエージェントとやり取りでき、最高のカスタマーサービスを体験いただけます。さらに、スキルベースのルーティングは、スキルレベルが低い新入社員のトレーニングに役立てます。そのおかげで、新入社員は対話の処理に圧倒されることなく、練習できます。 | シナリオを通して、スキルレベルの低いエージェントではなく、スキルレベルの高いエージェントに対話をルーティングできます。これにより、お客様は知識レベルが最も高いエージェントとやり取りでき、最高のカスタマーサービスを体験いただけます。さらに、スキルベースのルーティングは、スキルレベルが低い新入社員のトレーニングに役立てます。そのおかげで、新入社員は対話の処理に圧倒されることなく、練習できます。 | ||
| − | + | このシナリオでは、お客様が内線番号を直接ダイヤルできるオプション(つまり、"自動応答")を使って基本的なスキルベースルーティングを設定する方法について詳しく説明します。この例で使用されるスキルは | |
[[Contact-center-administrator-guide/CallCenterConfiguration/AuxiliarySkills|補助スキル]]ですが、 [[Contact-center-administrator-guide/CallCenterConfiguration/LanguageSkills|言語スキル]]に変更できます (例えば、コンタクトセンターは英語・フランス語・スペイン語でサービスを提供する場合)。 | [[Contact-center-administrator-guide/CallCenterConfiguration/AuxiliarySkills|補助スキル]]ですが、 [[Contact-center-administrator-guide/CallCenterConfiguration/LanguageSkills|言語スキル]]に変更できます (例えば、コンタクトセンターは英語・フランス語・スペイン語でサービスを提供する場合)。 | ||
| − | == | + | == シナリオの例 == |
| − | ''' | + | '''このチャットシナリオの例(コメント付バージョン)をダウンロードするには、次のリンクをクリックしてください。'''<br> |
[[File:App_Skill-Based_Call_Routing_%2B_Auto_Attendant.zip]] | [[File:App_Skill-Based_Call_Routing_%2B_Auto_Attendant.zip]] | ||
| − | + | このファイルをコンタクトセンターにインポートする方法については、''コンタクトセンター管理者ガイド''の | |
| + | [[Contact-center-administrator-guide/ScenariosOverview#How_to_Export_and_Import_Scenarios|シナリオ概要 > シナリオのエクスポートとインポート]]をご覧ください。 | ||
| − | + | シナリオに関する一般情報については、 [[Scenario-builder-reference-guide/ScenarioBuilderOverview|シナリオビルダー概要]]をご覧ください。 | |
| − | == | + | == シナリオフロー == |
| − | + | この音声シナリオは、メニューを使ってお客様を熟練したエージェントにルーティングし、特定のエージェントの内線番号を直接ダイヤルするオプションが含まれています。このシナリオには以下のブロックが必要です: | |
| + | [[Scenario-builder-reference-guide/ScenarioBlocks/Menu|メニュー]], [[Scenario-builder-reference-guide/ScenarioBlocks/RequestSkillorService|スキルまたはサービスのリクエスト]], [[Scenario-builder-reference-guide/ScenarioBlocks/CollectDigits|数字の取得]], [[Scenario-builder-reference-guide/ScenarioBlocks/SetVariable|変数の設定]], [[Scenario-builder-reference-guide/ScenarioBlocks/FindAgent|エージェントの検索]], 2つの[[Scenario-builder-reference-guide/ConnectCall|コールの接続]]です。 | ||
| − | + | このシナリオの例はあくまでも例であり、実際の使用を目的としていません。全ての[[Scenario-builder-reference-guide/ScenarioBuilderOverview#Conditional_Exits|条件付き出口]]に対して、実際に使われるアクションを指定しなければなりません。 | |
| − | === | + | === シナリオの概要 === |
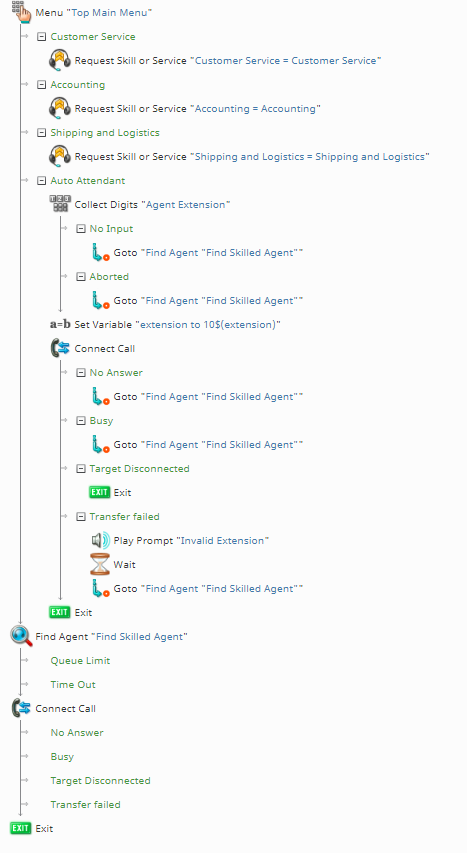
| − | + | 図では、シナリオビルダーアプリケーションで構成された場合のシナリオが表示されています。 | |
| Line 27: | Line 29: | ||
| − | === | + | === アクション1: スキルベース選択と自動応答選択を含むメニューを設定します。=== |
| − | + | このシナリオでは、 [[Scenario-builder-reference-guide/ScenarioBlocks/Menu|メニュー]] ブロックのおかげで発信者は熟練したエージェントにルーティングできるか、特定のエージェントの内線番号を直接入力できるメニューを選択できます。 | |
| − | + | [[Scenario-builder-reference-guide/ScenarioBlocks/Menu|メニュー]]ブロックを設定するにあたって、 [[Scenario-builder-reference-guide/ScenarioBlocks/Menu#Properties|再生されるプロンプト]]を作成してから、 [[Scenario-builder-reference-guide/ScenarioBlocks/Menu#Properties|メニューの有効な選択肢]]を設定します。この例のコールセンターでは、スキルが "顧客サービス"、"会計"、 "配送と物流"であるため、各スキルに対して有効な選択肢をブロック内で設定します。さらに、 "自動応答" の選択肢も設定します (つまり、発信者は内線番号を入力できます)。 | |
| − | [[File:SBR-1-1-53.PNG|650px|thumb|center| | + | [[File:SBR-1-1-53.PNG|650px|thumb|center|メニューブロックの設定]] |
| − | === | + | === アクション 1a: スキルベースのメニュー選択肢に対して、スキルまたはサービスのリクエストブロックを使います。 === |
| − | + | 次に、[[Scenario-builder-reference-guide/ScenarioBlocks/Menu|メニュー]]ブロックに追加したスキルベースの選択肢に対して、 [[Scenario-builder-reference-guide/ScenarioBlocks/RequestSkillorService|スキルまたはサービスのリクエスト]]ブロックを追加し、対応するスキルを設定します。これを行うには、最初のドロップダウンメニューからスキルグループ (例えば、補助スキル、言語スキルなど)を選択し、次のドロップダウンメニューから特定のスキルを選択します。 | |
| − | + | [[Scenario-builder-reference-guide/ScenarioBlocks/RequestSkillorService|スキルまたはサービスのリクエスト]]ブロックは、[[Scenario-builder-reference-guide/ScenarioBlocks/Menu|メニュー]]ブロックと[[Scenario-builder-reference-guide/ScenarioBlocks/FindAgent|エージェントの検索]] ブロック間のコネクターの役割を果たしており、このブロックではスキルベースルーティングが行われます。 | |
| − | [[File:SBR-2-53.PNG|650px|thumb|center| | + | [[File:SBR-2-53.PNG|650px|thumb|center|スキルまたはサービスのリクエストブロックの設定]] |
| − | === | + | ===アクション2: 数字の取得を含む自動応答の設定を開始します。 === |
| − | + | [[Scenario-builder-reference-guide/ScenarioBlocks/Menu|メニュー]] ブロック選択肢である"自動応答"では、お客様がエージェントの内線番号を使って特定のエージェントに接続できます。 そのために、[[Scenario-builder-reference-guide/ScenarioBlocks/CollectDigits|数字の取得]] ブロック、[[Scenario-builder-reference-guide/ScenarioBlocks/SetVariable|変数の設定]]ブロック、[[Scenario-builder-reference-guide/ConnectCall|電話の接続]]ブロックを使います。 | |
| − | + | 例のコールセンターでは全ての内線番号は10から始まります (例えば、 1003)。但し、お客様に4桁の番号を入力していただく必要はありません。[[Scenario-builder-reference-guide/ScenarioBlocks/CollectDigits#Properties|再生されるプロンプト]]は、内線番号の下2桁を入力するように、お客様にご案内します。 | |
| − | + | [[Scenario-builder-reference-guide/ScenarioBlocks/CollectDigits|数字の取得]]ブロックは、お客様が入力した2桁を記録し、[[Scenario-builder-reference-guide/ScenarioBlocks/CollectDigits#Properties|記録を保存する変数名]]というフィールドで設定された変数で保存します。 この例では、この変数名は''extension''です。 | |
| − | [[File:SBR-4-53.PNG|650px|thumb|center| | + | [[File:SBR-4-53.PNG|650px|thumb|center|数字の取得ブロックの設定]] |
| − | === | + | === アクション 2a: 変数の設定を使って、数字の取得ブロックのデータを変換します === |
| − | + | 次に、[[Scenario-builder-reference-guide/ScenarioBlocks/CollectDigits|数字の取得]]ブロックで作成された ''extension''変数は[[Scenario-builder-reference-guide/ScenarioBlocks/SetVariable|変数の設定]]ブロックに移動されます。ここで実際の内線番号の最初の2桁が変数に追加されます。例では、"10" は変数の前に以下の通りに追加されます: ''10$(extension)'' | |
| − | + | 例えば、お客様は[[Scenario-builder-reference-guide/ScenarioBlocks/CollectDigits|数字の取得]] ブロックに ''39''を入力します。この値は、[[Scenario-builder-reference-guide/ScenarioBlocks/SetVariable|変数の設定]]を通ってから、実際の内線番号である''1039''に変換されます。 | |
| − | [[File:SBR-5-53.PNG|650px|thumb|center| | + | [[File:SBR-5-53.PNG|650px|thumb|center|変数の設定ブロックの設定]] |
| − | === | + | === アクション 2b: 電話の接続ブロックが変数の設定ブロックから変換された情報を受け取るようにします。 === |
| − | + | 最終的に、[[Scenario-builder-reference-guide/ScenarioBlocks/SetVariable|変数の設定]]ブロックで作成された''$(extension)''変数は、以下の [[Scenario-builder-reference-guide/ConnectCall|電話の接続]]ブロックに移動され、[[Scenario-builder-reference-guide/ScenarioBlocks/ConnectCall#Override_Destination|宛先の上書き]] フィールドに入力されます。これにより、コールは受付可能なエージェントではなく、特定の内線番号に転送されます。 | |
| − | + | このシナリオ分岐 (つまり、"自動応答"メニュー選択肢)では、お客様が内線番号を入力しなかった場合、またはシステムがそれを認識できなかった場合、[[Scenario-builder-reference-guide/ScenarioBlocks/Goto|Goto]] ブロックは[[Scenario-builder-reference-guide/ScenarioBlocks/FindAgent|エージェントの検索]] ブロックに発信者をルーティングします。 | |
| − | [[File:SBR-6-53.PNG|800px|thumb|center| | + | [[File:SBR-6-53.PNG|800px|thumb|center|電話の接続ブロックの設定]] |
| − | === | + | === アクション 3: エージェントの検索ブロックではスキルベースルーティングを設定します。=== |
| − | + | 発信者がメニューからスキルベースの選択肢を選んだ場合(つまり、"自動応答"を選択しなかった場合)、このコールは、最適なスキルを持つエージェントに転送されます。 | |
| − | + | そのため、各[[Scenario-builder-reference-guide/ScenarioBlocks/Menu|メニュー]]ブロックの選択肢用に設定された[[Scenario-builder-reference-guide/ScenarioBlocks/RequestSkillorService|スキルまたはサービスのリクエスト]]ブロックは、 [[Scenario-builder-reference-guide/ScenarioBlocks/FindAgent|エージェントの検索]]ブロックで[[Scenario-builder-reference-guide/ScenarioBlocks/FindAgent#Settings|待機条件]]として設定されます。''待機条件''のおかげで、システムは対話に最適なスキルを持つエージェントを検索できます。ただし、スキル条件が[[Scenario-builder-reference-guide/ScenarioBlocks/FindAgent#Settings|待機時間]]内で満たされない場合、発信者は次のスキルグループ、最終的には受付可能なエージェントにルーティングされます。 | |
| − | [[File:SBR-7-53.PNG|800px|thumb|center| | + | [[File:SBR-7-53.PNG|800px|thumb|center|エージェントの検索ブロックの設定]] |
| − | === | + | === アクション4:電話を接続します。=== |
| − | + | エージェントが見つかった後、電話は[[Scenario-builder-reference-guide/ConnectCall|電話の接続]] ブロックで接続されます。エージェントの検索および電話の接続に関する詳しい情報は、[[Scenario-builder-reference-guide/HowtoCreateaBasicScenario|基本的なシナリオの作成]]をご覧ください。 全ての [[Scenario-builder-reference-guide/ScenarioBuilderOverview#Conditional_Exits|条件付き出口]]の指定を忘れないでください。 | |
Latest revision as of 15:57, 6 November 2019
自動応答とスキルベースのコールルーティング
Bright Patternコンタクトセンターでは、スキルとはコンタクトセンター管理者アプリケーションで定義できるユーザーの様々な能力です。スキルは、コンタクトセンターに関連するトピックまたは言語(例えば、経理、アラビア語、ITなど)として定義できます。スキルの評価については、 スキルレベルをご覧ください。スキルはユーザごとに 0 から 100まで評価されます (つまり、0は最低レベル、100は最高レベルを意味します)。さらに、スキルがサービスまたはキャンペーンに基づいて付与されます。
シナリオを通して、スキルレベルの低いエージェントではなく、スキルレベルの高いエージェントに対話をルーティングできます。これにより、お客様は知識レベルが最も高いエージェントとやり取りでき、最高のカスタマーサービスを体験いただけます。さらに、スキルベースのルーティングは、スキルレベルが低い新入社員のトレーニングに役立てます。そのおかげで、新入社員は対話の処理に圧倒されることなく、練習できます。
このシナリオでは、お客様が内線番号を直接ダイヤルできるオプション(つまり、"自動応答")を使って基本的なスキルベースルーティングを設定する方法について詳しく説明します。この例で使用されるスキルは 補助スキルですが、 言語スキルに変更できます (例えば、コンタクトセンターは英語・フランス語・スペイン語でサービスを提供する場合)。
シナリオの例
このチャットシナリオの例(コメント付バージョン)をダウンロードするには、次のリンクをクリックしてください。
File:App Skill-Based Call Routing + Auto Attendant.zip
このファイルをコンタクトセンターにインポートする方法については、コンタクトセンター管理者ガイドの
シナリオ概要 > シナリオのエクスポートとインポートをご覧ください。
シナリオに関する一般情報については、 シナリオビルダー概要をご覧ください。
シナリオフロー
この音声シナリオは、メニューを使ってお客様を熟練したエージェントにルーティングし、特定のエージェントの内線番号を直接ダイヤルするオプションが含まれています。このシナリオには以下のブロックが必要です:
メニュー, スキルまたはサービスのリクエスト, 数字の取得, 変数の設定, エージェントの検索, 2つのコールの接続です。
このシナリオの例はあくまでも例であり、実際の使用を目的としていません。全ての条件付き出口に対して、実際に使われるアクションを指定しなければなりません。
シナリオの概要
図では、シナリオビルダーアプリケーションで構成された場合のシナリオが表示されています。
アクション1: スキルベース選択と自動応答選択を含むメニューを設定します。
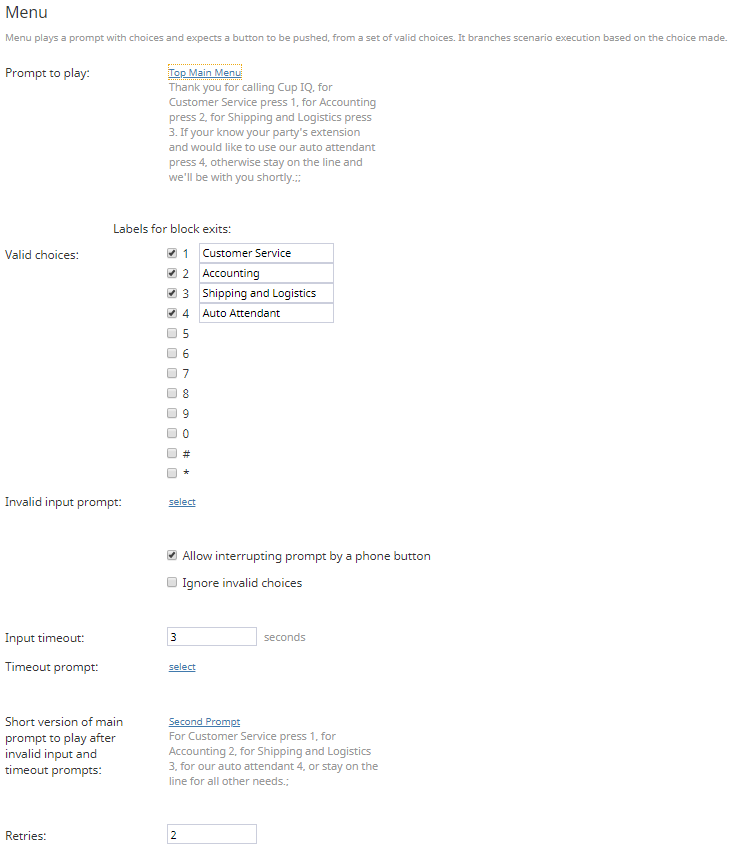
このシナリオでは、 メニュー ブロックのおかげで発信者は熟練したエージェントにルーティングできるか、特定のエージェントの内線番号を直接入力できるメニューを選択できます。
メニューブロックを設定するにあたって、 再生されるプロンプトを作成してから、 メニューの有効な選択肢を設定します。この例のコールセンターでは、スキルが "顧客サービス"、"会計"、 "配送と物流"であるため、各スキルに対して有効な選択肢をブロック内で設定します。さらに、 "自動応答" の選択肢も設定します (つまり、発信者は内線番号を入力できます)。
アクション 1a: スキルベースのメニュー選択肢に対して、スキルまたはサービスのリクエストブロックを使います。
次に、メニューブロックに追加したスキルベースの選択肢に対して、 スキルまたはサービスのリクエストブロックを追加し、対応するスキルを設定します。これを行うには、最初のドロップダウンメニューからスキルグループ (例えば、補助スキル、言語スキルなど)を選択し、次のドロップダウンメニューから特定のスキルを選択します。
スキルまたはサービスのリクエストブロックは、メニューブロックとエージェントの検索 ブロック間のコネクターの役割を果たしており、このブロックではスキルベースルーティングが行われます。
アクション2: 数字の取得を含む自動応答の設定を開始します。
メニュー ブロック選択肢である"自動応答"では、お客様がエージェントの内線番号を使って特定のエージェントに接続できます。 そのために、数字の取得 ブロック、変数の設定ブロック、電話の接続ブロックを使います。
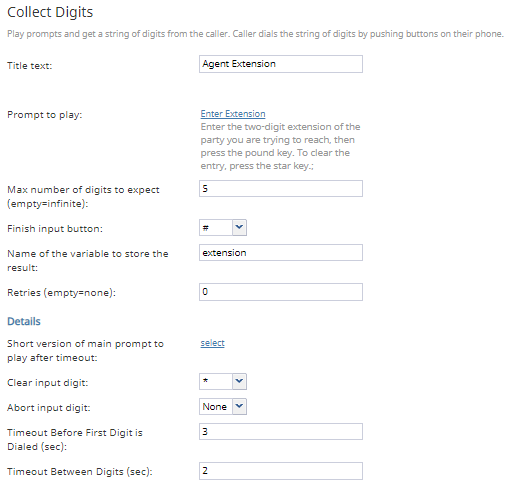
例のコールセンターでは全ての内線番号は10から始まります (例えば、 1003)。但し、お客様に4桁の番号を入力していただく必要はありません。再生されるプロンプトは、内線番号の下2桁を入力するように、お客様にご案内します。
数字の取得ブロックは、お客様が入力した2桁を記録し、記録を保存する変数名というフィールドで設定された変数で保存します。 この例では、この変数名はextensionです。
アクション 2a: 変数の設定を使って、数字の取得ブロックのデータを変換します
次に、数字の取得ブロックで作成された extension変数は変数の設定ブロックに移動されます。ここで実際の内線番号の最初の2桁が変数に追加されます。例では、"10" は変数の前に以下の通りに追加されます: 10$(extension)
例えば、お客様は数字の取得 ブロックに 39を入力します。この値は、変数の設定を通ってから、実際の内線番号である1039に変換されます。
アクション 2b: 電話の接続ブロックが変数の設定ブロックから変換された情報を受け取るようにします。
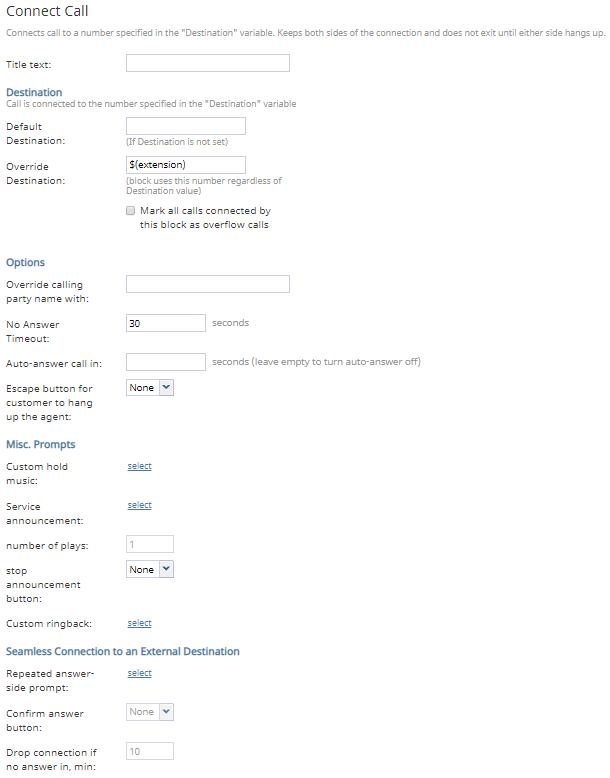
最終的に、変数の設定ブロックで作成された$(extension)変数は、以下の 電話の接続ブロックに移動され、宛先の上書き フィールドに入力されます。これにより、コールは受付可能なエージェントではなく、特定の内線番号に転送されます。
このシナリオ分岐 (つまり、"自動応答"メニュー選択肢)では、お客様が内線番号を入力しなかった場合、またはシステムがそれを認識できなかった場合、Goto ブロックはエージェントの検索 ブロックに発信者をルーティングします。
アクション 3: エージェントの検索ブロックではスキルベースルーティングを設定します。
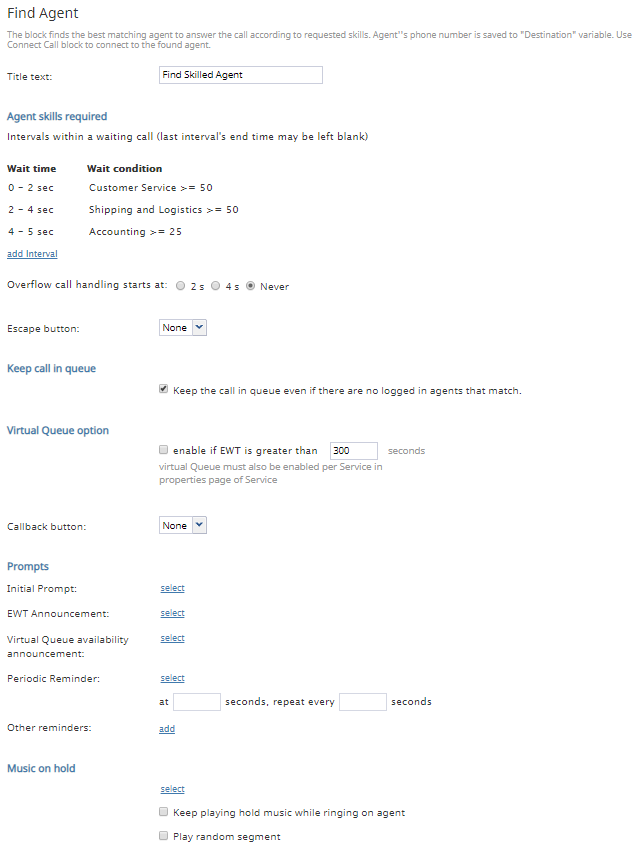
発信者がメニューからスキルベースの選択肢を選んだ場合(つまり、"自動応答"を選択しなかった場合)、このコールは、最適なスキルを持つエージェントに転送されます。
そのため、各メニューブロックの選択肢用に設定されたスキルまたはサービスのリクエストブロックは、 エージェントの検索ブロックで待機条件として設定されます。待機条件のおかげで、システムは対話に最適なスキルを持つエージェントを検索できます。ただし、スキル条件が待機時間内で満たされない場合、発信者は次のスキルグループ、最終的には受付可能なエージェントにルーティングされます。
アクション4:電話を接続します。
エージェントが見つかった後、電話は電話の接続 ブロックで接続されます。エージェントの検索および電話の接続に関する詳しい情報は、基本的なシナリオの作成をご覧ください。 全ての 条件付き出口の指定を忘れないでください。

