Real-Time Checklists Quickstart
Real-Time Checklists provide agents with dynamic, relevant guidance during live customer interactions. These checklists use the Intelligence Engine to listen for specific keywords and phrases Intents within a conversation. When an intent is detected, the corresponding item on the agent's checklist is automatically marked as complete. This helps agents follow required scripts, meet compliance standards, and cover necessary topics, while providing data to analyze agent adherence to the checklists.
Prerequisites
For users to receive real-time suggestions on any channel (voice or chat), they must be assigned the Use Real-time Intent-based Assist privilege.
Additionally, checklists in voice services require the following:
- Agents on voice services are assigned the View real-time transcripts of voice conversations privilege.
- Call recordings are enabled for the service in either of the following ways:
- By enabling the global Quality Management setting Call Recording to record calls on all services.
- By enabling the service-specific property Record Calls on each service that will show real-time suggestions.
- The following service-specific properties are active for each service that will show real-time checklists:
Procedure
Follow these steps to configure and deploy Real-Time Checklists:
- Create Intents for the Desired Checklist Items
- Organize Intents into a Checklist Form
- Create an Activity Form with a Checklist
- Associate the Activity Form with a Service
- Verify Form Association in Interaction Analytics
- Check the Agent Experience
- Configure a Checklist Adherence Dashboard
1. Create Intents for the Desired Checklist Items
Before building a checklist, you must first create the Intents that will power it. Each intent represents a single action item on the checklist. When an intent is detected during an interaction, its corresponding checklist item is automatically marked as complete.
You can also use intents to create conditional logic. For example, you could create an intent that detects when a customer wants to file a complaint. You can configure the service's Activity Form to display a specific set of checklist items related to handling complaints when this intent is detected.
Navigate to the Intelligence Engine and create the intents that will correspond to your checklist items. For detailed instructions, see the Intents Quickstart.
2. Organize Intents into a Checklist Form
After creating your intents, you need to group them into a Real-Time Checklist form. This form serves as the master container for all the intents that will make up your checklist. Within the form, you can use Areas to organize related intents into logical sections (e.g., "Greeting," "Verification," "Closing"). This structure is used for both checklist configuration and adherence reporting.
- Create a form using the intents you wish to include on your checklist. See Creating and Configuring a Form for detailed instructions.
| Make sure the form Type is Checklist. This allows the form to be used as a checklist on an activity form. | ||
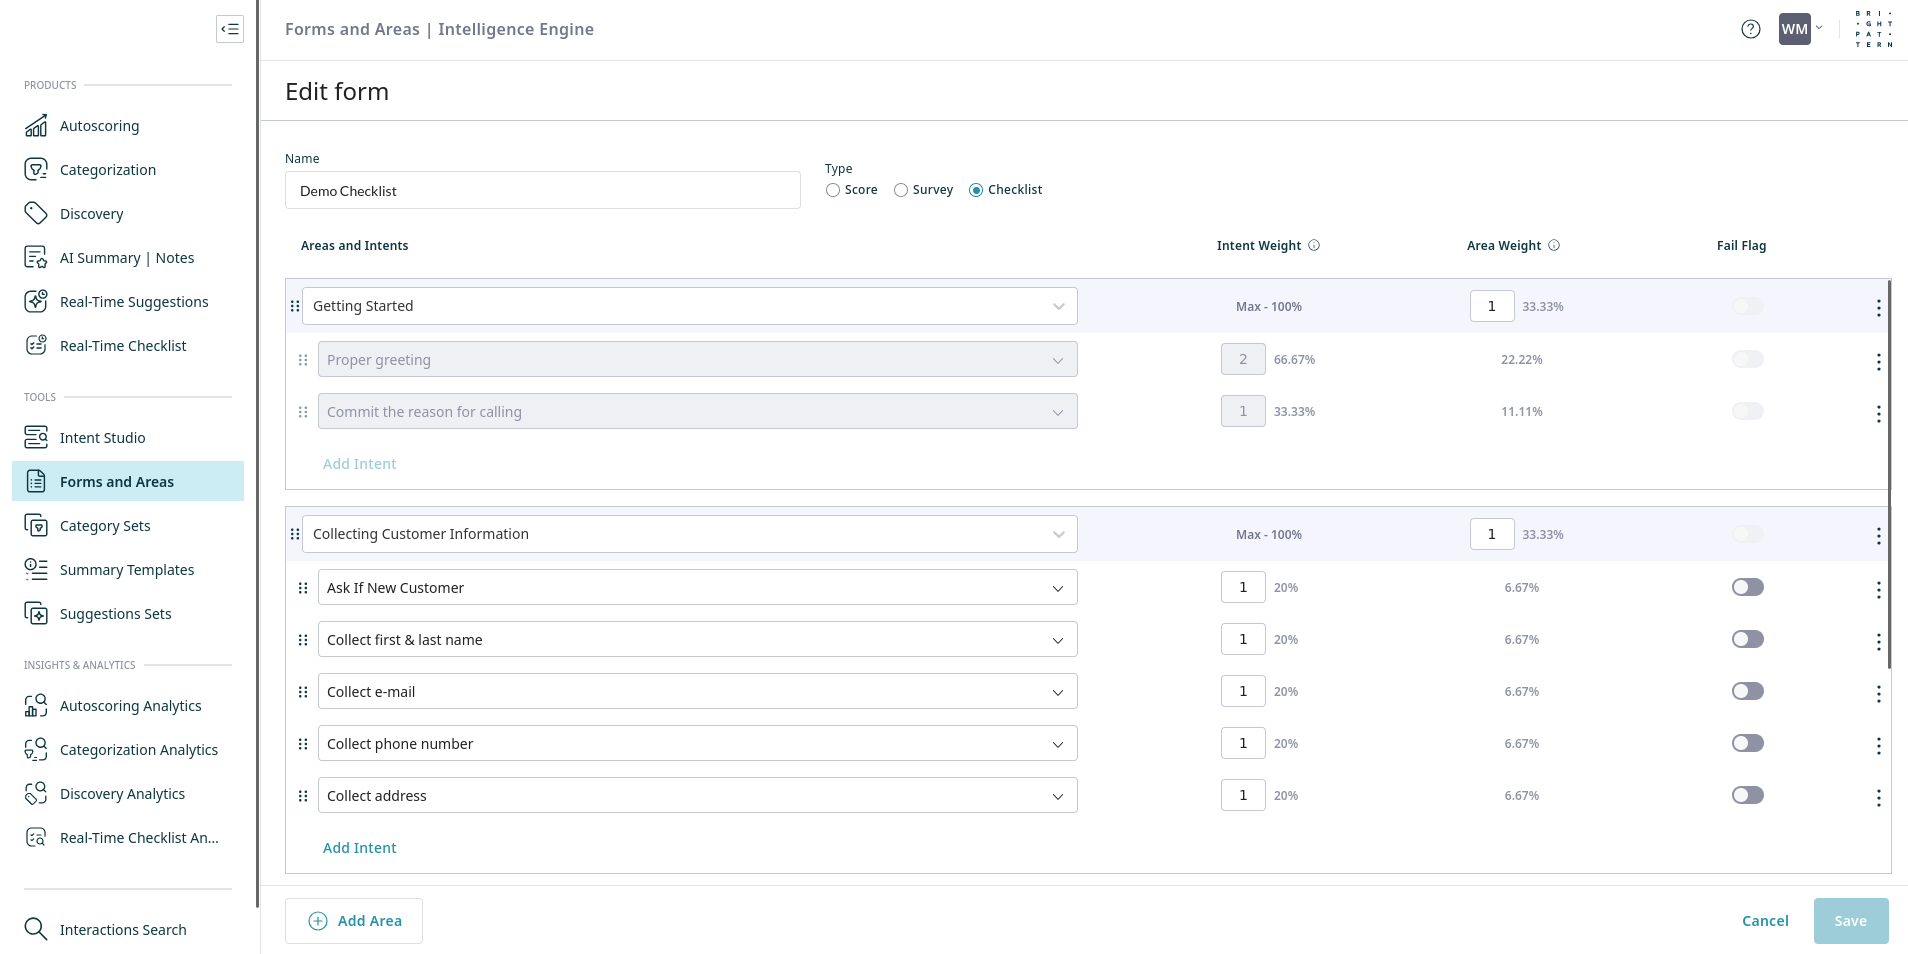
- Once completed, your form might look something like this:
- This example includes intents for specific actions, like "Proper Greeting" and "Collecting Customer Information".
3. Create an Activity Form with a Checklist
Create an Activity Form. In this form, you can add items from your checklist. If you have an existing activity form, open it for editing and add checklist items.
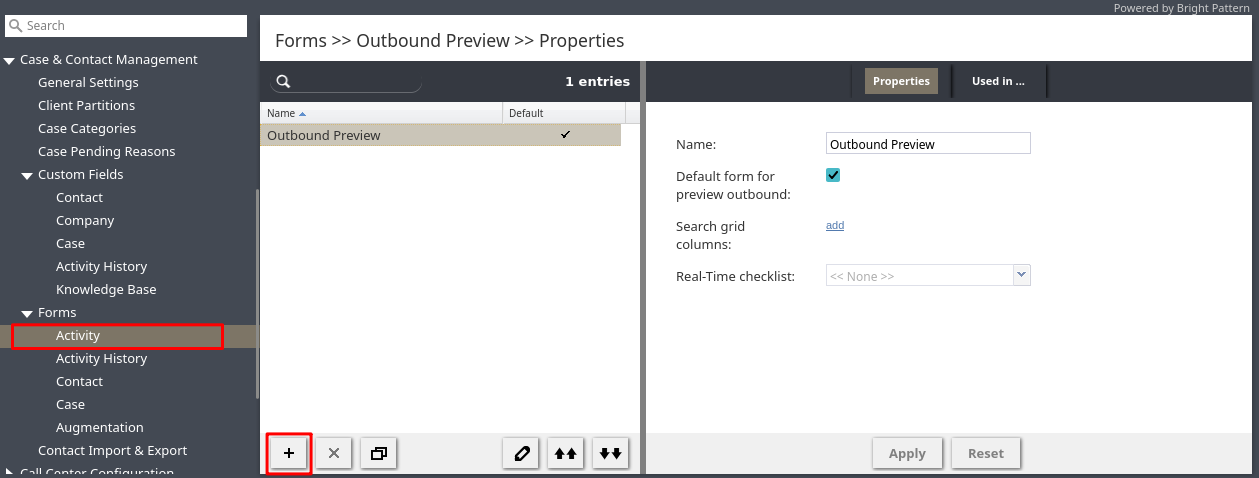
- In the Administrator application, navigate to Case & Contact Management > Forms > Activity and click the + icon to add a new form.
- On the form editor, select the Check Items tab, and click Select Checklist.
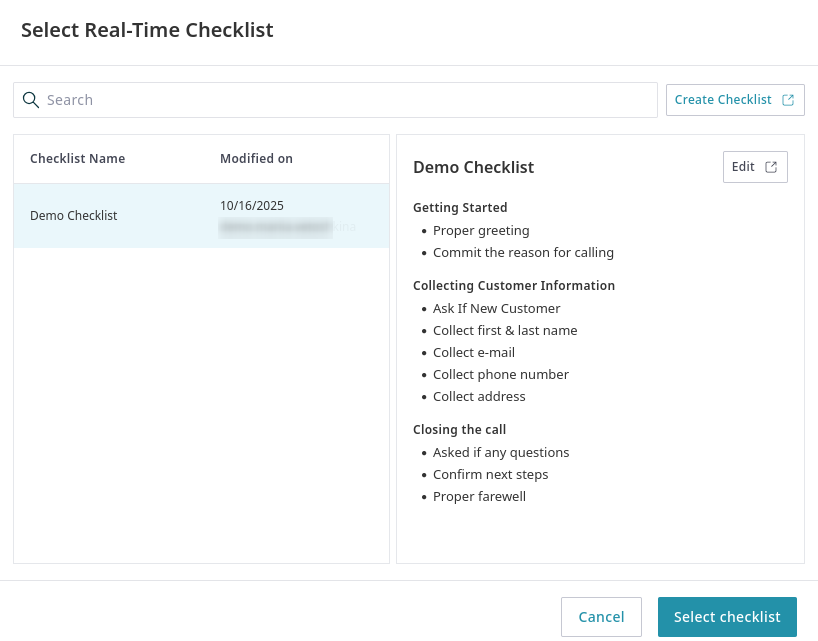
- Choose the Intelligence Engine form to use as the basis for the checklist and click Select checklist.
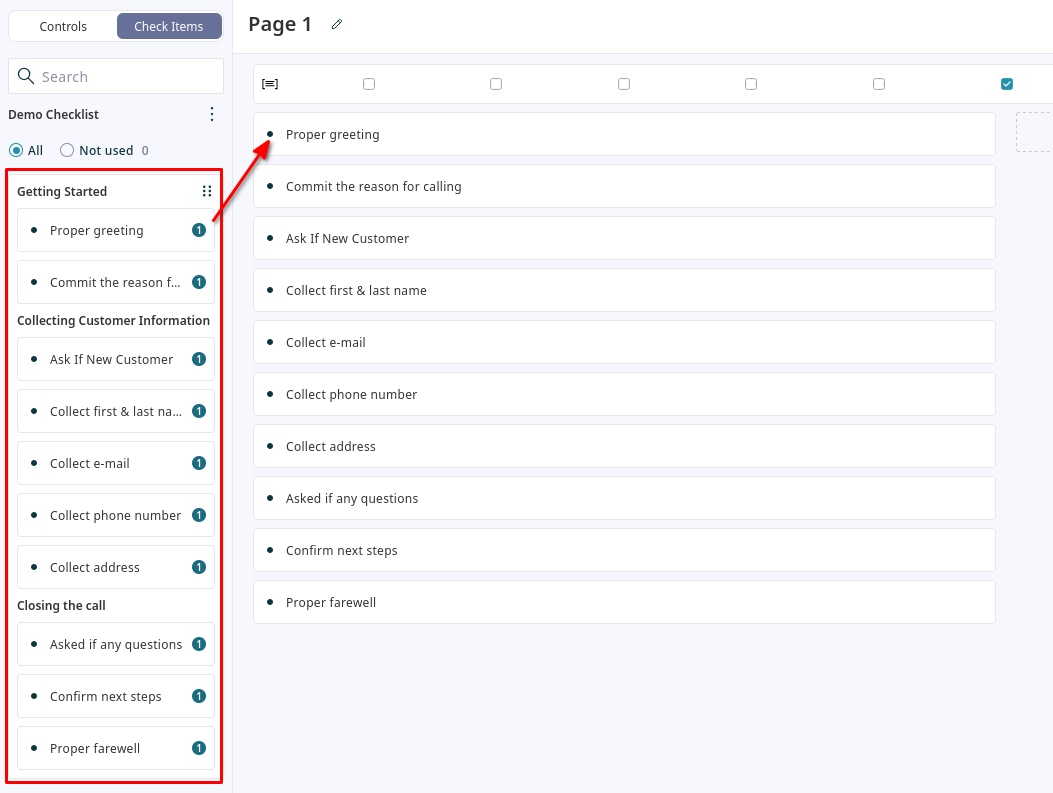
- The selected checklist will appear in the sidebar. Drag and drop individual items from the checklist, just like any other form control. Drag and drop the entire checklist to quickly add all checklist items to the form.
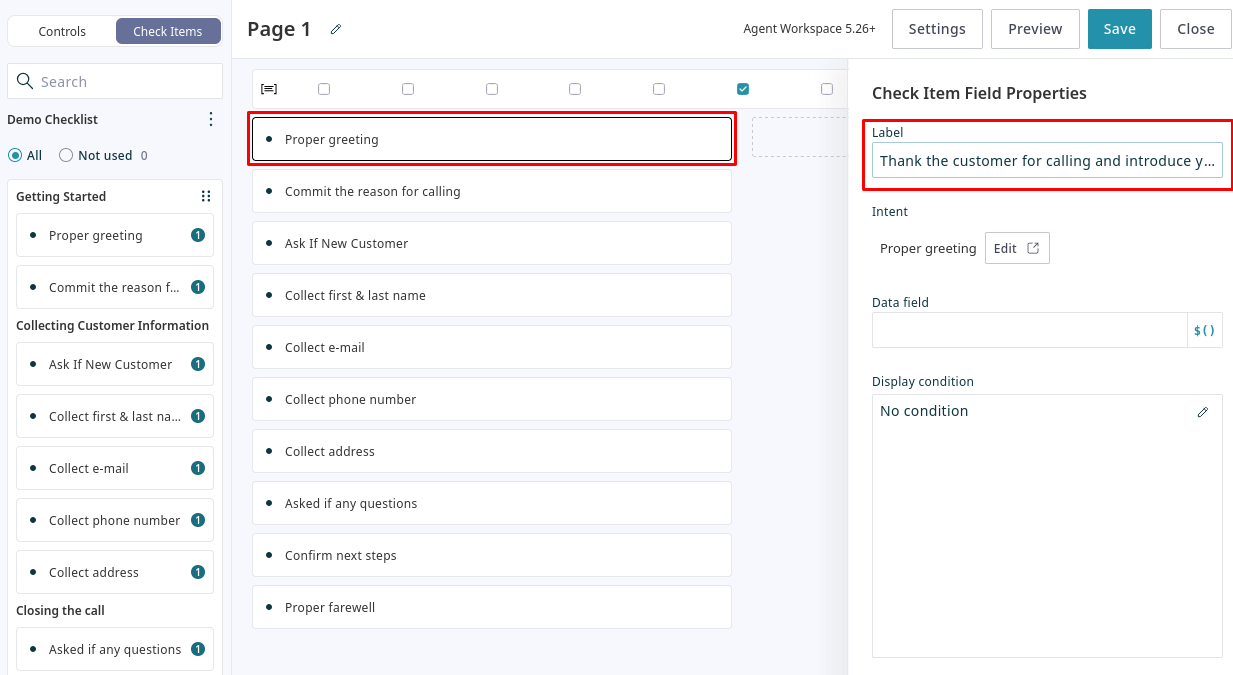
- One way to provide detailed instructions for a checklist item is to select it and edit its Label. This label is displayed to the agent. For example, you could change the
Proper Greetinglabel to something more descriptive for the agent, likeThank the customer for calling and introduce yourself by name.
- To customize the appearance of checked items, open the Form Settings at the top of the form editor. Configure the following options:
- Cross out checked items: Enable this to draw a line through the text of a completed checklist item.
- Background color for checked items: Choose a background color to highlight completed checklist items.
- Update any other labels or add other form controls as desired, then click Save.
4. Associate the Activity Form with a Service
After creating the Activity Form, assign it to a service. This ensures that the form, along with the embedded checklist, will be displayed to agents handling interactions for that specific service.
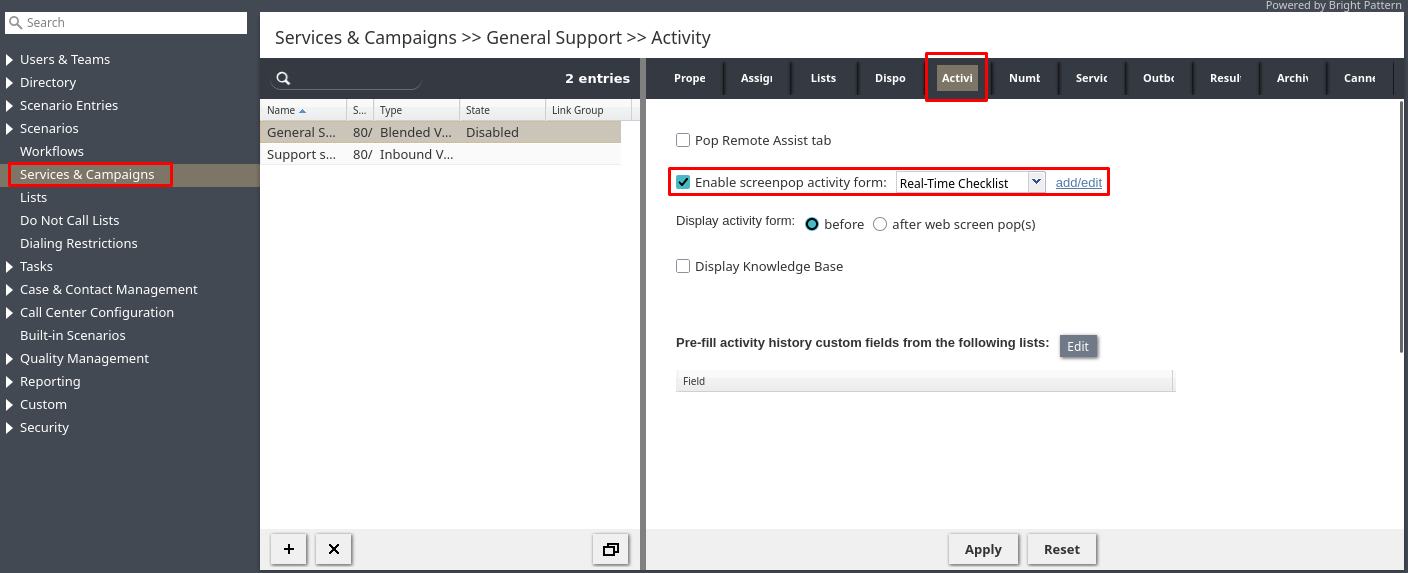
- Under Services & Campaigns, open the service where you want to display the Real-Time Checklist, navigate to the Activity tab, check the Enable screenpop activity form box, and select your new form.
- Click Apply to save the changes.
5. Verify Form Association in Interaction Analytics
Verify that Interaction Analytics recognizes the association between your service, activity form, and evaluation form.
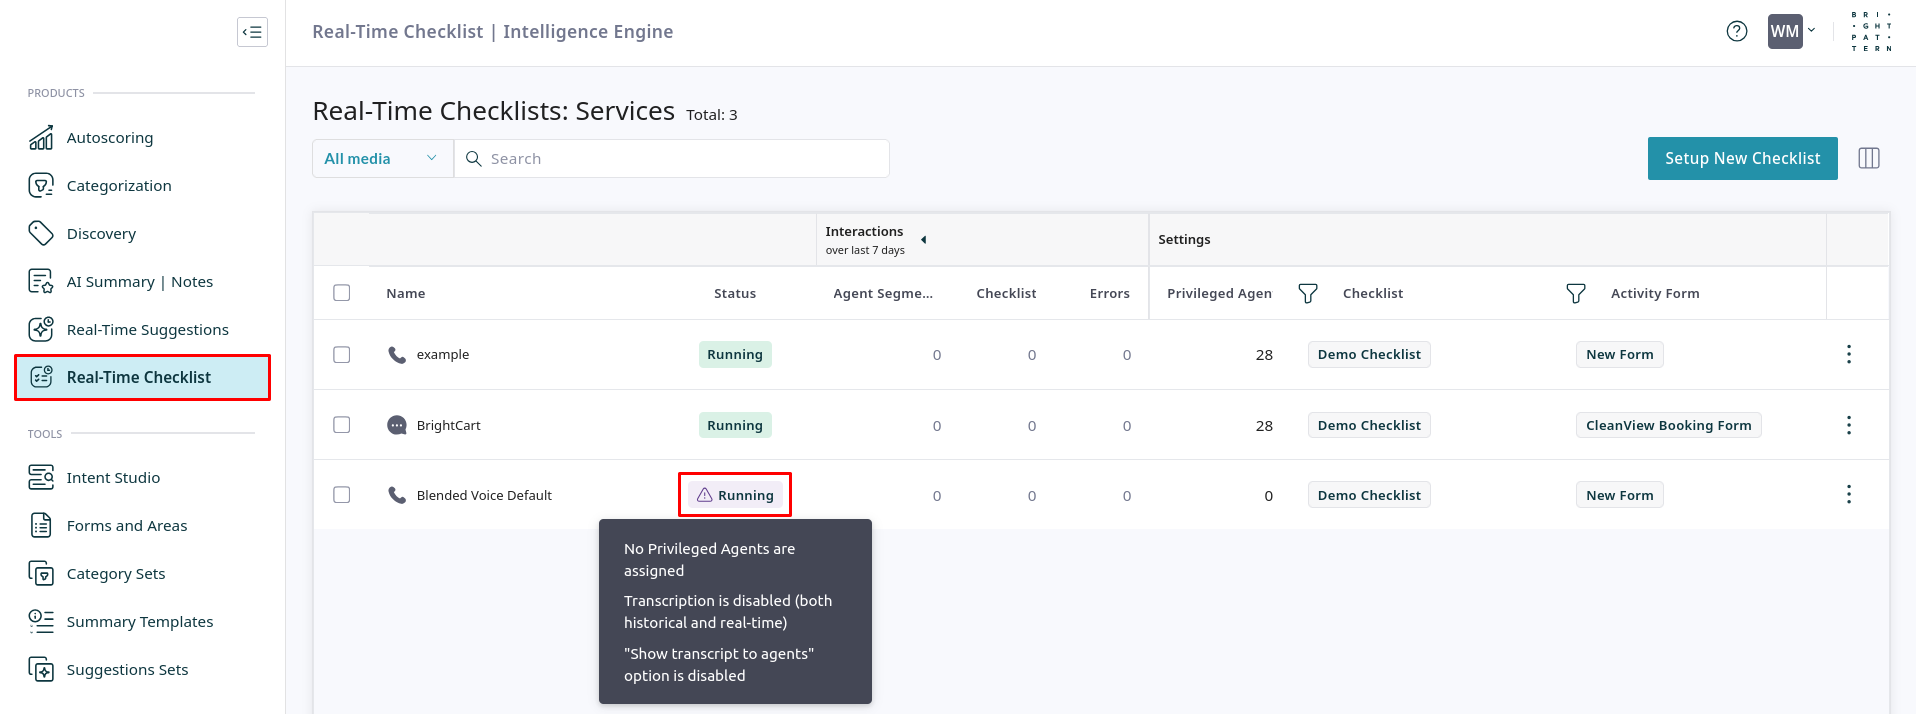
- In the Intelligence Engine application, navigate to the Real-Time Checklist page. You should see the service name, along with the associated checklist and activity form.
- The status of each service is also displayed. If a service shows a "Running" status accompanied by a hazard icon, hover over the status to see the specific issue. The checklist may not function correctly until the misconfiguration is resolved. A correctly configured service will show a green "Running" status.
- If any errors occur during real-time processing, the error count appears in the Errors column. Click the number to download a list of the specific errors.
|
Adherence is not calculated for checklists with processing errors. Resolve any errors to ensure accurate analytics. | ||
6. Check the Agent Experience
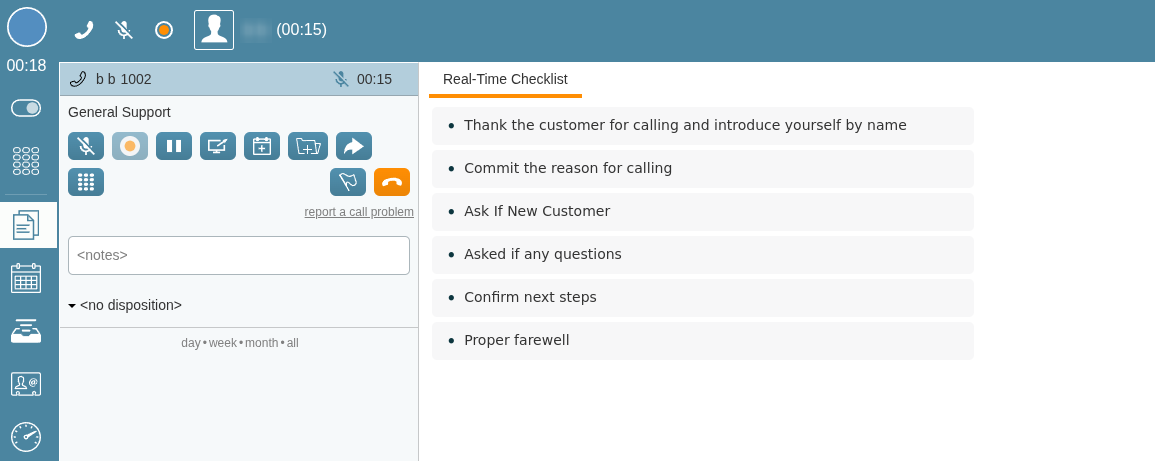
After configuring the checklist and associating it with a service, log in to Agent Desktop to confirm the checklist appears and functions as desired during a live interaction.
- Log in to Agent Desktop as an agent assigned to the configured service.
- Handle an interaction (e.g., place or receive a call). During the conversation, say phrases that are designed to trigger the intents you created for the checklist.
- As the conversation progresses, confirm that the checklist items are automatically checked off in real time as the corresponding intents are detected.
7. Configure a Checklist Adherence Dashboard
After deploying your checklists, create dashboards in Interaction Analytics to monitor agent and team performance. This data helps you analyze agent adherence to checklist requirements and identify areas for coaching.
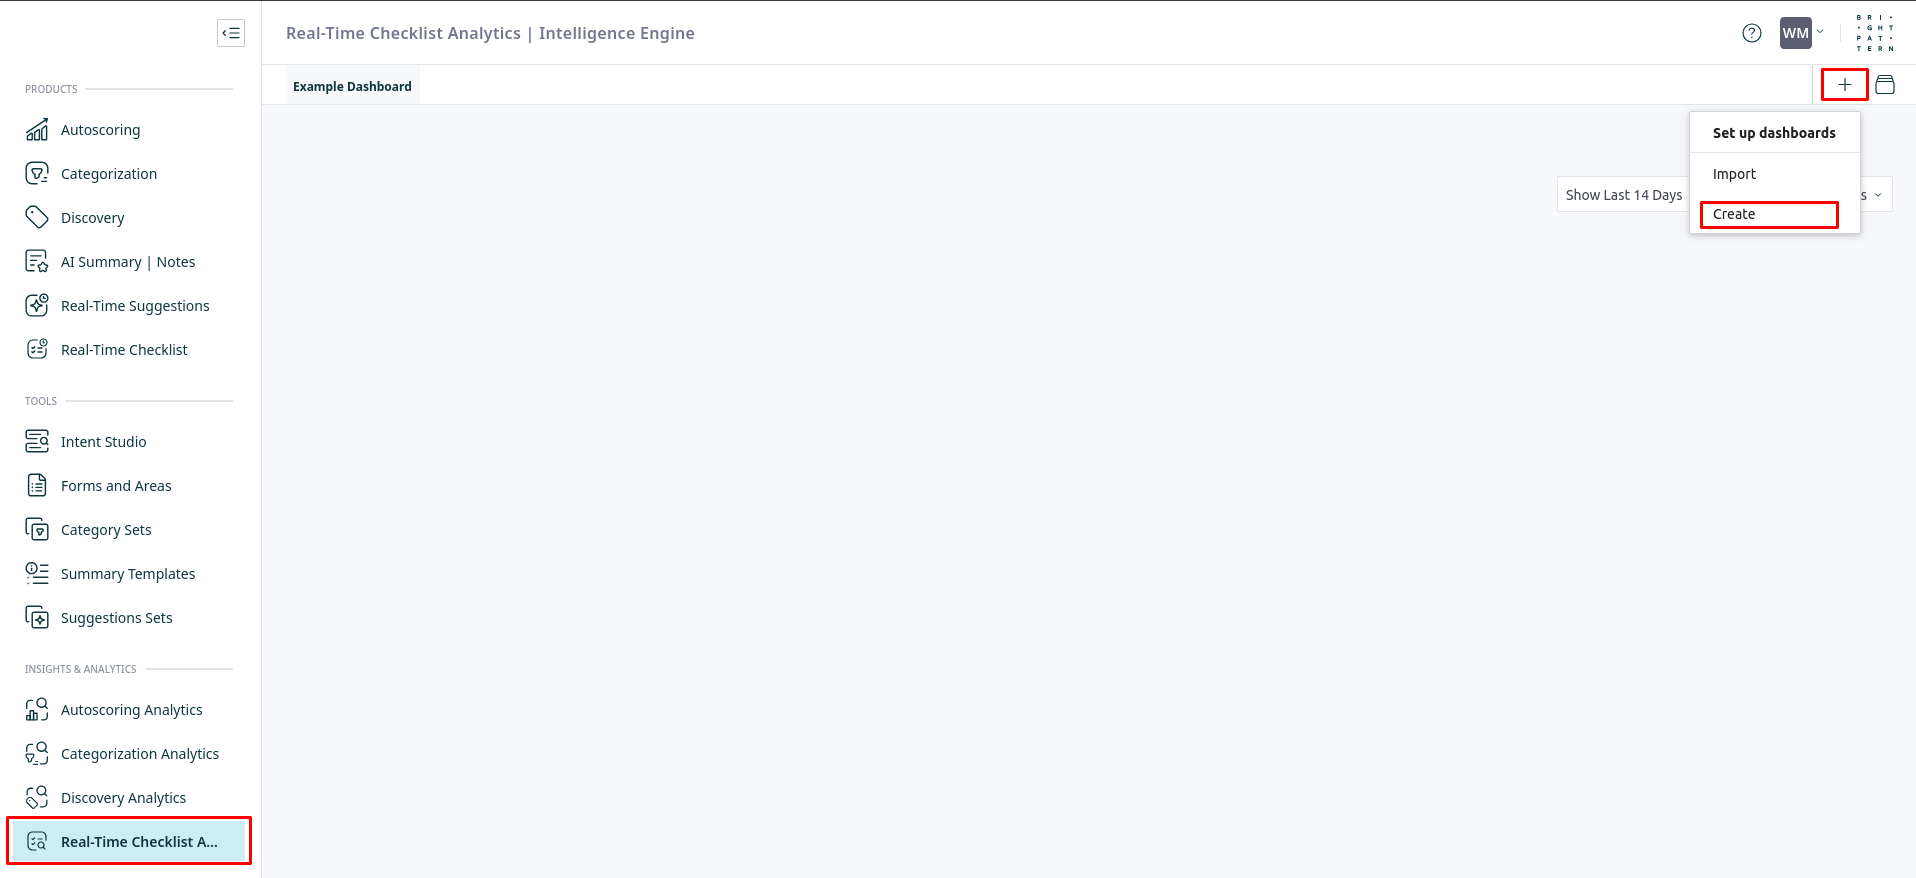
- In Interaction Analytics, navigate to Real-Time Checklist Analytics, click the + icon and select Create.
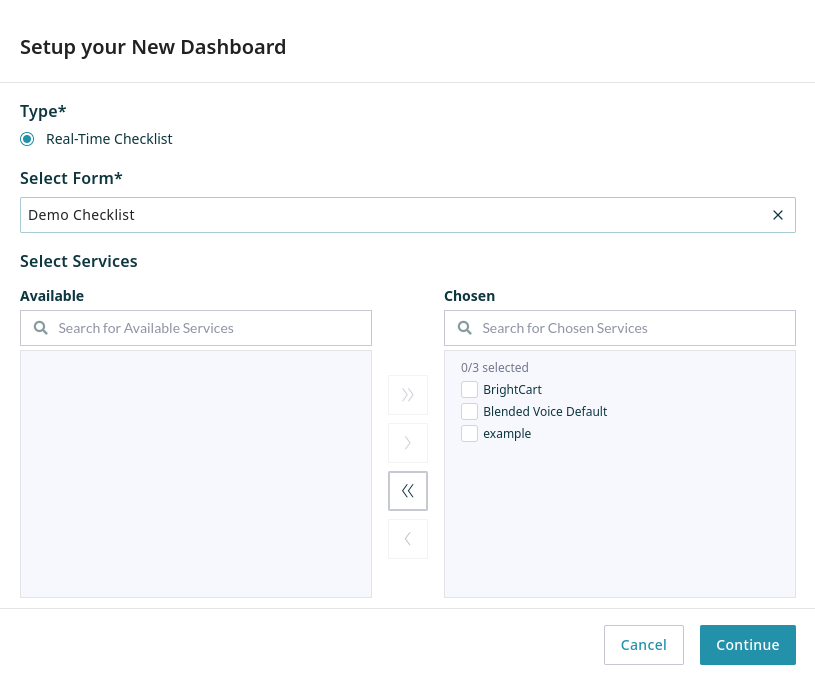
- In the Setup your New Dashboard window, select the checklist form to analyze, move the desired services from the Available list to the Chosen list, and click Continue.
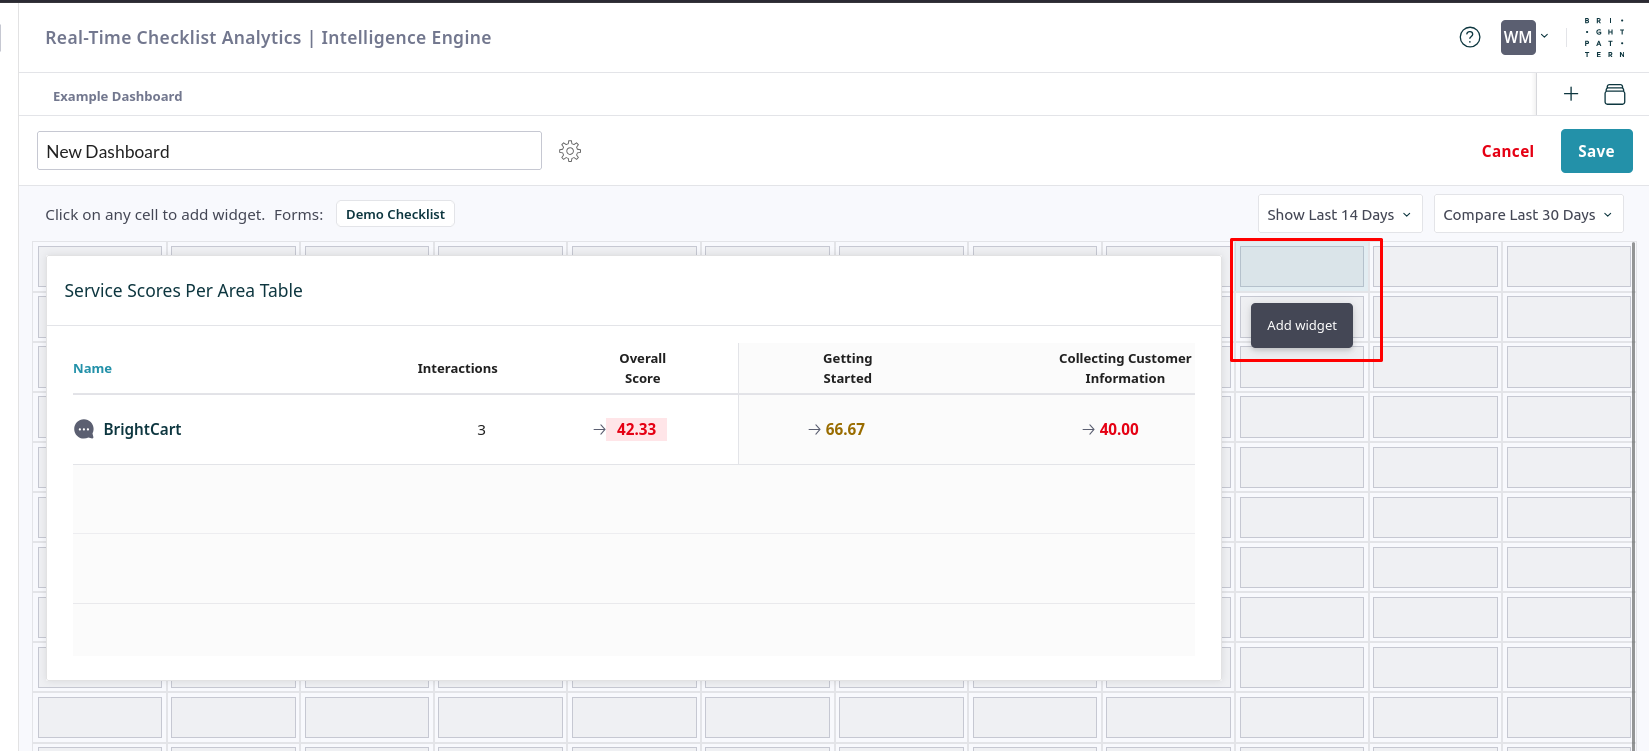
- On the dashboard work area, click any cell to add a widget. Choose from the available widgets to display metrics such as overall adherence scores, completion rates per agent or team, or performance on individual checklist items.
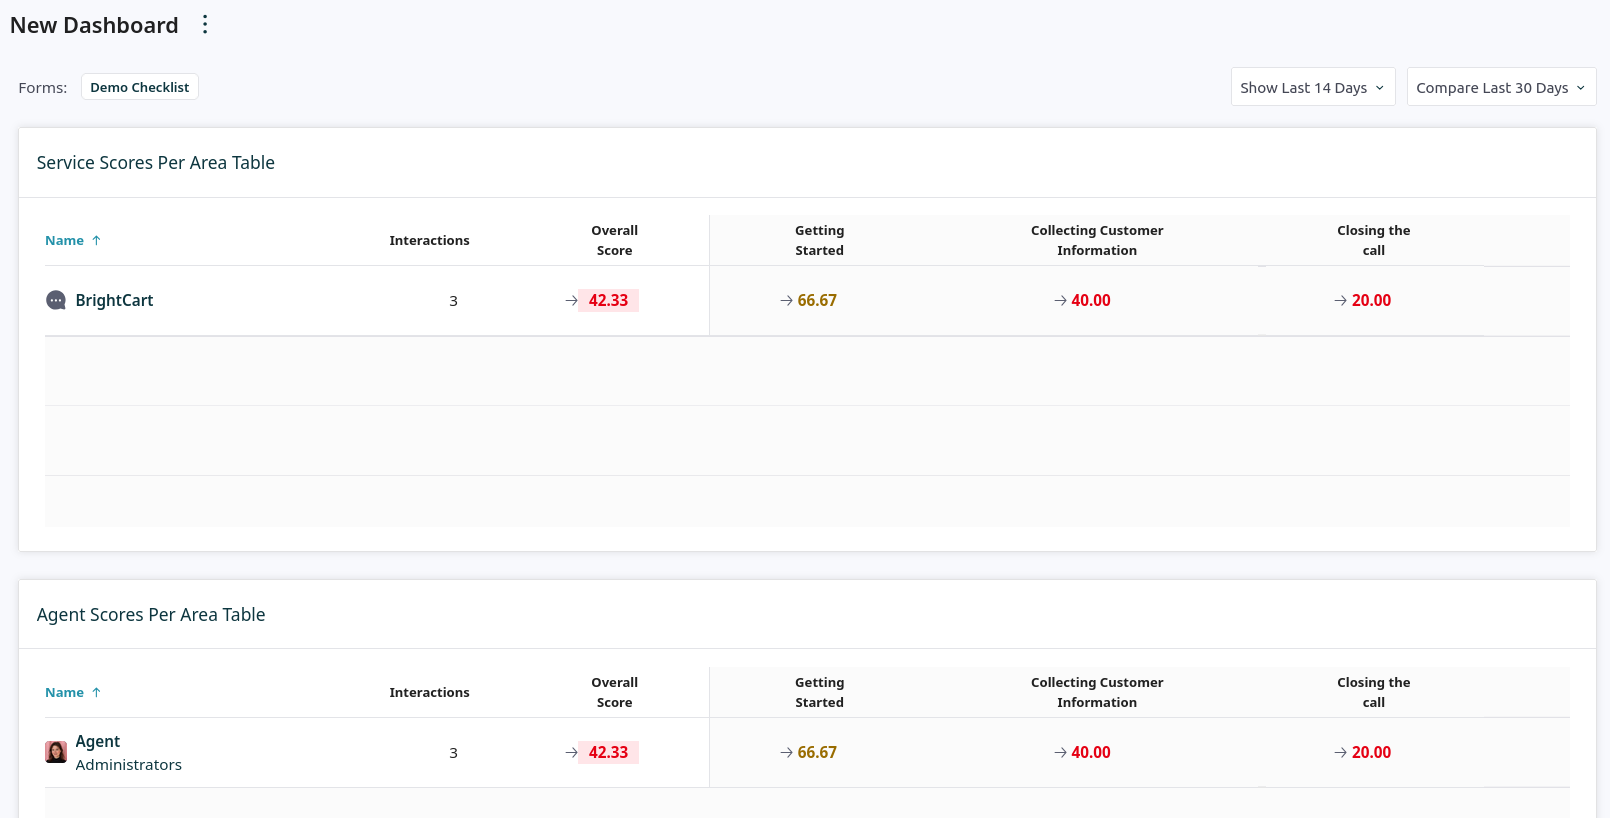
- Use the dashboard to analyze trends, identify coaching opportunities for agents who may be struggling with specific items, and measure the overall impact of your real-time guidance program.

