From Bright Pattern Documentation
• 日本語
Bria Mobile Softphone Configuration
The Bria Mobile softphone app works well for phone calls with Bright Pattern Contact Center software; it minimizes battery drain in standby by using Bria Push Service.
Configuration
In the Contact Center Administrator Application
To configure Bria Mobile with Bright Pattern Contact Center, take the following steps:
- Add a hardphone account in the Contact Center Administrator application, and edit Properties.
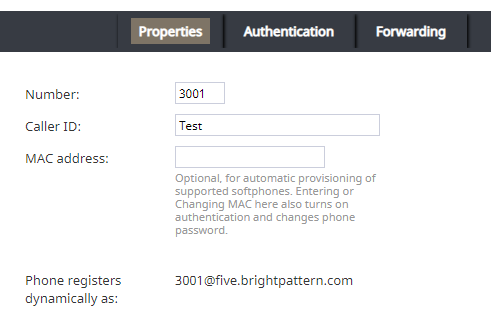
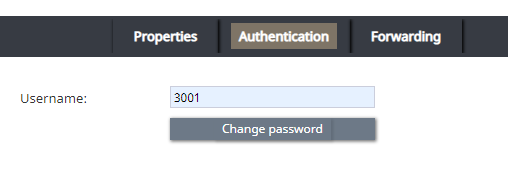
Hardphone Properties - In the Authentication tab, make sure the authentication username is the same as the phone's extension.
Hardphone Authentication tab - Note your domain (e.g., from the Properties tab, see “Phone registers as <ext>@<domain>”), extension, and password.


In the Bria Mobile Softphone
In the Bria Mobile app, add a new account. This is done by going to Settings > Accounts > “+” > Select Provider > User-Defined Generic Accounts > SIP.
Note that the steps that follow are for User-Defined Generic Accounts. You do not have to select a VoIP provider. Also note that you can only edit account options when the account is disabled.
Section SIP Account
To configure the SIP account, take the following steps:
- Give your account an Account Name.
- Set the desired Display as name.
- Set the Username and Password to the same username (e.g., "3001") and password from your configured hardphone account.
- Set the domain to the hardphone account’s domain and add :5080 (Bright Pattern CCaaS service uses the non-standard SIP port 5080). For example: "example.brightpattern.com:5080"
- Enable the option Use Push Notifications and set the option Registration Mode to Single Device Emulation.
- Disable the option NAT Emulation.
- Leave the option Push Advanced Settings disabled.
Section Account Advanced
To configure section Account Advanced, take the following steps:
- In section Network Traversal, option Custom configuration, turn all options off.
- In section IP Version, set option Wi-Fi IP Version to IPv4
- Also in section IP Version, set option Mobile IP Version to IPv4.
- In section DTMF Type, make sure option Send DTMF using is set to RFC2833.
- In section Transport and Security, set option SIP transport to UDP.
- In section SIP Registration, set options Wi-Fi Refresh Interval and Mobile Refresh Interval to 30 seconds.
- In section TLS Cert Management, disable option Verify TLS cert.
- In section SIP Miscellaneous, leave option Show Miscellaneous disabled.
< Previous | Next >