提供: Bright Pattern Documentation
(Created page with "コンタクトセンター管理者ガイドのサービス&キャンペーンの診断タブ は、設定の詳...") |
(Created page with "650px") |
||
| (8 intermediate revisions by the same user not shown) | |||
| Line 6: | Line 6: | ||
| − | [[File:Configuration-Checks.png|800px|thumbnail|center| | + | [[File:Configuration-Checks.png|800px|thumbnail|center|設定チェックの例]] |
| − | + | 設定チェックで簡単に解決できる一般的な問題には、チーム割り当てのバラツキ、無効化された発信音声キャンペーン、未定義の発信者番号、誤った発信者ID設定などが含まれます。 | |
| − | |||
| − | |||
| − | + | ''診断''タブは、発信音声キャンペーンを設定した後に確認する最後の項目です。 このタブはコンタクトセンター管理者アプリケーションの ''設定> サービス&キャンペーン> 発信音声サービス> 診断''にあります。詳しい情報については、''コンタクトセンター管理者ガイド''の[[contact-center-administrator-guide/Outbound-Diagnostics|診断タブ]]をご覧ください。 | |
| − | |||
| − | |||
| − | |||
| − | |||
| − | |||
| − | |||
| − | |||
| − | |||
| − | |||
| + | == 発信キャンペーンで親アカウントの設定方法を教えてください。 == | ||
| + | 以下に説明されている手順はプレビューキャンペーンを設定するための手順です。さらに、この手順は[[#For_Progressive_and_Predictive_type_campaigns|プログレッシブ及びプレディクティブキャンペーン]]にも適用できます。これらのモードの代替方法は次の通りです。 | ||
| + | * '''親アカウント'''という[[Contact-center-administrator-guide/Custom/CustomReportingFields|カスタムレポートフィールド]] を作成します。 | ||
| + | * キャンペーン専用の[[Form-builder-reference-guide/HowtoConfigureActivityForms|アクティビティフォーム]]を作成または編集します。アクティビティフォームは、 [[Contact-center-administrator-guide/ServicesandCampaigns/ActivityTab#Enable_screenpop_activity_form|スクリーンポップアクティビティフォームの有効化]]を介してキャンペーンに接続されます。 | ||
| + | * フォームに[[Form-builder-reference-guide/Text|テキストフィールド]] を追加します。 | ||
| + | ** このフィールドは編集不可です。 | ||
| + | ** [[Form-builder-reference-guide/Text#Initial_value|初期値]]は ''PARENTACCOUNT'' 値です。 | ||
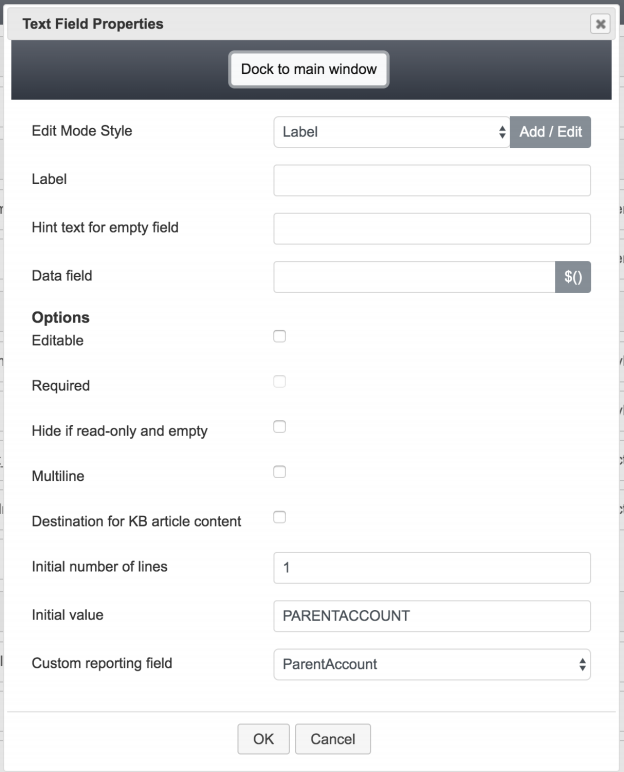
| + | ** カスタムレポートフィールドオプションは次の画面に示されるように'''親アカウント''' に設定しなければなりません。 | ||
| + | * フォームを保存します。 | ||
| + | * アクティビティフォームはログイン時にキャッシュされます。変更が行われたらエージェントはログアウトし再度ログインしなければなりません。 | ||
| − | |||
| + | [[File:OC-1.PNG|450px|thumb|center|アクティビティフォームの設定]] | ||
| − | |||
| − | |||
| − | |||
| − | === | + | ===リストにParentAccount 値のフィールドが含まれる場合=== |
| − | + | *上記の手順が使えます。ただし、初期値では、リストフィールドを ''$(workitem.fullInfo.FIELDFROMLIST)''の形式で指定します。 | |
| − | * | + | *これにより、必要に応じて特定の値を指定することなく、アクティビティフォームを"再利用"できます。 |
| − | |||
| − | |||
| − | * | ||
| + | ===プログレッシブおよびプレディクティブキャンペーンの場合=== | ||
| + | これらのキャンペーンにはシナリオが使用されるため、必要に応じてシナリオ内で親アカウントを明示的に設定できます。 | ||
| + | *キャンペーン専用のシナリオを作成します。コンタクトセンター管理者アプリケーション内にベースとして利用できるテンプレートがあります。 | ||
| + | *シナリオの上部に、[[Scenario-builder-reference-guide/ScenarioBlocks/SetCustomReportingField|カスタムレポートフィールドの設定]]ブロックを追加します。 | ||
| + | *[[Scenario-builder-reference-guide/ScenarioBlocks/SetCustomReportingField#Field|フィールド]] のドロップダウンメニューで、 '''親アカウント'''を選択します。 | ||
| + | *親アカウントフィールドに[[Scenario-builder-reference-guide/ScenarioBlocks/SetCustomReportingField#Value|値]]を設定します。 | ||
| − | |||
| + | [[File:OC-2.PNG|850px|thumb|center|シナリオの設定]] | ||
| − | |||
| − | |||
| + | * シナリオを保存します。 | ||
| + | * キャンペーン定義内、 [[Contact-center-administrator-guide/ServicesandCampaigns/Outbound-General#Scenario_to_run_when_answered|応答時に実行されるシナリオ]]として作成されたシナリオを指定します。 | ||
| − | [[File:OC-3.PNG|650px|thumb|center| | + | |
| + | [[File:OC-3.PNG|650px|thumb|center|キャンペーンのシナリオの設定]] | ||
Latest revision as of 07:48, 21 September 2019
• English
発信キャンペーン
発信音声キャンペーンが正しく動作していません。修正方法を知るにはどうすればよいですか?
コンタクトセンター管理者ガイドのサービス&キャンペーンの診断タブ は、設定の詳細チェクリストを通じて修正箇所について通知します。さらに、各設定チェックには、 編集リンクが含まれ、問題解決方法が記載されるページに直接アクセスできます。
設定チェックで簡単に解決できる一般的な問題には、チーム割り当てのバラツキ、無効化された発信音声キャンペーン、未定義の発信者番号、誤った発信者ID設定などが含まれます。
診断タブは、発信音声キャンペーンを設定した後に確認する最後の項目です。 このタブはコンタクトセンター管理者アプリケーションの 設定> サービス&キャンペーン> 発信音声サービス> 診断にあります。詳しい情報については、コンタクトセンター管理者ガイドの診断タブをご覧ください。
発信キャンペーンで親アカウントの設定方法を教えてください。
以下に説明されている手順はプレビューキャンペーンを設定するための手順です。さらに、この手順はプログレッシブ及びプレディクティブキャンペーンにも適用できます。これらのモードの代替方法は次の通りです。
- 親アカウントというカスタムレポートフィールド を作成します。
- キャンペーン専用のアクティビティフォームを作成または編集します。アクティビティフォームは、 スクリーンポップアクティビティフォームの有効化を介してキャンペーンに接続されます。
- フォームにテキストフィールド を追加します。
- このフィールドは編集不可です。
- 初期値は PARENTACCOUNT 値です。
- カスタムレポートフィールドオプションは次の画面に示されるように親アカウント に設定しなければなりません。
- フォームを保存します。
- アクティビティフォームはログイン時にキャッシュされます。変更が行われたらエージェントはログアウトし再度ログインしなければなりません。
リストにParentAccount 値のフィールドが含まれる場合
- 上記の手順が使えます。ただし、初期値では、リストフィールドを $(workitem.fullInfo.FIELDFROMLIST)の形式で指定します。
- これにより、必要に応じて特定の値を指定することなく、アクティビティフォームを"再利用"できます。
プログレッシブおよびプレディクティブキャンペーンの場合
これらのキャンペーンにはシナリオが使用されるため、必要に応じてシナリオ内で親アカウントを明示的に設定できます。
- キャンペーン専用のシナリオを作成します。コンタクトセンター管理者アプリケーション内にベースとして利用できるテンプレートがあります。
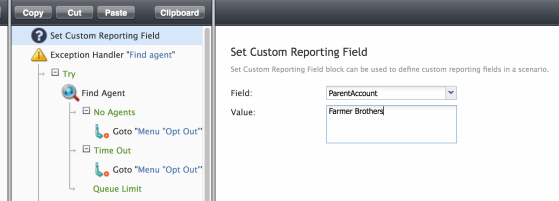
- シナリオの上部に、カスタムレポートフィールドの設定ブロックを追加します。
- フィールド のドロップダウンメニューで、 親アカウントを選択します。
- 親アカウントフィールドに値を設定します。
- シナリオを保存します。
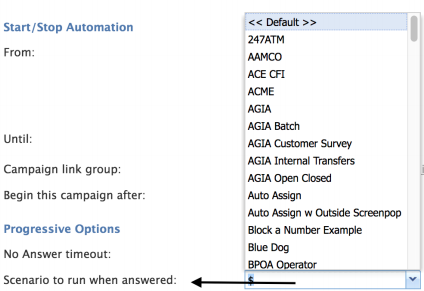
- キャンペーン定義内、 応答時に実行されるシナリオとして作成されたシナリオを指定します。


