Scheduling Reports
Reports may be scheduled for distribution at a future date and time. This functionality is particularly useful for contact centers that run specific reports and distribute them to the same users on a regular basis. Scheduling reports automates the process of running reports with specific parameters and distributing reports via email or FTP/SFTP.
How to Schedule a Report
To schedule a report or to update the settings of a scheduled report, follow these steps:
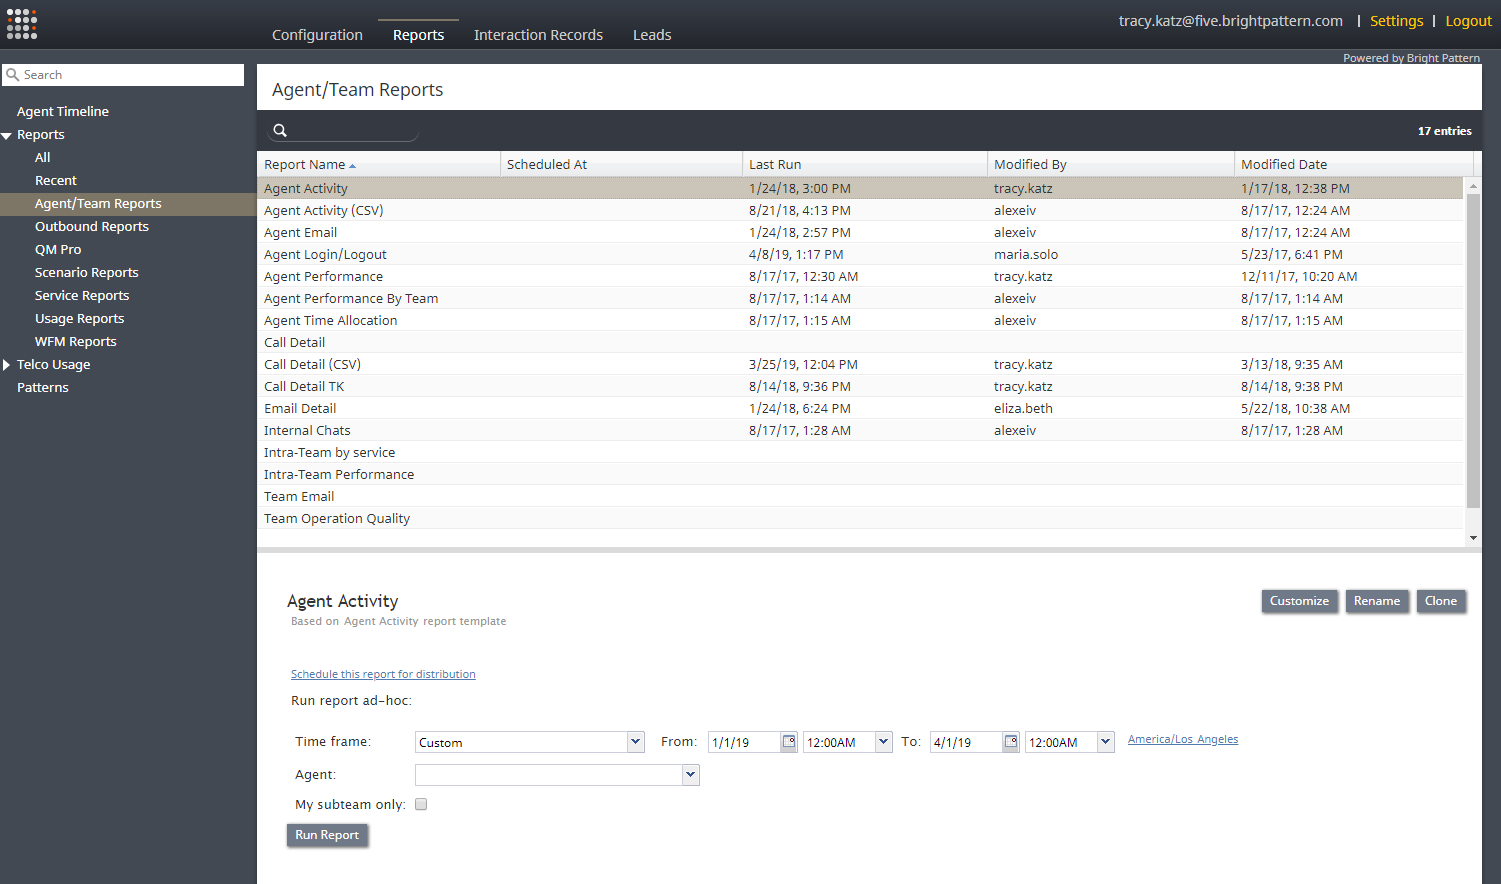
- In Contact Center Administrator, navigate to Reports and select the desired type of report from the main menu (i.e., Agent/Team Reports, Outbound Reports, Scenario Reports, etc.).
- In the list of reports, select the name of the report you wish to schedule. The report properties will be shown in the bottom pane of the screen.
- Click Schedule this report for distribution. The report scheduling parameters will be shown.
- Select the Enabled checkbox.
- Specify the properties for Report Schedule and Report Parameters. See section "Parameters tab" below for descriptions of properties.
- Specify the properties for the Email Delivery tab, if needed. See section "Email Delivery tab" below for descriptions of properties.
- Specify the properties for the FTP Delivery tab, if needed. See section "FTP Delivery tab" below for descriptions of properties.
- Click Apply.
- Review the remaining report properties and edit as needed.
- Click Run Report.
Properties
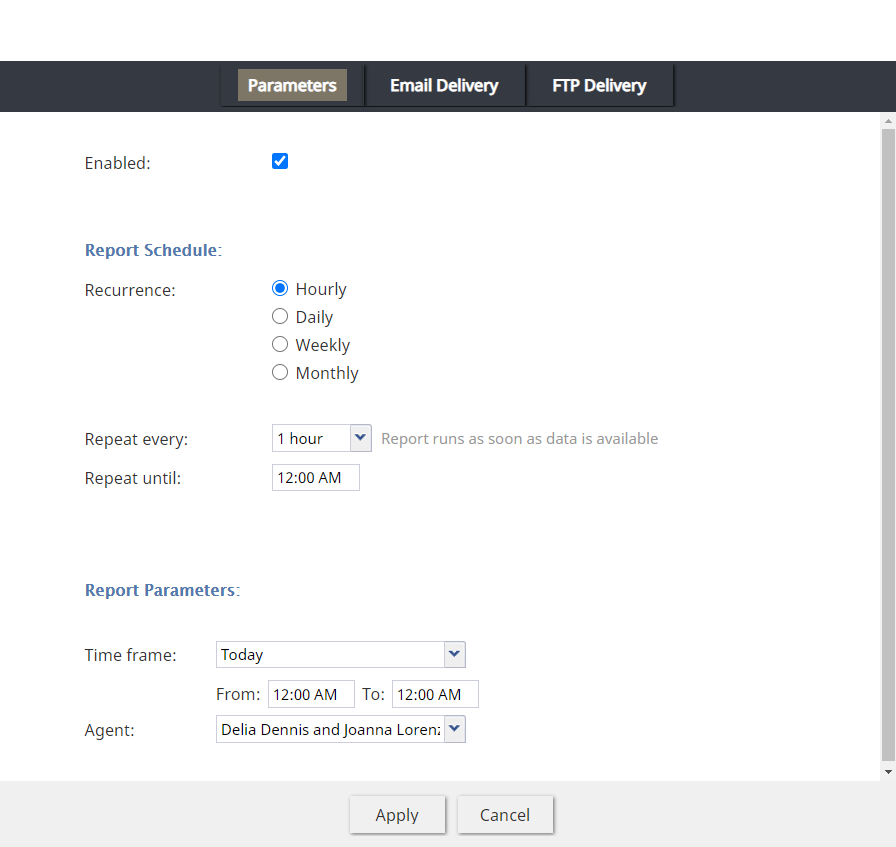
As described in How to Schedule a Report, clicking Schedule this report for distribution brings up a new dialog with report schedule properties and other report parameters. The dialog includes three tabs: Parameters, Email Delivery, and FTP Delivery. The properties of these tabs are described as follows.
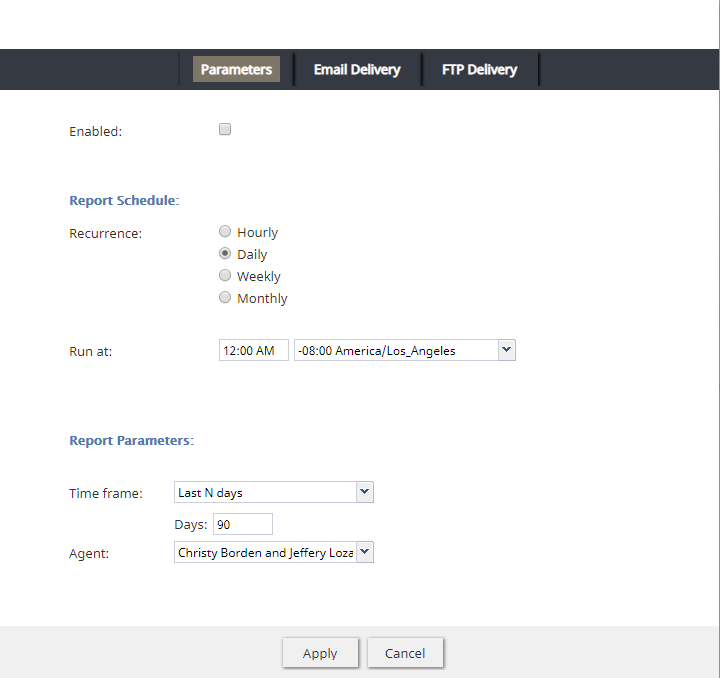
Parameters tab
Enabled
Select the Enabled checkbox to enable the report to be scheduled for distribution.
Report Schedule
In this section of Parameters, define when and how often the report will be scheduled to be run.
Recurrence
Recurrence is the frequency that the report will be run and distributed.
Select one of four options:
- Hourly
- Daily
- Weekly
- Monthly
Run at
Specify the time and the timezone in which the report will be scheduled to run.
Repeat every
Specify how often the report should be run, or if the report should be run only once. Available repeat options include every 15 minutes, 30 minutes, 1 hour, 2 hours, etc. For example, a report scheduled to run every 15 minutes will include data for the previous 15 minutes.
Repeat until
If you selected how often the report run should be repeated, you should specify the time when the report should stop being sent. For example, if you schedule hourly reports repeating every 30 minutes with Repeat until set to "06:00 PM", the last report will be sent at 6 p.m. with data up until 5:30 p.m.
Report Parameters
The Report Parameters section includes the parameters relevant to the selected report name. Depending on the selected Recurrence, you will have the following options:
- For Hourly recurrence:
- Repetition interval - Based on the combination of Repeat every and Repeat until settings
- Today
- This week
- For Daily, Weekly, and Monthly recurrence:
- Today
- Yesterday
- This week
- This week (since Monday)
- Last week
- Last week (Monday - Sunday)
- Current month
- Last month
- Last N days - Allows you to specify the number of days
In the example shown, the selected report name is "Agent Activity" and therefore, only the Agent Activity report parameters "Time Frame" and "Agents" are shown.
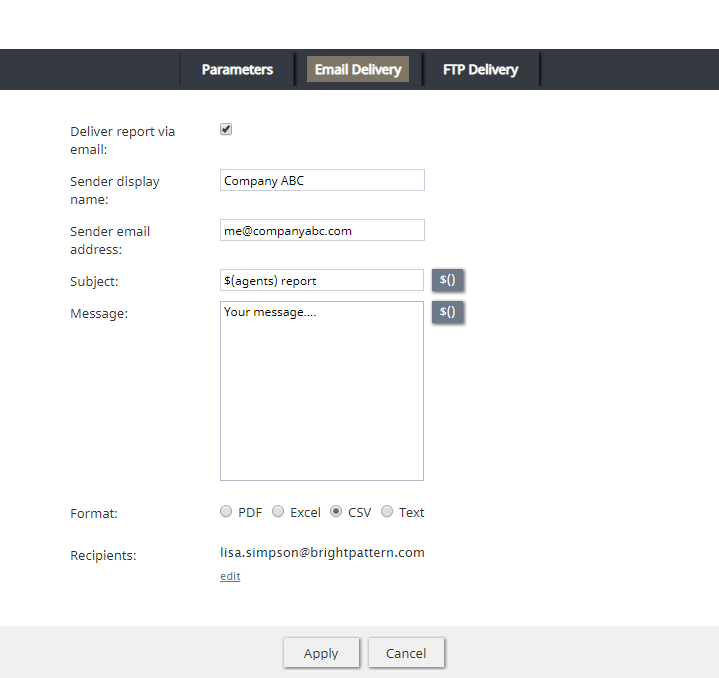
Email Delivery tab
Deliver report via email
Select the Deliver report via email checkbox to enable delivery of the report to specified email addresses.
Sender display name
Enter the desired Sender display name here. This name can be any name (e.g., organization name, your name, team name, service name, etc.).
Sender email address
The Sender email address is the email address that will be used to send the report.
Subject
The Subject is the subject line of the email message to be sent.
$()
Variables of the $(varname) format may be used in the Subject field and Message field.
The Insert Variables button allows you to insert one of the following variables into the Subject or the Message field:
- $(agents) - This variable displays the name of the agent(s) defined in the Report Parameters section.
- $(services) - This variable displays the name of the service(s) defined in the Report Parameters section.
- $(scenarioName) - This variable displays the name of the scenario defined in the Report Parameters section.
- $(startDate) - This variable displays the date of the beginning of the interval defined in the Report parameters setting of the Parameters tab; the format is YYYYMMDD.
- $(endDate) - This variable displays the date of the ending of the interval defined in the Report parameters setting of the Parameters tab; the format is YYYYMMDD.
- $(endTime) - This variable displays the time of the last entry in the report; the format is YYYYMMDDHHMM.
- $(startTime) - This variable displays the time of the first entry in the report; the format is YYYYMMDDHHMM.
- $(timeframe) - This variable displays the timeframe of the report as defined in the Report Parameters section.
- $(timezone) - This variable displays the time zone as defined in the Report Schedule section.
Please note that the available variables depend on the type of report being scheduled.
Message
The Message is the body text of the email message to be sent.
Format
Format is how the report will be provided in the email message to be sent.
Choose one of four options:
- Excel
- CSV
- Text
Recipients
Recipients are the people who will receive the scheduled report. Click edit to select and add recipients to the list.
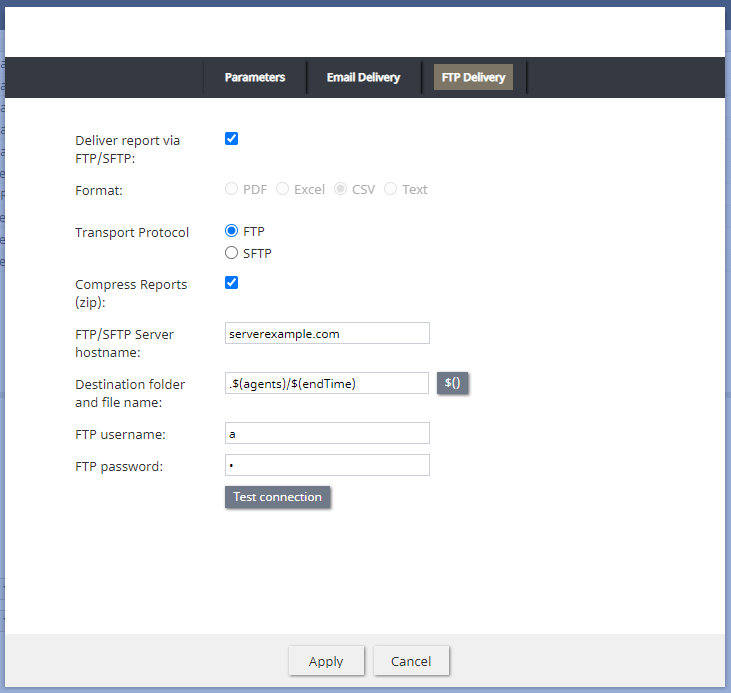
FTP Delivery tab
Deliver report via FTP/SFTP
Select the Deliver report via FTP/SFTP checkbox to enable delivery of the report via FTP/SFTP.
Format
Format is how the report will be saved and sent via FTP/SFTP.
Choose one of four options:
- Excel
- CSV
- Text
Compress Reports (zip)
When selected, this option delivers reports (.CSV) in a compressed .ZIP file. If not selected, reports will be delivered as the specified file type as uncompressed, individual attachments.
Transport Protocol
Transport Protocol is the specified transfer protocol (FTP or SFTP).
FTP/SFTP Server hostname
FTP/SFTP Server hostname is the is the specified FTP/SFTP server username.
Destination folder and file name
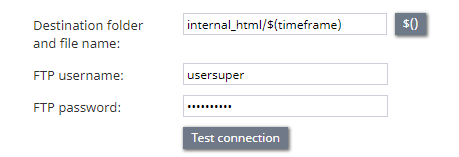
Destination folder and file name is where the scheduled report will be saved.
$()
Variables of the $(varname) format may be used in the Destination folder and file name field.
The Insert Variables button allows you to insert one of the following variables into the Destination folder and file name field:
- $(agents) - This variable displays the name of the agent(s) defined in the Report Parameters section.
- $(services) - This variable displays the name of the service(s) defined in the Report Parameters section.
- $(scenarioName) - This variable displays the name of the scenario defined in the Report Parameters section.
- $(startDate) - This variable displays the date of the beginning of the interval defined in the Report parameters setting of the Parameters tab; the format is YYYYMMDD.
- $(endDate) - This variable displays the date of the ending of the interval defined in the Report parameters setting of the Parameters tab; the format is YYYYMMDD.
- $(endTime) - This variable displays the time of the last entry in the report; the format is YYYYMMDDHHMM.
- $(startTime) - This variable displays the time of the first entry in the report; the format is YYYYMMDDHHMM.
- $(timeframe) - This variable displays the timeframe of the report as defined in the Report Parameters section.
- $(timezone) - This variable displays the time zone as defined in the Report Schedule section.
FTP username
FTP username is the specified FTP username.
FTP password
FTP password is the specified FTP password.
Test connection
The Test connection button is used to test the FTP/SFTP connection with the supplied credentials.

