Email Settings
This menu contains various settings related to email communications. Note that in addition to customer interactions, email in Bright Pattern Contact Center is used for various auxiliary tasks, such as sending transcripts of chat sessions, password reset instructions, scheduled reports, and voicemail audio files.
To configure email settings, select Email Settings from the Call Center Configuration menu.
Note the following:
- Except for the SMTP settings, configuring the system to send voicemail attachments is done via scenarios. For more information, see section Voicemail of this guide and description of the Voicemail block in the Scenario Builder Reference Guide.
- Except for the SMTP settings, configuring the system to send reports via email is done via the Scheduled Reports page.
- Except for the SMTP settings and chat transcript template, configuring the system to email chat transcripts is done via scenarios. Note that the EMail scenario block is not used for this purpose. Rather, sending a chat transcript email is triggered by setting variable $(item.sendTranscript) to 1 in the chat scenario. You can see an example of such configuration in the Support Chat scenario template.
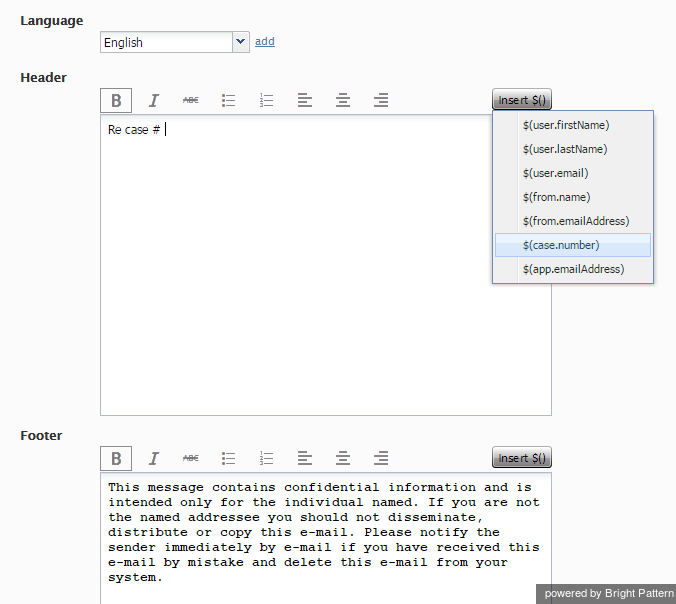
This section relates to customer email interactions and lets you define mandatory standard messages that will be inserted above (the header) and/or below (the footer) the main text of each email that is sent to a customer. Some examples of such messages are references to case numbers, legal disclaimers, and a company’s contact information. Headers and footers are not applied to acknowledgements (initial automatic replies sent to acknowledge receipt of incoming mail).
Note: The headers and footers configured here will be applied to all emails sent from your contact center regardless of the service. For service-specific email templates, default Knowledge Base articles should be used.
To configure these elements, select option Email Header and Footer from the Email Settings menu.
The Email Header and Footer screen properties are described as follows.
Language
The Language setting is where you select the language of the header and footer message. Note that you can define the header and footer in multiple languages. The system will automatically insert the version corresponding to the language of the main text of the email.
Please note: The languages listed here differ from those found in Language Skills; only auto-detectable languages are available to select from this menu.
Header
Type the text of the message that should appear in the Header field, above the main text of all emails sent to customers.
Type the text of the message that should appear in the Footer field, below the main text of all emails sent to customers.
Insert $()
This setting specifies the menu of substitution fields that can be inserted in the header and footer messages. Except for $(cursor), these are the same substitution fields that are used in Knowledge Base articles.
Remove
Use the Remove button to remove the header and footer in the selected language.
SMTP Configuration
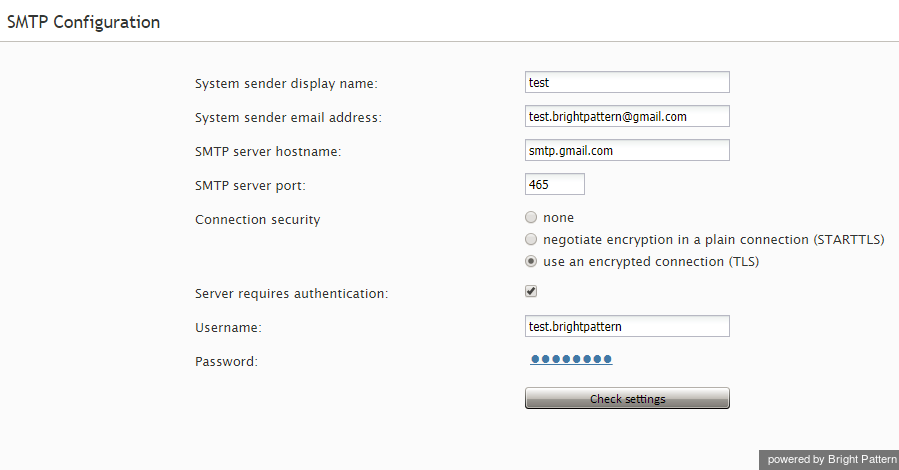
This section contains settings for connection to the SMTP server used for auxiliary email communications, including transcripts of chat sessions, password reset instructions, scheduled reports, and voicemail audio files. Note that this section is not used to configure SMTP for the outbound email interactions with customers. For the latter, email scenario entries are used.
To configure SMTP connection settings, select SMTP Configuration from the Email Settings menu.
SMTP Configuration Screen Properties
The Email SMTP Configuration screen properties are described as follows.
System sender display name
Sender display name is the name that will appear in the From field of the emails with password reset instructions.
System sender email address
This is the email address that will appear in the From field of the emails with password reset instructions.
SMTP server hostname
SMTP server hostname specifies the SMTP server host name.
SMTP server port
SMTP server port specifies the SMTP server port.
Connection security
Connection security indicates whether a cryptographic protocol (TLS or SSL) will be used to secure this connection.
- For a nonsecure connection, select none.
- To negotiate encryption in a plain connection, select negotiate encryption in a plain connection (STARTTLS).
- For an immediate secure connection, select use an encrypted connection (TLS/SSL v3).
Server requires authentication
This setting indicates whether client authentication is required for the SMTP server.
Username
Username is the user name for SMTP client authentication. This user name must be specified if the Server requires authentication option is selected.
Password
Password is the password for SMTP client authentication. The password must be specified if the Server requires authentication option is selected.
Check settings
Use the Check settings button to verify the correctness of your SMTP settings.
Password Recovery Template
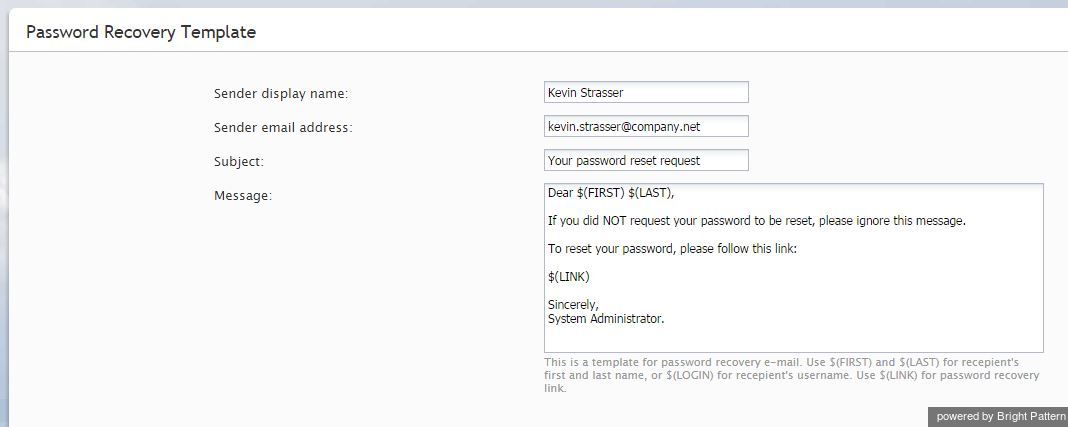
To configure a template for password reset instructions, select Password Recovery Template from the Email Settings menu.
Password Recovery Template Screen Properties
The Password Recovery Template screen properties are described as follows.
Subject
This setting specifies the text that will appear in the Subject field of the emails with password reset instructions.
Message
This setting specifies the text that will appear in the body of the emails with password reset instructions.
You can use the following variables in this text:
- $(FIRST) for the first name of the email recipient
- $(LAST) for the last name of the email recipient
- $(LOGIN) for recipient’s username
- $(LINK) as a placeholder for password recovery link
Chat Transcript Template
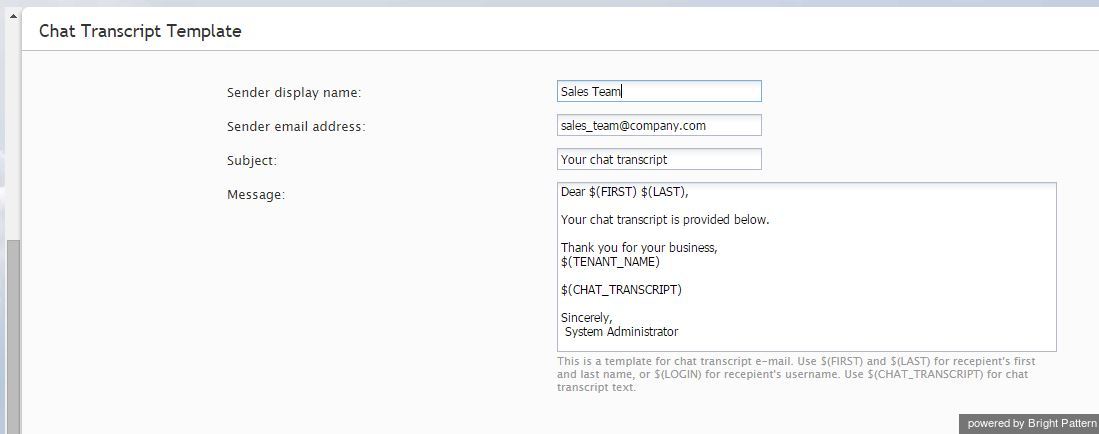
To configure a system-wide template for chat transcripts, select Chat Transcript Template from the Email Settings menu. Note that it is possible to configure chat transcript templates per Scenario Entry.
In order for transcripts to be emailed, you will need the following:
- A configured SMTP server - In order for the system to automatically send emails, you will need complete SMTP Configuration.
- A configured pre-chat form with an email field - Transcripts are emailed to the address(es) specified in fields containing the variable $(item.email) when the session ends.
- A chat scenario containing $(item.sendTranscript) - In the corresponding chat scenario, you must include a Set Variable scenario block with the variable $(item.sendTranscript); the value must be set to 1 in order for the transcript to send.
Chat Transcript Template Screen Properties
The Chat Transcript Template screen properties are described as follows.
System sender display name
This is the name that will appear in the From field of the emails with chat transcripts. This setting is mandatory for sending emails with chat transcripts.
System sender email address
The Sender email address will appear in the From field of the emails with chat transcripts. This setting is mandatory for sending emails with chat transcripts.
Subject
This setting specifies the text that will appear in the Subject field of the emails with chat transcripts.
Message
This setting specifies the text that will appear in the body of the emails with chat transcripts.
You can use the following variables in this text:
- $(FIRST) for the first name of the email recipient
- $(LAST) for the last name of the email recipient
- $(LOGIN) for recipient’s username
- $(CHAT_TRANSCRIPT) for chat transcript
- $(TENANT_NAME) for your business name as it is registered with your service provider
< Previous | Next >


