List Leads Preview Campaign Tutorial
If your contact center receives leads from a website form, when your agents follow up with a lead, you want them to know the name of the person they are calling.
This can be accomplished by adding the customer’s information to an outbound preview campaign’s calling list as a new record. When the new record pops to an agent during the running campaign, a screenpop form will display the customer’s entered information.
This tutorial describes how to do the following:
- Create a .CSV calling list and this list with an outbound preview campaign
- Use the BPCC List API to pass customer information from the website to the .CSV calling list
- Configure an activity form that pops the list’s information to the agent while the campaign is running
Prerequisites
In order to complete this tutorial, you will need to do the following first:
- Create a CSV calling list
- Configure an outbound preview campaign
- Be able to test the BPCC List API by making cURL requests in the terminal
- Ensure your user has API access
Create a New .CSV List File
The first step for this tutorial explains how to create a new .CSV calling list with spreadsheet software. The created spreadsheet will contain the information you wish to pass to the agents at the end of this tutorial.
Create List in Admin using a List Wizard
Adding a .CSV list using the wizard is a fairly straightforward process. This tutorial will step you through the finer points of how to upload the spreadsheet you just created.
Updating Lists
New lists imported via the list import wizard appear in the list view of Lists. You can update these lists manually or set up periodic automatic updates. In both cases, the list update procedure can be performed as needed during the actively running campaigns.
Once you have created and u, you can further update it as needed later.
How to Give a User API Access
The next step of the tutorial details the two components required for any Bright Pattern Contact Center (BPCC) user to be able to use the various BPCC APIs: granting a user privileges and API secrets. Certain privileges are required in order to use specific APIs. Granting specific privileges allows the user to populate the list records, and the API secret key will then allow the system to execute further actions on behalf of the user via API.
Creating an Activity Form
Here you will create an activity form using the form builder. Building this form creates a screenpop for the spreadsheet information collected from your website (i.e., the customer names, emails, and phone numbers, etc.). This form will later provide this information to the agents in Agent Desktop.
This is an example of a very basic form. Using the provided fields, this screenpop builder can be as intricate or as simple as you need.
Note: In order to create an activity form, your user must have the Configure Contact Forms and fields privilege.
- Login to Bright Pattern’s Contact Center Administrator.
- Click Case & Contact Management on the left menu.
- Click Forms.
- Click Activity.
- Click the “ + “ button on the bottom left to add a new form.
- A Create Screenpop window will open.
- Rename the form at the top center by hovering over the text “Main Page” to the right of the gear icon.
- A pencil icon will appear.
- Click it and rename the page.
- For this example, the page is named “Info Form.”
- Click “OK.”
- Click it and rename the page.
- A pencil icon will appear.
- Scroll down the left pane until you reach the “Text” form control.
- Drag and drop text controls onto the right hand pane until you have the same number of text controls as you have spreadsheet fields that you wish to pass to your agents.
- Example: In the “TestWebsiteFormLeads” list, there are four fields that the agents will receive later - “FirstName”, “LastName”, “Email”, and “PhoneNumber.”
- To match, you would drag and drop four text controls.
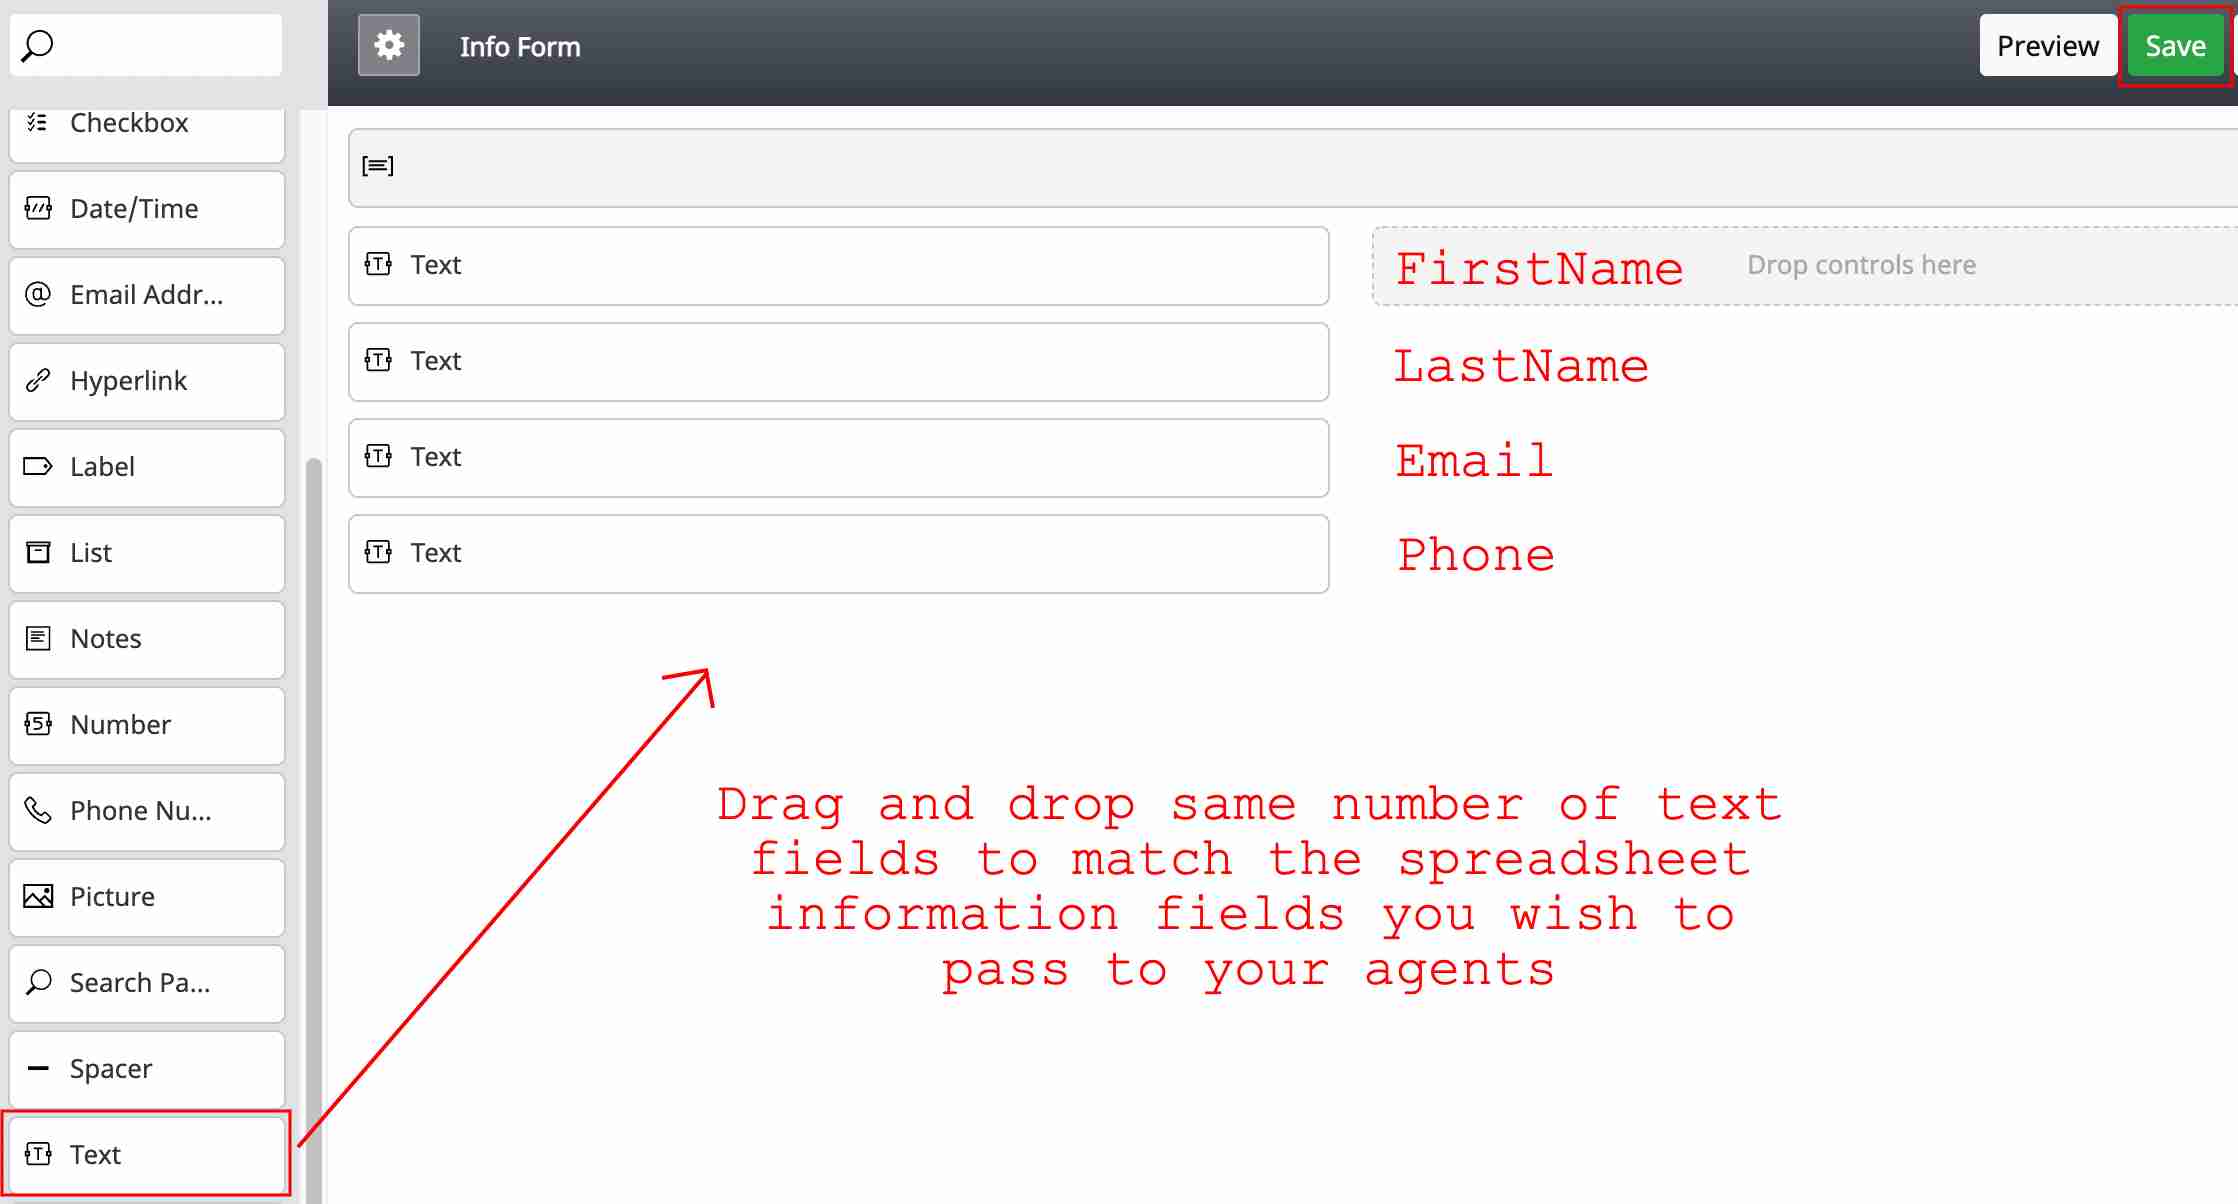
These fields are going to create a list in Admin using the List Wizard and become the information your agents receive in Agent Desktop.
- Once the appropriate controls are in place, hover over the top text field until a pencil icon appears.
- Click the pencil icon.
- A pop up editing window will appear named “Text Field Properties.”
- Make certain you can see the “OK” and “Cancel” buttons on the bottom.
- If you cannot, resize the window by grasping the upper right corner and pulling down and to the left until you can see the “OK” and “Cancel” buttons.
- Scroll down to “Options”.
- The “Editable” checkbox will be checked.
- You do not want your agents to be able to change this information.
- Uncheck the checkbox.
- Scroll down to the “Initial Value” box.
- This is the spot that we are passing in the variables from the list spreadsheet to the form.
- For each text field that you have provided, you must change the Initial value.
- In the .CSV uploaded earlier we passed four fields (besides the ID) - “FirstName”, “LastName”, “Email”, and “PhoneNumber.”
- In the first text field, the Initial value would be:
- First Name: $(workitem.fullInfo.FirstName)
- In the second text field, the Initial value would be:
- Last Name: $(workitem.fullInfo.LastName)
- In the third text field, the Initial value would be:
- Email: $(workitem.fullInfo.Email)
- In the fourth text field, the Initial value would be:
- Phone Number: $(workitem.fullInfo.PhoneNumber)
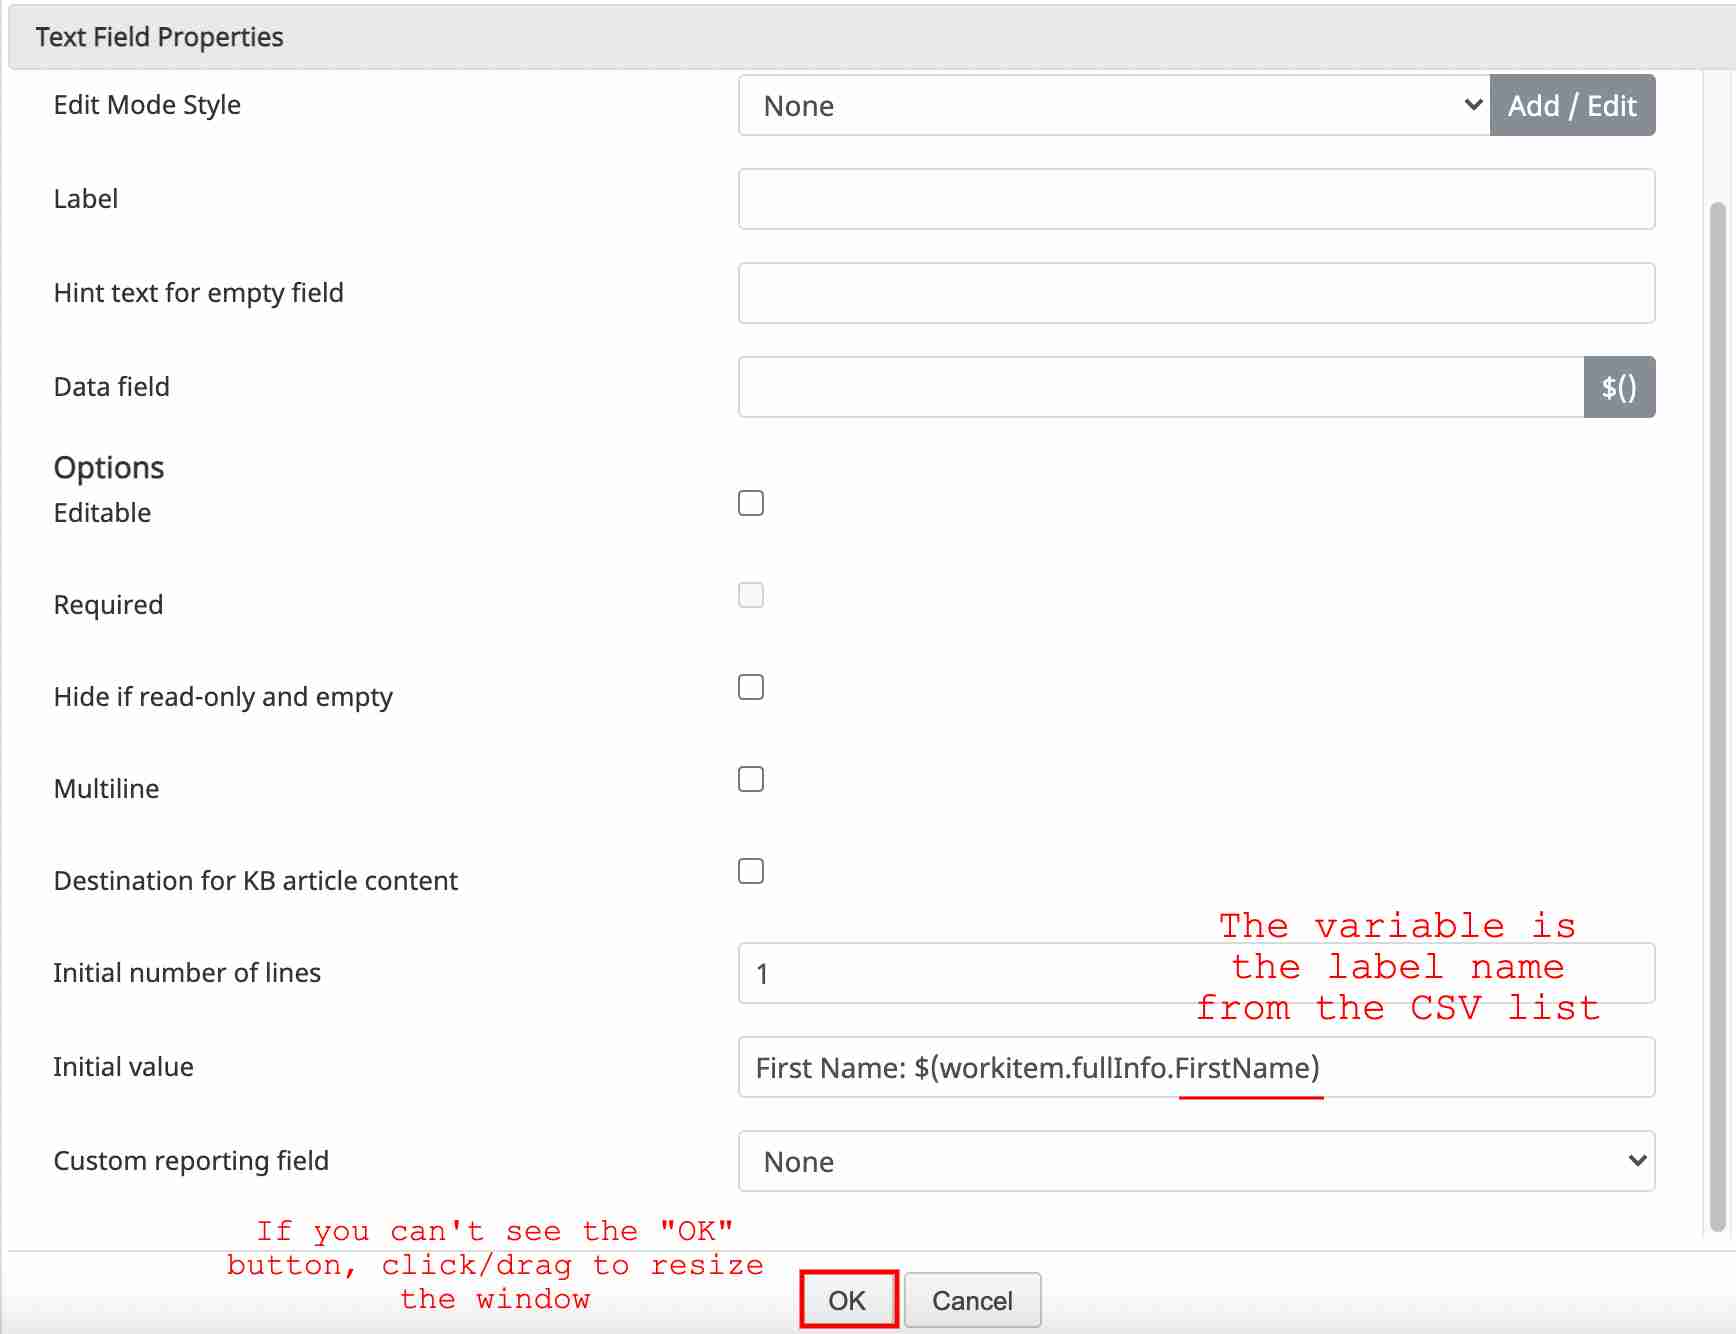
Each of the text fields will have the same “Initial value” field, only replacing the “FirstName” with the appropriate spreadsheet label variable. Alt:Screenshot of the Bright Pattern form builder text button variable creation page with Options and Initial Value highlighted
- Phone Number: $(workitem.fullInfo.PhoneNumber)
- In the first text field, the Initial value would be:
- In the .CSV uploaded earlier we passed four fields (besides the ID) - “FirstName”, “LastName”, “Email”, and “PhoneNumber.”
- After each value is entered, click “OK.”
- Once all the fields are filled, check to make sure none of the fields are editable and that all have the appropriate information passed in.
- Click “Save.”
- If you would like to improve the look of the form, you can add columns and labels.
- Example: You would like your agents to see two columns on their screenpop - one with labels (First Name, Last Name, Email, and Phone) on the left hand side and the other with the fields passed in from the website on the right.
- Hover your mouse near the center-top of the right pane beneath the gear icon and the Preview/Save/Close buttons.
- A row of checkmark-capable boxes will appear. These are part of the Dynamic Layout Editor called the System Controls section, and they allow you to adjust the columns and define the number of sections that appear on the form.
- For this example, we only want two columns.
- Click the center checkbox.

Checking only the center checkbox divides the form into two columns. Alt: Screenshot of the Bright Pattern form builder column creation checkboxes
- Scroll down the left menu until you see the Labels button.
- Drag and drop labels onto the left side of the form to match the fields you created earlier.
- Example: Earlier, you created four fields that the agents will receive - “FirstName”, “LastName”, “Email”, and “PhoneNumber.”
- To match, you would drag and drop four label controls.
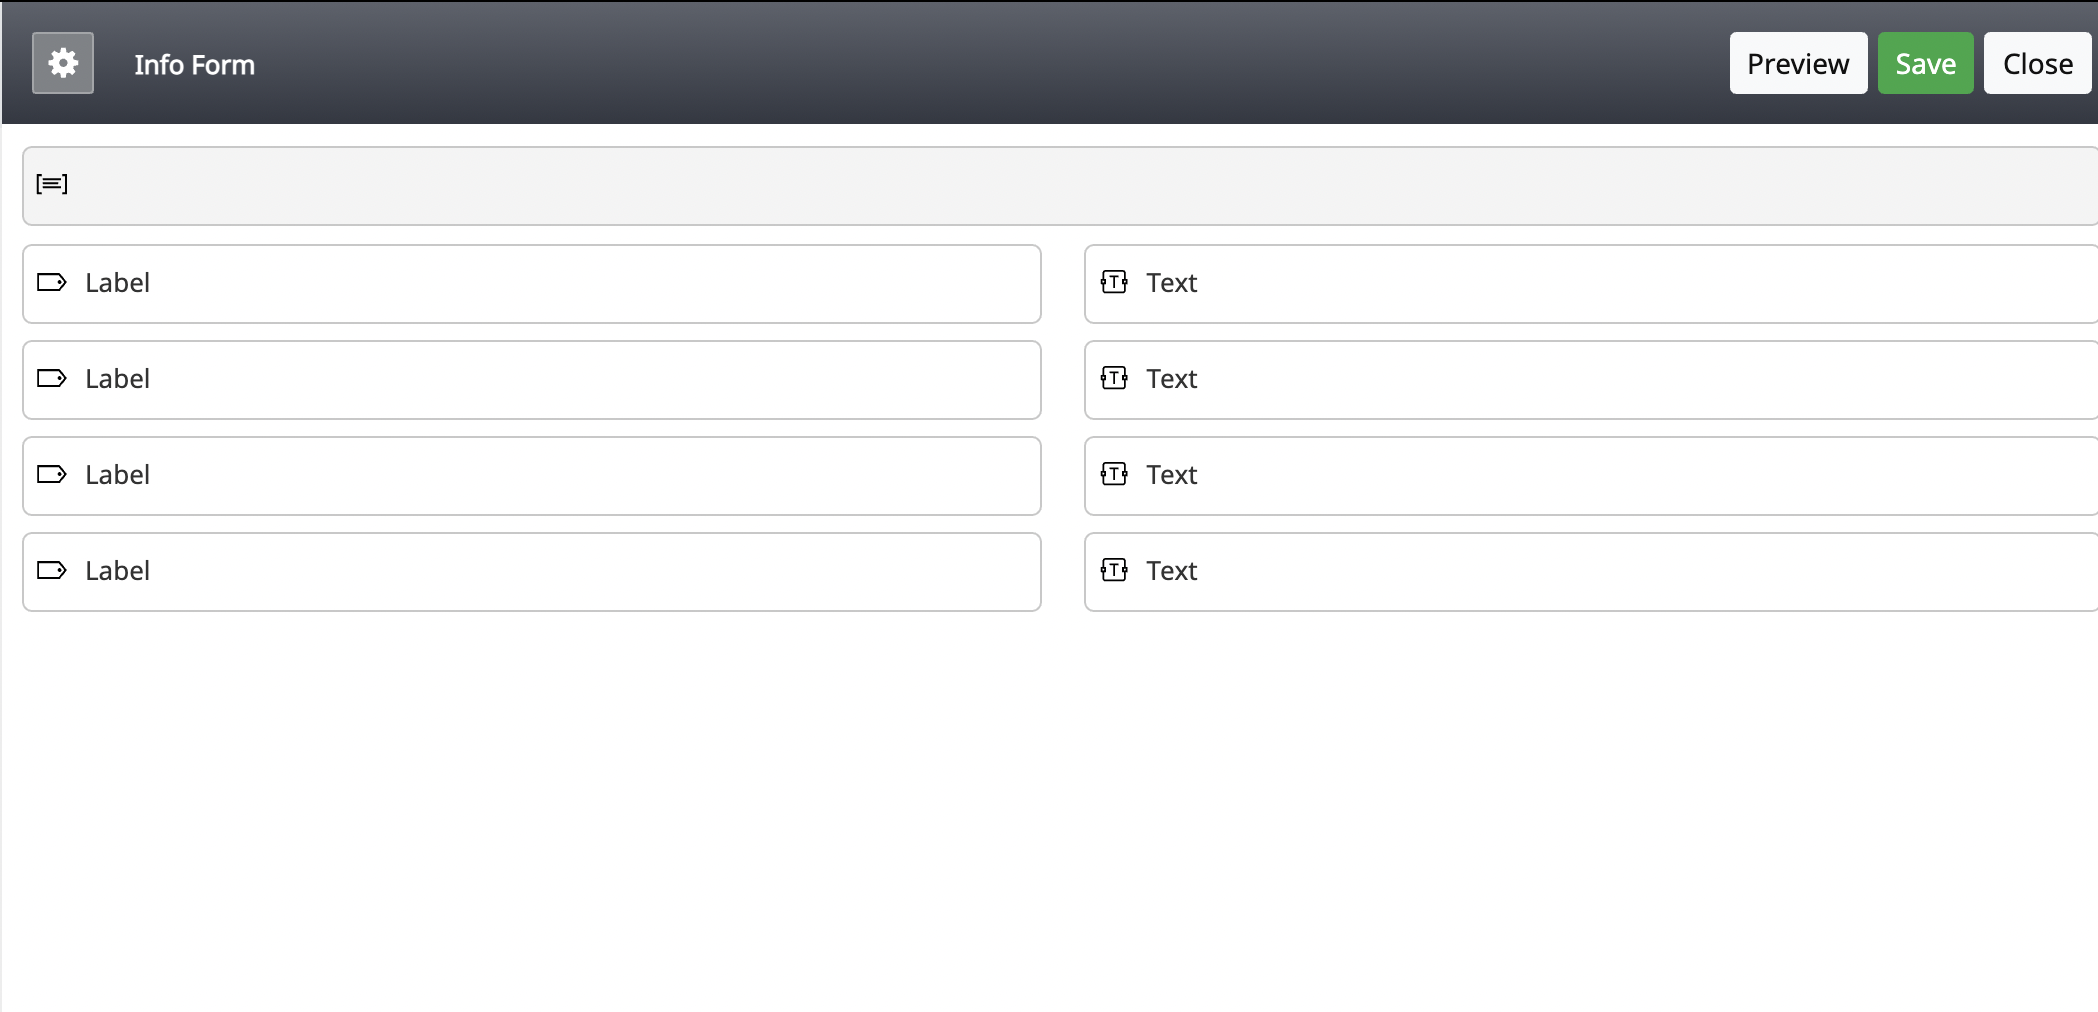
In this example, there are four blank labels to match the four fields created earlier. Alt: Screenshot of the Bright Pattern form builder with four labels to match the four fields in two columns
- Hover over the top label and a pencil icon will appear.
- Click on the icon.
- A “Label Field Properties” box will open with two options: a Style drop down and a blank Label field.
- On Style, click the drop down arrow and choose “Label”.
- On Label, type the name of the label.
- Example: The label to match the “FirstName” variable in the text field on the right could be “First Name” for the agent’s easy readability.
- Click “OK.”
- Repeat for the other fields you wish to label.
- Click “Save.”
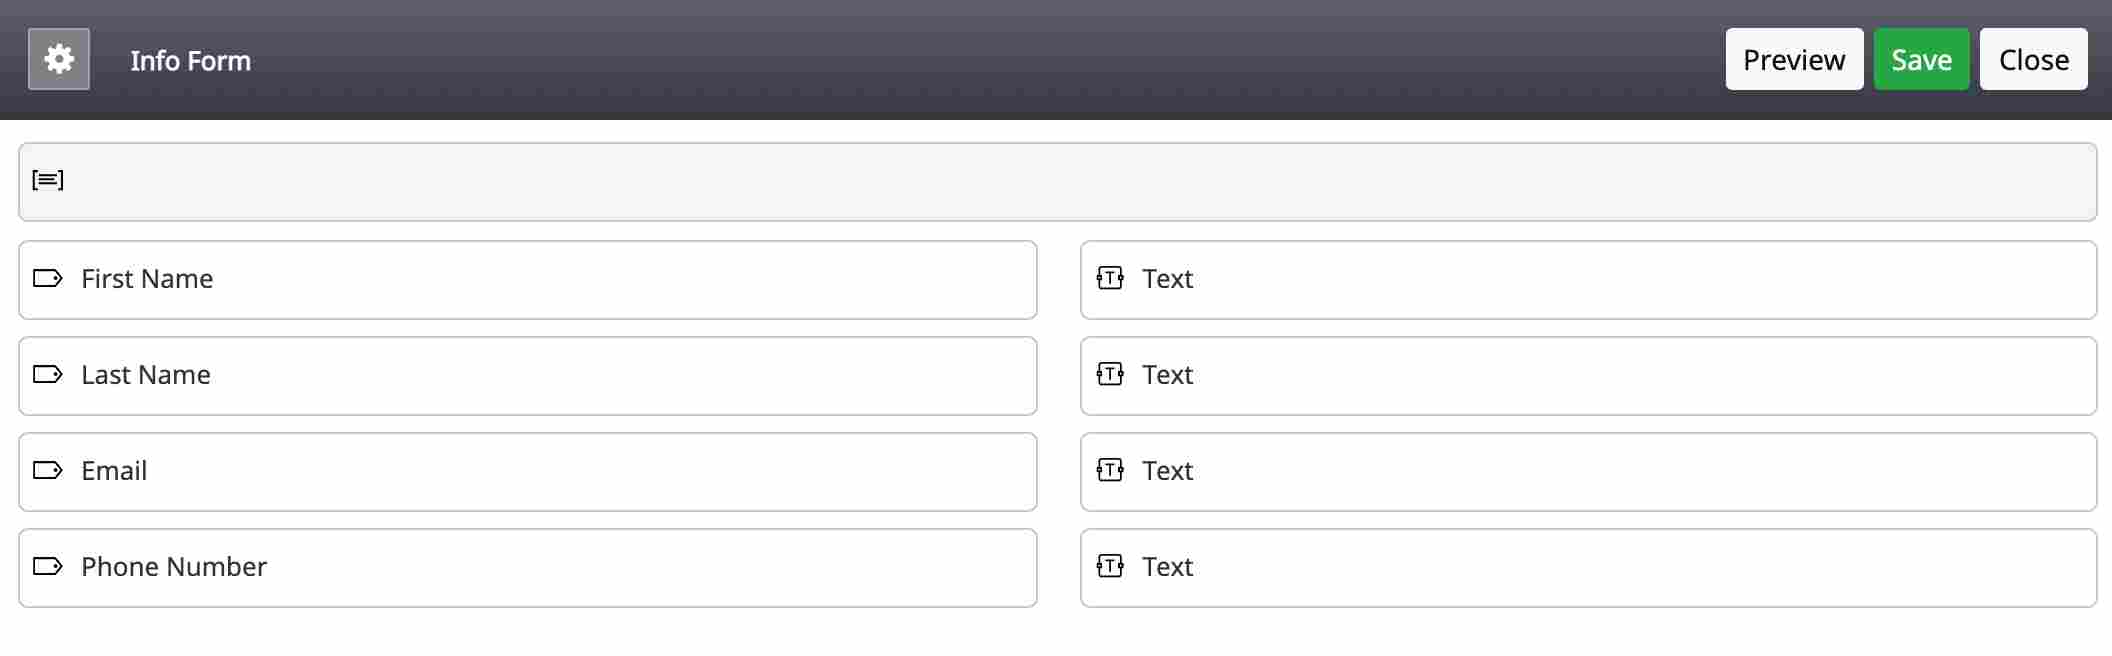
These labels are named to match the text boxes on the right. Alt: Screenshot of the Bright Pattern form builder with four completely named labels to match the four fields in two columns - Verify that the labels correctly match the text variables in the parallel column.
- Click “Save.”
- Verify that the form was added to the forms list by going to section Case & Contact Management > Forms > Activity.
- Your form name will appear in the center pane.


Creating an Outbound Preview Campaign
The next step for this tutorial requires creating an outbound campaign container. Building this campaign will later allow you to distribute the records from the list to your agents via the Agent Desktop.
Using cURL and the Terminal to Test List Import APIs
If you need to test Bright Pattern Contact Center (BPCC) REST APIs, note that you may do so by using cURL and your computer’s terminal. If your company maintains a website, it will use the server-side scripts to perform similar actions. Installing cURL for the Windows OS is a fairly simple process; Mac OS has cURL installed by default.
This step in the tutorial uses the BPCC List Management API to add a record to an existing .CSV list and then return all records from the list. For information regarding uploading calling lists, see Tutorials for Admins, section Lists.