From Bright Pattern Documentation
Creating an Outbound Preview Campaign
The following tutorial describes how to create an outbound campaign container. Creating this campaign will later allow you to distribute the records from the list to your agents via the Agent Desktop.
Procedure
- Login to Bright Pattern’s Contact Center Administrator.
- Click Services & Campaigns from the left menu.
- Choose the Properties tab.
- Click the “ + “ button on the bottom to add a new campaign.
- A Create Service window will open.
- There are seven radio buttons to choose from: Inbound Voice, Outbound Voice, Blended Voice, Chat, Marketing, Email, and Outbound Messaging.
- Choose “Outbound Voice.” You could theoretically choose any of the options, but Outbound Voice allows your agents to contact your potential customers from the website form via calling out.
- Click “OK.”
- In the right pane, make sure you are still on the Properties tab.
- Name the campaign.
- For this example, we have named our campaign “WebformPreview.”
- Under the Type dropdown, choose “Outbound Voice.”
- Scroll down to the “Require dispositions” checkbox and check it.
- Click “Apply.”

- Move one tab to the right to the Assignments tab.
- There are four groups to add to: Teams, Administrators, Operators, and Reviewers.
- Choose “add” to add the appropriate teams to each group.
- This brings you to a blank team choice dropdown.
- In our example, we have chosen to add Customer Service to the Teams group.
- Click the green check mark to save.
- Go down the list, adding whichever teams you deem appropriate to each group.
- Next, select the desired Administrators for the campaign.
- When you are finished, click “Apply.”

- Move one tab to the right to the List tab.
- Note: Pull up the bottom pane from the right side if you can’t see it initially.

- To add a new list to the Lists tab, click the bottom right “ + “ sign.
- This will open the Add Calling List window with a blank field and a drop down.
- Click the drop-down menu and choose from the available lists.
- In our example, we are choosing WebsiteFormLeadsCSV.
- Click “OK.”
- In the Lists tab, on the bottom pane, make sure the Enabled checkbox is checked.
- Click “Apply.”
- Move one tab to the right to the Dispositions tab.
- There are two groups: Outbound and Preview Record.
- Clicking either shows you the list of available disposition reasons.
- These can be added to or edited at your discretion to fully adapt to your call center’s disposition needs.
- For the time being, choose Outbound.
- Click “Apply.”
- Move one tab to the right to the Activity tab.
- There is a checkbox labeled “Enable screenpop activity form” with a drop-down menu.
- Click the drop-down menu.
- Choose from the list of available forms.
- For our example, we have chosen Info Form from the Creating an Activity Form tutorial above.
- Click “Apply.”
- Choose from the list of available forms.
- Move one tab to the right to the Numbers tab.
- This is another two-pane tab.
- If necessary, drag the bottom pane on the right side upward.
- Click the “ + “ button on the bottom right to add a default Caller ID number to the available list and to specify which state/province the dialer is dialing from.
- This will open an Add Caller ID window.
- There are two fields: Caller ID and State/Province.
- Click the Caller ID drop-down menu to choose which number to dial from.
- Type into the empty text field which state or province in which this phone number is located.
- Click “OK.”
- There are two fields: Caller ID and State/Province.
- This will open an Add Caller ID window.
- On the top pane, there are two choices: Scenarios and Caller ID.
- As we have not created any scenarios for this campaign, choose Caller ID.
- There are two drop down fields:
- There are two drop down fields:
- Click “Apply.”
- As we have not created any scenarios for this campaign, choose Caller ID.
- This is another two-pane tab.

- Move one tab to the right to the Outbound tab.
- There are five sub-tabs: General, Calling Hours, Dial Rules, DNC, and Diagnostics.
- Click on General.
- The first section has three fields: a Type drop-down menu, an Enabled checkbox, and Status buttons (Start and Stop)
- Type: Click the Type drop down and choose Preview.
- This is an outbound campaign that receives its information from a customer-initiated webform. It does not use Predictive or Progressive algorithms and Automatic doesn’t apply in this situation.
- Check the Enabled checkbox so that the campaign is enabled and will be ready to use later.
- For the time being, leave the Status button on “Stop.”
- Later, when you are ready to run the campaign, you will click the “Start” button and then “Apply.”
- Type: Click the Type drop down and choose Preview.
- The first section has three fields: a Type drop-down menu, an Enabled checkbox, and Status buttons (Start and Stop)
- The second section - Start/Stop Automation - does not need to be interacted with for this tutorial. Leave it alone.
- The third section, Preview Options, has five fields.
- For this tutorial, you only need the first three: the Screenpop URL field, the “Start dialing first number automatically” checkbox, and the “Start dialing after:” field.
- You pass in a website address into the Screenpop URL field if you wish the agent to see a specific website posted on their Agent Desktop form when interacting with this client.
- Click the “Start dialing first number automatically” checkbox if you wish your agent to have the phone number field fed to their dialer automatically.
- Enter a number of seconds into the “Start dialing after:” field to determine the wait time between the agent receiving the form information from the list.
- Click “Apply.”
- Click on Calling Hours.
- There are four sections in the Calling Hours tab: Hours, a “Phones to call, by preference” drop down, the “Use safe calling hours” checkbox, and “Comply with state calling hours” checkbox.
- The Hours section is where you can add and specify the hours of your calling center, as well as the hours that you will allow agents to call from this list for this campaign.
- The “Phones to call, by preference” dropdown is where you pass the phone number variable from the webpage form.
- In this example, it is “PhoneNumber”.
- Click on the drop down and choose the phone variable.
- Click on the green checkmark to save.
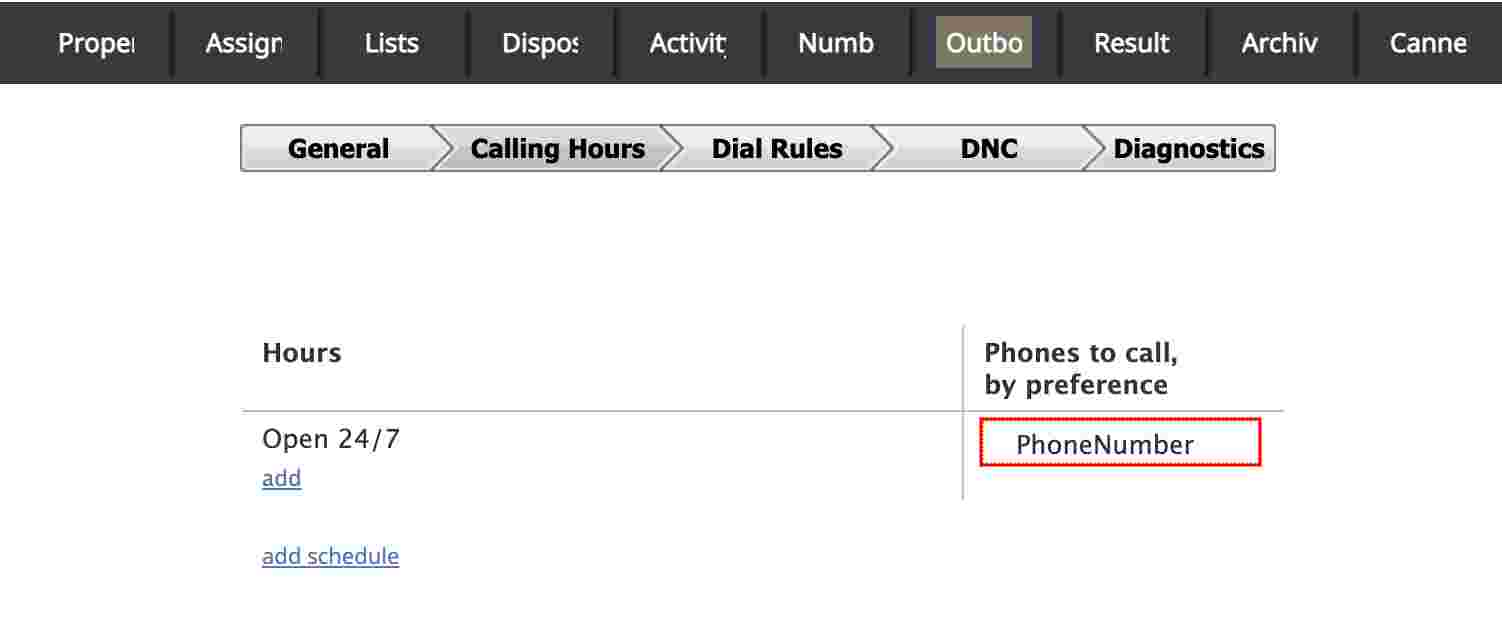
Make certain to provide the variable from the form field beneath “Phones to call, by preference.” Alt: Screenshot of Bright Pattern's Services and Campaigns Outbound Calling Hours section with the variable to pass in highlighted
- Check the “Use safe calling hours” only if you have collected zip code and address information from your website form. The system will check the provided zip code information against the time of day where the call is originating from to verify if it is an appropriate time to call the customer back.
- Check the “Comply with state calling hours” box if it is necessary that your call center requires this option.
- Example: A 24/7 call return form for plumbing emergencies would not need to comply with state calling time guidelines.
- Click “Apply.”
- There are four sections in the Calling Hours tab: Hours, a “Phones to call, by preference” drop down, the “Use safe calling hours” checkbox, and “Comply with state calling hours” checkbox.
- Click on Dial Rules.
- Note: This section has an upper and lower pane. If you cannot see the lower pane, drag the gray bar up from the bottom to reveal the Disposition Retry pane.
- The top pane of Dial Rules includes three fields: a “Maximum attempts per record” field, a “Maximum attempts per number” field, and an “Attempt all numbers in record first” checkbox.
- For the time being, leave the two “Maximum attempts” boxes as default. You can return later to adjust these sections to your desired specifications.
- Only check the “Attempt all numbers in record first” checkbox if you wish to cycle through all of the records in the website form list first before beginning the list again.
- If the list is particularly long, consider leaving this unchecked.
- The bottom pane is the Disposition Retry panel. It includes: Disposition, Retries, Retry Interval, and Action.
- By choosing each individual disposition and clicking the pencil icon on the bottom right, you can specify and streamline a time frame before your outbound agents can call the client back.
- For this tutorial, we will be leaving these as default.
- Click “Apply.”
- Click on Do Not Call (DNC).
- This section allows you to append a Do Not Call list (DNC) to your campaign by clicking the “add” link and choosing a DNC list from the available drop down menu.
- In this tutorial, you will not be adding a DNC list.
- Click “Apply.”
- Click on Diagnostics.
- The Diagnostics page has one primary purpose: Configuration Checks.
- If the page is blank that means that your set up is sufficient so far.
- Click “Apply.”
- If the page is not blank, there will be a list of potential issues to be addressed beneath Configuration Checks.
- Example: You see the error: “Inconsistent assignment of teams to enabled campaigns” with an “edit” link to the right. This means that you have assigned too many campaigns to one specific team.
- Click on the “edit” link and it will take you to the issue in question, where you can fix it if you so wish.
- When the Diagnostics error list is fixed to your satisfaction, click “Apply.”
- If the page is blank that means that your set up is sufficient so far.
- The Diagnostics page has one primary purpose: Configuration Checks.
- The remaining three tabs (Results, Archive, and Canned) will not be needed for the rest of this tutorial.
- Click “Apply.”
- The basic Outbound Campaign is now set up.


