<translate>
Set up a Watson Assistant Integration Account
Integrations with IBM Watson Assistant are enabled through integration accounts, which store the credentials of third-party services so that Bright Pattern Contact Center can access and work with them.
A Note About the Watson Name
Bright Pattern integrates with both IBM Watson Assistant--the latest version--and IBM Watson Assistant (Conversation)--the legacy version.
Previously, Watson Assistant was called Watson Conversation, and credentials for Watson Conversation included username and password. IBM has since renamed it Watson Assistant and has changed replaced username and password credentials with API key. For backwards compatibility, our integration accounts still work with either type of bot.
In this article, you will learn how to set up your Watson Assistant integration account and edit its properties.
Procedure
Step 1: Add integration account
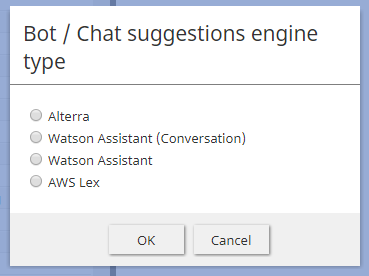
Add a bot/chat suggestions engine integration account, and select type Watson Assistant.
Step 2: Edit properties
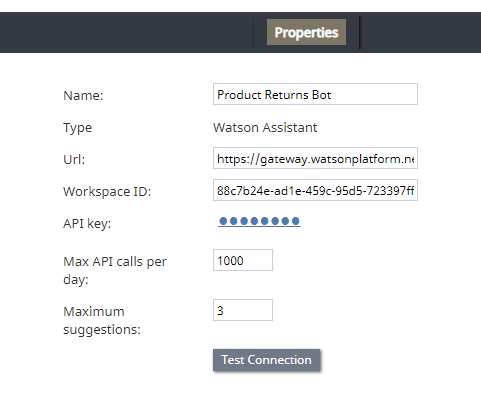
In the Properties dialog, enter the credentials of your IBM Watson Assistant bot instance as follows. This allows Bright Pattern to access your bot and use it in chat interactions.
Name
The unique name of this integration account (any). Because you can have multiple integration accounts of the same type, it is helpful to have a descriptive, memorable name.
Type
By default, the type is “Watson Assistant” because you selected this type when adding the account.
Url
The endpoint of your Watson Assistant bot instance (string).
Note that you must enter the Url in the following way for your bot to work properly!
The Url consists of these elements, strung together:
- Endpoint: https://gateway.watsonplatform.net/assistant/api/v1/workspaces/
- Your workspace ID string (see below)
- /message?version=2017-05-26
For example:
Workspace ID
The identifying number (string) of your Watson Assistant (Conversation) Skill (i.e., instance). Note that in IBM Watson, skills used to be called workspaces.
- To find this ID, go to IBM Watson Assistant > Skills, click on the desired skill’s Actions button, and select View API details.
- On the page that opens, copy your workspace ID.
API Key
The API key (string) used to authenticate the API.
For example:
EEE-MTX13ZS1Ta4pD8qO4rmGP_SXR7HPB8IAAnPgTwKV
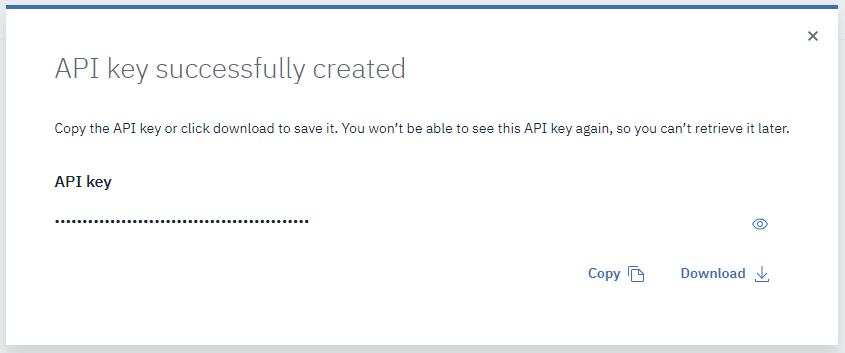
The API key is either auto-generated for you or created manually in IBM Cloud.
How to Create a New Key
- Go to IBM's website and navigate to IBM Cloud > Access (IAM) > IBM Cloud API Keys.
- Click Create an IBM Cloud API key.
- In Create API Key dialog, add name and description.
- Download it and save it because the API key will be shown only once.
Max API calls per day
The maximum number of calls that can be done each day. This limit is here to keep your account from being charged for additional calls beyond the first 1,000 that are included in a free account.
Maximum suggestions
The maximum number of suggestions (e.g., 3) that can be delivered to the Agent Desktop during active chat interactions. Suggestions are the bot-generated replies that agents can select and use during chats.
Test Connection
Click to be sure Bright Pattern Contact Center can connect to your Watson Assistant.
If the credentials are invalid, go back to the Url property and make sure you’ve entered it exactly as explained. Test until you see the success dialog: "Account credentials appear to be valid."
Step 3: Save properties
Click Apply at the bottom of the screen to save your account properties. Your Watson Assistant integration configuration is now complete.
Recommended Reading
For more information on Watson Assistant, see:
</translate>


