My Cases Interface
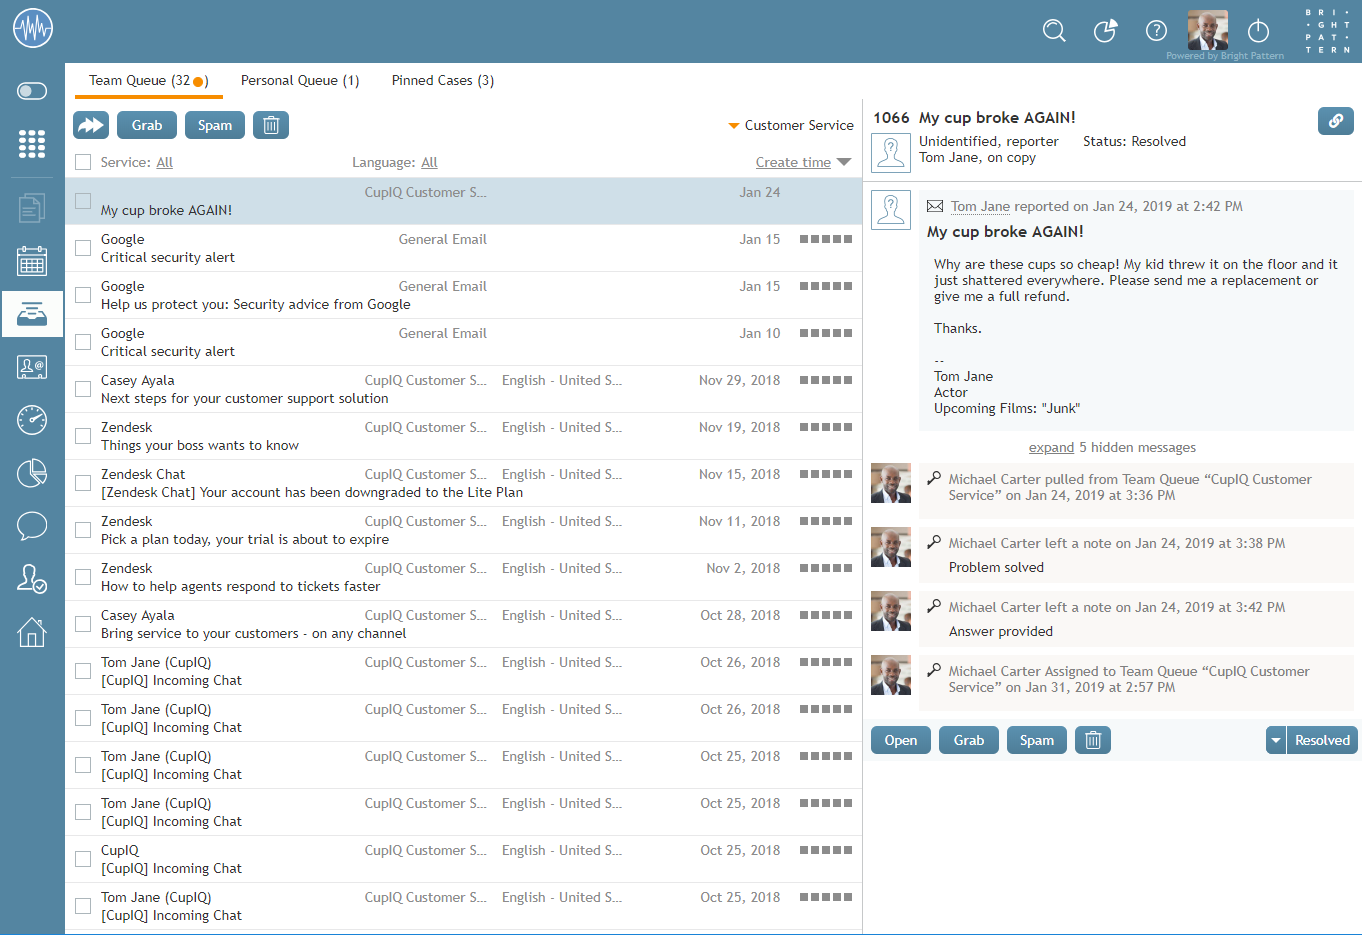
In order for you to better understand all the things you can do in My Cases, you will need to get familiar with all the working parts and pieces, how cases are displayed, and so forth. The following describes what you will see in this section of Agent Desktop.
Header
Disposition Buttons
The optional disposition buttons can be found at the top of your team queue and personal queue toolbars. These buttons allow you to quickly disposition emails and remove them from the queue without having to open them. Note that the dispositions these buttons correspond with, as well as the icons displayed, are set by your system administrator (i.e., these buttons will look different for every contact center).
To use disposition buttons, click the checkbox to the left of the selected email(s); the available buttons will appear in the toolbar and can be selected. Buttons corresponding to either a Final disposition or Spam disposition apply the Resolved state to all selected emails. Buttons mapped to the Nonfinal disposition type do not apply a different state to the selected emails (i.e., all selected emails will retain the New state).
SLA Icons
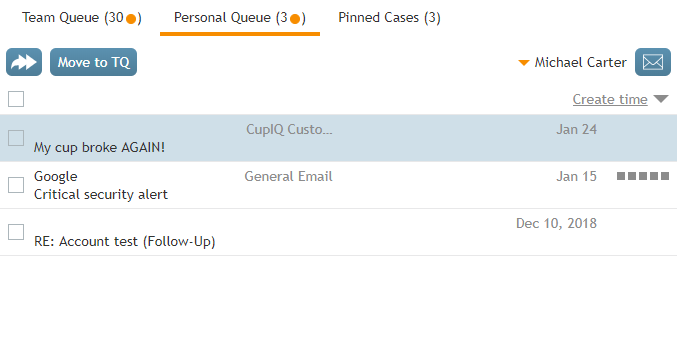
If a particular queue contains emails with SLA over 90%, a half-grey dot is displayed on the queue tab; if a queue has contains emails with SLA breached, a filled orange dot is displayed on the queue tab.
Team Queue
The Team Queue is your team's email inbox. Note that if your contact center distributes email through the push method, emails will route directly to your Personal Queue.
Assign button
The assign button allows supervisors to assign an email to an agent on their team.
Grab button
If pull queue is enabled, the Grab button allows you to take a case from the team queue; when grabbed, the case will appear in your Personal Queue.
Spam button
The spam button removes selected cases from your Team Queue. Note that this button does not function as a spam filter; spam filters are managed by your contact center's administrators.
Trash button
The trash button deletes cases from your Team Queue.
Case Filters
Case filters allow you to quickly organize and sort through your Team Queue's emails. The following filters are available.
Service
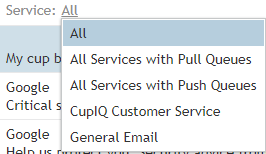
If you have access to more than one service, the service filter allows you to sort emails per service. Additionally, supervisors have the ability to filter per email distribution type (i.e., push or pull).
Languages
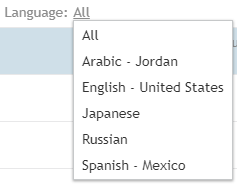
The languages filter allows you to sort your emails by the languages recognized by your contact center.
Case details
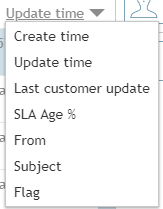
The case details filter allows you to sort emails by pertinent details; this filter includes a further option to organize by ascending/descending order by clicking the grey triangle . Case details filters include the following:
Create time
Create time is the time the case first arrived in your contact center or was created.
Update time
Update time is the time the case was last updated.
Last customer update
Last customer update is the time a customer last interacted with your contact center through a given case.
SLA Age %
The SLA Age % filter displays cases by age according to your contact center's SLA percentage. SLA, which stands for "service level agreement", is the percentage of emails associated with a service that must be replied to within the specified amount of time (i.e., hours or days); this percentage is relative to all replied emails.
From
From displays cases in alphabetical order based on the name field.
Subject
Subject displays cases in alphabetical order based on the subject line.
Flag
The Flag filter allows those cases that have been flagged to be displayed at the top of the queue.
Target time
The target time bar is located to the right side of all cases and is a visual indicator of SLA. It comprises five squares, which are empty when a case arrives at your contact center; as time progresses, the squares gradually fill until the target time is exceeded and all are eventually greyed out.
Personal Queue
The Personal Queue is the destination for emails you have grabbed, have had assigned to you by a supervisor, or not immediately accepted (i.e., if your contact center uses push method of distribution). Like in Team Queue, you can use the case details filter to sort your cases, as well as see the target time. Additionally, if you are a supervisor, your Personal Queue will contain an assign button, allowing you to assign cases to agents on your team.
Move to TQ button
The Move to TQ button allows you to move a selected case from your Personal Queue back to the Team Queue.
Compose email button
The Compose email button allows you to create a new case. For more information, see How to Create New Cases.
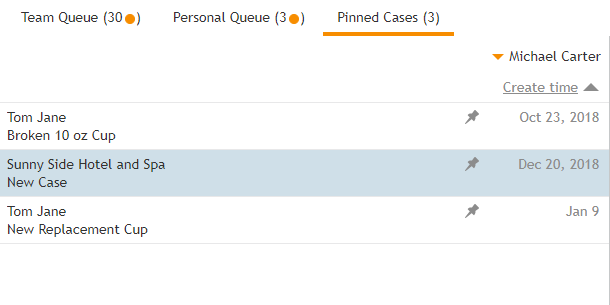
Pinned Cases
Pinned cases are the cases you want quick access to for any number of reasons (e.g., historical reference, examples, etc.). When you pin a case, it acts as a shortcut. All cases that you pin will be kept in your personal Pinned Cases section. Additionally, you can use the case details filter to sort these cases.
Case View Panel
Case Header
The case header area displays information related directly related to the case. The following is a list of the type of information you can see.
Case number
Case number is the number assigned to an interaction in chronological order. All emails to your contact center are automatically assigned case numbers; manually created cases receive these numbers, too. To manually create cases from other types of interactions, see How to Create New Cases.
Subject
This is the subject line of the email/case.
Link button
The link button copies a shareable link of the case to the clipboard, allowing you to paste the link elsewhere; this makes it possible for you to share the case with other agents or supervisors in your contact center. Note that links may be pasted into your web browser's search bar or into the search bar to access the case.
When a case link is pasted, it will be presented in the format <domain>/agentdesktop/case/id/<actual id number> (e.g., http[s]://YourCompany.brightpattern.com/agentdesktop/case/id/5ca2f3eed04fd756afcca6c6). Note that it is possible manually enter a link to access the same case with the following formats:
- <domain>/agentdesktop/case/number/<case number> (e.g., http[s]://YourCompany.brightpattern.com/agentdesktop/case/number/1099)
- <domain>/agentdesktop/case/<case number> (e.g., http[s]://YourCompany.brightpattern.com/agentdesktop/case/1099)
If case links are pasted in internal chats, they may be displayed in the following formats for the most compact view:
- case/id/<id> (e.g., case/id/5ca2f3eed04fd756afcca6c6)
- case/number/<case number> (e.g., case/number/1099)
- case/<case number> (e.g., case/1099)
Current assignments
Current assignments are basic historical details related to the case. The following is a list of the types of information you can see in the case header.
Reporter
The reporter is the identified customer who contacted your contact center.
On copy
On copy is an unidentified customer who contacted your contact center.
State
State displays the current case state. Note that if the state is Pending, the pending reason will be displayed, also.
Assigned to
Assigned to displays the name of the agent the case is assigned to.
Pinned by
Pinned by displays the name of the agent or supervisor who pinned the case.
Case History
Case history is displayed in each case as records showing completed actions; additionally, the date and time the action was completed is displayed. The following is a list of what is considered a completed action:
- Agent Desktop pushing an email to an agent
- Transferring a case from one agent to another agent or to a different queue or service
- Agents pulling emails from the Team Queue
- Agents opening emails
- Supervisors assigning emails from a Team Queue
- Saving notes to a case
The case footer displays several of the same buttons seen at the top of the Team Queue (e.g., Grab, Spam, etc.). Additionally, the footer contains the Open button, which opens the case, and the case state button, which will display the current case state.

