WFM レポート
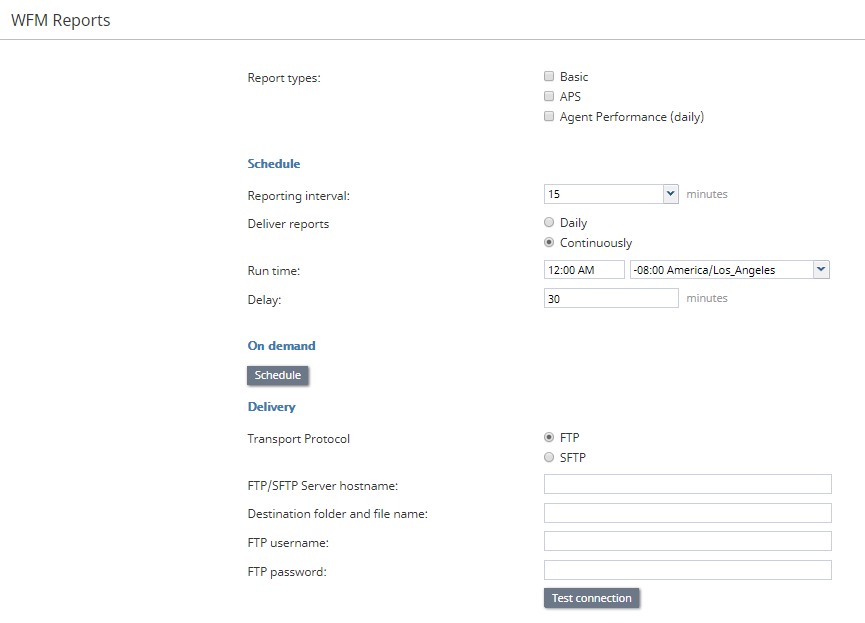
Bright Patternコンタクトセンターは、Aspect WFM(ワークフォースマネジメント)アプリケーションとの統合をサポートしています。これらのアプリケーションは、従業員のスケジュール作成およびエージェントによる作業スケジュールの遵守をリアルタイムで監視するために、自動的に生成された多数のレポートを提供します。 WFMレポートの作成は、設定した間隔に基づいて、または必要に応じて行われます。
WFMアカウントの統合については、統合アカウントをご覧ください。
Note that in order to generate WFM reports, the privilege must be enabled for your contact center by the system administrator. Starting from Bright Pattern Contact Center version 5.3.12, there is support for Calabrio but you have to enable it through the system provider.
レポートタイプ
レポートタイプは以下が含まれます: ベーシック, APS, エージェントパフォーマンス (日次)
スケジュール
スケジュール の設定でWFMレポートの自動生成が設定できます。設定は以下の通りです。
レポート間隔
レポート間隔とは、レポートがWFMアカウントに配信される頻度(分)を意味します。初期設定は15分間です。ご注意: この間隔は、エージェントパフォーマンス(日次)レポートには適用されません。
配信レポート
毎日 または継続的を選択します。
エージェントパフォーマンス(日次)レポートが有効になっている場合、 毎日実行/配信されます。連続配信は、ベーシックレポートとAPSレポートに適用されます。
実行時間
実行時間 はレポートをいつ生成するかを設定します。設定するには、時間を入力し、ドロップダウンメニューから適用されるタイムゾーンを選択します。初期設定上の時間は "Midnight UTC"です。
Delay
The number of minutes to delay when delivering reports continuously (only available when you select "Continuously"; see above).
オンデマンド
オンデマンド 設定では、必要に応じてWFMレポートを生成することができます。設定内容は以下の通りです。
時間枠
時間枠 では、レポートに含める日付の範囲を指定できます。事前定義済みの期間またはカスタム期間から選ぶことができます。日付の範囲を選択したら、 From / Toで時間の範囲を設定できます。時間枠のオプションは以下のとおりです。
- 今日
- 昨日
- 今週
- 先週
- 今月
- 先月
- カスタム
ご注意: 週は、日曜日から土曜日までです。
From/To
From/To は、時間枠 で指定した日付の範囲を表示します。手動で日付を変更した場合、時間枠は カスタムに変わります。ドロップダウンメニューを使用して時間範囲を設定することもできます。
実行時刻
実行時刻 では、指定したレポート期間を後でスケジュールすることができます。カレンダー上で日付、ドロップダウンメニューで時刻を選択します。
Delivery
Delivery is where you configure the destination of either the scheduled or on-demand reports.
Transport Protocol
Select FTP or SFTP. Note that the corresponding SMTP settings are configured on the Email Settings > SMTP Configuration page.
FTP/SFTP Server hostname
Enter the FTP/SFTP Server hostname (e.g., "cust.anyftp.com").
Destination and file folder name
Specify the address of the destination folder and file name (e.g., 50Reports/Report.csv where 50Reports is the destination folder and Report is the file name).
FTP Username
Specify the FTP username (e.g., "demo@gmail.com").
FTP Password
Specify the FTP password.
Test connection
Test connection tests the connection of the FTP username and password.


