OneCloud Integration Configuration Quick Start
The OneCloud UCaaS integration connects your Bright Pattern Contact Center (BPCC) with OneCloud, letting agents interact with OneCloud users via calls and chats directly from the Agent Desktop. The following guide explains how to set up your integration.
Key considerations before you begin:
- Configuration is required in both the OneCloud and Bright Pattern systems.
- Only one OneCloud integration account is supported per contact center.
Procedure
Step 1: Configure User Extensions in BPCC and OneCloud
Before configuring the OneCloud integration, you must define the extensions for both BPCC and OneCloud users in such a way that all extensions in one system share certain prefixes, and extensions in the other system share a different prefix. This ensures that every contact has a unique extension, and that Bright Pattern can correctly route calls to OneCloud contacts. For example:
- For all Bright Pattern users, define extensions that begin with "2". (e.g., 2001, 2002, 2xxx, etc.)
- For all OneCloud users, define extensions that begin with "1" or "5" (e.g., 1001, 1xxx, 5002, 5xxx, etc.)
In order to configure the telephone connection between Bright Pattern and OneCloud, your service provider will need to know which prefixes ("1" and "5" in this case) are associated with your OneCloud users.
Step 2: Coordinate with your Service Provider
Configuring the OneCloud integration requires some actions on the part of your service provider. Start by contacting them and ensuring the following:
- Your service provider has enabled the OneCloud integration for your contact center.
- You know the IP address and port of the SIP server associated with your contact center.
- Your service provider has created a PBX trunk for the OneCloud integration.
- They know the dialing prefix or prefixes that indicate calls to OneCloud users. From the example in the previous step, the prefixes "1" and "5" indicate OneCloud users.
Step 3: Contact OneCloud for Credentials and Configurations
Next, you need to coordinate with OneCloud to obtain credentials for their API, and ensure that their system will accept certain connections from your contact center.
Request the following credentials from OneCloud:
- Account Domain: The specific domain associated with your organization's OneCloud service.
- OneCloud API URL: The URL that the integration should use to connect with the OneCloud API.
- API Key: Non-expiring key for authenticating with the OneCloud API. Your OneCloud representative may refer to this as a "Machine-2-Machine" or "M2M" token.
- Client ID: The ID that the integration will use to identify itself when BPCC users enable the OneCloud integration in Agent Desktop.
- Client Secret: The secret paired with the Client ID for authentication.
Ensure OneCloud has done the following in their system:
- Whitelisted the IP address and port of the SIP server associated with your contact center.
- Whitelisted the OAuth redirect URL for your call center, typically of the format:
https://<your company>.brightpattern.com/onecloudcallback.html
- Created a PBX trunk connection and configured it with appropriate routing rules.
Step 4: Create and Configure a OneCloud Integration Account
- In the Contact Center Administrator application, navigate to Call Center Configuration > Integration Accounts
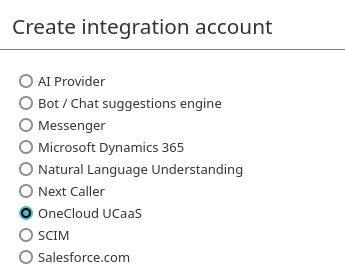
- Click + to add a new integration account, and select OneCloud UCaaS.
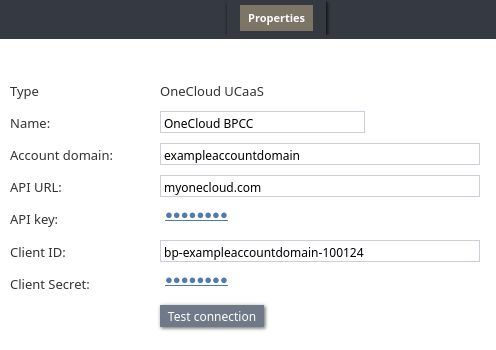
- Configure the OneCloud integration with the account information provided by your OneCloud representative during Step 3.
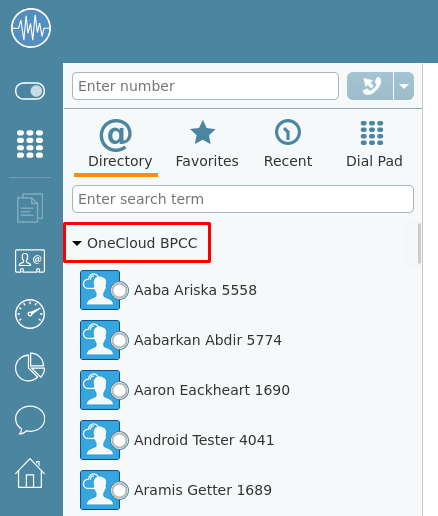
- Name: A descriptive name for the integration (e.g., "OneCloud BPCC"). Note that this setting determines the name of the folder in the Agent Desktop Directory that contains OneCloud contacts.
- Account Domain: Your OneCloud domain.
- API URL: The OneCloud API endpoint.
- API Key: The API key.
- Client ID: The provided Client ID.
- Client Secret: The provided Client Secret.
- Name: A descriptive name for the integration (e.g., "OneCloud BPCC"). Note that this setting determines the name of the folder in the Agent Desktop Directory that contains OneCloud contacts.
- Click the "Test Connection" button to verify that the credentials you provided are correct, and a connection can be established with OneCloud.
Step 5: Test that OneCloud Contacts are Available via Agent Desktop
- Log in to Agent Desktop and open the Directory tab. You should see a folder with the same name as your integration (e.g., "OneCloud BPCC"). This folder holds your organization's OneCloud users.
- You should be able to initiate an internal call with any contact in this folder.
- To enable chat functionality with OneCloud users, you must enable OneCloud as an enterprise messenger and authenticate with your OneCloud credentials. Follow the agent tutorial How to Sign in to OneCloud integrated with Bright Pattern Contact Center for a detailed explanation.
< Previous | Next >


