How to Send Google Analytics Events from Chat Scenarios
This tutorial shows how to integrate web chat with Google Analytics 4 (GA4) by configuring your chat widget and scenarios to send key interaction data. Before continuing, please make sure you have done the following:
- Set up a chat scenario and service
- Configured the web chat widget on your website
- Are using GA4 on the website where the chat widget is configured
- Are familiar with custom events in GA4
- Have generated an API secret for sending Measurement Protocol Events
Procedure
Suppose you want to send a custom event to Google Analytics whenever one of your agents answers a web chat from one of your customers. This requires capturing the Google Analytics clientId and sessionId from the customer's website visit, sending them to the chat scenario, and then using them in custom event data sent to GA4.
The following steps illustrate how to:
- Retrieve the GA4 session ID and client ID
- Edit the chat widget configurations to send
clientIdandsessionIddata to the scenario - Configure the chat scenario to send a custom event using the
clientIdandsessionId
1. Retrieving Client ID and Session ID with gtag.js
The gtag 'get' command allows you to retrieve the current client ID and session ID when a customer visits a page measured with GA4. A code example is provided below. It assumes that the gtag.js library has already been loaded.
- Replace
G-XXXXXXXXwith your GA4 measurement ID in the provided code snippet and add it to the HTML of your web page. The snippet does the following:
- Requests the client ID and session ID
- Adds the client ID and session ID to the 'params' object
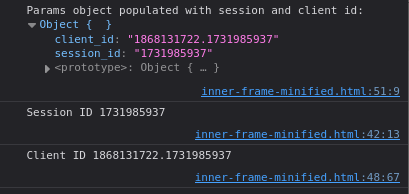
- Logs the retrieved values to the browser console
- Requests the client ID and session ID
<script>
// Initialize a params variable to hold the session ID and client ID
var params = {};

// Get the session ID.
gtag(
  'get', // Specifies the 'get' command to retrieve a value.
  'G-XXXXXXXX', // The measurement ID of the Google Analytics property.
  'session_id', // The name of the metric to retrieve ('session_id' in this case).
  (id) => { // Callback function that receives the retrieved session ID.
    console.log("Session ID", id); // Logs the session ID to the console.
    params['session_id'] = id; // Adds the session ID to the 'params' object.
  }
);

// Get the client ID.
gtag('get', 'G-XXXXXXXX', 'client_id', (client_id) => { console.log("Client ID",client_id); params['client_id'] = client_id; });

// Log the 'params' object to console, so we can check that both IDs are present.
console.log("Params object populated with session and client id:",params)
</script>
- Open the page and look in the browser console log to see if the session ID and client ID were logged, and that they were both saved to the
paramsobject.
- If the values (session ID and client ID) are missing from the browser logs, it may be helpful to check the following:
- Whether the gtag.js library is correctly loading in your web page
- That you are using the correct measurement ID (of the format "G-XXXXXXX") for your website
- Whether your browser is blocking cookies or JavaScript
- Whether the gtag.js library is correctly loading in your web page
2. Edit Chat Widget Configurations
Once you have confirmed that you are able to retrieve the session ID and client ID for your website visitors, you can pass these JavaScript variables to scenarios during configuration of the chat widget.
- Incorporate the above code snippet into the chat widget configurations. Note the following parts of the code example below:
- The
paramsobject is initialized with{'session_id':0, 'client_id':0} - Client ID and Session ID are retrieved from GA4 and saved to the
paramsobject - The
paramsobject is passed to the chat configurations with the lineparameters:params
- The
<link type="text/css" rel="stylesheet" href="https://example.brightpattern.com/clientweb/chat-client-v4/css/form.css">
<script type="text/javascript">

    // Initialize 'params' object
    var params = {'session_id':0, 'client_id':0};

    // Get Session ID and Client ID
    gtag('get', 'G-XXXXXXXX', 'session_id', (id) => {params['session_id'] = id;});
    gtag('get', 'G-XXXXXXXX', 'client_id', (client_id) => {params['client_id'] = client_id; });
    console.log("Params",params);

    // Configure the chat widget
    SERVICE_PATTERN_CHAT_CONFIG = {
        appId: '70a6624585ef2b0981fed84fcd12d4db',
        apiUrl: 'https://example.brightpattern.com/clientweb/api/v1',
        tenantUrl: 'example.brightpattern.com',
        chatPath: 'https://example.brightpattern.com/clientweb/chat-client-v4/',

        // Send the Session ID and Client ID as custom parameters to the chat widget
        parameters: params
    };
</script>
<script src="https://example.brightpattern.com/clientweb/chat-client-v4/js/init.js" defer></script>
- Ensure that the
appId,apiUrl,tenantUrl, andchatPathare configured with the correct values for your chat widget. - Ensure that you have replaced
G-XXXXXXXXwith your GA4 measurement ID.
3. Configuring the Chat Scenario to Send GA4 Events
Recall from the previous step that parameters in the web chat configuration has been populated with an object {'session_id':<Session ID>, 'client_id':<Client ID>}. As a result, the following scenario variables will be populated with the Session ID and Client ID:
$(item.externalChatData.session_id)will contain the Session ID$(item.externalChatData.client_id)will contain the Client ID
Refer to the relevant tutorial How to Pass JavaScript Variables Through Web HTML for more details. The next steps illustrate how to configure a simple scenario to send GA4 events linked with the Session ID and Client ID of the customer who initiated the web chat.
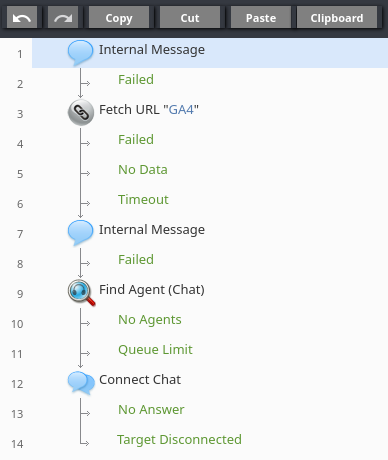
- Open the chat scenario associated with your chat widget, and add the following blocks:
- Internal Message block to check whether the Session ID and Client ID were correctly received
- Fetch URL block to send one or more GA4 events via the Measurement Protocol API
- Internal Message block to check the outcome of the Fetch URL block
- Find Agent (chat) block with default configurations to find an agent
- Connect chat block to connect an agent to the chat
- Internal Message block to check whether the Session ID and Client ID were correctly received
- Select the first Internal Message block and configure the indicated properties to allow you to see that the scenario variables
$(item.externalChatData.session_id)and$(item.externalChatData.client_id)are being populated:
- Username: The username of the agent that you will be using in Agent Desktop when testing this scenario. In this example, an account with the username "administrator" is being used.
- Message: Configure a message that displays the value of the scenario variables being populated by the chat widget:
Session ID
$(item.externalChatData.session_id)
Client ID
$(item.externalChatData.client_id)
- Username: The username of the agent that you will be using in Agent Desktop when testing this scenario. In this example, an account with the username "administrator" is being used.
- Select the Fetch URL block, and configure it to send a custom GA4 event via the Measurement Protocol API:
- Title text: Any name can be used, but descriptive naming can be particularly useful to differentiate between multiple Fetch URL blocks.
- Request type: POST
- URL to fetch: The Measurement Protocol endpoint:
https://www.google-analytics.com/mp/collect - URL Parameters: Add two parameters with the following names and values:
api_secret: the value must be the Measurement Protocol API secret for the GA4 property associated with your website.measurement_id: the measurement ID of the GA4 property associated with your website.
- Content type: application/json
- Body: The query parameters for the Measurement Protocol event endpoint. The following example sends an event called "custom_scenario_event" that uses the scenario variables
$(item.externalChatData.session_id)and$(item.externalChatData.client_id):{ "client_id": "$(item.externalChatData.client_id)", "events": [ { "name": "custom_scenario_event", "params": { "custom_scenario_param": "Some info about the customer", "session_id": "$(item.externalChatData.session_id)" } } ] }
- Response body content is: JSON
- Title text: Any name can be used, but descriptive naming can be particularly useful to differentiate between multiple Fetch URL blocks.
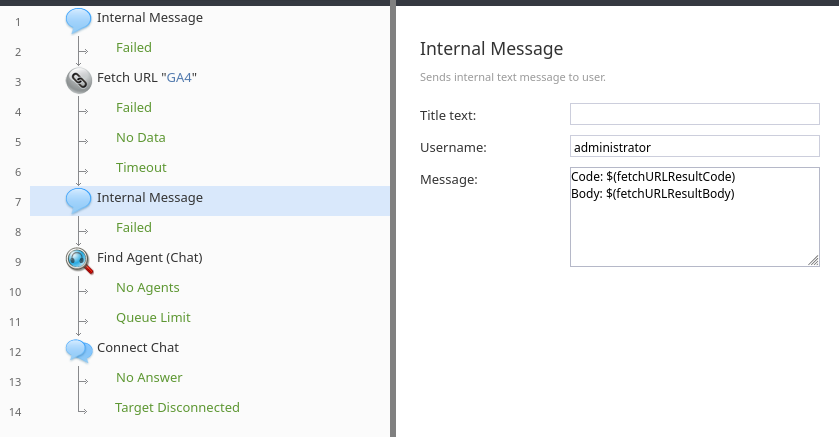
- Select the second Internal Message block. The previous block, Fetch URL, will populate two scenario variables
$(fetchURLResultCode)and$(fetchURLResultBody)that will indicate whether the event creation was successful. If the result code is-1, this indicates success. If there is a failure, the result body will help determine the error. Configure the block as indicated:
- Username: The username of the agent that you will be using in Agent Desktop when testing this scenario. In this example, an account with the username "administrator" is being used.
- Message: Configure a message that displays the value of the scenario variables being populated by the Fetch URL block:
Code: $(fetchURLResultCode)
Body: $(fetchURLResultBody)
- Username: The username of the agent that you will be using in Agent Desktop when testing this scenario. In this example, an account with the username "administrator" is being used.
- The Find Agent and Connect Chat can be left with the default configurations.
- Save the Scenario.
4. Test that Custom Events are Sent to GA4
Follow these steps to be sure that the events are being received in your Google Analytics account.
- Log in to the agent desktop using the credentials of the user who is configured to receive the internal messages created in the previous step.
- Start a web chat session from your website as a customer would.
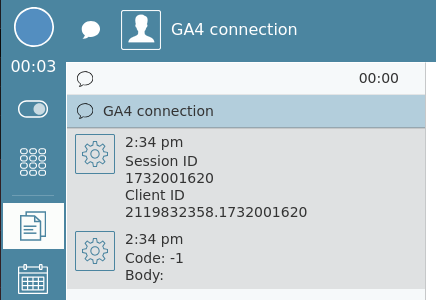
- Upon initiating the chat, you should see internal messages within your agent desktop. These messages help you understand whether. Specifically, look for messages indicating:
- Client ID and Session ID reception: A message confirming the successful retrieval of the Client ID and Session ID
- Fetch URL success: A message indicating the
-1result code. This specifically indicates that the Fetch URL block executed successfully. If you see a different result code, troubleshoot the Fetch URL block configuration.
- Client ID and Session ID reception: A message confirming the successful retrieval of the Client ID and Session ID
- In your Google Analytics dashboard, navigate to Reports > Realtime overview and look for your custom event in the widget "Event count by Event name".
Further Considerations
- Data Privacy: Be mindful of data privacy regulations when sending data to Google Analytics. Ensure you are compliant with regulations like GDPR and CCPA. Consider anonymizing or hashing sensitive data before sending it to GA4.
- Additional Events: Expand the functionality to track more than just the initial chat connection. Send events for key interaction points like agent assignment, chat duration, customer satisfaction ratings, and specific conversation milestones.
- Custom Dimensions and Metrics: Explore using custom dimensions and metrics in GA4 to provide more granular analysis of your chat interactions. These can capture information specific to your business needs, like product categories discussed or customer segments.
- Testing and Validation: Thoroughly test your implementation to ensure accurate data collection. Use the Realtime reports in GA4 to validate that events are being sent correctly during testing. Monitor data quality over time to identify and address any discrepancies.
< Previous | Next >


