(Created page with "= シナリオの概要= シナリオは、コンタクトセンターでの自動対話処理の流れを定義します。特定の対話に関連するシナリオは、特...") |
(Updated via BpDeeplTranslate extension) |
||
| (28 intermediate revisions by 3 users not shown) | |||
| Line 1: | Line 1: | ||
| − | = シナリオの概要= | + | =シナリオの概要= |
| − | + | シナリオは、コンタクトセンターにおける自動対話処理のロジックを定義します。特定のアクセス番号へのコールや特定のウェブページからのチャットセッションの開始など、特定のイベントによって特定のインタラクションに関するシナリオの実行がトリガーされます。 [[scenario-builder-reference-guide/ScenarioBuilderOverview#Scenario_Engine|シナリオエンジン]]. | |
| − | + | シナリオは様々な自動アクションを実行することができます。例えば、インバウンドコールに関して、シナリオは以下の方法で追加情報を収集することができます。 [[contact-center-administrator-guide/Glossary#Interactive_Voice_Response|対話型の音声応答(IVR)]]要求されたサービスを識別し、適格で利用可能なコンタクトセンターのエージェントのいずれかにコールを分配します。さらに、シナリオのフェイルオーバーが発生した場合(シナリオエンジンの処理中に失敗した場合など)には、シナリオのフェイルオーバーを回避するために、シナリオエンジンのフェイルオーバーを回避することができます。 [[contact-center-administrator-guide/Voice|音声]]これにより、最後に実行されたブロックからシナリオが再開され、アクティブで接続中のコールが切断されるのを防ぎます。 | |
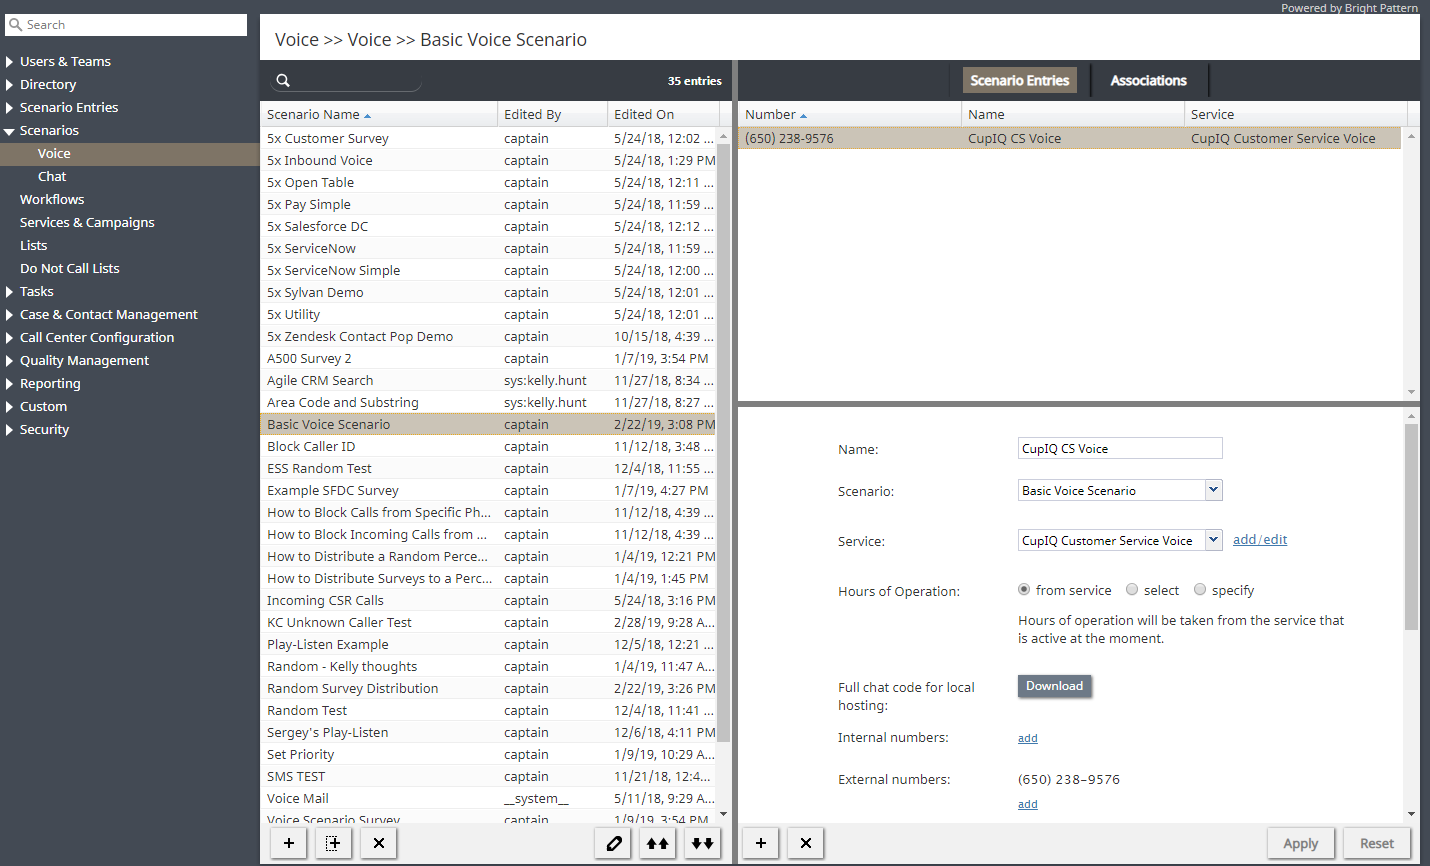
| − | + | シナリオビューの左ペインのリストには、既存の音声シナリオが表示されます。シナリオが他の人によって編集されている場合、編集者の名前が''Currently Edited By''欄に表示されます。 | |
| − | + | 詳細は [[scenario-builder-reference-guide/ScenarioBuilderOverview|シナリオビルダーの概要]]を''ご参照''ください。 | |
| − | == | + | ==セクション== |
| − | + | 以下は、Contact Center Administrator アプリケーションのセクション「シナリオ」にあるセクションのリストです。 | |
| − | *[[contact-center-administrator-guide/Scenarios/Voice | | + | *[[contact-center-administrator-guide/Scenarios/Voice | 音声]] |
| − | *[[contact-center-administrator-guide/Scenarios/Chat | | + | *[[contact-center-administrator-guide/Scenarios/Chat | チャット]] |
| − | [[File:CCA-Scenarios-Overview-53.PNG|thumb|800px|center|'' | + | [[File:CCA-Scenarios-Overview-53.PNG|thumb|800px|center|''シナリオ'']] |
| − | == | + | ==シナリオの作成、編集、削除方法== |
| − | ''' | + | '''シナリオを作成するには''' |
| − | # | + | #まず、シナリオが処理するインタラクションのメディアタイプを選択します([[contact-center-administrator-guide/Voice|音声]]または [[contact-center-administrator-guide/Chat|チャット]]). |
| − | # | + | #シナリオリスト表示で、リスト下部の'''シナリオ追加'''ボタン [[File:Add-Scenario-Button.png|26px]]ボタンをクリックします。 |
| − | |||
| − | + | '''選択済シナリオを編集するには''' | |
| − | ''' | + | #リストの下にある'''シナリオ編集'''ボタンをクリックします。 [[File:Edit-Scenario-Button.png|26px]]ボタンをクリックします。 |
| − | |||
| − | + | '''シナリオ名を変更する:''' | |
| + | #シナリオを選択し、プロパティタブの "名前 "フィールドに新規名前を入力する。 | ||
| − | + | シナリオ名は空白でなく、その他シナリオ名と区別できるものでなければなりません。 | |
| − | |||
| − | ''' | + | '''シナリオを削除するには''' |
| − | # | + | #'''シナリオ削除'''ボタンをクリックする。 [[File:Remove-Scenario-Button.png|26px]]ボタンをクリックします。 |
| + | '''追加シナリオ'''ボタンか'''編集シナリオ'''ボタンのどちらかをクリックすると [[scenario-builder-reference-guide/Purpose|シナリオビルダー]]アプリケーションを新規ウィンドウまたはタブで開きます。シナリオビルダーアプリケーションには、自動インタラクション処理中に使用される全てのコントロールエレメントが含まれています。 | ||
| − | |||
| − | |||
| − | |||
| − | |||
| − | |||
| − | |||
| − | |||
| − | |||
| − | |||
| − | |||
| − | |||
| − | |||
| − | + | ==シナリオテンプレートの使用方法== | |
| + | ブライトパターンコンタクトセンターでは、バーチャルキューや対応テレマーケティングコールなど、いくつかの標準機能に対応したシナリオテンプレートを提供しています。作業中のシナリオの種類によっては、ゼロからシナリオを作成するよりも、対応するテンプレートを選択し、コンタクトセンターの必須要件に合わせてカスタマイズする方が簡単な場合があります。 | ||
| + | '''テンプレートを使用してシナリオを作成するには、以下の手順に従います:''' | ||
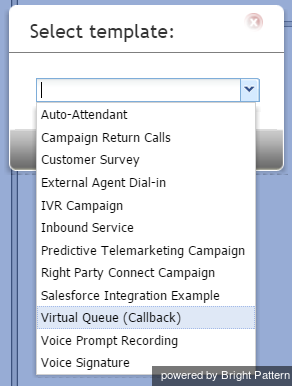
| − | + | #'''テンプレートから追加を'''クリックします。 [[File:Add-From-Template-Button.png|26px]]ボタンをクリックし、''テンプレートの選択''ウィンドウを開きます。 | |
| − | + | ''テンプレートの選択''ウィンドウには、以下のテンプレートが選択できるドロップダウンメニューが表示されます: | |
| + | * オートアテンダント | ||
| + | * キャンペーンリターンコール | ||
| + | * 外部エージェントダイヤルイン | ||
| + | * IVRキャンペーン | ||
| + | * インバウンドサービス | ||
| + | * プレディクティブ・テレマーケティングキャンペーン | ||
| + | * ライトパーティコネクトキャンペーン。 | ||
| + | * Salesforceとの統合例 | ||
| + | * バーチャルキュー(コールバック) | ||
| + | * 音声プロンプト録音 | ||
| + | * 音声署名 | ||
| + | これらのテンプレートについては、セクション [[contact-center-administrator-guide/Voice|音声]]のセクションで説明されています。 | ||
| − | |||
| − | |||
| − | |||
| − | |||
| − | |||
| − | |||
| + | 希望するテンプレートを選択し、必要に応じてコンテンツを修正し、新規シナリオとして保存します。 | ||
| − | |||
| + | [[File:Select-Template-Options.png|800px|thumbnail|center|リストからシナリオテンプレートを選択します。]] | ||
| − | |||
| − | |||
| − | |||
| − | |||
| − | |||
| − | |||
| − | |||
| + | ==シナリオのエクスポートとインポート方法== | ||
| + | '''シナリオをエクスポートするには''' | ||
| + | #まず、エクスポートするシナリオのメディアタイプを選択します、 [[contact-center-administrator-guide/Voice|音声]]または [[contact-center-administrator-guide/Chat|チャット]]). | ||
| + | #シナリオリストビューで、エクスポートしたいシナリオの名前を選択/ハイライトします。 | ||
| + | #選択済のシナリオが表示されたら、'''エクスポートボタンを'''クリックします。 [[File:Export-Scenario-Button-53.PNG|26px]]ボタンをクリックします。このボタンを選択するとすぐにファイルがダウンロードされますのでメモしてください。 | ||
| + | #エクスポートされたファイルは.ZIPフォーマットになります。 | ||
| − | [[File:Import-Scenario-Window-53.PNG|450px|thumb|center| | + | |
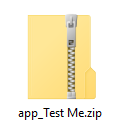
| + | [[File:Exported-Scenario-Zip-File-53.PNG|450px|thumb|center|エクスポートされたシナリオファイル]] | ||
| + | |||
| + | シナリオはエディターから直接エクスポートすることもできます。 | ||
| + | |||
| + | '''シナリオをインポートするには''' | ||
| + | #シナリオをインポートする前に、ファイルは.ZIPフォーマット(つまりエクスポートしたシナリオと同じフォーマット)でなければならないことに注意してください。 | ||
| + | #インポートするシナリオのメディアタイプを選択します、 [[contact-center-administrator-guide/Voice|音声]]または [[contact-center-administrator-guide/Chat|チャット]]). | ||
| + | #シナリオリストビューで、'''シナリオインポートボタンを'''クリックします。 [[File:Import-Scenario-Button-53.PNG|26px]]ボタンをクリックし、''シナリオインポートウィンドウを''開きます。 | ||
| + | #''シナリオ名''フィールドに、インポートするシナリオの名前を入力します。 | ||
| + | #''インポート元フィールドで''、'''閲覧'''ボタンをクリックし、インポートするファイルを選択します。 | ||
| + | #名前を付けてファイルを選択したら、'''インポートシナリオボタンを'''クリックします。 | ||
| + | |||
| + | |||
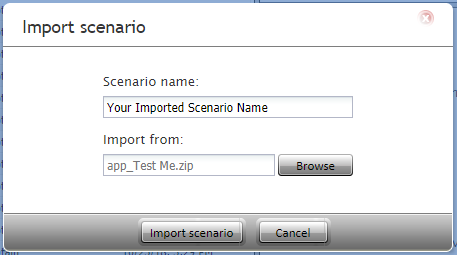
| + | [[File:Import-Scenario-Window-53.PNG|450px|thumb|center|シナリオインポートウィンドウ]] | ||
Latest revision as of 11:36, 29 May 2024
シナリオの概要
シナリオは、コンタクトセンターにおける自動対話処理のロジックを定義します。特定のアクセス番号へのコールや特定のウェブページからのチャットセッションの開始など、特定のイベントによって特定のインタラクションに関するシナリオの実行がトリガーされます。 シナリオエンジン.
シナリオは様々な自動アクションを実行することができます。例えば、インバウンドコールに関して、シナリオは以下の方法で追加情報を収集することができます。 対話型の音声応答(IVR)要求されたサービスを識別し、適格で利用可能なコンタクトセンターのエージェントのいずれかにコールを分配します。さらに、シナリオのフェイルオーバーが発生した場合(シナリオエンジンの処理中に失敗した場合など)には、シナリオのフェイルオーバーを回避するために、シナリオエンジンのフェイルオーバーを回避することができます。 音声これにより、最後に実行されたブロックからシナリオが再開され、アクティブで接続中のコールが切断されるのを防ぎます。
シナリオビューの左ペインのリストには、既存の音声シナリオが表示されます。シナリオが他の人によって編集されている場合、編集者の名前がCurrently Edited By欄に表示されます。
詳細は シナリオビルダーの概要をご参照ください。
セクション
以下は、Contact Center Administrator アプリケーションのセクション「シナリオ」にあるセクションのリストです。
シナリオの作成、編集、削除方法
シナリオを作成するには
選択済シナリオを編集するには
シナリオ名を変更する:
- シナリオを選択し、プロパティタブの "名前 "フィールドに新規名前を入力する。
シナリオ名は空白でなく、その他シナリオ名と区別できるものでなければなりません。
シナリオを削除するには
追加シナリオボタンか編集シナリオボタンのどちらかをクリックすると シナリオビルダーアプリケーションを新規ウィンドウまたはタブで開きます。シナリオビルダーアプリケーションには、自動インタラクション処理中に使用される全てのコントロールエレメントが含まれています。
シナリオテンプレートの使用方法
ブライトパターンコンタクトセンターでは、バーチャルキューや対応テレマーケティングコールなど、いくつかの標準機能に対応したシナリオテンプレートを提供しています。作業中のシナリオの種類によっては、ゼロからシナリオを作成するよりも、対応するテンプレートを選択し、コンタクトセンターの必須要件に合わせてカスタマイズする方が簡単な場合があります。
テンプレートを使用してシナリオを作成するには、以下の手順に従います:
テンプレートの選択ウィンドウには、以下のテンプレートが選択できるドロップダウンメニューが表示されます:
- オートアテンダント
- キャンペーンリターンコール
- 外部エージェントダイヤルイン
- IVRキャンペーン
- インバウンドサービス
- プレディクティブ・テレマーケティングキャンペーン
- ライトパーティコネクトキャンペーン。
- Salesforceとの統合例
- バーチャルキュー(コールバック)
- 音声プロンプト録音
- 音声署名
これらのテンプレートについては、セクション 音声のセクションで説明されています。
希望するテンプレートを選択し、必要に応じてコンテンツを修正し、新規シナリオとして保存します。
シナリオのエクスポートとインポート方法
シナリオをエクスポートするには
- まず、エクスポートするシナリオのメディアタイプを選択します、 音声または チャット).
- シナリオリストビューで、エクスポートしたいシナリオの名前を選択/ハイライトします。
- 選択済のシナリオが表示されたら、エクスポートボタンをクリックします。
ボタンをクリックします。このボタンを選択するとすぐにファイルがダウンロードされますのでメモしてください。
- エクスポートされたファイルは.ZIPフォーマットになります。
シナリオはエディターから直接エクスポートすることもできます。
シナリオをインポートするには
- シナリオをインポートする前に、ファイルは.ZIPフォーマット(つまりエクスポートしたシナリオと同じフォーマット)でなければならないことに注意してください。
- インポートするシナリオのメディアタイプを選択します、 音声または チャット).
- シナリオリストビューで、シナリオインポートボタンをクリックします。
ボタンをクリックし、シナリオインポートウィンドウを開きます。
- シナリオ名フィールドに、インポートするシナリオの名前を入力します。
- インポート元フィールドで、閲覧ボタンをクリックし、インポートするファイルを選択します。
- 名前を付けてファイルを選択したら、インポートシナリオボタンをクリックします。


