提供: Bright Pattern Documentation
Updating to match new version of source page |
Updated via BpDeeplTranslate extension |
||
| Line 1: | Line 1: | ||
= | =発信の再スケジュール方法= | ||
アウトバウンドキャンペーンに参加している間、通常、あなたが処理したすべてのコールの結果を示すdispositionを選択することが求められます。詳細については、セクション [[agent-guide/HowtoEnterDispositionsandNotes|処分とメモの入力方法]]. | |||
選択済処分によっては、同じ顧客への再度の試行をスケジュールする必要がある場合もあります。再スケジュールは、例えば、顧客から都合の良い時間に再度発信するよう要求された場合によく行われます。様々な状況での発信の再スケジュールに関する詳細な指示は、キャンペーン管理者から受け取ります。選択済のコールが次の試行を意味する場合、'''次へコールの'''スケジュールコントロールは、''連絡先情報パネルの'' ''[選択済]''の下に表示されます。 | |||
[[File:AD-Reschedule-Campaign8a-5321.PNG|center|thumb|350px| | [[File:AD-Reschedule-Campaign8a-5321.PNG|center|thumb|350px|次へコールスケジュールコントロールの例]] | ||
== | ==操作手順== | ||
別の発信試行をスケジュールするには、次のステップに従います。 | |||
# | #着信コールを承認します。表示された顧客の電話番号またはIDにカーソルを合わせ、['''通話開始''']アイコンをクリックして顧客との通話を開始します。<br /><br />[[File:AD-Reschedule-Campaign2c-5321.PNG|center|thumb|350px|顧客への発信を開始する]]<br /><br /> | ||
# | #アクティビティコール中に、ディスパージョンを設定して再スケジュールすることも、アフターコールワークで行うこともできます。アクティブコール中に行う場合は、[''処分]セレクタを''使用して、適切な処分(最終処分でないもの)を選択します。再スケジュールのオプションが表示されます。<br /><br />[[File:AD-Reschedule-Campaign4a-5321.PNG|center|thumb|350px|リストより選択済のディスポジションを選択してください。]]<br /><br /> | ||
# | #コールを再スケジュールするには、次のように設定します:<br /><br /> | ||
#'''# 次へ発信'''- 次回発信を試行する一般的な時間帯(午後、夕方、明日など)。<br /><br />[[File:AD-Reschedule-Campaign5-5321.PNG|center|thumb|350px|次へコールの時間帯オプション]]<br /><br /> | |||
## ''' | ##'''タイムゾーン'''- 希望するタイムゾーン(例: 「アメリカ/ロサンゼルス」).カスタマーの環境設定によっては、選択済のインターバルに対して別のタイムゾーンを選択する必要があります.タイムゾーンを変更すると、"from/to "フィールドの時間も変更されることに注意してください。インタラクションを完了する前に、常に正しい時間が設定されていることを再確認することをお勧めします。<br /><br />[[File:AD-Reschedule-Campaign6a-5321.PNG|center|thumb|650px|タイムゾーンの選択]]<br /><br /> | ||
#'''# オン'''- 小さな矢印をクリックして、顧客が発信を希望する電話番号またはIDを設定します。番号を選択しない場合、システムは最初のアウトバウンドコールでの顧客の番号を設定します。<br /><br /> | |||
# | #すべての再スケジュールフィールドを入力した後、'''電話を切る'''ボタンをクリックしてコールを終了します。<br /><br /> | ||
# | #''アフターコールワークで''、まだ上記のように発信していない場合は、今すぐ発信し、コールを完了させてください。<br /><br />[[File:AD-Reschedule-Campaign8a-5321.PNG|center|thumb|350px|チェックマークをクリックすると、アフターコールワークでコールが完了します。]]<br /><br /> | ||
再スケジュール情報を入力すると、通常はコールを終了できます。発信終了の詳細については、以下を参照してください。 [[agent-guide/HowtoReleaseaCall|コールの解除方法]]および [[agent-guide/HowtoWrapUpAfter-callWork|アフターコールの終了方法]]. | |||
Latest revision as of 06:58, 30 May 2024
発信の再スケジュール方法
アウトバウンドキャンペーンに参加している間、通常、あなたが処理したすべてのコールの結果を示すdispositionを選択することが求められます。詳細については、セクション 処分とメモの入力方法.
選択済処分によっては、同じ顧客への再度の試行をスケジュールする必要がある場合もあります。再スケジュールは、例えば、顧客から都合の良い時間に再度発信するよう要求された場合によく行われます。様々な状況での発信の再スケジュールに関する詳細な指示は、キャンペーン管理者から受け取ります。選択済のコールが次の試行を意味する場合、次へコールのスケジュールコントロールは、連絡先情報パネルの [選択済]の下に表示されます。

操作手順
別の発信試行をスケジュールするには、次のステップに従います。
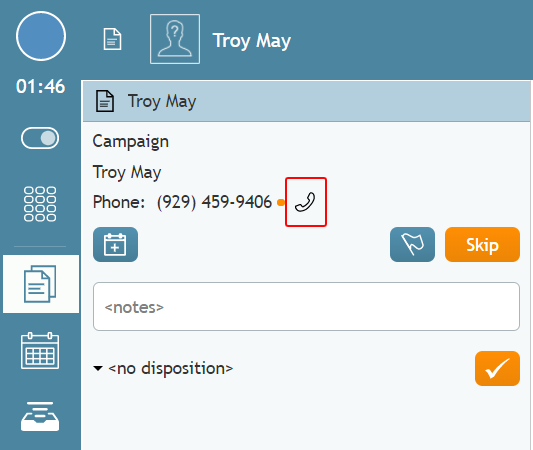
- 着信コールを承認します。表示された顧客の電話番号またはIDにカーソルを合わせ、[通話開始]アイコンをクリックして顧客との通話を開始します。
顧客への発信を開始する - アクティビティコール中に、ディスパージョンを設定して再スケジュールすることも、アフターコールワークで行うこともできます。アクティブコール中に行う場合は、[処分]セレクタを使用して、適切な処分(最終処分でないもの)を選択します。再スケジュールのオプションが表示されます。
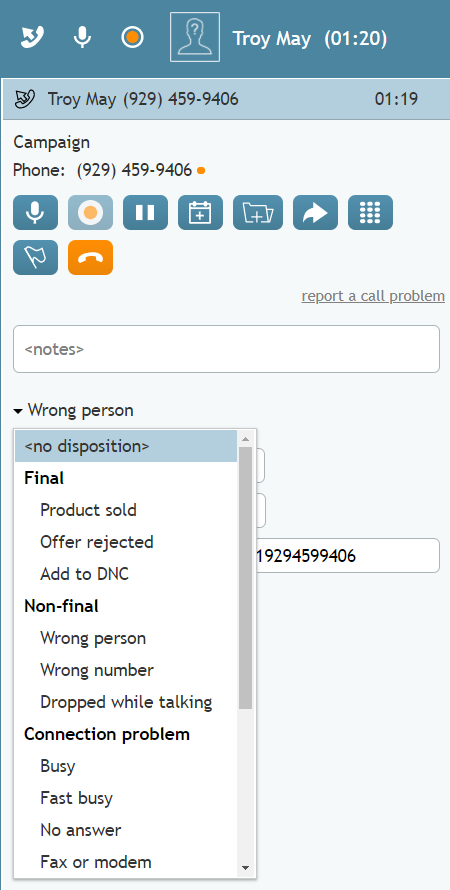
リストより選択済のディスポジションを選択してください。 - コールを再スケジュールするには、次のように設定します:
- # 次へ発信- 次回発信を試行する一般的な時間帯(午後、夕方、明日など)。
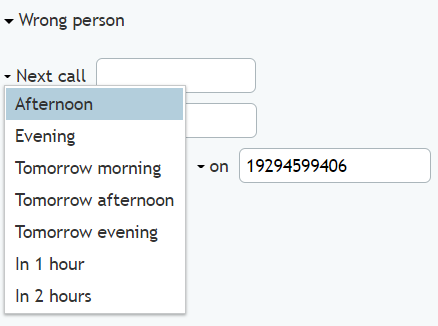
次へコールの時間帯オプション
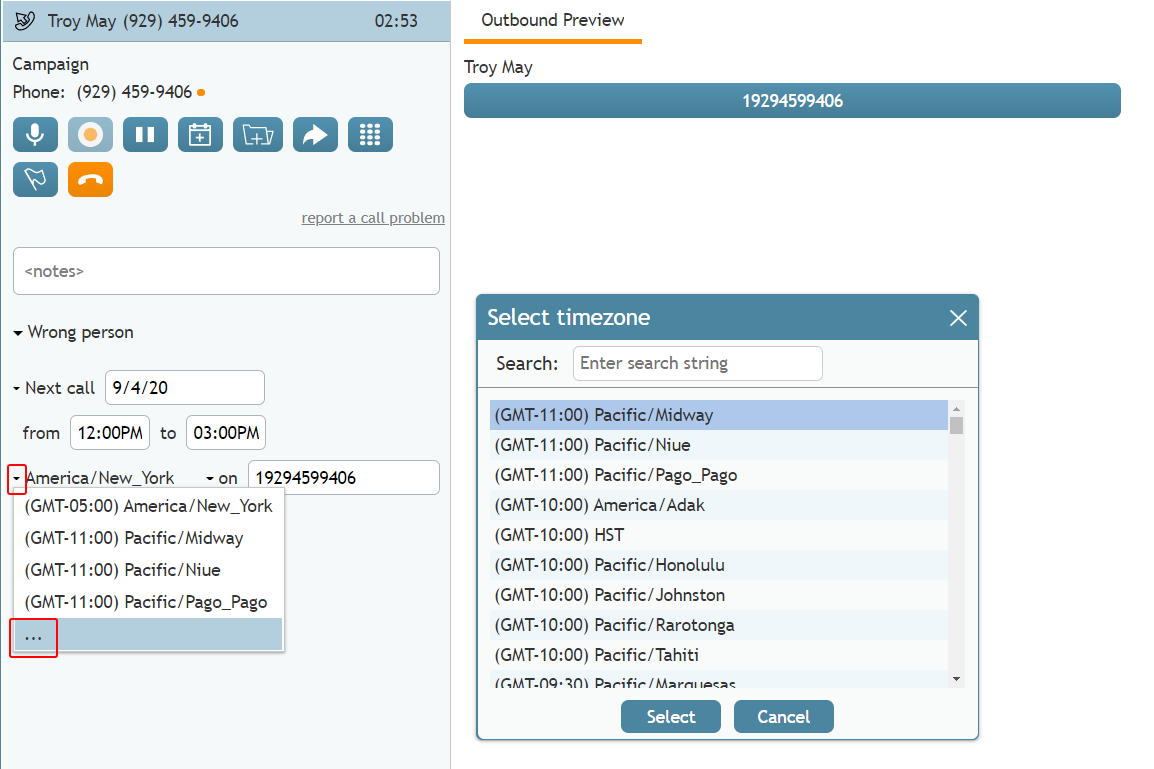
- タイムゾーン- 希望するタイムゾーン(例: 「アメリカ/ロサンゼルス」).カスタマーの環境設定によっては、選択済のインターバルに対して別のタイムゾーンを選択する必要があります.タイムゾーンを変更すると、"from/to "フィールドの時間も変更されることに注意してください。インタラクションを完了する前に、常に正しい時間が設定されていることを再確認することをお勧めします。
タイムゾーンの選択
- タイムゾーン- 希望するタイムゾーン(例: 「アメリカ/ロサンゼルス」).カスタマーの環境設定によっては、選択済のインターバルに対して別のタイムゾーンを選択する必要があります.タイムゾーンを変更すると、"from/to "フィールドの時間も変更されることに注意してください。インタラクションを完了する前に、常に正しい時間が設定されていることを再確認することをお勧めします。
- # オン- 小さな矢印をクリックして、顧客が発信を希望する電話番号またはIDを設定します。番号を選択しない場合、システムは最初のアウトバウンドコールでの顧客の番号を設定します。
- すべての再スケジュールフィールドを入力した後、電話を切るボタンをクリックしてコールを終了します。
- アフターコールワークで、まだ上記のように発信していない場合は、今すぐ発信し、コールを完了させてください。
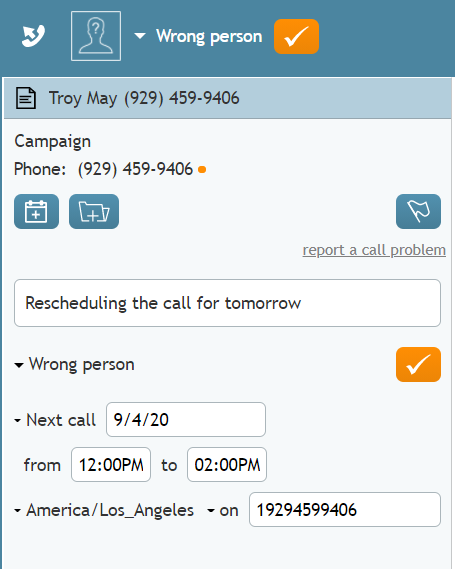
チェックマークをクリックすると、アフターコールワークでコールが完了します。


再スケジュール情報を入力すると、通常はコールを終了できます。発信終了の詳細については、以下を参照してください。 コールの解除方法および アフターコールの終了方法.