Passing URL Query Parameters to a Chat Scenario
This tutorial shows how to use the query parameters from a website URL in a chat scenario, and assumes that you have already:
Procedure
When customers navigate your website, their URL often contains valuable information in the form of query parameters. These parameters can be captured and utilized to enhance the chat experience. For instance, suppose the customer opens the web chat widget from a page on your website with this URL:
https://example.com/checkout.html?cart_id=6789-defg-h4i5&user_id=abc-123
In this case, the query parameters are everything following the ? character:
cart_id=6789-defg-h4i5&user_id=abc-123
After parsing and passing this to the scenario via the web chat widget, the following scenario variables will be populated as follows:
$(item.externalChatData.cart_id)will be set with the value6789-defg-h4i5$(item.externalChatData.user_id)will be set with the valueabc-123
In general, the value of any other key=value pair from a query string will be available in the scenario by referencing the scenario variable $(item.externalChatData.key). The following steps illustrate how to:
- Use JavaScript to extract the individual query parameters.
- Edit the chat widget configurations to send the extracted to query parameters to the chat scenario.
- Use scenario variables to access the values of each query parameter.
- Open a chat and see how the query parameters are presented to the agent.
1. Extract Query Parameters
The following steps demonstrate one way to parse the query parameters from the URL.
- Add the following JavaScript snippet to your website in order to extract the query parameters to the variable
queryParams:
<script>
// Function to extract and parse URL query parameters into an object
function getQueryParams() {
    // Create URLSearchParams object from current URL's query string (everything after '?')
    const params = new URLSearchParams(window.location.search);

    // Initialize an empty object to store the key-value pairs
    const queryParams = {};

    // Iterate through each key-value pair in the URLSearchParams object
    for (const [key, value] of params) {
        // Add each key-value pair to our queryParams object
        queryParams[key] = value;
    }

    // Return the object containing all query parameters
    return queryParams;
}

// Execute the function and store the result in queryParams constant
const queryParams = getQueryParams();

// Log the extracted query parameters to the console for debugging
console.log("Query Parameters:",queryParams);
</script>
- Open the console log of your browser, which can be found in the developer tools of Chrome, Safari, Firefox, Edge and most other modern browsers.
- Append
?cart_id=6789-defg-h4i5&user_id=abc-123to your website URL, and load the page
- You should see that the contents of
queryParamshave been logged to the console and consist of an object:{cart_id: "6789-defg-h4i5", user_id: "abc-123"}
2. Configure the Chat Widget
The chat widget allows you to pass JavaScript variables to scenarios during configuration.
- Incorporate the preceding JavaScript function into your chat widget to pass the query parameters to the scenario. Note the key points of the script:
- First the function
getQueryParams()is defined - Next, the value of
queryParamsis set with the lineconst queryParams = getQueryParams(); - Finally, the key: value pair
parameters:queryParamsis added toSERVICE_PATTERN_CHAT_CONFIG
- First the function
<link type="text/css" rel="stylesheet" href="https://example.brightpattern.com/clientweb/chat-client-v4/css/form.css">
<script type="text/javascript">

   function getQueryParams() {
      const params = new URLSearchParams(window.location.search);
      const queryParams = {};
      for (const [key, value] of params) {
         queryParams[key] = value;
      }
      return queryParams;
   }

   const queryParams = getQueryParams();

   SERVICE_PATTERN_CHAT_CONFIG = {
      appId: '70a6624585ef2b0981fed84fcd12d4db',
      apiUrl: 'https://example.brightpattern.com/clientweb/api/v1',
      tenantUrl: 'example.brightpattern.com',
      chatPath: 'https://example.brightpattern.com/clientweb/chat-client-v4/',

      // Set the new variable "queryParams" as the value for the custom 'parameters' sent when configuring the chat widget
      parameters:queryParams

   };
</script>
 <script src="https://example.brightpattern.com/clientweb/chat-client-v4/js/init.js"></script>
- Ensure that the
appId,apiUrl,tenantUrl, andchatPathare configured with the correct values for your chat widget.
- Open your webpage to ensure that the chat widget loads correctly.
3. Access Query Parameter Values with Scenario Variables
Data passed to the parameters key of the chat configuration is accessible through the scenario variable $(item.externalChatData). As mentioned earlier, the value of any key=value pair from a query string will be available in the scenario by referencing the scenario variable $(item.externalChatData.key).
If we use the example URL:
https://example.com/checkout.html?cart_id=6789-defg-h4i5&user_id=abc-123
Then there will be two query parameters, accessible by the following scenario variables:
$(item.externalChatData.cart_id)will be set with the value6789-defg-h4i5$(item.externalChatData.user_id)will be set with the valueabc-123
To configure the scenario to display the cart_id and user_id values from the query string to the agent via internal message:
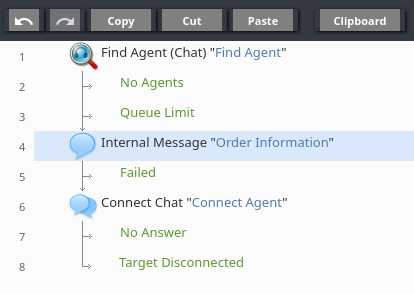
- Open the chat scenario associated with this chat widget. Add these three blocks in order:
- Find Agent (Chat) block with the default values.
- Internal Message configured to show query parameter values (next step).
- Connect Chat with the default values.
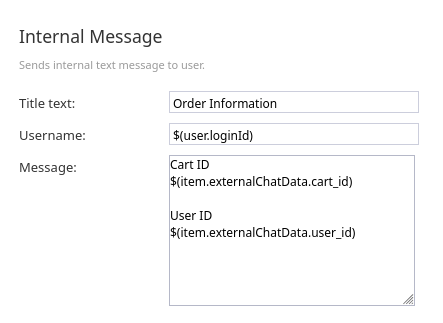
- Select the Internal Message block and configure its fields as indicated:
- Title text: Option name for the block to help understand it's purpose. Simply set to "Order Information".
- Username: Indicates who should see the message. The scenario variable
$(user.loginId)provides the login of the Agent selected by the Find Agent (Chat) block, so the same person who answers the customer chat will see the internal message containing the order information. - Message: Text to display to the agent. In order to show them data from the query string, use the
$(item.externalChatData)scenario variable as indicated:Cart ID $(item.externalChatData.cart_id) User ID $(item.externalChatData.user_id)
- Title text: Option name for the block to help understand it's purpose. Simply set to "Order Information".
- The Find Agent and Connect Chat blocks can be left with their default configurations. Save the scenario
4. Test the Scenario
Now test the entire setup and see the query parameters passed from the website, through the chat widget, into the chat scenario, and finally displayed to the agent.
- Log in to the Agent Desktop application as an agent who can handle chats from the scenario.
- Navigate to your website where the chat widget is configured. Append the query parameters to the URL, (e.g.
https://example.com/checkout.html?cart_id=6789-defg-h4i5&user_id=abc-123), reload the page, then open the chat widget to initiate a new chat session.
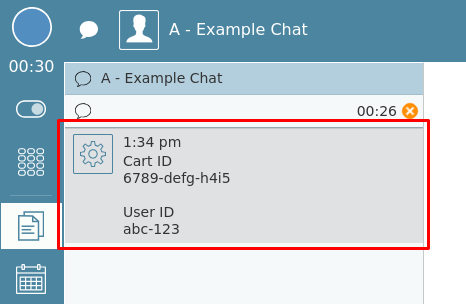
- From the agent desktop, accept the chat and see that the query parameter values are displayed in an internal message:
Further Ideas
Showing data to the agent using an internal message is a simple example from among many possibilities. Consider using scenario variables to create URLs for CRM or Web Screen Pops, get automated answers from Ask a Bot, or create customized instructions for the AI Agent.


