From Bright Pattern Documentation
Configure the Outbound Messaging Campaign
Once you are finished with your list, message, and other planning, you will be ready to configure your Outbound Messaging campaign.
Procedure
1. Create the service
- In the Contact Center Administrator application, section Services & Campaigns, click the Add service
 button, select Outbound Messaging, and then click OK.
Select Outbound Messaging

2. Configure the Properties tab
- In the Properties tab, you will need to configure the following:
- The name of your service
- The hours of operation (i.e., when your customers receive the message)
- If there will be an override schedule on select days
- The Messaging ‘From’ number
- When configuring your hours of operation, it is important to remember these are the hours that your customers will receive your messages. Being mindful of these hours will help both optimize campaign effectiveness and minimize any potential nuisance.
- Additionally, note that customers may reply to the Messaging ‘From’ number so a separate inbound scenario should be defined. As a reminder, if you do not have an SMS-capable access number for your contact center, no number will appear in this field. If this happens, contact your service provider.

3. Configure the Assignments tab
- In the Assignments tab, you will assign Administrators and Operators.
- Administrators are users with the privilege Manage all services and campaigns or the privilege Manage assigned services and campaigns who can change the campaign’s configuration.
- Operators are users with the privilege Control campaign operations who can operate the campaign in real-time (i.e., start it, stop it, view statistics, etc.).
- Note: Because outbound messaging campaigns are automatic and do not involve agents, no Teams or Reviewers are assignable.

4. Configure the Lists tab
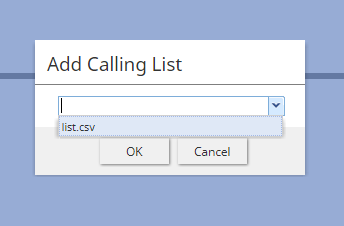
- In the Lists tab, click the Add list button and the Add Calling List dialog will pop. The list you previously uploaded should be seen from the drop-down menu. Select the list and then click OK.
Select a list - Once your list is uploaded, you will be able to configure list properties, filters, and sorting. Sorting is important if you have particular records you want prioritized, and filters are helpful for filtering out other records, especially if your lists are imported via FTP/SFTP, List API, or from a Salesforce.com SOQL query.

- Most importantly, you will need to ensure the Enabled checkbox from the list Properties is selected. Once this is done and your list configuration is complete, click Apply.

5. Configure the Outbound tab
The Outbound tab is where you will configure the campaign-specific properties such as the outbound message, calling hours, other campaign restrictions, and so forth. Additionally, the Diagnostics section will help you resolve any issues preventing your campaign from running. Note that Dial Rules are not configurable for this type of campaign.
- Outbound - General
- In the General section, you will configure the following:
- Whether the campaign is enabled (i.e., if not done in the Lists tab
- Automation restrictions
- The Message to send
- An optional Media file to include with the message
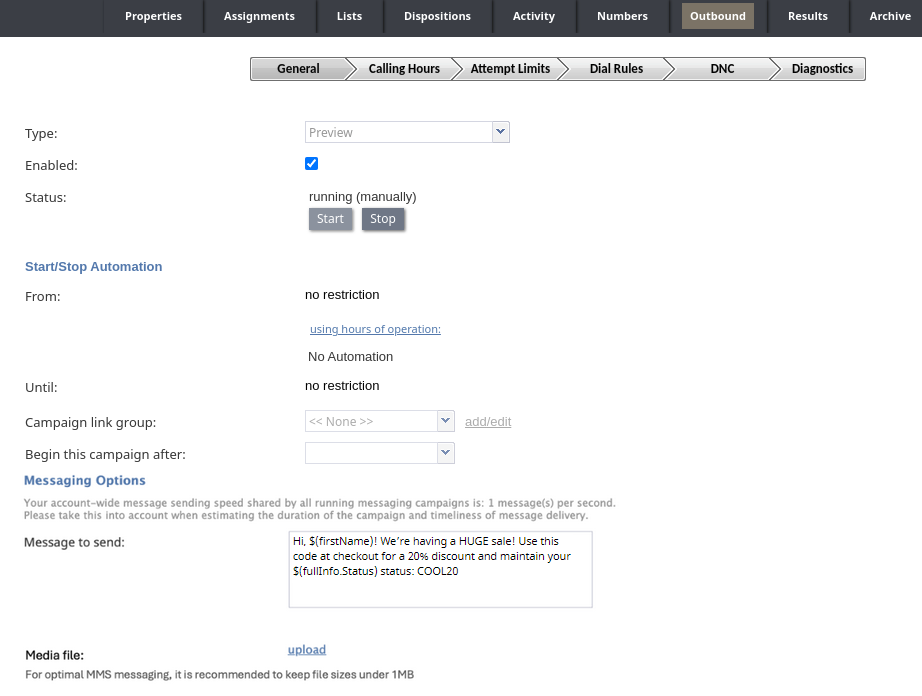
Outbound general tab
- Values of calling list record fields may be added as variables in the message body for personalization using the following format: $(fullInfo.[list field name]). For example, list field "previousPurchase" should appear in the message as $(fullInfo.previousPurchase). When including record fields, you may use the following variables:
- contactInfo
- firstName
- fullInfo (e.g., $(fullInfo.Status))
- lastName
- otherInfo
- suggestedPhone
- As a reminder, the Message to send field does not have a character limit; however, SMS carriers may limit the length of the messages. If the message is too long, the carrier may either truncate it or reject the request completely. If your message is longer than 160 characters, check with your service provider about possible limitations and workarounds.
- For operators, the campaign can be started and stopped from this section as well as in the Agent Desktop application, section Campaign Operations.
- In the General section, you will configure the following:
- Outbound - Calling Hours
- In the Calling Hours section, you can define calling hours schedules, select the prefered phone number from the list to call, and so forth. Note that you must define one type of phone to call per hours schedule.
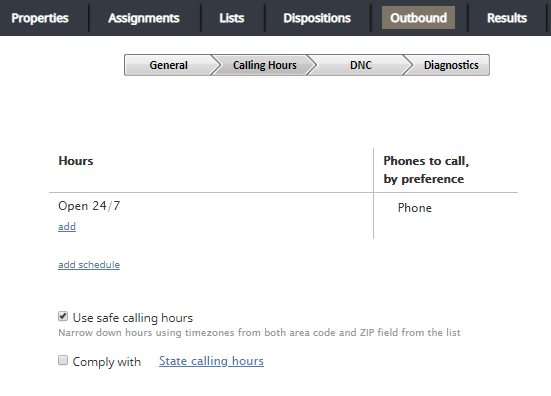
Calling Hours
- In the Calling Hours section, you can define calling hours schedules, select the prefered phone number from the list to call, and so forth. Note that you must define one type of phone to call per hours schedule.
- Outbound - DNC
- In the DNC section, you may add Do Not Call (DNC) lists. For more information, see the Contact Center Administrator Guide, section Outbound - DNC.
- In the DNC section, you may add Do Not Call (DNC) lists. For more information, see the Contact Center Administrator Guide, section Outbound - DNC.
- Outbound - Diagnostics
- It is important to check the Diagnostics section as it will indicate any errors there are with your campaign configuration. Note: You must resolve all errors before you can run the campaign. For more information, see the Contact Center Administrator Guide, section Outbound - Diagnostics.
< Previous | Next >
- It is important to check the Diagnostics section as it will indicate any errors there are with your campaign configuration. Note: You must resolve all errors before you can run the campaign. For more information, see the Contact Center Administrator Guide, section Outbound - Diagnostics.

