提供: Bright Pattern Documentation
No edit summary |
Created page with "次の手順は、ユーザー定義のジェネリックアカウント用です。 VoIPプロバイダーを選択する必要はありません。また、アカウント..." |
||
| Line 12: | Line 12: | ||
Bria Mobile アプリで、新しいアカウントを追加します。これは、 '''設定 > アカウント > “+” > プロバイダの設定 > ユーザー定義のジェネリックアカウント > SIP'''に移動して行います。 | Bria Mobile アプリで、新しいアカウントを追加します。これは、 '''設定 > アカウント > “+” > プロバイダの設定 > ユーザー定義のジェネリックアカウント > SIP'''に移動して行います。 | ||
次の手順は、ユーザー定義のジェネリックアカウント用です。 VoIPプロバイダーを選択する必要はありません。また、アカウントが無効になっている場合にのみ、アカウントオプションを編集できます。 | |||
==== Section SIP Account ==== | ==== Section SIP Account ==== | ||
Revision as of 09:35, 20 September 2020
• English
Bria Mobile ソフトフォン設定
Bria Mobileソフトフォンアプリは、Bright Pattern コンタクトセンターソフトウェアを使った通話に適しています。 Bria Push サービスを使うことで、スタンバイ時のバッテリーの消耗を最小限に抑えます。
設定
コンタクトセンター管理者アプリケーション側
Bria MobileをBright Pattern コンタクトセンターで設定するには、以下を行います:
- ハードフォン アカウントをコンタクトセンター管理者アプリケーションで追加し、プロパティを編集します。
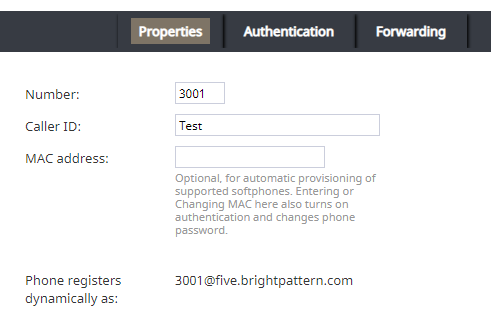
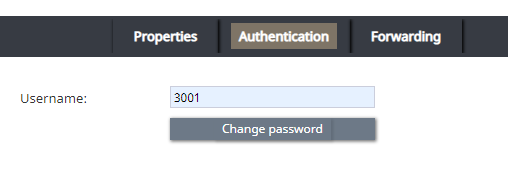
ハードフォンのプロパティ - 認証タブで、 ユーザー名の認証は電話の内線番号と同じであることを確認します。
ハードフォン認証タブ - ドメイン (例:プロパティタブの “電話登録 <ext>@<domain>”をご覧ください)、 内線番号、パスワードをメモします。


Bria Mobile ソフトフォン側
Bria Mobile アプリで、新しいアカウントを追加します。これは、 設定 > アカウント > “+” > プロバイダの設定 > ユーザー定義のジェネリックアカウント > SIPに移動して行います。
次の手順は、ユーザー定義のジェネリックアカウント用です。 VoIPプロバイダーを選択する必要はありません。また、アカウントが無効になっている場合にのみ、アカウントオプションを編集できます。
Section SIP Account
To configure the SIP account, take the following steps:
- Give your account an Account Name.
- Set the desired Display as name.
- Set the Username and Password to the same username (e.g., "3001") and password from your configured hardphone account.
- Set the domain to the hardphone account’s domain and add :5080 (Bright Pattern CCaaS service uses the non-standard SIP port 5080). For example: "example.brightpattern.com:5080"
- Enable the option Use Push Notifications and set the option Registration Mode to Single Device Emulation.
- Disable the option NAT Emulation.
- Leave the option Push Advanced Settings disabled.
Section Account Advanced
To configure section Account Advanced, take the following steps:
- In section Network Traversal, option Custom configuration, turn all options off.
- In section IP Version, set option Wi-Fi IP Version to IPv4
- Also in section IP Version, set option Mobile IP Version to IPv4.
- In section DTMF Type, make sure option Send DTMF using is set to RFC2833.
- In section Transport and Security, set option SIP transport to UDP.
- In section SIP Registration, set options Wi-Fi Refresh Interval and Mobile Refresh Interval to 30 seconds.
- In section TLS Cert Management, disable option Verify TLS cert.
- In section SIP Miscellaneous, leave option Show Miscellaneous disabled.
< 前へ | 次へ >