How to Generate Custom Reports from Web Chat Data
This tutorial shows how to use data from the webpage where a customer has started a web chat to generate custom reports. Before starting, please ensure you have already:
Procedure
Suppose your customers are able to open web chats from any page in your knowledge base, and you want to generate a report that lets you see the URL of the webpages where your customers typically start chats.
The following steps illustrate how to:
- Edit the chat widget configurations to send the current URL to the chat scenario
- Add a custom reporting field
- Use the Set Custom Reporting Field scenario block to make the URL data accessible in reports
- Start a web chat to populate the custom field with data
- Create a custom report template that shows the URL where each web chat started
- Run and download a report based on the template
1. Configure the Chat Widget
The chat widget allows you to pass JavaScript variables to scenarios during configuration. While several methods exist for retrieving the URL in JavaScript, this example uses window.location.href to access the entire URL string.
- Incorporate
window.location.hrefinto your chat widget configuration by setting theparameterskey to{pageURL:window.location.href}as indicated below:
<link type="text/css" rel="stylesheet" href="https://example.brightpattern.com/clientweb/chat-client-v4/css/form.css">
<script type="text/javascript">

   SERVICE_PATTERN_CHAT_CONFIG = {
      appId: '70a6624585ef2b0981fed84fcd12d4db',
      apiUrl: 'https://example.brightpattern.com/clientweb/api/v1',
      tenantUrl: 'example.brightpattern.com',
      chatPath: 'https://example.brightpattern.com/clientweb/chat-client-v4/',

      // Set the value of "pageURLnew" to hold the full URL of the current page
      parameters:{pageURL:window.location.href}

   };
</script>
 <script src="https://example.brightpattern.com/clientweb/chat-client-v4/js/init.js"></script>
- Ensure that the
appId,apiUrl,tenantUrl, andchatPathare configured with the correct values for your chat widget.
- Open your webpage to ensure that the chat widget loads correctly.
2. Add a Custom Reporting Field
Custom Reporting Fields allow you to define fields for Custom Reports. In order to save the page URL where each chat starts, you will need to add a custom reporting field.
- Log in to your Contact Center Administrator application, navigate to Configuration > Custom > Custom Reporting Fields, and click on any field 1 through 5. Note that only custom fields 1 through 5 can be included in custom reports.
- Give the field a meaningful name (in this case "URL when chat was opened"), and make sure the "Enable" box is checked.
3. Set the Value of the Custom Reporting Field
Data passed to the parameters key of the chat configuration is accessible through the scenario variable $(item.externalChatData). In this example, the URL data was passed as follows:
parameters: {pageURL:window.location.href}
Therefore, in the chat scenario, the URL where the page was opened will be accessible through the scenario variable:
$(item.externalChatData.pageURL)
The next steps show how to save the value of this scenario variable to the "URL when chat was opened" custom reporting field.
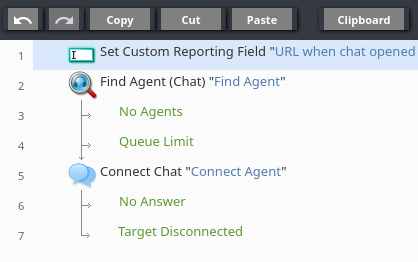
- Open the chat scenario associated with this chat widget. Add these three blocks in order:
- Set Custom reporting Field block to save the URL for reports.
- Find Agent (Chat) block with the default values.
- Connect Chat with the default values.
- Select the Set Custom Reporting Field block and configure the following fields as indicated:
- Field: Choose the name of the custom field to save the URL data, in this case "URL when chat opened"
- Value: Indicate the value to save in the field. Use the variable
$(item.externalChatData.pageURL)which will contain the URL where the customer initiated the web chat.
- The Find Agent and Connect Chat blocks can be left with their default configurations. Save the scenario
4. Start a Few Web Chats
To ensure there is data for your custom report to draw from, navigate to the web page where your chat widget is configured, and start a few web chats. If possible, start the chat from pages with different URLs.
5. Create a Report Template
In order to generate a report using data from the custom field "URL when chat opened", you will need to create a report template. Refer to the custom reporting tutorial for a detailed guide on creating reports. The following steps explain how to create a minimal report that can be downloaded as a CSV file.
- Determine what fields you want to display in your report. Refer to the list of metrics available in the call_detail database for more information. Note that the call_detail table includes data about interactions of all media types, including chat interactions. This example will use the following metrics:
- start_time: the time when the chat interaction entered the system, expressed in UTC.
- callee_login_id: the login ID of the agent who received the chat interaction
- custom1: Since the custom field "URL when chat was opened" is defined in custom "field1", the corresponding database field is "custom1"
- Based on the chosen fields (metrics), create a BPXML-formatted report template. You can copy the below example into a file and save it with the
.bpxmlextension.
<?xml version="1.0" encoding="UTF-8"?>
<BPcsvReport version="1.0" resourceBundle="com.brightpattern.reports.oob_reports">
    <parameters><!-- Defines the report parameter that will be used when generating the report. -->
        <parameter name="start_time" type="timeframe" subtype="start" />
    </parameters>

    <queryString><!-- Contains the SQL query to generate the report data -->
        <![CDATA[
            SELECT
                start_time,
                callee_login_id,
                custom1
            FROM
                call_detail
            WHERE
                start_time > $P{start_time}
        ]]>
    </queryString>
</BPcsvReport>
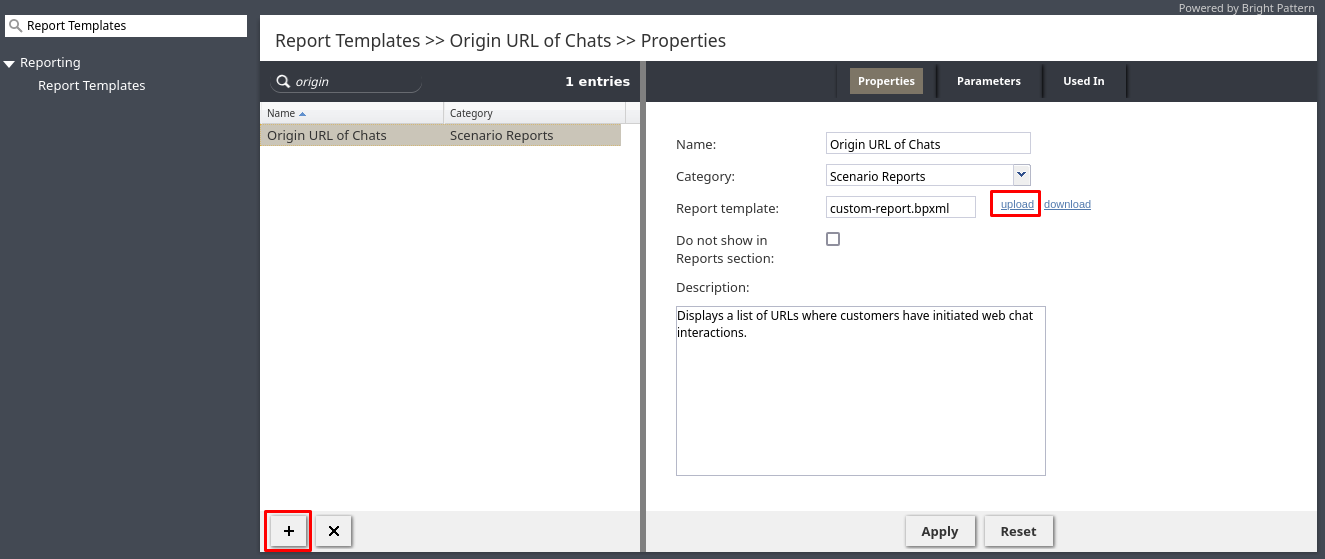
- Navigate to Configuration > Reporting > Report Templates in the Administrator application, click + to create a new report, and configure the indicated properties
- Name: Descriptive name of the report, which will be used to find this template when you want to generate the report in the next step.
- Category: Choose the category where this report template will appear when generating the report.
- Report template: Upload the
.bpxmlfile created in the previous step.
- Click Apply to save the report template.
6. Run and Download the Report
In order to download the data from the report template as a CSV file, you will need to run the report, specifying the desired time frame.
- Navigate to Reports > Reports > All and select the report template created in the previous step. Click Run report.
- The report will automatically be downloaded as a ZIP archive containing one CSV file. Unpack the archive and open the CSV. This example produced the following file:
"start_time","callee_login_id","custom1"
"11/17/24 10:39:03 PM PST","administrator","https://knowledge-base.example.com/interesting-article"
"11/17/24 10:43:27 PM PST","administrator","https://knowledge-base.example.com/difficult-article"
"11/17/24 10:44:01 PM PST","administrator","https://www.example.com/homepage"
Further Ideas and Related Tutorials
Consider making reports with data retrieved from the URL query parameters, use the retrieved URL to get automated answers from Ask a Bot, or create customized instructions for the AI Agent.


