(Created page with "600px") |
(Created page with "メッセージは送信されます。") |
||
| Line 109: | Line 109: | ||
# Hit '''Enter''' to send the message to the customer.<br /><br /> | # Hit '''Enter''' to send the message to the customer.<br /><br /> | ||
| − | + | メッセージは送信されます。 | |
Revision as of 22:10, 25 June 2020
チャット定型文の作成と編集
チャット定型文とは、お客様へ送信する標準的な挨拶を意味します。チャット定型文を使うと、エージェントがチャットごとに使う挨拶(私の名前は○○です。どのようなご用件でしょうか)を入力する手間が省きます。チャット定型文は、エージェントがお客様一人一人に対して標準的な対応を行っていることを保証するものです。
各エージェントは、チャット定型文を作成することはもちろん、チームまたはコンタクトセンター管理者が作成した定型文を編集することもできます。
Create a New Response
- Click the Settings icon
 in the upper right corner of the desktop. Note that if you have uploaded a photo to your user profile, your photo will be shown instead of the Settings icon.
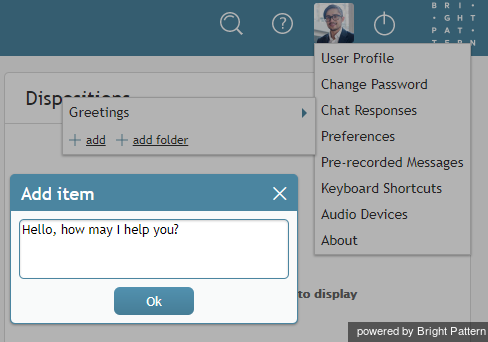
 - Select the Chat Responses option. A list of the previously defined responses will appear.
- To define a new chat response, click the add option.
- Type the desired text in the editable field and click the OK to confirm.
Edit an Existing Chat Response
- Navigate to Settings > Chat Responses
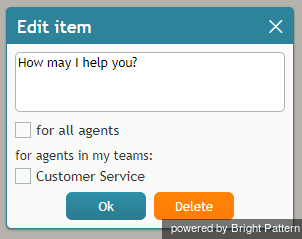
- Select the item to edit. The text of the response will appear in an editable field.
- Select the for all agents checkbox if you wish to make this chat response available globally.
- Select the checkbox for the desired team(s) if you wish to make this chat response available to selected team(s).
- Make the desired changes and click OK to confirm. Note that you can also delete a response while in the Edit window.
Include Rich Formatting in a Canned Response
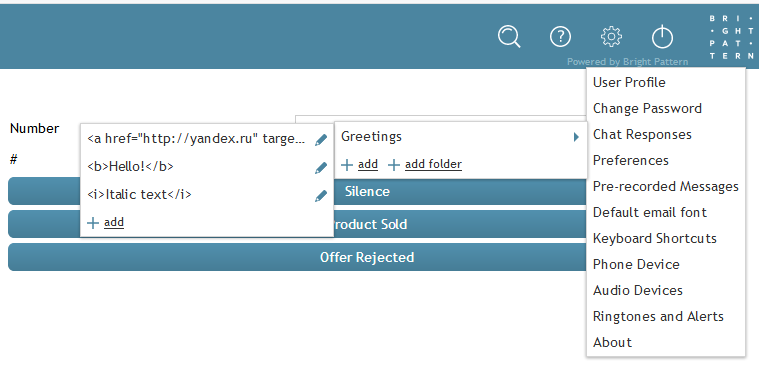
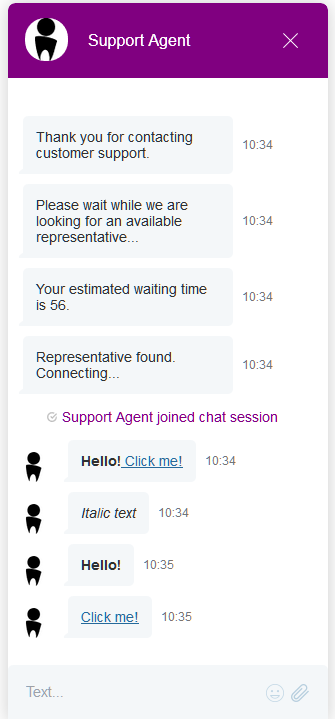
You can use standard HTML tags in canned chat responses to make text appear in bold, italics, as a web link, and so on. Canned responses that include HTML tags will be formatted as such for the customer to see in the active chat.
Usage
Place the opening HTML tag before the text you want to affect, and place the closing tag after the text. The following are some examples of how you can use HTML tags in your canned responses.
| Format | HTML | Example |
| Italic | <i> | <i>Make this text italic for emphasis. |
| Bold | <b> | <b>Let's make it bold. |
| Italic and Bold | <i><b> | <i><b>Make this look italic and bold! |
| Link | <a href="URL"> | <a href="http://help.brightpattern.com"> |
| Link that opens in new tab/window | <a href="URL" target="blank"> | <a href="http://help.brightpattern.com" target="blank"> |
How to Apply Rich Formatting in a New Response
- Follow the instructions to create a new response.
- After you click add to add a new response, type into the text entry field, being sure to format the text with the desired HTML tags (see section Usage above).
- Click OK to confirm and save.
- Your richly formatted response will appear in the list of all responses.
- When you use the canned responses in your chat, the customer will see the formatting.
Arrange Your Canned Responses in Folders
- Click add folder.
- Enter a folder name.
- Click OK. The new folder will appear in the list.
- To open the folder, click its name.
お持ちの権限によりますが、作成したチャット定型文はコンタクトセンターの全エージェントで使用できます。当該の権限を持っているならば、 編集ウィンドウの全エージェントのチェックボックスが表示されます。
The following variables can be used in canned chat responses:
- %AF – for agent’s first name
- %AL – for agent’s last name
- %F – for customer’s first name
- %L – for customer’s last name
Append Canned Chat Responses
Once one or more canned chat responses (i.e., greetings) have been created and saved, agents or users working in the Agent Desktop application have the option of editing a canned response from within the chat window before it is sent. This capability allows agents to change a standard response to suit the customer's message or question, before the response is delivered to the customer.
例えば、どのようなご用件でしょうか?という定型文が保存されています。お客様からのリクエストが明確である場合(例えば ログインIDの変更方法を教えてください)、エージェントはこの定型文を、例えば、 ご質問ありがとうございます。ご対応いたしますなど、お客様の質問に合うように変更しなければなりません。 チャット定型文の付け加えを行うことによって、お客様への対応をより適切でカスタマイズされた対応にすることができます。
Step 1: Begin a chat
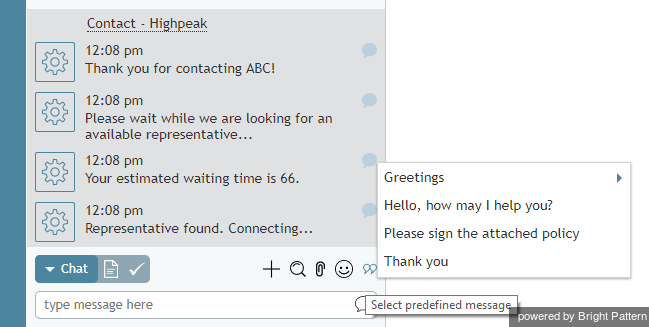
Canned chat responses are edited from within the Text Input Field in the Agent Desktop application. When your chat interaction is in session, you can type in the chat box or insert a canned chat response (i.e., a greeting or message).
Step 2: Select a canned chat response
- To select a canned chat response, click the Select predefined message icon
 .
. - Select the desired greeting.
- The selected greeting will appear in the Text Input Field. Note that you can modify this message before sending it--this is called editing and appending a canned chat response.
- Click Send message or hit Enter.
挨拶など定型文をまだ作成していない場合は、挨拶/定型文は表示されません。定型文を作成してから、チャットウィンドウでの編集が可能になります。
Step 3: Edit the canned chat response and append it to the chat
- When you select the desired greeting, the greeting text will appear in the chat box.
- You can edit your canned chat response from within the Active Communications List window.
- Hit Enter to send the message to the customer.
メッセージは送信されます。

