提供: Bright Pattern Documentation
< 5.19:Agent-guide | Tutorials | Chat | HowtoHaveaVideoChat
(Created page with "お客様とビデオチャットを行うには、以下の手順に従ってください:") |
(Created page with "#先ず、音声チャットを開始します。そのため'''ヘッドセットアイコン''' 37px.をクリックします。 #次...") |
||
| Line 6: | Line 6: | ||
お客様とビデオチャットを行うには、以下の手順に従ってください: | お客様とビデオチャットを行うには、以下の手順に従ってください: | ||
| − | # | + | #先ず、音声チャットを開始します。そのため'''ヘッドセットアイコン''' [[File:Chat-Widget-VoIP-Button-52.PNG|37px]].をクリックします。 |
| − | # | + | #次に'''ビデオ入''' [[File:Chat-Widget-Video-ON-Button-52.PNG|37px]] ボタンをクリックします。こちらの映像が相手に送信される間に、画面の右下にこちらの映像が表示されます。 お客様からの映像が届かない場合、またはこちらの映像がお客様のところに送信中の場合、メイン画面が黒色の ままです。 |
| − | # | + | #お客様はビデオチャットを開始する場合、 '''ヘッドセットアイコン''' [[File:Chat-Widget-CUSTOMER-VoIP-Call-Button-52.PNG|26px]]、次に'''ビデオ入''' [[File:Chat-Widget-CUSTOMER-Video-ON-Button-52.PNG|26px]] ボタンをクリックしなければなりません。 '''ご注意''': お客様のデバイスで表示されるボタンの背景色は、チャットウィジェットの設定により異なります。 |
| − | # | + | #音声及びビデオチャットを終了するには、'''電話アイコン''' [[File:Chat-Widget-End-Call-Button-52.PNG|37px]]をクリックします。 |
Revision as of 22:10, 25 June 2020
ビデオチャットの利用
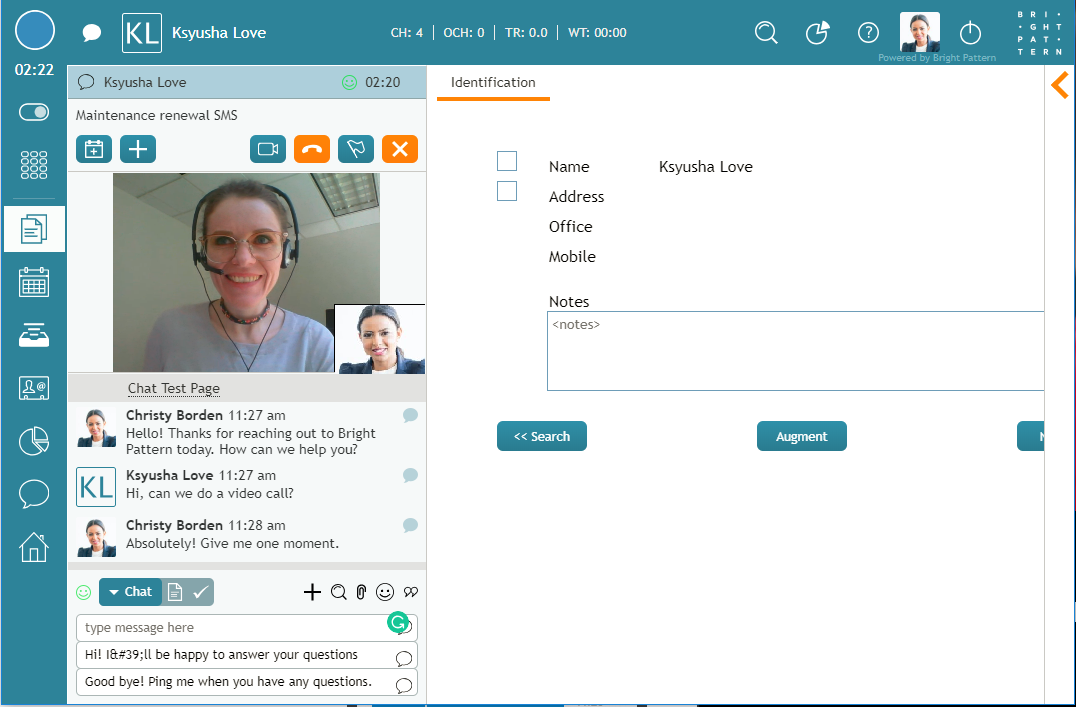
アクティブなチャットセッション中に、エージェント及びお客様は、チャットとビデオの切り替えが容易にできるビデオチャットを利用できます。
ご注意': ビデオチャットを開始する場合、先ず音声チャットを開始してから、ビデオへアップグレードしてください。さらにチャットを使ってビデオコールを行うのに、システム管理者はVoIPコールの設定を有効にしなければなりません。
お客様とビデオチャットを行うには、以下の手順に従ってください:
- 先ず、音声チャットを開始します。そのためヘッドセットアイコン
.をクリックします。
- 次にビデオ入
ボタンをクリックします。こちらの映像が相手に送信される間に、画面の右下にこちらの映像が表示されます。 お客様からの映像が届かない場合、またはこちらの映像がお客様のところに送信中の場合、メイン画面が黒色の ままです。
- お客様はビデオチャットを開始する場合、 ヘッドセットアイコン
、次にビデオ入
ボタンをクリックしなければなりません。 ご注意: お客様のデバイスで表示されるボタンの背景色は、チャットウィジェットの設定により異なります。
- 音声及びビデオチャットを終了するには、電話アイコン
をクリックします。
Switching from Video to Audio-Only Chat
Because both video and VoIP settings must be enabled for video chat to work, either you or your customer may turn off your camera but continue having an audio-only chat.
To switch from video to audio, turn off your camera by clicking the video off button. If your customer wants to turn off their camera, they may click their video off
button. If there is no video from the visitor, and you are still sending video, the main video screen will be black.

