Interaction Records Search
When you select the Interaction Records tab from the top of the screen, the application pane will initially display a search page where you define media type(s) of the interactions you are looking for as well as other search criteria, such as time frame, participating agent(s), and/or service(s) involved.
This section offers an overview of the Interaction Records Search feature. For detailed descriptions of search criteria and search results, see sections List of Interaction Records Search Criteria and Search Results.
Notes:
- Only completed interaction segments appear in the Interaction Records search. For emails, this means that an email will only appear in search results after it has been replied to, closed without reply, or saved as a draft. Thus, emails in the initial distribution queue will not be shown.
- The standard aggregation period for the raw data used to produce detailed interaction records and historical reports is 15 minutes; therefore, under normal circumstances, detailed records for completed interactions and agent activities are available in Interaction Records and Agent Timeline within 15 minutes.
- In a worst-case scenario, the recordings for an interaction may be unavailable during two aggregation intervals (i.e., 30 minutes). Therefore, we recommend reviewing an interaction 30 minutes after it is completed.
Adding Search Conditions
Your search criteria can have any number of conditions (i.e., search criteria). To add a condition to your search, click add condition. To edit or delete an existing condition, use the mouse-over operation.

Saving Search Conditions
You can save a set of search conditions for future use--a helpful capability for when you regularly run the same searches and you do not want to add conditions manually each time you search. To save a set of search conditions, click Save and assign a name to it. To use a previously saved set of search conditions, click Load, and select its name from the drop-down menu.

Viewing Search Results
When all desired search conditions are specified, click the Search button. The Search Results page will open with the list of interaction records matching your search criteria. Each row of the displayed table describes a single interaction.

Note that an interaction may have multiple segments (e.g., when a call was handled by multiple agents). The number of segments in a call is shown in the Segments column. You can see details for each segment of a selected call by clicking that number.
Some columns show data that is media-type specific (e.g., Case ID Subject is only relevant for emails). You can adjust the format of your table to display only the columns for the data that you need. To remove columns, hover over any column header, open the drop-down menu, and unselect the columns for the data you do not need.
You can download all records that appear in the Search Results page in the .CSV format. To export the records, click the export button at the bottom of the page.
You can also manually download email content, call recordings, and call progress analysis (CPA) recordings for the interactions shown in the Search Results page. Note that manual download is limited to up to 100 emails, 100 call recordings, and 500 CPA recordings, respectively.
Periodic automated export of call/CPA recordings is configured via Services and Campaigns > Results Tab of the Contact Center Administrator application.
Erasing Interaction Content
The Erase feature for an interaction record allows you to remove the content of the record (i.e., voice recording and/or transcript for a call, the transcript for a chat, message body for an email, etc.), which may be necessary in order to comply with privacy laws or security standards. When taking this action, note that you can delete the content of one interaction at a time. For bulk erasure of interaction content, see the Contact Center Administrator Guide, section Results Tab > Interactions Erasing.

How to Erase Interaction Content
To erase content of a single interaction, take the following steps:
- Configure the desired criteria for your records search and find the desired interaction record.
- Open the record for review by clicking it's content item.
- At the bottom of the record, select the Erase
 button; this will pop the Erase interaction window
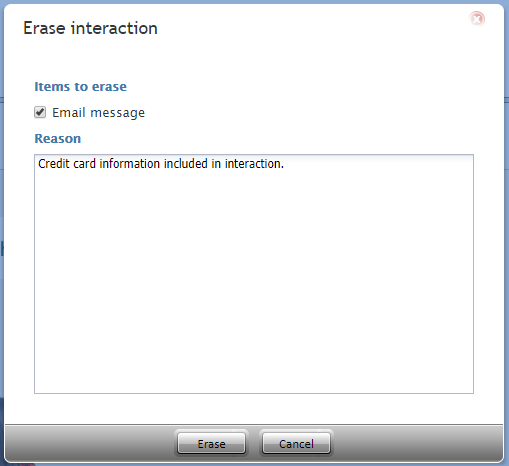
- Select Items to erase, which displays the type of content you wish to erase (e.g., a voice recording, a transcript, or both)
- Fill in the mandatory Reason field; this allows you to provide a reason the content was erased.
- Select the Erase button and you will see a new prompt, warning you that erasing the interaction is permanent.

- Select the Erase button again and the interaction will be permanently erased. Note that for email interactions, the Erase function erases content of one email message at a time. For other media types (voice, chat), the content of the entire interaction will be erased at once, regardless of the number of interaction segments.


Note that in the interaction window, if you select the segment that was erased, a message will display the time, date, user, and reason the interaction was erased.
