(Marked this version for translation) |
|||
| Line 1: | Line 1: | ||
| − | <translate>= Messenger Integration = <!--T:1--> | + | <translate>= Messenger Integration Account Properties = <!--T:1--> |
| − | + | Bright Pattern Contact Center integrates with all major social messaging applications (i.e., messengers), including Facebook Messenger, LINE, Telegram, Twitter, Viber, WeChat, and WhatsApp (via Infobip, Twilio, or Vonage API Group/Nexmo), allowing Agent Desktop users to handle service chat interactions over any configured messenger channel. In the Bright Pattern platform, we use messenger integration accounts to store credentials and allow connections between Bright Pattern and your organization's messaging app accounts and/or developer portals. | |
| − | |||
| − | + | This article describes the only properties for every type of messenger integration account. For complete integration configuration instructions and administrative tutorials, see the [[Messenger-integration-guide/Introduction/Overview | Messenger Integration Guide]]. | |
| − | |||
| + | == How to Add a Messenger Integration Account == <!--T:2--> | ||
| + | To add a messenger integration account to your contact center, go to the Contact Center Administrator application's ''Call Center Configuration > Integration Accounts'' section. | ||
| + | |||
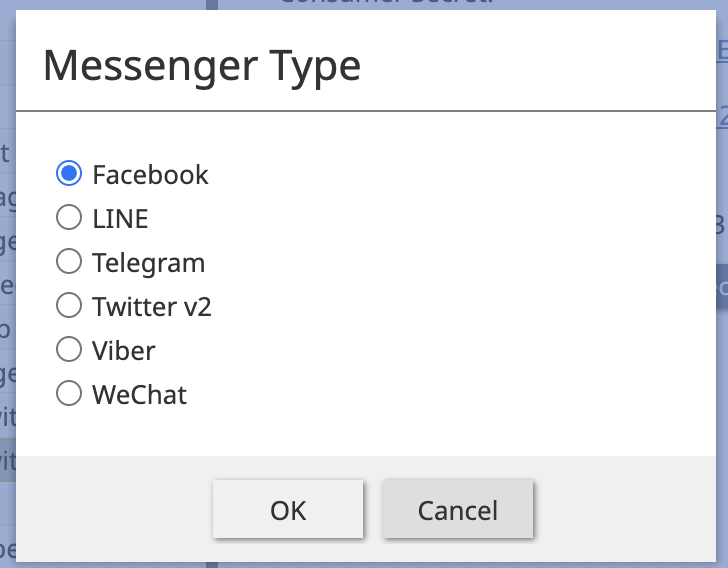
| + | Click the '''add''' "+" button and select the desired type of messaging application to add. | ||
<!--T:3--> | <!--T:3--> | ||
| − | [[File: | + | [[File:messengersintegration.PNG|450px|thumbnail|center|Selecting the type of Messenger integration account]] |
| − | <!--T:4--> | + | == Facebook Messenger Properties == <!--T:4--> |
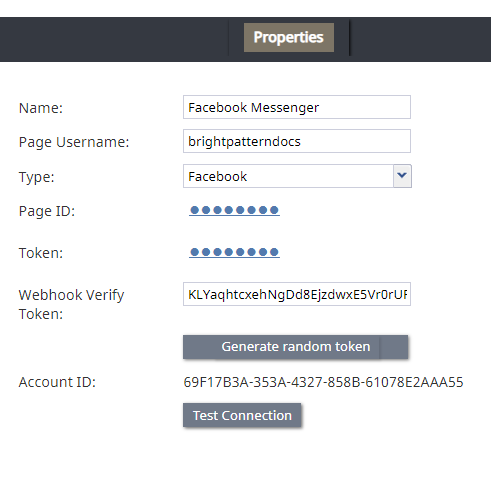
| − | The properties of | + | The properties of the Facebook Messenger type of integration account are described as follows. For complete integration instructions and configuration, see the ''Messenger Integration Guide'', section [[Messenger-integration-guide/FacebookMessenger/Overview | Facebook Messenger Integration]]. |
| − | + | <!--T:5--> | |
| − | + | [[File:Facebook-Messenger-Integration-Account-5399.PNG|650px|thumbnail|center|Facebook Messenger integration account properties]] | |
| − | + | === Name=== <!--T:6--> | |
| − | <!--T:6--> | + | The name for this integration account (can be any name of your choosing). |
| − | |||
=== Page Username === <!--T:7--> | === Page Username === <!--T:7--> | ||
| − | The | + | The @username of the Facebook Page (e.g., “brightpatterndocs” with no @ symbol). |
=== Type === <!--T:8--> | === Type === <!--T:8--> | ||
| − | Select Facebook | + | The messenger integration count type. Select '''Facebook''' for Facebook Messenger. |
=== Page ID === <!--T:9--> | === Page ID === <!--T:9--> | ||
| − | The | + | The Facebook Page ID (string), which can be found in the "About" section of the Facebook Page. |
=== Token === <!--T:10--> | === Token === <!--T:10--> | ||
| − | The Page Access Token for | + | The Page Access Token for the Facebook Page. |
=== Webhook Verify Token === <!--T:11--> | === Webhook Verify Token === <!--T:11--> | ||
The token used to confirm that Facebook is the real server, which is needed for Facebook to send you a message from the customer. If you do not have a token, click the Generate random token below. | The token used to confirm that Facebook is the real server, which is needed for Facebook to send you a message from the customer. If you do not have a token, click the Generate random token below. | ||
| − | === Generate random token === <!--T: | + | === Account ID === <!--T:12--> |
| − | Creates a random webhook token that you can copy and paste into your Facebook App | + | The unique identifier of this integration account, which is filled in for you upon clicking '''Apply'''. |
| + | |||
| + | === Generate random token === <!--T:13--> | ||
| + | Creates a random webhook token that you can copy and paste into your Facebook App in section ''Messenger Settings > Webhooks > Edit Callback URL > Verify Token''. | ||
| + | |||
| + | === Test Connection === <!--T:14--> | ||
| + | Tests the credentials and confirms whether the connection is valid. | ||
| + | |||
| + | == LINE Properties == <!--T:15--> | ||
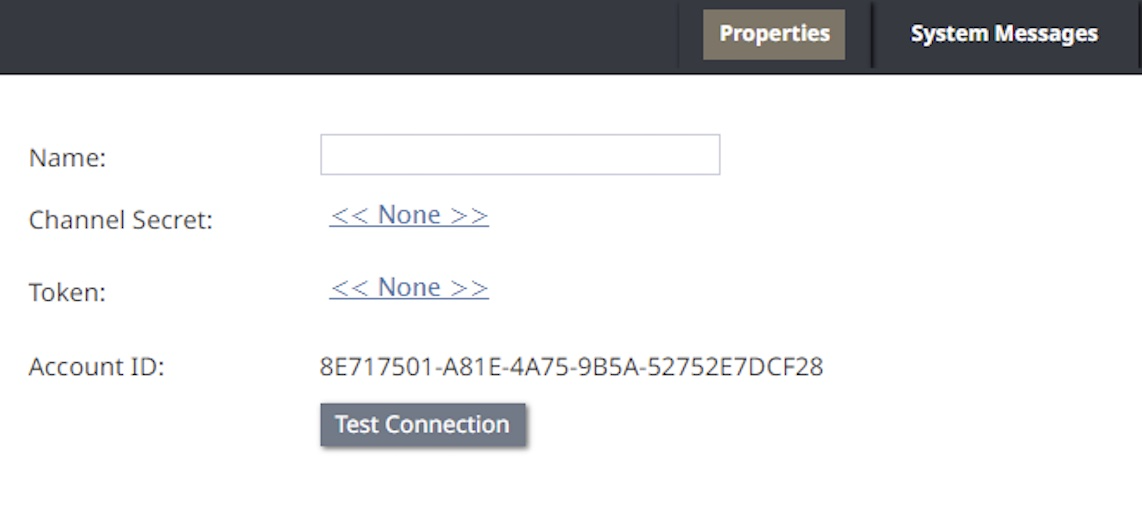
| + | The properties of the LINE type of integration account are described as follows. For complete integration instructions and configuration, see the ''Messenger Integration Guide'', section [[Messenger-integration-guide/LINE/Overview|LINE Integration]]. | ||
| + | |||
| + | <!--T:16--> | ||
| + | [[File:LINE-Integration-Account-5399.PNG|800px|thumb|center|LINE messenger integration account properties]] | ||
| + | |||
| + | === Name === <!--T:17--> | ||
| + | The name of your integration account (this does not need to be your LINE@ account name). | ||
| + | |||
| + | === Type === <!--T:18--> | ||
| + | The integration account type. For LINE accounts, select LINE. | ||
| + | |||
| + | === Token === <!--T:19--> | ||
| + | The access token for your LINE account. | ||
| + | |||
| + | === Account ID === <!--T:20--> | ||
| + | The unique identifier of this integration account, which is filled in for you upon clicking '''Apply'''. | ||
| + | |||
| + | === Test Connection === <!--T:21--> | ||
| + | Tests the credentials and confirms whether the connection is valid. | ||
| + | |||
| + | |||
| + | == Telegram Properties == <!--T:22--> | ||
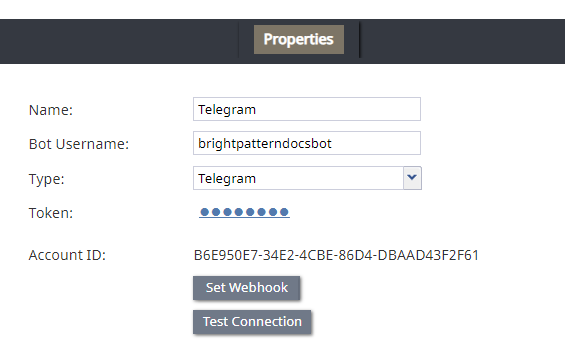
| + | The properties of the Telegram type of messenger integration account are described as follows. For complete integration instructions and configuration, see the ''Messenger Integration Guide'', section [[Messenger-integration-guide/Telegram/Overview|Telegram Integration]]. | ||
| + | |||
| + | <!--T:23--> | ||
| + | [[File:Telegram-Integration-Account-5399.PNG|450px|thumbnail|center|Telegram messenger integration account properties]] | ||
| + | |||
| + | |||
| + | === Bot Username === <!--T:24--> | ||
| + | The exact username of your Telegram bot. | ||
| + | |||
| + | === Type === <!--T:25--> | ||
| + | The integration account type. For Telegram accounts, select '''Telegram'''. | ||
| + | |||
| + | === Token === <!--T:26--> | ||
| + | The API token for your Telegram bot. | ||
| + | |||
| + | === Account ID === <!--T:27--> | ||
| + | The unique identifier of this integration account, which is filled in for you upon clicking '''Apply'''. | ||
| + | |||
| + | === Set Webhook === <!--T:28--> | ||
| + | Click this button to confirm that Telegram is the real server, which is needed for Telegram to send you a message from the customer. Note that you must get the token/webhook from Telegram; you cannot generate one here. | ||
| + | |||
| + | === Test Connection === <!--T:29--> | ||
| + | Tests the credentials and confirms whether the connection is valid. | ||
| + | |||
| + | |||
| + | == Twitter v2 Properties == <!--T:30--> | ||
| + | The properties of the Twitter type integration account are described as follows. For complete integration instructions and configuration, see the ''Messenger Integration Guide'', section [[Messenger-integration-guide/Twitter/Overview|Twitter Integration]] | ||
| + | |||
| + | <!--T:31--> | ||
| + | [[File:Twitterv2.PNG|450px|thumb|center|Twitter messenger integration account properties]] | ||
| + | |||
| + | === Name === <!--T:32--> | ||
| + | The name of your integration account (can be any name of your choosing). | ||
| + | |||
| + | === Consumer Key === <!--T:33--> | ||
| + | Your Twitter app's [[Messenger-integration-guide/Twitter/ConfigurationCreateanApp#2._Save_the_API_Key_and_Secret|API key]]. | ||
| + | |||
| + | === Consumer Secret === <!--T:34--> | ||
| + | Your Twitter app's [[Messenger-integration-guide/Twitter/ConfigurationCreateanApp#2._Save_the_API_Key_and_Secret|API secret key]]. | ||
| + | |||
| + | === Access Token === <!--T:35--> | ||
| + | Your Twitter app's [[Messenger-integration-guide/Twitter/ConfigurationCreateanApp#4._Generate_and_Save_the_Access_Token_.26_Secret|access token]]. | ||
| + | |||
| + | === Access Token Secret === <!--T:36--> | ||
| + | Your Twitter app's [[Messenger-integration-guide/Twitter/Configuration/CreateanApp#4._Generate_and_Save_the_Access_Token_.26_Secret|access token secret]]. | ||
| + | |||
| + | === Account ID === <!--T:37--> | ||
| + | The unique identifier of this integration account, which is filled in for you upon clicking '''Apply'''. | ||
| − | === Test Connection === <!--T: | + | === Test Connection === <!--T:38--> |
| − | Tests the credentials and confirms whether the connection is valid | + | Tests the credentials and confirms whether the connection is valid. |
| − | |||
| − | |||
| + | == Viber Properties == <!--T:39--> | ||
| + | The properties of the Viber type of integration account are described as follows. For complete integration instructions and configuration, see the ''Messenger Integration Guide'', section [[Messenger-integration-guide/Viber/Overview|Viber Integration]]. | ||
| − | <!--T: | + | <!--T:40--> |
| − | [[File: | + | [[File:VIber-Integration-Account-5399.PNG|450px|thumbnail|center|Viber messenger integration account properties]] |
| − | === | + | === Bot Username === <!--T:41--> |
| − | The | + | The exact username of your Viber Bot Account. |
| − | === Type === <!--T: | + | === Type === <!--T:42--> |
| − | + | The integration account type. For Viber accounts, select '''Viber'''. | |
| − | === Token === <!--T: | + | === Token === <!--T:43--> |
| − | The | + | The private token of your Viber Bot Account. |
| − | === | + | === Account ID === <!--T:44--> |
| − | + | The unique identifier of this integration account, which is filled in for you upon clicking '''Apply'''. | |
| − | == | + | === Set Webhook === <!--T:45--> |
| − | + | Setting the webhook is necessary for Viber to send you a message from the customer. Click '''Set Webhook''' to open enter the webhook URL. | |
| + | === Webhook url (host and port) === <!--T:46--> | ||
| + | Your contact center domain (e.g., “company.brightpattern.com”). This includes the server address and port number. | ||
| − | <!--T: | + | <!--T:47--> |
| − | [[File: | + | [[File:Viber-Webhook-5399.PNG|450px|thumbnail|center|Example webhook]] |
| + | === Test Connection === <!--T:48--> | ||
| + | Tests the credentials and confirms whether the connection is valid. | ||
| − | === Name === <!--T: | + | |
| + | == WeChat Properties == <!--T:49--> | ||
| + | The properties of the WeChat type of integration account are described as follows. For complete integration instructions and configuration, see the ''Messenger Integration Guide'', section [[Messenger-integration-guide/WeChat/Overview|WeChat Integration]]. | ||
| + | |||
| + | <!--T:50--> | ||
| + | [[File:WeChat-Integration-Account-Properties2-5399.PNG|450px|thumbnail|center|WeChat messenger integration account properties]] | ||
| + | |||
| + | |||
| + | === Name === <!--T:51--> | ||
The name of your integration account (can be any name of your choosing) | The name of your integration account (can be any name of your choosing) | ||
| − | === Type === <!--T: | + | === Type === <!--T:52--> |
| − | + | The integration account type. For WeChat accounts, select '''WeChat'''. | |
| + | |||
| + | === App ID === <!--T:53--> | ||
| + | The appId of your WeChat sandbox, which is found on the ''Test number management'' page. | ||
| − | === | + | === App Secret === <!--T:54--> |
| − | The | + | The app secret of your WeChat sandbox, which is found on the ''Test number management'' page. |
| − | === | + | === WeChat ID === <!--T:55--> |
| − | The | + | The identifying string for your WeChat account, which is found in the top right corner of your WeChat sandbox ''Test number management'' page. |
| − | == | + | === WeChat type === <!--T:56--> |
| − | The | + | The type of WeChat official account. Set “China” if the region of your WeChat official account is China, or “International” if the region of your WeChat official account is not China. |
| + | === Account ID === <!--T:57--> | ||
| + | The unique identifier of this integration account, which is filled in for you upon clicking '''Apply'''. | ||
| − | <!--T: | + | === Test Connection === <!--T:58--> |
| − | + | Tests the credentials and confirms whether the connection is valid. | |
| − | == | + | == WhatsApp Properties == <!--T:59--> |
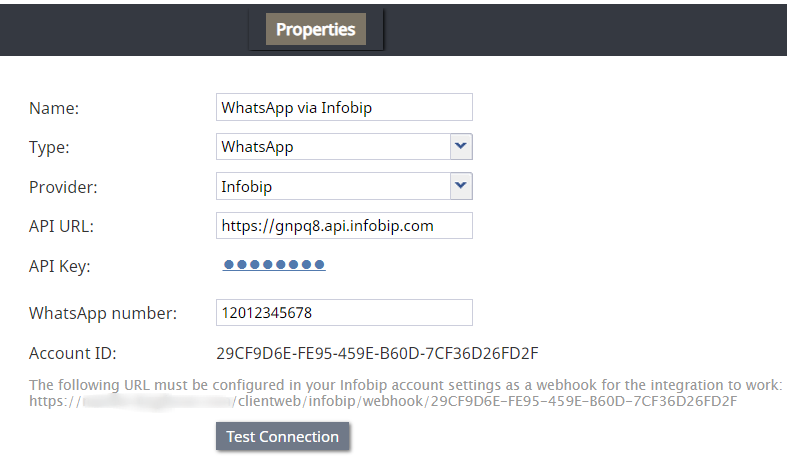
| − | The | + | Bright Pattern Contact Center integrates with WhatsApp via the following service providers: Infobip, Twilio, and Vonage API Group/Nexmo. When configuring a messenger integration account for WhatsApp, select either Infobip, Twilio, or Vonage API Group/Nexmo. The integration account properties for each provider type are provided as follows. |
| − | === | + | === Infobip === <!--T:60--> |
| − | For | + | For complete integration configuration instructions, see the ''Messenger Integration Guide'', section [[Messenger-integration-guide/WhatsAppInfobip/Overview|WhatsApp via Infobip Integration]]. |
| − | + | <!--T:61--> | |
| − | + | [[File:WhatsApp-Infobip-Integration-Account5-5399.PNG|center|thumb|650px|WhatsApp via Infobip integration account properties]] | |
| − | |||
| − | |||
| − | === | + | ==== Name ==== <!--T:62--> |
| − | + | The name of your integration account (can be any name of your choosing). | |
| − | == | + | ==== Type ==== <!--T:63--> |
| − | + | WhatsApp | |
| + | ==== Provider ==== <!--T:64--> | ||
| + | Infobip | ||
| − | <!--T: | + | ==== API URL ==== <!--T:65--> |
| − | + | The Base URL obtained from Infobip (e.g., “https://gnpq8.api.infobip.com”) | |
| + | ==== API Key ==== <!--T:66--> | ||
| + | Your Infobip Public API key. | ||
| − | === | + | ==== WhatsApp number ==== <!--T:67--> |
| − | The | + | The dedicated WhatsApp number obtained from Infobip (e.g., 12012345678) |
| − | === | + | ==== Account ID ==== <!--T:68--> |
| − | + | The unique identifier of this integration account, which is appended to the end of the [[Messenger-integration-guide/WhatsAppInfobip/IntegrationConfiguration&action=submit#Step_6:_On_Infobip.2C_set_the_webhook_for_your_dedicated_WhatsApp_number | webhook URL]] in the Infobip portal. The Account ID is generated when you click '''Apply''' at the bottom of the screen. | |
| − | |||
| − | |||
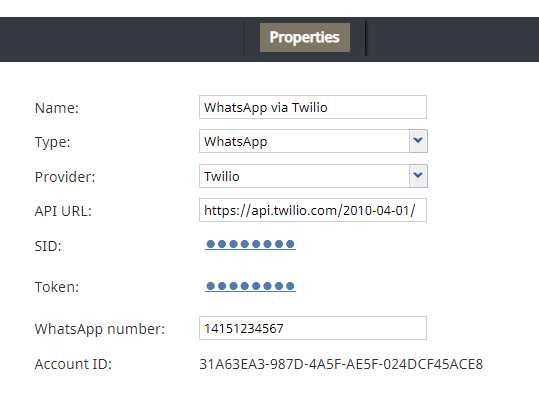
| − | === | + | === Twilio === <!--T:69--> |
| − | + | For complete integration configuration instructions, see the ''Messenger Integration Guide'', section [[Messenger-integration-guide/WhatsAppTwilio/Overview|WhatsApp via Twilio Integration]]. | |
| − | + | <!--T:70--> | |
| − | + | [[File:WhatsApp-Twilio-Integration-Account2-5399.PNG|center|thumb|450px|WhatsApp via Twilio integration account properties]] | |
| − | === | + | ==== Name ==== <!--T:71--> |
| − | + | The name of your integration account (can be any name of your choosing) | |
| + | |||
| + | ==== Type ==== <!--T:72--> | ||
| + | WhatsApp | ||
| + | |||
| + | ==== Provider ==== <!--T:73--> | ||
| + | Twilio | ||
| + | |||
| + | ==== API URL ==== <!--T:74--> | ||
| + | https://api.twilio.com/2010-04-01/ | ||
| + | |||
| + | ==== SID ==== <!--T:75--> | ||
| + | The SID obtained from Twilio WhatsApp Sandbox credentials | ||
| + | |||
| + | ==== Token ==== <!--T:76--> | ||
| + | The token obtained from Twilio WhatsApp Sandbox credentials | ||
| + | |||
| + | ==== WhatsApp number ==== <!--T:77--> | ||
| + | The WhatsApp number provided by Twilio (e.g., +XXXXXXXX) | ||
| + | |||
| + | <!--T:78--> | ||
| + | [[File:Twilio6a-5399.PNG||thumb|center|800px|The WhatsApp number can be found on the Twilio Programmable Messaging Dashboard > Sandbox Participants properties]] | ||
| + | |||
| + | |||
| + | ==== Account ID ==== <!--T:79--> | ||
| + | The unique identifier of this integration account, which is filled in for you upon clicking '''Apply''' | ||
| + | |||
| + | |||
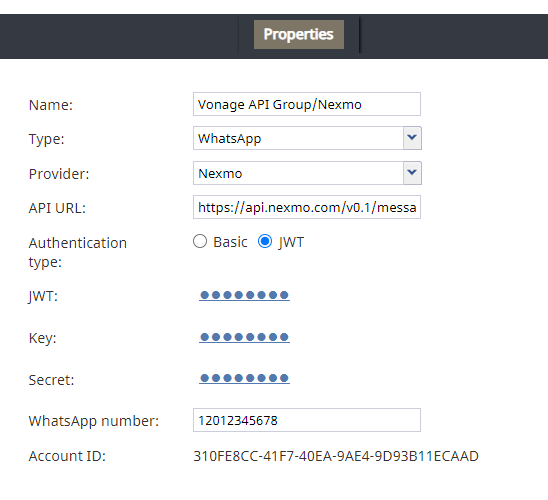
| + | === Nexmo === <!--T:80--> | ||
| + | For complete integration configuration instructions, see the ''Messenger Integration Guide'', section [[Messenger-integration-guide/WhatsAppVonageAPIGroupNexmo/Overview|Vonage API Group/Nexmo Integration]]. | ||
| + | |||
| + | <!--T:81--> | ||
| + | [[File:WhatsApp-Vonage-Integration-Account2-5399.PNG|center|thumb|450px|Messenger integration account properties for type WhatsApp via Vonage API Group/Nexmo]] | ||
| + | |||
| + | |||
| + | ==== Name ==== <!--T:82--> | ||
| + | The name of your integration account (can be any name of your choosing) | ||
| + | |||
| + | ==== Type ==== <!--T:83--> | ||
| + | WhatsApp | ||
| + | |||
| + | ==== Provider ==== <!--T:84--> | ||
| + | Nexmo | ||
| + | |||
| + | ==== API URL ==== <!--T:85--> | ||
| + | https://api.nexmo.com/v0.1/messages | ||
| + | |||
| + | ==== Authentication type ==== <!--T:86--> | ||
| + | Set '''JWT''' and then set the actual JWT. | ||
| + | |||
| + | ==== Key ==== <!--T:87--> | ||
| + | The JWT authentication key from the Vonage API Group sandbox account | ||
| + | |||
| + | ==== Secret ==== <!--T:88--> | ||
| + | For a sandbox environment, leave this field empty. | ||
| + | |||
| + | ==== WhatsApp number ==== <!--T:89--> | ||
| + | The Nexmo (Vonage API Group) Customer Dashboard number (e.g., “123418342149”). This number is shown on the top right of the Nexmo (Vonage API Group) sandbox account after login. | ||
| + | |||
| + | ==== Account ID ==== <!--T:90--> | ||
| + | The unique identifier of this integration account, which is filled in for you upon clicking '''Apply'''. | ||
</translate> | </translate> | ||
Revision as of 19:06, 4 April 2024
<translate>= Messenger Integration Account Properties = Bright Pattern Contact Center integrates with all major social messaging applications (i.e., messengers), including Facebook Messenger, LINE, Telegram, Twitter, Viber, WeChat, and WhatsApp (via Infobip, Twilio, or Vonage API Group/Nexmo), allowing Agent Desktop users to handle service chat interactions over any configured messenger channel. In the Bright Pattern platform, we use messenger integration accounts to store credentials and allow connections between Bright Pattern and your organization's messaging app accounts and/or developer portals.
This article describes the only properties for every type of messenger integration account. For complete integration configuration instructions and administrative tutorials, see the Messenger Integration Guide.
How to Add a Messenger Integration Account
To add a messenger integration account to your contact center, go to the Contact Center Administrator application's Call Center Configuration > Integration Accounts section.
Click the add "+" button and select the desired type of messaging application to add.
Facebook Messenger Properties
The properties of the Facebook Messenger type of integration account are described as follows. For complete integration instructions and configuration, see the Messenger Integration Guide, section Facebook Messenger Integration.
Name
The name for this integration account (can be any name of your choosing).
Page Username
The @username of the Facebook Page (e.g., “brightpatterndocs” with no @ symbol).
Type
The messenger integration count type. Select Facebook for Facebook Messenger.
Page ID
The Facebook Page ID (string), which can be found in the "About" section of the Facebook Page.
Token
The Page Access Token for the Facebook Page.
Webhook Verify Token
The token used to confirm that Facebook is the real server, which is needed for Facebook to send you a message from the customer. If you do not have a token, click the Generate random token below.
Account ID
The unique identifier of this integration account, which is filled in for you upon clicking Apply.
Generate random token
Creates a random webhook token that you can copy and paste into your Facebook App in section Messenger Settings > Webhooks > Edit Callback URL > Verify Token.
Test Connection
Tests the credentials and confirms whether the connection is valid.
LINE Properties
The properties of the LINE type of integration account are described as follows. For complete integration instructions and configuration, see the Messenger Integration Guide, section LINE Integration.
Name
The name of your integration account (this does not need to be your LINE@ account name).
Type
The integration account type. For LINE accounts, select LINE.
Token
The access token for your LINE account.
Account ID
The unique identifier of this integration account, which is filled in for you upon clicking Apply.
Test Connection
Tests the credentials and confirms whether the connection is valid.
Telegram Properties
The properties of the Telegram type of messenger integration account are described as follows. For complete integration instructions and configuration, see the Messenger Integration Guide, section Telegram Integration.
Bot Username
The exact username of your Telegram bot.
Type
The integration account type. For Telegram accounts, select Telegram.
Token
The API token for your Telegram bot.
Account ID
The unique identifier of this integration account, which is filled in for you upon clicking Apply.
Set Webhook
Click this button to confirm that Telegram is the real server, which is needed for Telegram to send you a message from the customer. Note that you must get the token/webhook from Telegram; you cannot generate one here.
Test Connection
Tests the credentials and confirms whether the connection is valid.
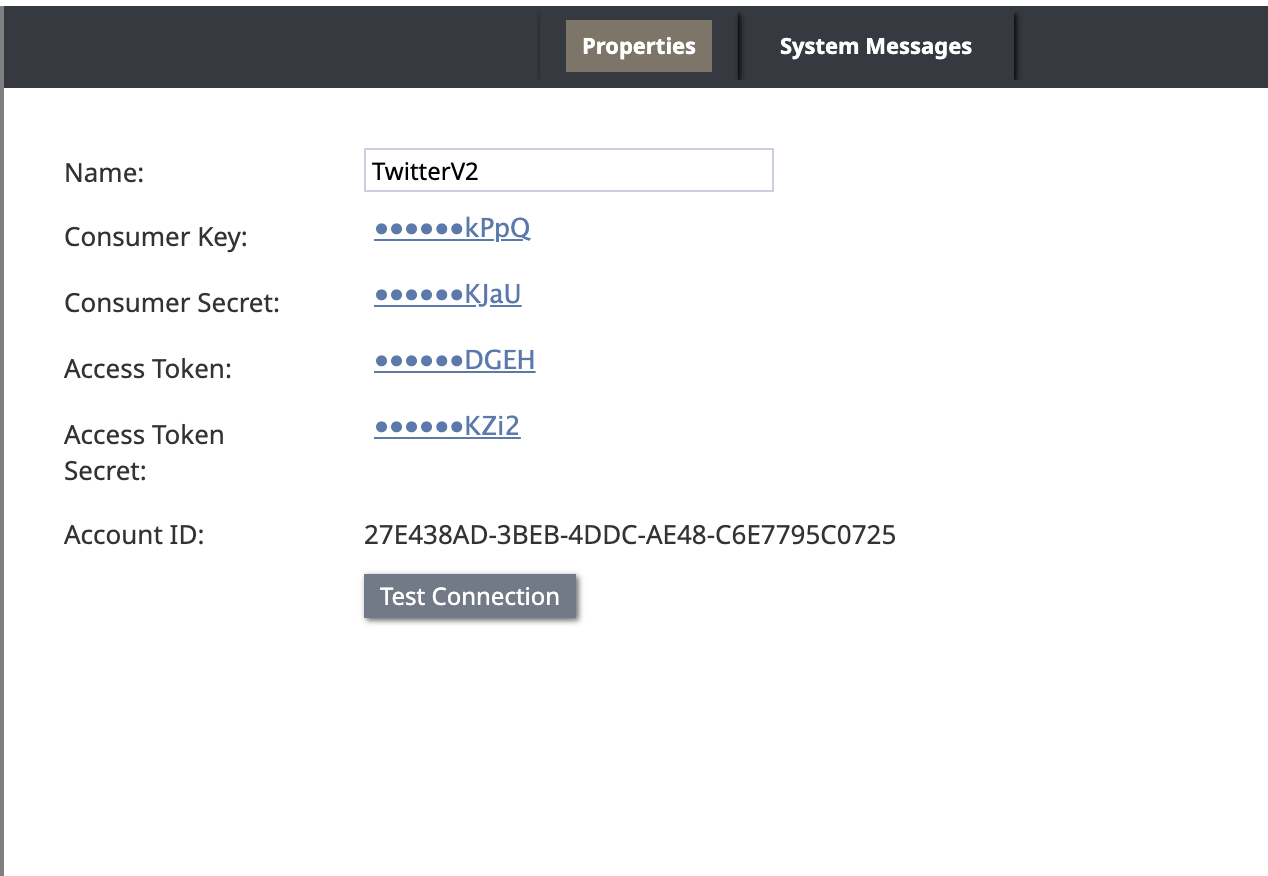
Twitter v2 Properties
The properties of the Twitter type integration account are described as follows. For complete integration instructions and configuration, see the Messenger Integration Guide, section Twitter Integration
Name
The name of your integration account (can be any name of your choosing).
Consumer Key
Your Twitter app's API key.
Consumer Secret
Your Twitter app's API secret key.
Access Token
Your Twitter app's access token.
Access Token Secret
Your Twitter app's access token secret.
Account ID
The unique identifier of this integration account, which is filled in for you upon clicking Apply.
Test Connection
Tests the credentials and confirms whether the connection is valid.
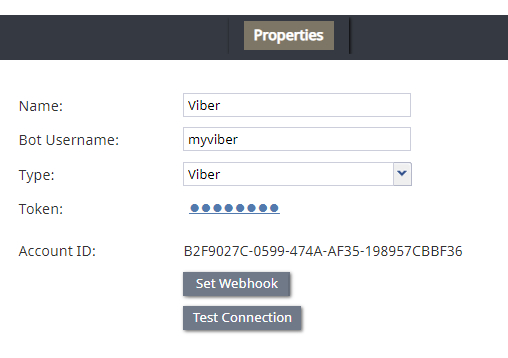
Viber Properties
The properties of the Viber type of integration account are described as follows. For complete integration instructions and configuration, see the Messenger Integration Guide, section Viber Integration.
Bot Username
The exact username of your Viber Bot Account.
Type
The integration account type. For Viber accounts, select Viber.
Token
The private token of your Viber Bot Account.
Account ID
The unique identifier of this integration account, which is filled in for you upon clicking Apply.
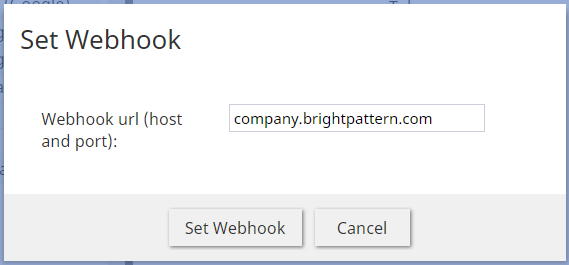
Set Webhook
Setting the webhook is necessary for Viber to send you a message from the customer. Click Set Webhook to open enter the webhook URL.
Webhook url (host and port)
Your contact center domain (e.g., “company.brightpattern.com”). This includes the server address and port number.
Test Connection
Tests the credentials and confirms whether the connection is valid.
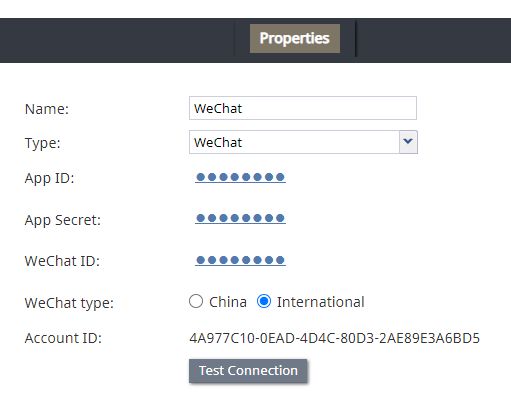
WeChat Properties
The properties of the WeChat type of integration account are described as follows. For complete integration instructions and configuration, see the Messenger Integration Guide, section WeChat Integration.
Name
The name of your integration account (can be any name of your choosing)
Type
The integration account type. For WeChat accounts, select WeChat.
App ID
The appId of your WeChat sandbox, which is found on the Test number management page.
App Secret
The app secret of your WeChat sandbox, which is found on the Test number management page.
WeChat ID
The identifying string for your WeChat account, which is found in the top right corner of your WeChat sandbox Test number management page.
WeChat type
The type of WeChat official account. Set “China” if the region of your WeChat official account is China, or “International” if the region of your WeChat official account is not China.
Account ID
The unique identifier of this integration account, which is filled in for you upon clicking Apply.
Test Connection
Tests the credentials and confirms whether the connection is valid.
WhatsApp Properties
Bright Pattern Contact Center integrates with WhatsApp via the following service providers: Infobip, Twilio, and Vonage API Group/Nexmo. When configuring a messenger integration account for WhatsApp, select either Infobip, Twilio, or Vonage API Group/Nexmo. The integration account properties for each provider type are provided as follows.
Infobip
For complete integration configuration instructions, see the Messenger Integration Guide, section WhatsApp via Infobip Integration.
Name
The name of your integration account (can be any name of your choosing).
Type
Provider
Infobip
API URL
The Base URL obtained from Infobip (e.g., “https://gnpq8.api.infobip.com”)
API Key
Your Infobip Public API key.
WhatsApp number
The dedicated WhatsApp number obtained from Infobip (e.g., 12012345678)
Account ID
The unique identifier of this integration account, which is appended to the end of the webhook URL in the Infobip portal. The Account ID is generated when you click Apply at the bottom of the screen.
Twilio
For complete integration configuration instructions, see the Messenger Integration Guide, section WhatsApp via Twilio Integration.
Name
The name of your integration account (can be any name of your choosing)
Type
Provider
Twilio
API URL
https://api.twilio.com/2010-04-01/
SID
The SID obtained from Twilio WhatsApp Sandbox credentials
Token
The token obtained from Twilio WhatsApp Sandbox credentials
WhatsApp number
The WhatsApp number provided by Twilio (e.g., +XXXXXXXX)
Account ID
The unique identifier of this integration account, which is filled in for you upon clicking Apply
Nexmo
For complete integration configuration instructions, see the Messenger Integration Guide, section Vonage API Group/Nexmo Integration.
Name
The name of your integration account (can be any name of your choosing)
Type
Provider
Nexmo
API URL
https://api.nexmo.com/v0.1/messages
Authentication type
Set JWT and then set the actual JWT.
Key
The JWT authentication key from the Vonage API Group sandbox account
Secret
For a sandbox environment, leave this field empty.
WhatsApp number
The Nexmo (Vonage API Group) Customer Dashboard number (e.g., “123418342149”). This number is shown on the top right of the Nexmo (Vonage API Group) sandbox account after login.
Account ID
The unique identifier of this integration account, which is filled in for you upon clicking Apply.
</translate>

