How To Configure Calabrio WFM Integration within Bright Pattern
Bright Pattern’s Calabrio workforce management (WFM) integration creates the ability to transfer data between the Bright Pattern and Calabrio software, allowing administrators to use complex data inputs for scheduling and to initiate efficiency processes.
Workflow
Ensure the following tasks are completed prior to beginning the steps outlined in this tutorial:
- Contact Calabrio customer care to enable a Calabrio account.
- The prerequisite connection between the Automatic Call Distributor (ACD) and Calabrio One is configured in Application Management > System Configuration > ACD Configuration. For more information, see Calabrio's "Configure general WFM" page.
- The service provider has enabled WFM integration capabilities for the contact center.
Steps
Bright Pattern
Complete the following steps to perform the Bright Pattern portion of the Calabrio integration.
Obtain Feed Information
Configure and obtain the Historical feed and Real-time feed parameters for Bright Pattern integration from the Calabrio web client.
Historical
WFM >> WFM settings >> Integrations
Real-time
WFM >> WFM settings >> Integrations
Bright Pattern Integration
After completing the previous steps, follow these steps within Bright Pattern's Call Center Administrator (BPCC) to configure the Calabrio WFM Integration account for a call center.
1. Select the "Add account" (“+”) button in Configuration >> Call Center Configuration >> Integration Accounts.
2. In the "Create integration account" selection menu, choose WFM and select "Ok."
3. On the "Select WFM integration type" menu, select "Calabrio" and choose "Ok."
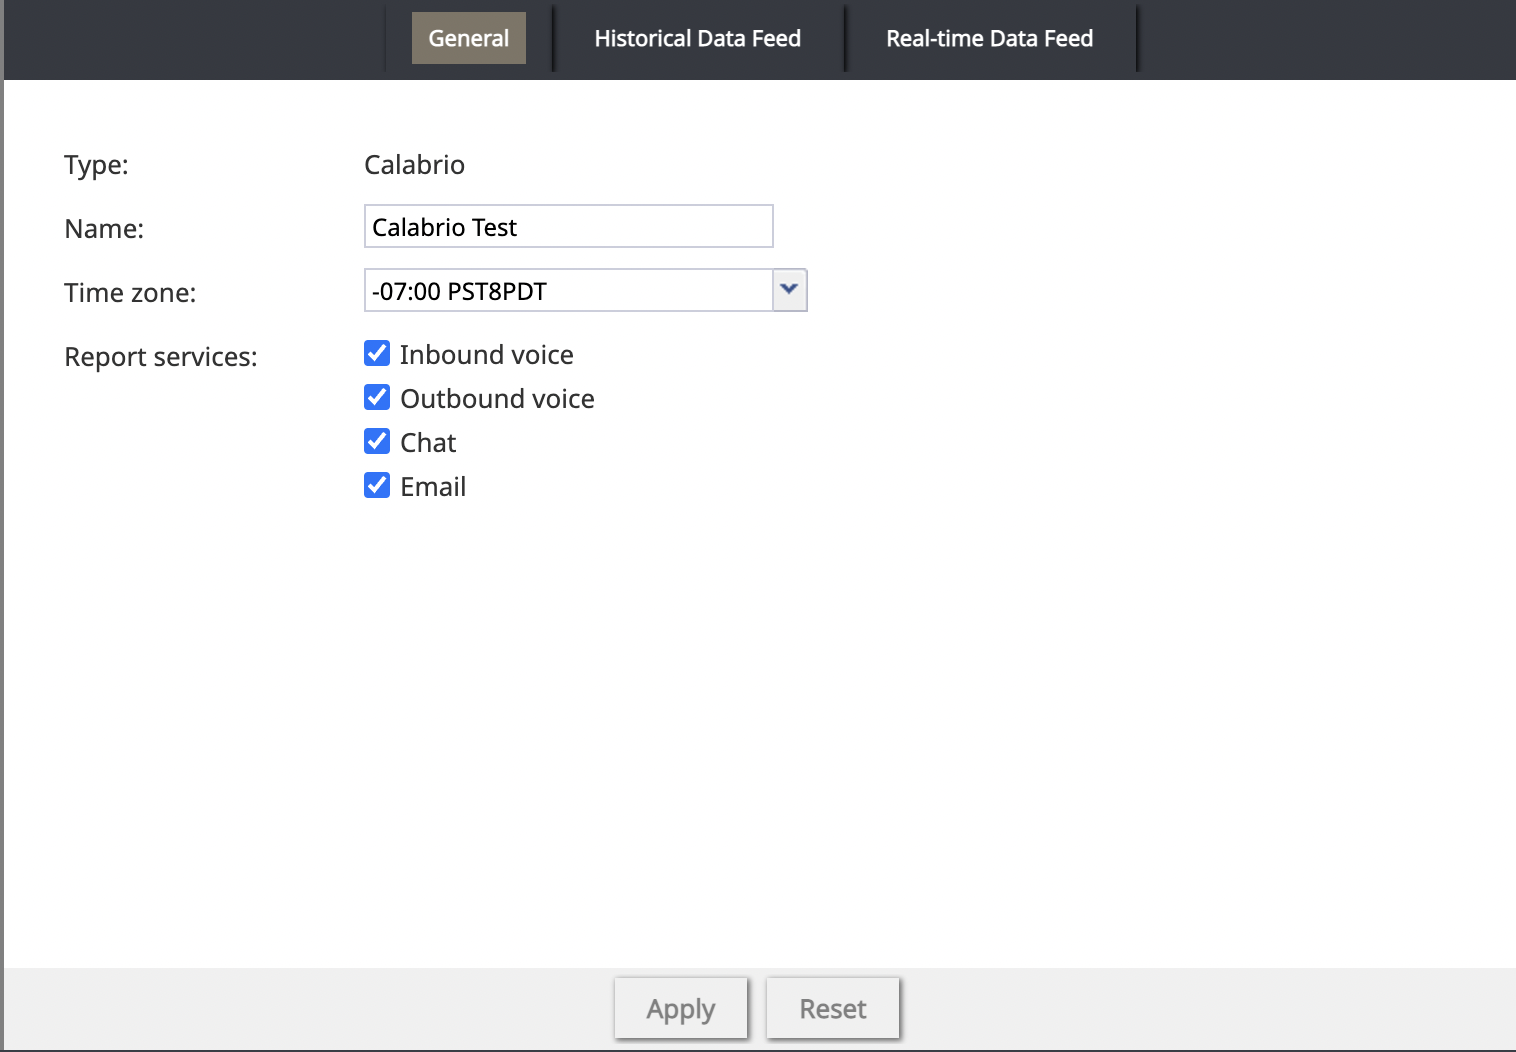
4. In the Properties tab, complete the Name and Time zone, then select the appropriate Report services:
- Inbound voice
- Outbound voice
- Chat
5. Select Apply.
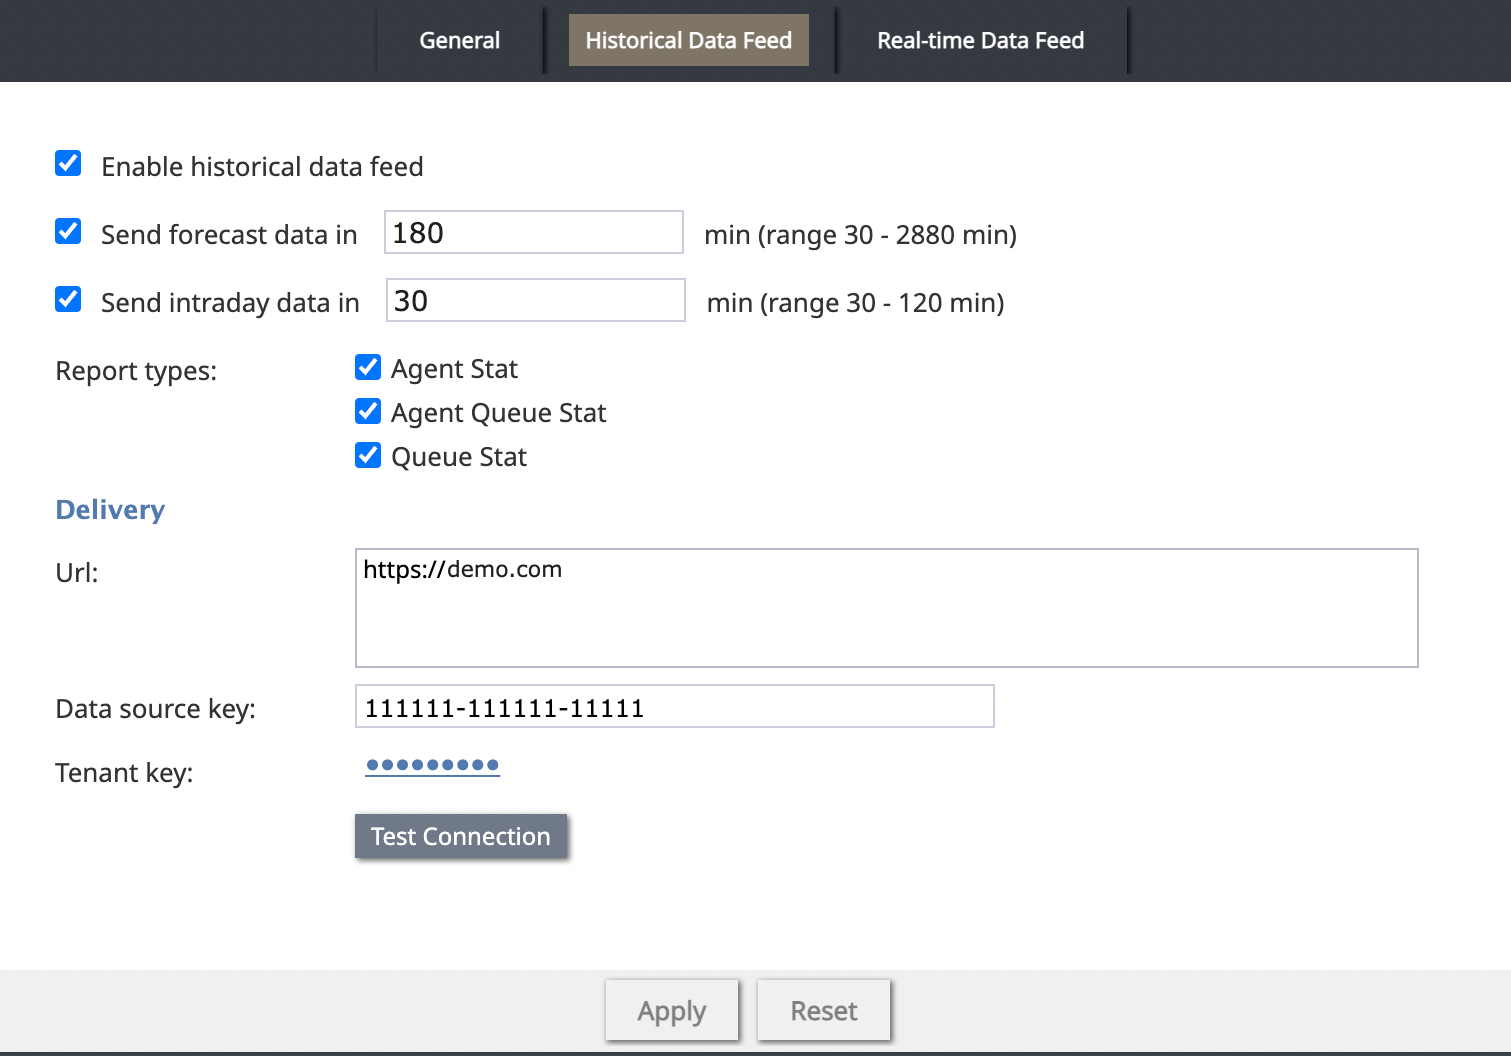
6. In the Historical Data Feed tab, check "Enable historical data feed."
7. Send forecast or intraday data to the Calabrio WFM integration application by selecting the appropriate checkboxes to define the ranges. Otherwise, leave the default settings.
8. Select the report types you require for integration:
- Agent Stat
- Agent Queue Stat
- Queue Stat
9. In the Delivery section, enter the Calabrio WFM integration connection parameters:
- Url
- DataSourceKey
- Tenant key
10. Select Apply.
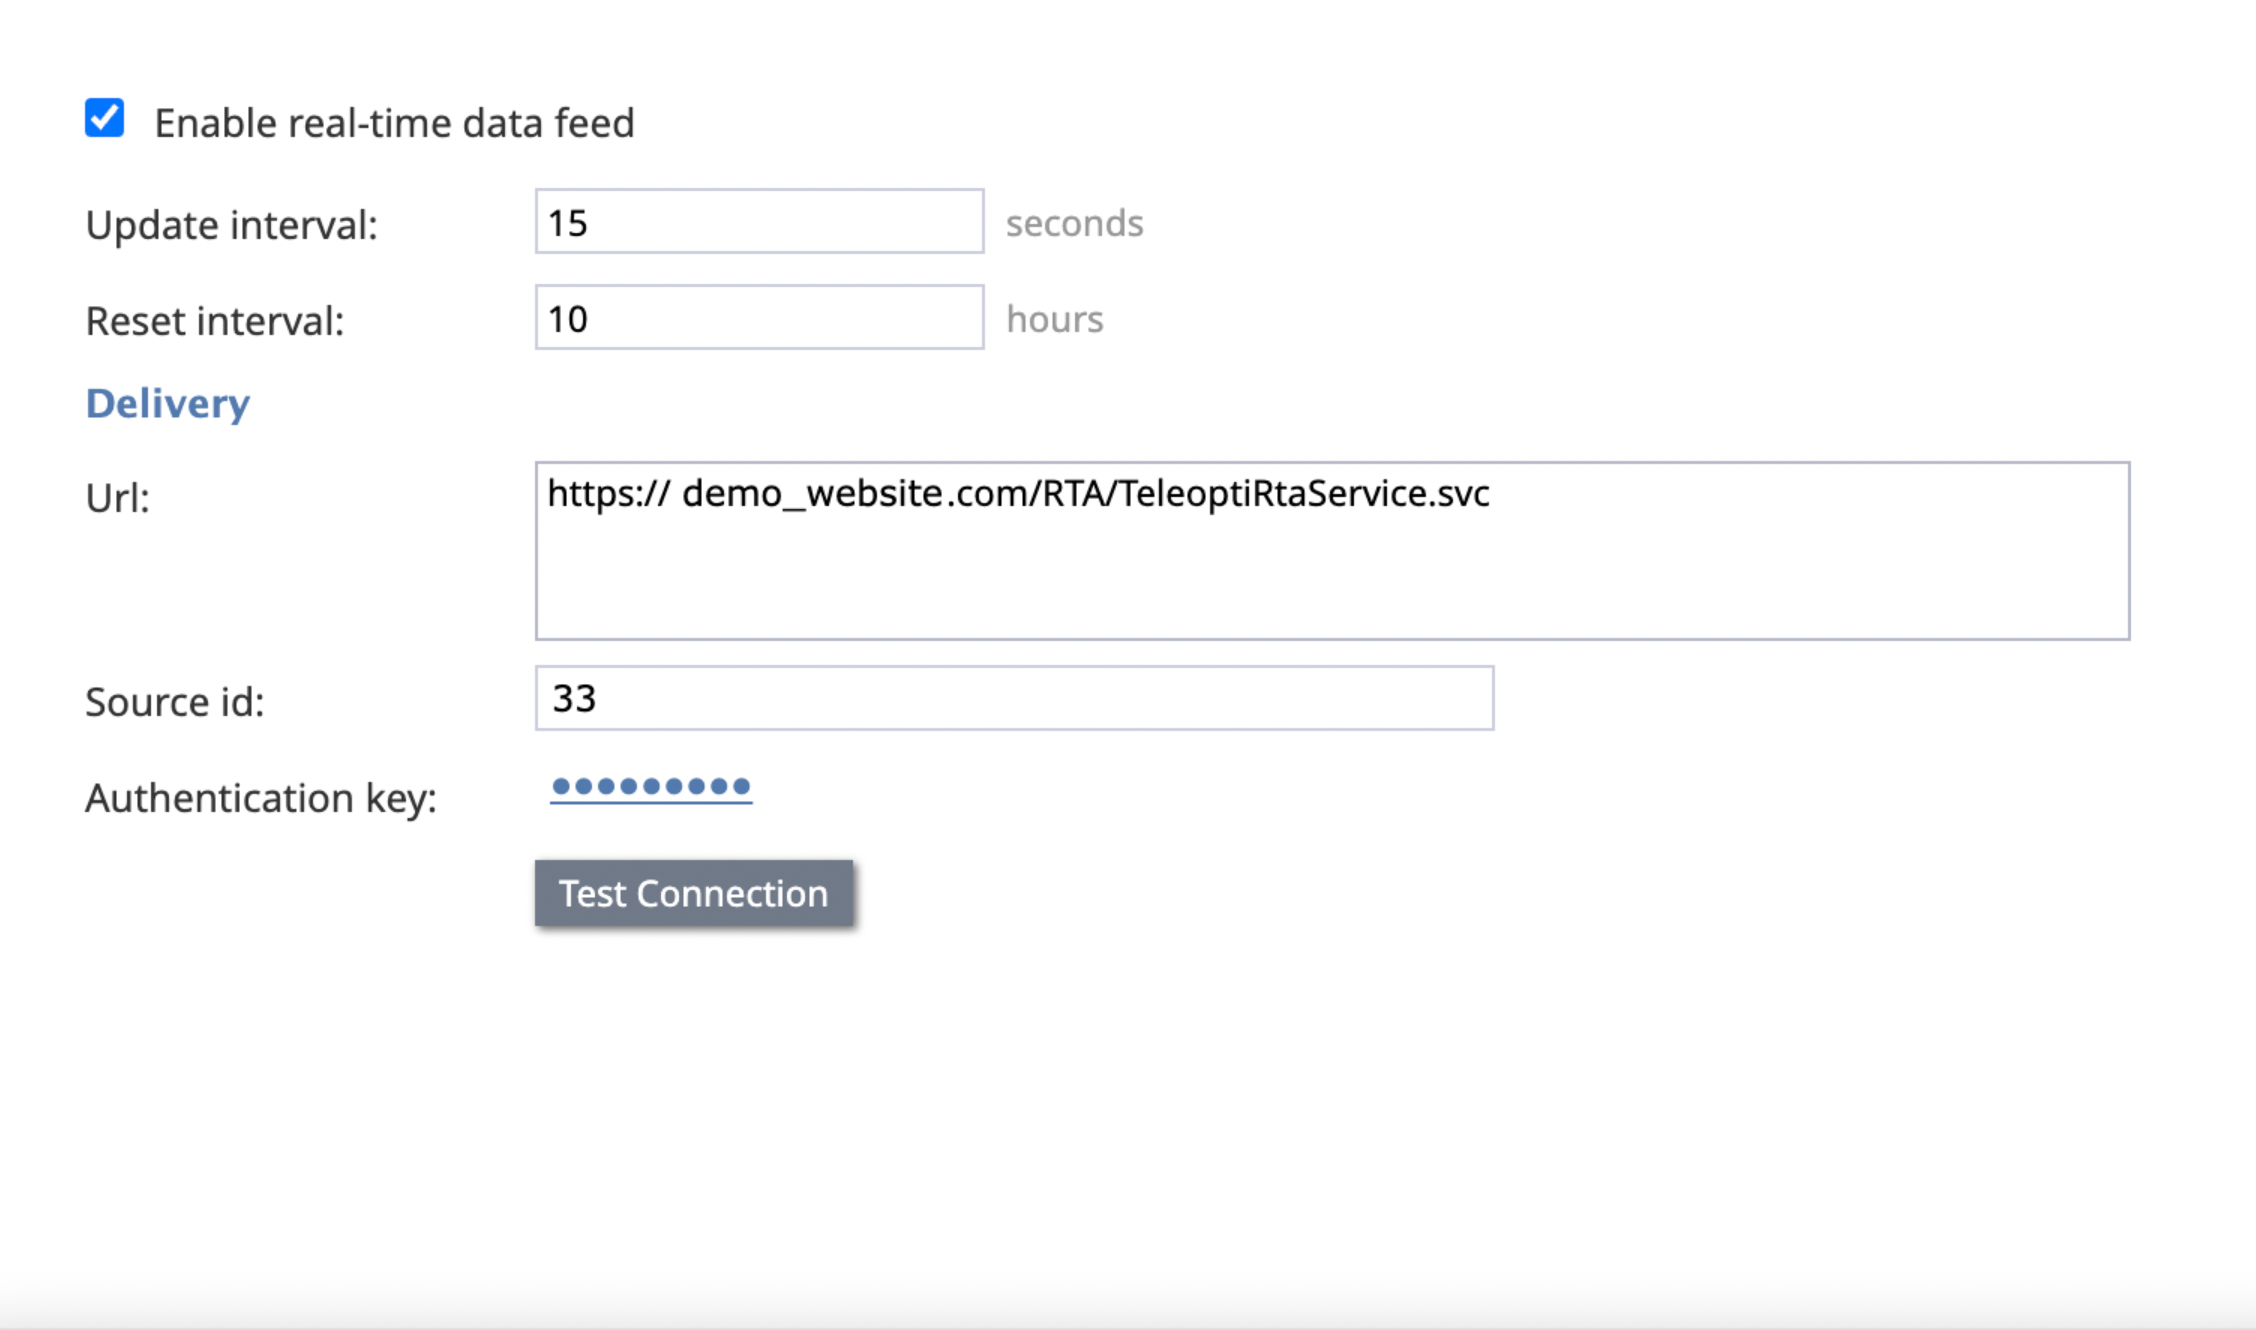
11. In the "Real-time Data Feed" tab, select "Enable real-time data feed."
- Update interval defaults to ten seconds.
- Reset interval defaults to four hours.
- Delivery parameters
- Url
- Source id
- Authentication key. The Authentication key is identical to the Tenant key found in the Historical Data Feed tab.
12. Select Apply.
Note
Disabled BP users do not send historical or real-time data to the Calabrio WFM integration in BPCC.
The BPCC integration portion of this integration is now complete. Continue to the Calabrio configuration portion to initiate the data feed integration process.
Calabrio
1. Obtain the required connection parameters by contacting Calabrio customer care directly.
2. Create an initial Calabrio setup to receive data feeds from the Bright Pattern API by following these steps in the Calabrio system:
Link Queue Data
Use either the Calabrio client option or the Calabrio Web Forecasts tool to link BP API queue data in the Calabrio skill creation process.
Follow the steps as outlined by Calabrio to set up activities, skills, and queues in preparation for linking the BP API queue data. When necessary skills exist, edit them to link the BP API queue data rather than create new skills.
Option: Calabrio Client
Process
1. Create an activity.
2. Create a skill.
- Note: Each skill must contain at least one workload, and each skill must be assigned to an activity.
3. Assign skills to appropriate agents if the skill is new.
4. Create a workload.
During workload creation, the queue link establishes after selecting the appropriate queue from the list of available queues. If a workload already exists, add the queue in the properties.
Option: Calabrio Web Forecasts Tool
During the skill creation process, link the queue data imported via the Bright Pattern API to a Calabrio workload. The workload is created implicitly.
Process
1. Create an activity.
2. Create a skill.
3. Assign a skill to an activity.
- Establish the queue link by selecting the queue from the available queues list.
Note:
Add the queue link via the skill editing process if the necessary skill already exists.
Link External Logon ID
1. Link the Bright Pattern ID (external logon) to the Calabrio agent ID in the Calabrio People module.
2. Click the agent, and select the appropriate box in the external login list.
Note
Each night the Bright Pattern API automatically populates the external logons.
Maintain Agent Data
Link the appropriate agents and skills, if necessary.
View the Feeds
View data feeds in these Calabrio reports:


