How to Retrieve an Email from the Team Queue
If emails are distributed via the Pull method, they will appear in your team queue. You can immediately see if there are any emails in the queue by checking entry My Cases in your Active Communications List. The entry will show how many emails you currently have in Personal Queue and in Team Queue.
Viewing Team Queue Content
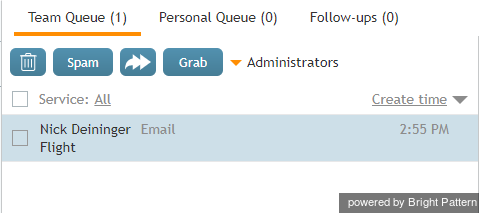
To view the content of the Team Queue, select the My Cases entry. Both Personal Queue and the Team Queue will be displayed in the Contact Info Panel area. Click on Team Queue to view all emails in the team queue.
For each queued email, customer’s display name, arrival date/time, subject line, and attachment indicator (if there are attachments) will be shown. Depending on your system configuration, an abbreviated service name may also be displayed next to the arrival date/time. If such short names are used, you will receive their descriptions from your system administrator.
To see the full sender’s email address, hover over the customer’s display name.
To see the full service name, hover over the abbreviated service name.
The attachment indicator ![]() shows whether there are any attachments in the messages sent or received in the entire email thread. The indicator is displayed for each message in the thread at the end of the line in the queue.
shows whether there are any attachments in the messages sent or received in the entire email thread. The indicator is displayed for each message in the thread at the end of the line in the queue.
A bar indicator next to each email will indicate how close the current wait time is to breaching the service level agreement (SLA). The SLA is your contact center's "standard" time for replying to customers’ emails. The unshaded portion of the SLA bar represents the time remaining to the SLA breach. This time also defines the default order in which emails appear in the queue.
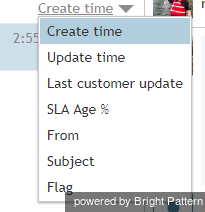
You can sort emails in the team queue by Create Time, Update Time, Last customer update, SLA Age %, From, Subject, and Flag. In addition, you may choose either ascending or descending order of email appearance in each case. This is done by clicking the up/down arrow icon.
Adjusting Team Queue View
If your team is assigned to handling emails for multiple services, you can adjust your Team Queue view to display emails for any one of those services separately or for all assigned services at once. The name of the currently selected service will be displayed under the queue title. To view another service, click on the currently selected service name and select the desired service from the drop-down menu. To view queued emails for all assigned services, click All.
Note: The limited screen space allocated for the team queue on the screen only allows to see a few emails. You can use scrolling to see more emails.
Preview Email Content Without Retrieving It
You can preview content of an email in the Team Queue without retrieving it. To preview an email, click it once.
For more information about reviewing email content, see section How to Review an Incoming Email.
Retrieving Email
To retrieve an email for handling, double-click it. (Note that double-clicking the email moves the email to your Personal Queue. The Active Communications List will display the email icon ![]() , indicating that you now have an active email on your desktop. For subsequent email handling steps, see section How to Review an Incoming Email.
, indicating that you now have an active email on your desktop. For subsequent email handling steps, see section How to Review an Incoming Email.
Note: If subsequent handling of a selected email involves replying or forwarding, you can also retrieve it for handling by selecting the corresponding action from the editing area. For more information, see sections How to Forward an Email and How to Compose a Reply.
Instead of retrieving an email for handling, you can move it to Personal Queue for processing at a later time. To move an email to Personal Queue, you can click the Grab button in the reading pane, drag the selected email from the team queue and drop it anywhere in Personal Queue, or double-click it.
You can use the drag-and-drop operation to move multiple emails to Personal Queue in one step. Click the desired emails while holding the Ctrl button. (If you select a range, you can click the first and last email in the range while holding the Shift button.) Drag selected emails and drop them anywhere in Personal Queue.


