How to Create and Edit Canned Chat Responses
Canned chat responses are greetings that you send as standard to your customers. Creating canned chat responses can save agents time in that agents will not have to type in standard responses for every new chat (i.e., Hi, my name is .... How may I help you?). Such responses are guarantee that agents reply to customers in a standard way.
You can create your own canned chat responses as well as edit existing responses provided by your team or your contact center administrator.
Create a New Response
- Click the Settings icon
 in the upper right corner of the desktop. Note that if you have uploaded a photo to your user profile, your photo will be shown instead of the Settings icon.
 - Select the Chat Responses option. A list of the previously defined responses will appear.
- To define a new chat response, click the add option.
- Type the desired text in the editable field and click the OK to confirm.

Edit an Existing Chat Response
- Navigate to Settings > Chat Responses
- Select the item to edit. The text of the response will appear in an editable field.
- Select the for all agents checkbox if you wish to make this chat response available globally. It may require Supervisor privileges.
- Select the checkbox for the desired team(s) if you wish to make this chat response available to selected team(s). This is only available for those with Supervisor privileges.
- Make the desired changes and click OK to confirm. Note that you can also delete a response while in the Edit window.

Include Rich Formatting in a Canned Response
You can use standard HTML tags in canned chat responses to make text appear in bold, italics, as a web link, and so on. Canned responses that include HTML tags will be formatted as such for the customer to see in the active chat.
Usage
Place the opening HTML tag before the text you want to affect, and place the closing tag after the text. The following are some examples of how you can use HTML tags in your canned responses.
| Format | HTML | Example |
| Italic | <i> | <i>Make this text italic for emphasis. |
| Bold | <b> | <b>Let's make it bold. |
| Italic and Bold | <i><b> | <i><b>Make this look italic and bold! |
| Link | <a href="URL"> | <a href="http://help.brightpattern.com"> |
| Link that opens in new tab/window | <a href="URL" target="blank"> | <a href="http://help.brightpattern.com" target="blank"> |
How to Apply Rich Formatting in a New Response
- Follow the instructions to create a new response.
- After you click add to add a new response, type into the text entry field, being sure to format the text with the desired HTML tags (see section Usage above).
- Click OK to confirm and save.
- Your richly formatted response will appear in the list of all responses.
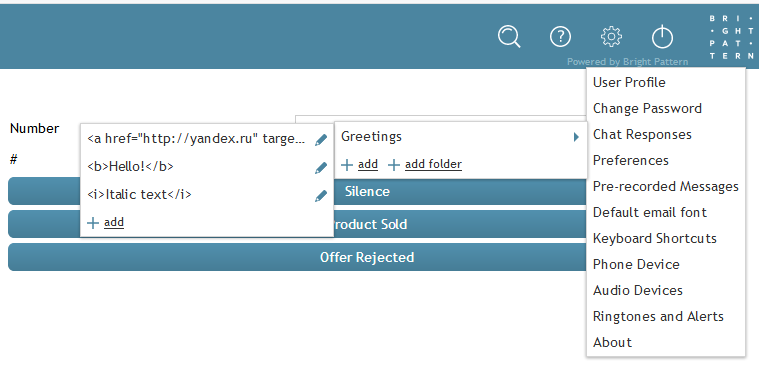
Example of canned responses with rich formatting - When you use the canned responses in your chat, the customer will see the formatting.
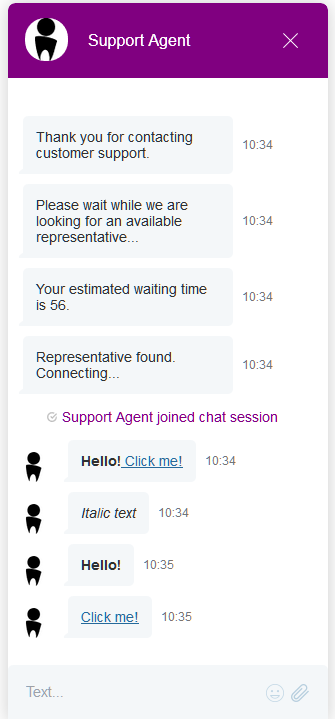
Example of the customer's view during an active chat


Arrange Your Canned Responses in Folders
- Click add folder.
- Enter a folder name.
- Click OK. The new folder will appear in the list.
- To open the folder, click its name.
Note that depending on your permissions, you may be able to make the chat responses that you create available to all agents in your contact center. If you have such permissions, you will see the for all agents checkbox in the Edit window.
The following variables can be used in canned chat responses:
- %AF – for agent’s first name
- %AL – for agent’s last name
- %F – for customer’s first name
- %L – for customer’s last name
Append Canned Chat Responses
Once one or more canned chat responses (i.e., greetings) have been created and saved, agents or users working in the Agent Desktop application have the option of editing a canned response from within the chat window before it is sent. This capability allows agents to change a standard response to suit the customer's message or question, before the response is delivered to the customer.
For example, if your saved canned chat response is, Hello, how may I help you?, and your customer's message explicitly states what the customer needs (e.g., How do I change my login ID?), you should append your canned chat response to something more appropriate, such as, Thank you for your question. I can help you with that. Appending canned responses makes it easy to create a more relevant, personalized chat experience for your customers.
Step 1: Begin a chat
Canned chat responses are edited from within the Text Input Field in the Agent Desktop application. When your chat interaction is in session, you can type in the chat box or insert a canned chat response (i.e., a greeting or message).
Step 2: Select a canned chat response
- To select a canned chat response, click the Select predefined message icon
 .
. - Select the desired greeting.
- The selected greeting will appear in the Text Input Field. Note that you can modify this message before sending it--this is called editing and appending a canned chat response.
- Click Send message or hit Enter.
If you have not already created any greetings, no greetings/canned chat responses will be displayed. You must create them before they can be edited in the chat window.

Step 3: Edit the canned chat response and append it to the chat
- When you select the desired greeting, the greeting text will appear in the chat box.
- You can edit your canned chat response from within the Active Communications List window.
- Hit Enter to send the message to the customer.
The appended message is delivered to the customer.