(Created page with "'''ご注意:''' 最近返信したメールをフォローアップするのに、当該のメールを''履歴''タブから選択してください。") |
(Updated via BpDeeplTranslate extension) |
||
| (31 intermediate revisions by 2 users not shown) | |||
| Line 1: | Line 1: | ||
| − | = | + | =フォローアップアウトバウンドメールの送信にケースを使用する方法= |
| − | + | 提供するサービスの種類によっては、1回の返信で顧客のリクエストを満たすことができるとは限りません。例えば、最初の返信済メールでは、単にリクエストを受信したことを伝え、処理中であることを伝えるだけで、実際のリクエスト完了は1通以上のフォローアップメールで伝えることができます。フォローアップメールは、開いたケースとクローズ済ケースの両方に作成できます。 | |
| − | + | 複数のコミュニケーションを必要とするリクエストをサポートするために、各メールは''ケースと'' ''スレッドに関連付けられて''います。詳細については、以下を参照してください。 [[Agent-guide/Work/CasesEmail/CasesEmailandThreads|ケース、メール、スレッド]]. | |
| − | ''' | + | メ'''モ''': 最近送信した返信をフォローアップする場合は、[''履歴''] タブから選択する方が簡単な場合があります。 |
| − | == | + | ==開いたケースから== |
| − | === | + | ===ステップ1: リクエストに関連するケースを見つける=== |
| − | + | 特定のカスタマーリクエストのフォローアップメールを作成するために必須となる情報がすべて揃ったら、まずこのリクエストに関連するケースを検索する必要があります。ケースを検索するには、ケース番号または顧客の名前を使用します。 | |
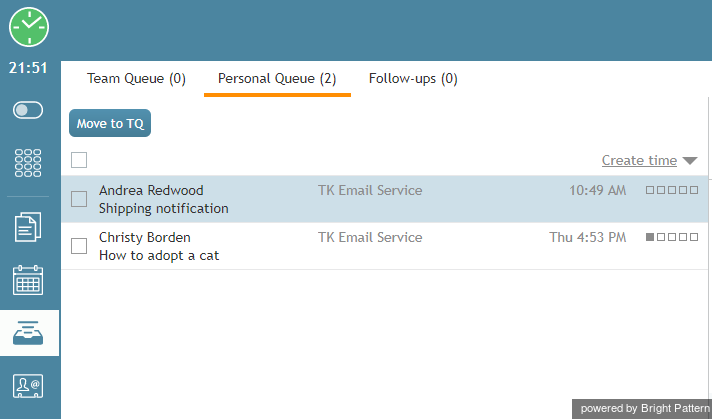
| − | + | ケースを表示するには、''有効なコミュニケーションリストの''横のメニューから'''マイケースを'''選択します。 | |
| − | [[File:My-Cases-50.png|thumb|800px|center| | + | [[File:My-Cases-50.png|thumb|800px|center|選択済マイケース]] |
| − | === | + | ===ステップ2:ケースの検索=== |
| − | + | 希望するケースが''コンテキスト情報''エリアに表示されていない場合は、有効な連絡先リストの横にあるメインメニューから'''連絡先を'''選択します。次に「'''ケース」を'''クリックして、すべてのケースを表示します。 | |
| − | + | または、入力してケースを検索することもできます: | |
| − | * | + | * ケース」という単語 |
| − | * | + | * ケース番号 |
| − | * | + | * お客様の名前 |
| − | * | + | * 件名の一部 |
| − | * | + | * 名 |
| − | * | + | * 姓名 |
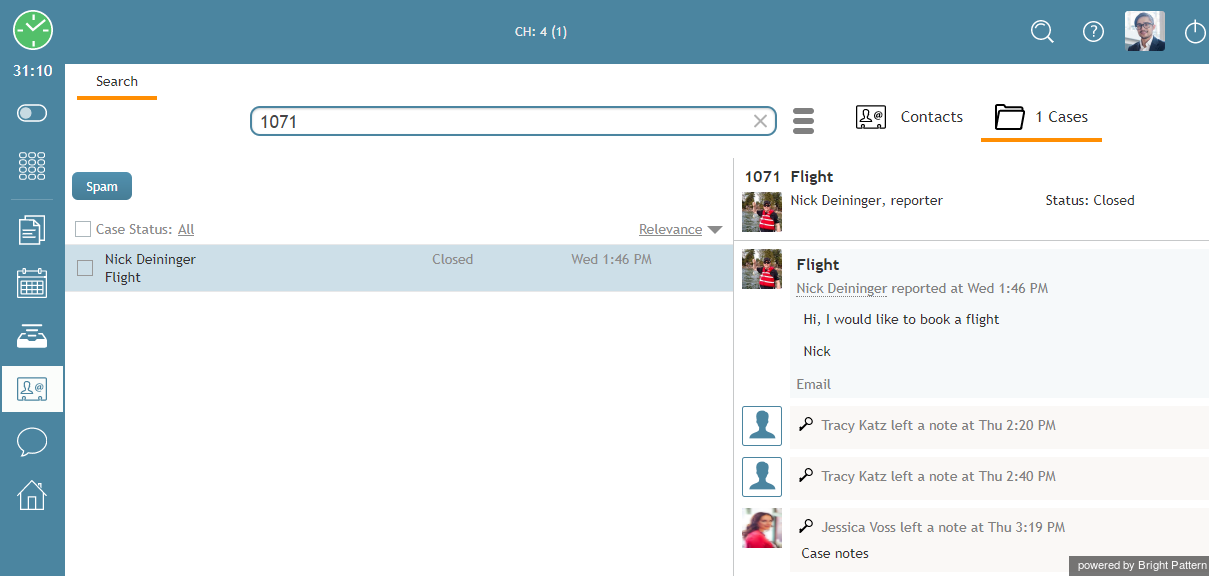
| − | + | ケース番号がわかっている場合は、検索フィールドに入力してください。ケース番号は一意であるため、下のリストには1つのケースしか表示されません。 | |
| − | [[File:Case-Number-Search-50.png|800px|thumbnail|center| | + | [[File:Case-Number-Search-50.png|800px|thumbnail|center|ケース番号による検索]] |
| − | === | + | ===ステップ3:ケースを閲覧し、並び替え、選択する=== |
| − | + | ケースごとに、番号、作成日、元のメールの件名が表示されます。件名の長さによっては、リスト表示で切り捨てられて表示される場合があります。切り捨てられた件名にカーソルを合わせると、全コンテンツが表示されます。検索条件に適合するケースがリスト表示されます。 | |
| − | + | アクセス権に応じて、あなたが以前に担当したケース、またはあなたが担当する資格を持つサービスの全ケースのいずれかを表示することができます。 | |
| − | [[File:Contacts-Cases-50.png|thumb|800px|center| | + | [[File:Contacts-Cases-50.png|thumb|800px|center|ケース検索]] |
| − | + | 番号付きリストでは、ケース番号、作成日、件名のアルファベット順に並び替えができます。 | |
| − | + | リストでケースを選択すると、このケースに関連するすべての受信、転送、および送信メールメッセージが、[''履歴''] タブに時系列順にリストされます。このケースに関して、あなたまたはその他エージェントが提供したメモも、'''メモアイコンで'''一覧表示されます。 [[File:Notes-Button-50.png|26px]].特定のメッセージを選択すると、そのコンテンツがメッセージ本文エリアに表示されます。 | |
| − | ''' | + | '''注:'''前述のとおり、ケースの構成は、所属する組織のビジネスプロセスおよび担当するサービスを反映します。ケースの処理とフォローアップメッセージの作成については、システム管理者から具体的な指示があります。一般的な推奨事項として、通常、このケースに関連する新規メールを送信する前に、このケースに対して前に入力されたすべてのメモと処分を含むケース履歴全体を調べることが重要であることを覚えておいてください。 |
| − | === | + | ===ステップ4: カスタマにメールする=== |
| − | + | フォローアップメールを送信するには、このフォローアップメッセージが直接関連するカスタマーのメールをダブルクリックするか、'''返信'''ボタンをクリックします。 | |
| − | + | このメールは''有効なアクティビティリストに''表示されます。''コンテキスト情報エリアには''、使い慣れたメール処理ビューとコントロールが表示されます。詳しくは [[agent-guide/OverviewoftheEmailWorkingArea|メール作業エリアの概要]]. | |
| − | + | この瞬間から、フォローアップメールを作成することは、最初の返信を作成することと変わりません。詳しくは [[agent-guide/HowtoComposeaReply|返信メールの作成方法]]. | |
| − | + | フォローアップしたいメールの'''開く'''ボタンが表示されない場合、他のエージェントがすでにこのメールを作成していることを意味します。 | |
| − | == | + | ==クローズ済ケースから== |
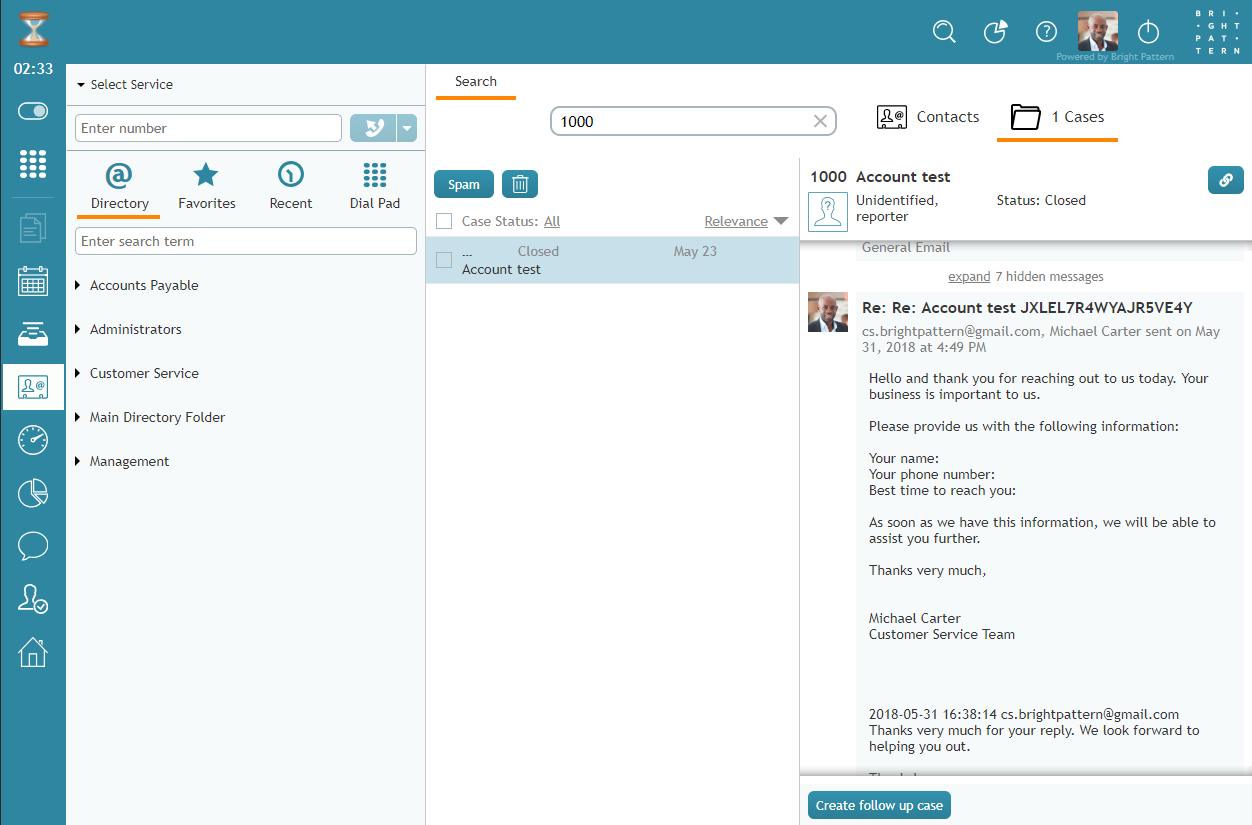
| − | + | クローズ済ケースを再び開くことはできませんが、''フォローアップケース作成''ボタンを使用して、お客様とのやり取りを続けることができます。クローズ済ケースからフォローアップケースを作成すると、新規ケース番号が作成されることに注意してください。 | |
| − | [[File:Create-Follow-Up-Case-53.PNG|800px|thumb|center| | + | [[File:Create-Follow-Up-Case-53.PNG|800px|thumb|center|クローズ済ケースにフォローアップケースを作成する]] |
| − | === | + | ===ステップ1:ケースを見つける=== |
| − | * | + | * 次の場所に移動します。 [[Agent-guide/Work/SearchandPreviewRecords/SearchandPreviewInterface#Cases|記録の検索とプレビュー]、[ケース]タブ]]. |
| − | + | または | |
| − | * | + | * 検索バーを使用し、ケース番号、連絡先、その他関連情報を入力し、クローズ済ケースを検索します。 |
| − | === | + | ===ステップ 2: フォローアップケースの作成と送信=== |
| − | * | + | *'''フォローアップケースの作成''']ボタンをクリックします。 [[File:Create-Follow-Up-Case-Button-53.PNG|140px]] |
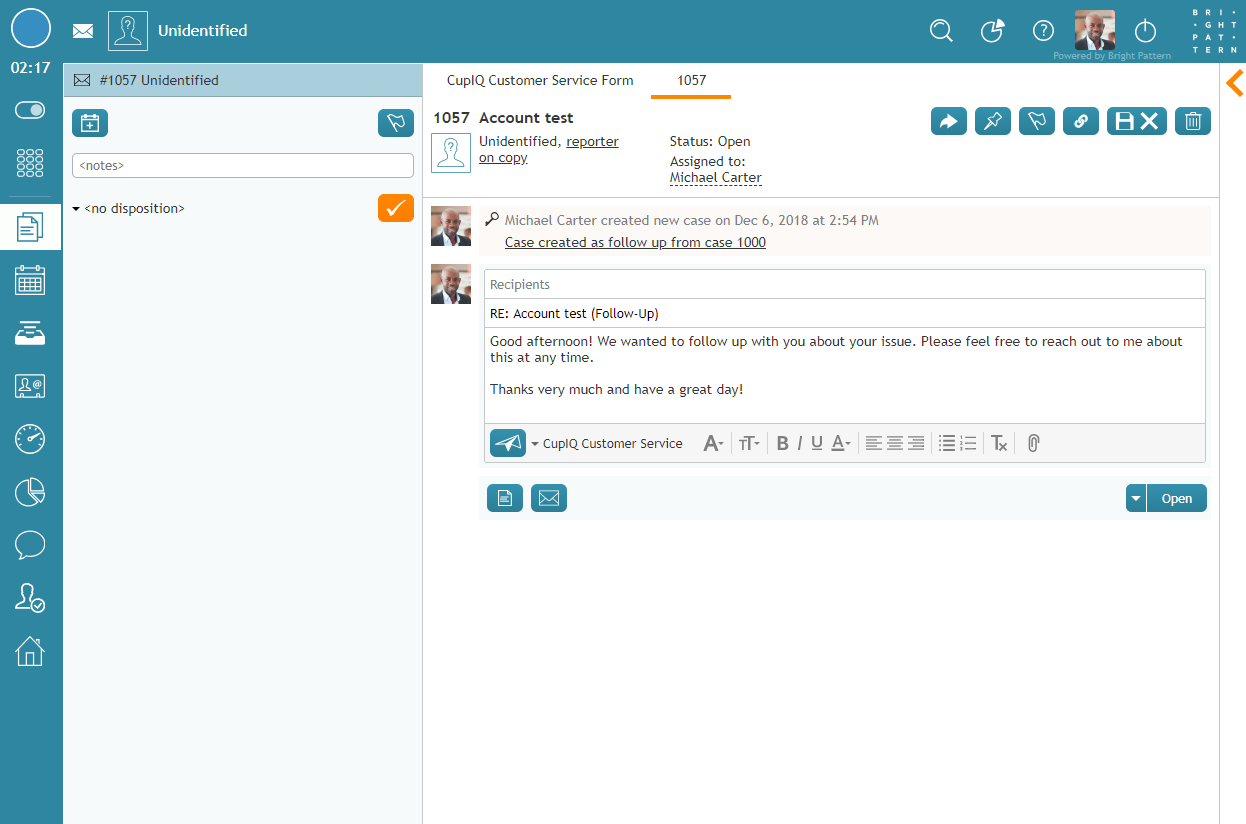
| − | * | + | * ここから、お客様に送信するメールを作成できます。フォローアップメールを作成すると、新規ケース番号が作成されることに注意してください。 |
| − | [[File:Create-Follow-Up-Case-1-53.PNG|800px|thumb|center| | + | [[File:Create-Follow-Up-Case-1-53.PNG|800px|thumb|center|フォローアップメールの下書き]] |
| − | === | + | ===追加情報=== |
| − | * | + | * メール送信後、フォローアップケースが作成されたこと、および新しいケース番号を含むリンクがケース履歴に表示されます。さらに、フォローアップケースが作成されると、次のことが行われます: |
| − | ** | + | ** 元のケースへのリンクを含むアクティビティ履歴メモが、新規ケースに自動的に挿入されま す。メモは、'''フォローアップケース作成'''ボタンをクリックしたエージェントに代わって書かれます。 |
| − | ** | + | ** 元のケースには、「フォローアップケース XXX を作成」と書かれたアクティビティ履歴メモが自動 的に挿入されます。フォローアップケースがエージェントによって作成された場合、メモはそのエージェントからのものとしてマークされます。 |
| − | [[File:Create-Follow-Up-Case-Created-53.PNG|450px|thumb|center| | + | [[File:Create-Follow-Up-Case-Created-53.PNG|450px|thumb|center|フォローアップケースの記録は、ケースに追加されます。]] |
Latest revision as of 06:58, 30 May 2024
フォローアップアウトバウンドメールの送信にケースを使用する方法
提供するサービスの種類によっては、1回の返信で顧客のリクエストを満たすことができるとは限りません。例えば、最初の返信済メールでは、単にリクエストを受信したことを伝え、処理中であることを伝えるだけで、実際のリクエスト完了は1通以上のフォローアップメールで伝えることができます。フォローアップメールは、開いたケースとクローズ済ケースの両方に作成できます。
複数のコミュニケーションを必要とするリクエストをサポートするために、各メールはケースと スレッドに関連付けられています。詳細については、以下を参照してください。 ケース、メール、スレッド.
メモ: 最近送信した返信をフォローアップする場合は、[履歴] タブから選択する方が簡単な場合があります。
開いたケースから
ステップ1: リクエストに関連するケースを見つける
特定のカスタマーリクエストのフォローアップメールを作成するために必須となる情報がすべて揃ったら、まずこのリクエストに関連するケースを検索する必要があります。ケースを検索するには、ケース番号または顧客の名前を使用します。
ケースを表示するには、有効なコミュニケーションリストの横のメニューからマイケースを選択します。
ステップ2:ケースの検索
希望するケースがコンテキスト情報エリアに表示されていない場合は、有効な連絡先リストの横にあるメインメニューから連絡先を選択します。次に「ケース」をクリックして、すべてのケースを表示します。
または、入力してケースを検索することもできます:
- ケース」という単語
- ケース番号
- お客様の名前
- 件名の一部
- 名
- 姓名
ケース番号がわかっている場合は、検索フィールドに入力してください。ケース番号は一意であるため、下のリストには1つのケースしか表示されません。
ステップ3:ケースを閲覧し、並び替え、選択する
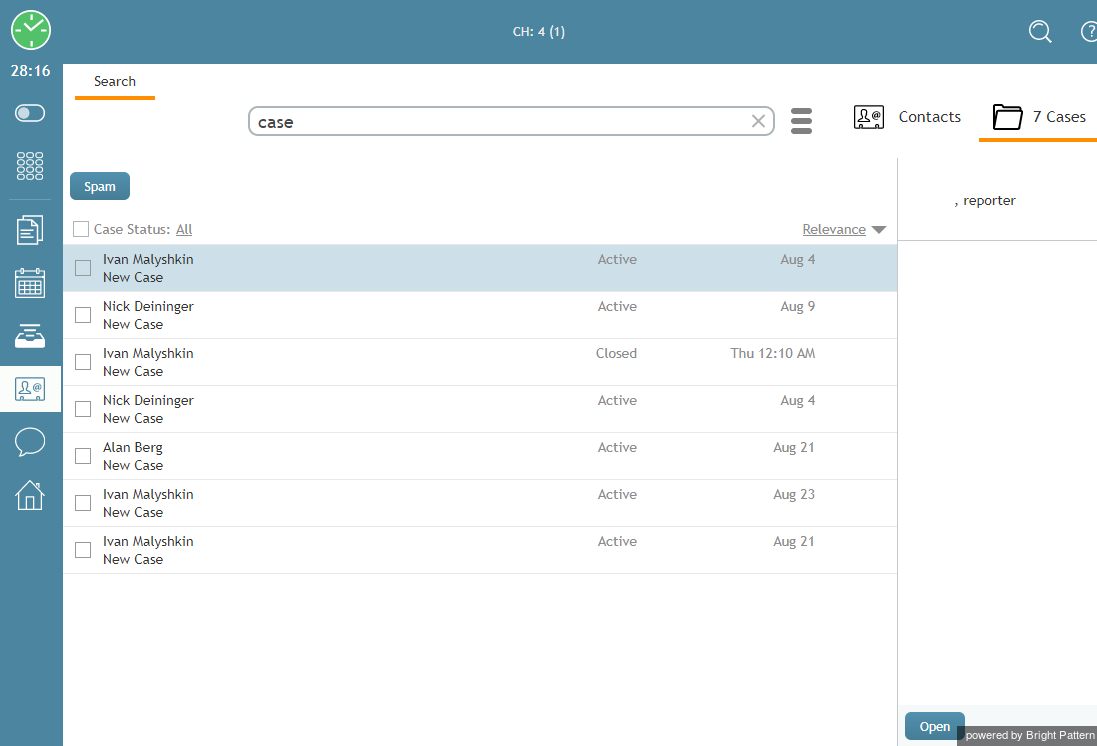
ケースごとに、番号、作成日、元のメールの件名が表示されます。件名の長さによっては、リスト表示で切り捨てられて表示される場合があります。切り捨てられた件名にカーソルを合わせると、全コンテンツが表示されます。検索条件に適合するケースがリスト表示されます。
アクセス権に応じて、あなたが以前に担当したケース、またはあなたが担当する資格を持つサービスの全ケースのいずれかを表示することができます。
番号付きリストでは、ケース番号、作成日、件名のアルファベット順に並び替えができます。
リストでケースを選択すると、このケースに関連するすべての受信、転送、および送信メールメッセージが、[履歴] タブに時系列順にリストされます。このケースに関して、あなたまたはその他エージェントが提供したメモも、メモアイコンで一覧表示されます。 ![]() .特定のメッセージを選択すると、そのコンテンツがメッセージ本文エリアに表示されます。
.特定のメッセージを選択すると、そのコンテンツがメッセージ本文エリアに表示されます。
注:前述のとおり、ケースの構成は、所属する組織のビジネスプロセスおよび担当するサービスを反映します。ケースの処理とフォローアップメッセージの作成については、システム管理者から具体的な指示があります。一般的な推奨事項として、通常、このケースに関連する新規メールを送信する前に、このケースに対して前に入力されたすべてのメモと処分を含むケース履歴全体を調べることが重要であることを覚えておいてください。
ステップ4: カスタマにメールする
フォローアップメールを送信するには、このフォローアップメッセージが直接関連するカスタマーのメールをダブルクリックするか、返信ボタンをクリックします。
このメールは有効なアクティビティリストに表示されます。コンテキスト情報エリアには、使い慣れたメール処理ビューとコントロールが表示されます。詳しくは メール作業エリアの概要.
この瞬間から、フォローアップメールを作成することは、最初の返信を作成することと変わりません。詳しくは 返信メールの作成方法.
フォローアップしたいメールの開くボタンが表示されない場合、他のエージェントがすでにこのメールを作成していることを意味します。
クローズ済ケースから
クローズ済ケースを再び開くことはできませんが、フォローアップケース作成ボタンを使用して、お客様とのやり取りを続けることができます。クローズ済ケースからフォローアップケースを作成すると、新規ケース番号が作成されることに注意してください。
ステップ1:ケースを見つける
- 次の場所に移動します。 記録の検索とプレビュー]、[ケース]タブ.
または
- 検索バーを使用し、ケース番号、連絡先、その他関連情報を入力し、クローズ済ケースを検索します。
ステップ 2: フォローアップケースの作成と送信
追加情報
- メール送信後、フォローアップケースが作成されたこと、および新しいケース番号を含むリンクがケース履歴に表示されます。さらに、フォローアップケースが作成されると、次のことが行われます:
- 元のケースへのリンクを含むアクティビティ履歴メモが、新規ケースに自動的に挿入されま す。メモは、フォローアップケース作成ボタンをクリックしたエージェントに代わって書かれます。
- 元のケースには、「フォローアップケース XXX を作成」と書かれたアクティビティ履歴メモが自動 的に挿入されます。フォローアップケースがエージェントによって作成された場合、メモはそのエージェントからのものとしてマークされます。

