From Bright Pattern Documentation
< 5.19:Agent-guide | Tutorials | RA
(Updated via BpDeleteTranslateTags script) |
Wyler.metge (talk | contribs) (minor changes and adding that only macOS 11+ is supported) |
||
| Line 1: | Line 1: | ||
= Remote Assist on Macs = | = Remote Assist on Macs = | ||
| − | Due to Apple | + | Due to Apple macOS security features, customers using Bright Pattern's Remote Assist (RA) features must enable the Remote Assist client (RAClient) upon initial download (i.e., the client has never been used). Further sessions will maintain the granted permissions. If the macOS customer does not provide these permissions, the agent will not be able to assist them via the Remote Assist application. |
| − | + | {{Note| Bright Pattern Remote Assist requires macOS 11 (Big Sur) or later to run.}} | |
| − | # In a session with a | + | |
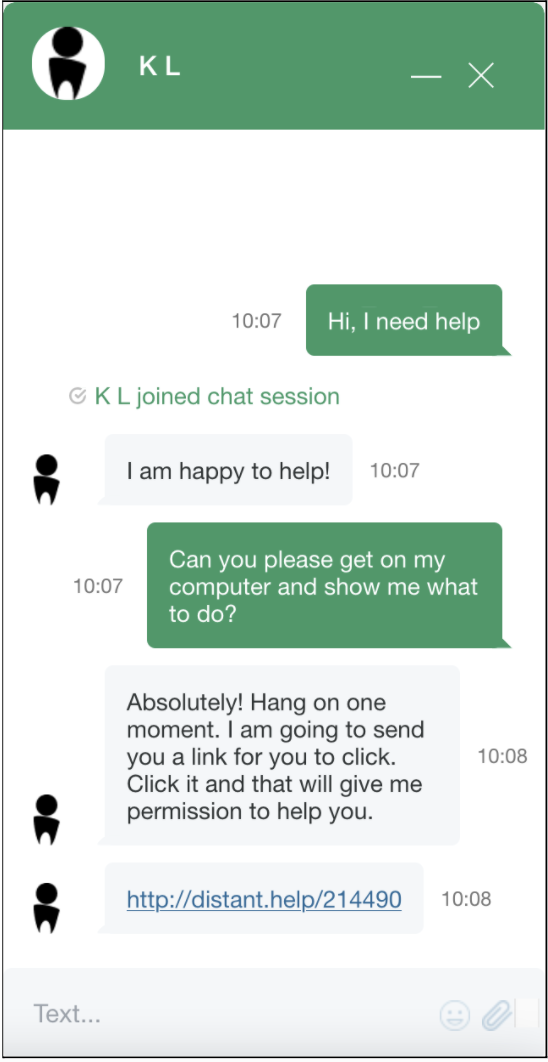
| − | #* If you are on a call with a | + | [[File:2022.02.04_NRA.MacInstall.01.png|200px|center|thumb|Send the macOS user the Remote Assistance link to click]] |
| − | # On the ''Remote Assist'' page, have the | + | |
| − | # Have your | + | |
| − | # The ''RAClient'' window with the ''RemoteAssistClient'' application will open. Have your | + | # In a session with a macOS customer, provide the user with an RA link by clicking on the '''Remote Assist''' icon [[File:2021.10.26_NRA_callicon.png|30px]] and pressing Enter. |
| − | # The ''RemoteAssistClient'' application will open. Have your | + | #* If you are on a call with a macOS user, rather than a chat, after you press the RA button you must read aloud the ''Session URL'' and ''PIN'' to the macOS user for them to enter. |
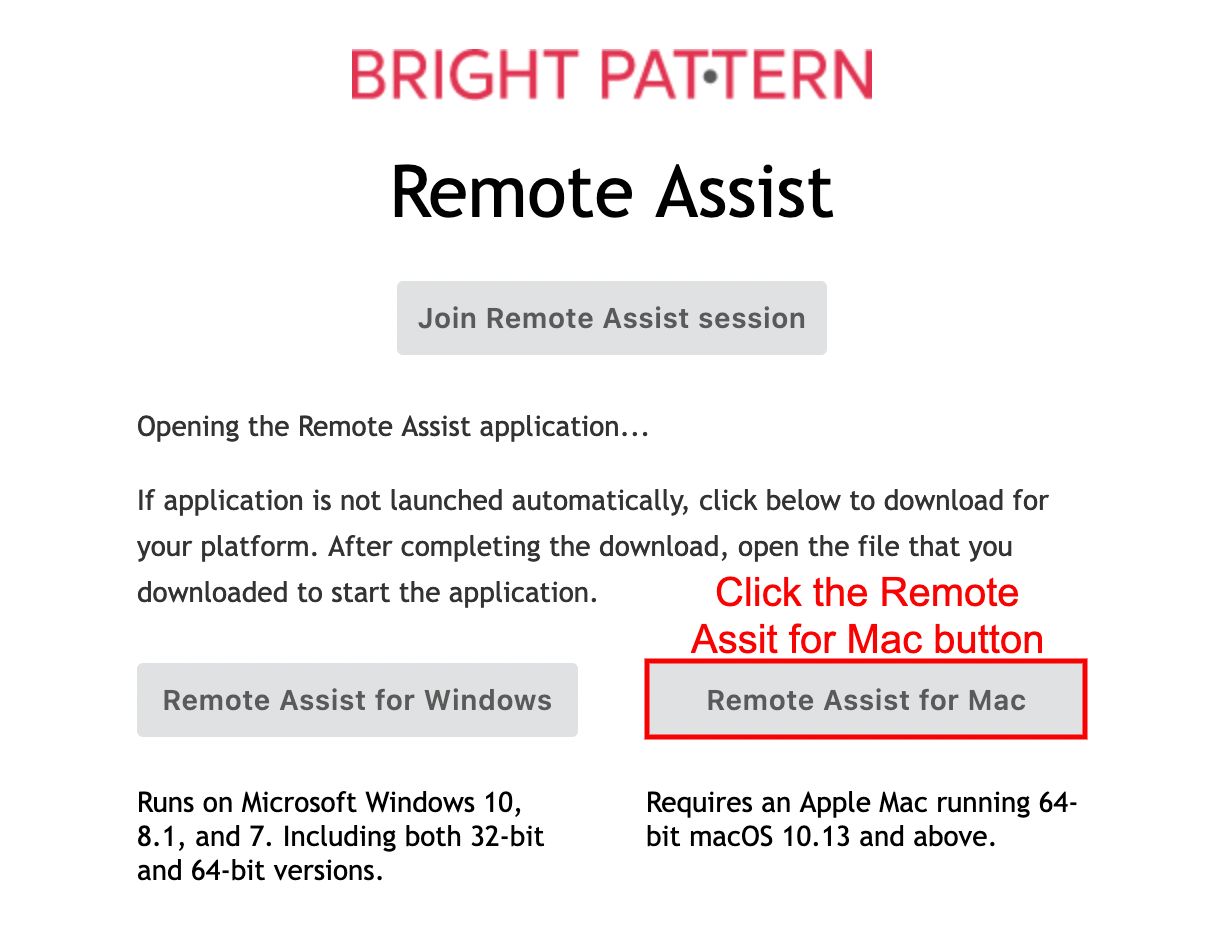
| − | # The ''Screen Recording'' permissions window will open with two options: ''Open System Preferences'' and ''Deny''. The | + | # On the ''Remote Assist'' page, have the macOS user click the '''Remote Assist for Mac''' button.<br><br>[[File:2022.02.04_NRA.MacInstall.02.png|300px|center|thumb|The macOS customer will need to click on the "Remote Assist for Mac" button]]<br><br> |
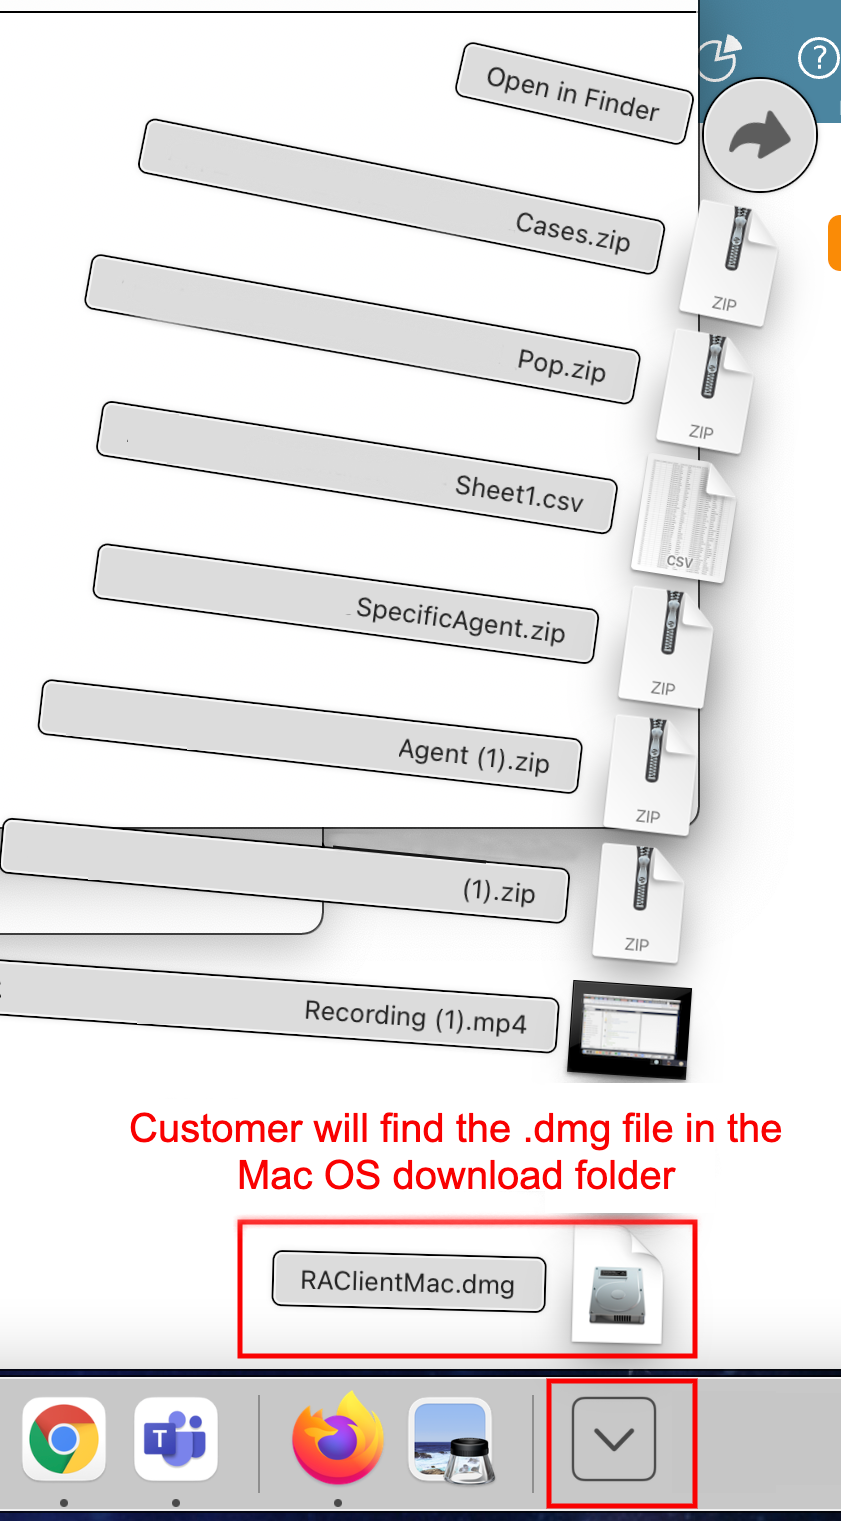
| − | # The ''Security and Privacy'' permissions window will open. If it does not open automatically to the ''Screen Recording'' section in the ''Privacy'' tab, have the | + | # Have your macOS customer locate the downloaded .DMG file in the Dock's ''Downloads'' folder at the bottom of the screen and click the "RAClientMac.dmg" file.<br><br>[[File:2022.02.04_NRA.MacInstall.04.png|300px|center|thumb]]<br><br>[[File:2022.02.04_NRA.MacInstall.05.png|300px|center|thumb|Have your macOS customer click the RAClientMac.dmg file]]<br><br> |
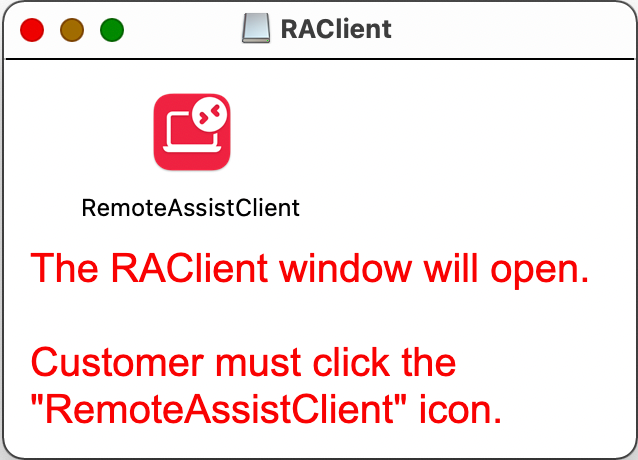
| − | # Tell the | + | # The ''RAClient'' window with the ''RemoteAssistClient'' application will open. Have your macOS customer double-click the ''RemoteAssistClient'' application icon.<br><br>[[File:2022.02.04_NRA.MacInstall.06.png|300px|center|thumb|Have your macOS customer double-click the "RemoteAssistClient" icon]]<br><br> |
| − | # The '''System Preferences''' window will open and request that your | + | # The ''RemoteAssistClient'' application will open. Have your macOS customer click the '''Open''' [[File:2022.02.09_NRA_MacOpenButton.png|150px]] button to accept and open the download.<br><br>[[File:2022.02.04_NRA.MacInstall.07.png|300px|center|thumb|]]<br><br> |
| − | # Your customer will know that sign in is successful because the lock in the lower | + | # The ''Screen Recording'' permissions window will open with two options: ''Open System Preferences'' and ''Deny''. The macOS customer must click '''Open System Preferences'''.<br><br>[[File:2022.02.04_NRA.MacInstall.08.png|300px|center|thumb|Have your macOS customer click "Open System Preferences" to grant RemoteAssistClient screen recording access in the Security and Privacy preference folder. This is necessary so that you, the agent, can see and work on the macOS customer's screen]]<br><br> |
| − | # | + | # The ''Security and Privacy'' permissions window will open. If it does not open automatically to the ''Screen Recording'' section in the ''Privacy'' tab, have the macOS customer navigate there. |
| − | # Have your | + | # Tell the macOS customer to click the '''permissions lock''' [[File:macOS.permissions.lock.icon.png|30px]] in the lower left corner of the window to grant permissions access.<br><br>[[File:2022.02.04_NRA.MacInstall.09.png|400px|center|thumb|Have your macOS customer click the permissions lock in the lower-left corner of the window]]<br><br> |
| + | # The '''System Preferences''' window will open and request that your macOS customer sign in with either ''Touch ID'' or their password to grant permissions access.<br><br>[[File:2022.02.04_NRA.MacInstall.10.png|200px|center|thumb|Have your macOS customer sign in via password or Touch ID to allow "System Preferences" to unlock "Security & Privacy" preferences]]<br><br> | ||
| + | # Your customer will know that sign in is successful because the lock in the lower-left corner of the permissions window will appear to be open [[File:macOS.permissions.lock.icon.open.png|30px]] and they can now click the checkbox to the left of the ''RemoteAssistClient'' application icon.<br><br>[[File:2022.02.04_NRA.MacInstall.11.png|400px|center|thumb|Have your macOS click the "RemoteAssistClient" checkbox to grant permission]]<br><br> | ||
| + | # macOS will now offer to restart the client application so that it can use the granted privileges. | ||
| + | # Have your macOS click the '''Quit & Reopen''' button. The macOS customer will now be presented with a standard ''Connect to server'' Remote Assist window. It should already have the server address and PIN entered.<br><br>[[File:2022.02.04_NRA.MacInstall.12.png|200px|center|thumb|Have your macOS click the "Quit & Reopen" button]]<br><br> | ||
# Tell your customer to click the '''Share screen and input''' button, which will now open the RA session.<br><br> | # Tell your customer to click the '''Share screen and input''' button, which will now open the RA session.<br><br> | ||
| − | [[File:2022.02.04_NRA.MacInstall.13.png|200px|center|thumb|Have your | + | [[File:2022.02.04_NRA.MacInstall.13.png|200px|center|thumb|Have your macOS click the "Quit & Reopen" button.]]<br><br>Note: Now that permissions have been granted, your customer will not have to repeat this process; the permissions will remain granted. |
<br><br><br> | <br><br><br> | ||
Latest revision as of 08:58, 2 June 2025
• 5.19
Remote Assist on Macs
Due to Apple macOS security features, customers using Bright Pattern's Remote Assist (RA) features must enable the Remote Assist client (RAClient) upon initial download (i.e., the client has never been used). Further sessions will maintain the granted permissions. If the macOS customer does not provide these permissions, the agent will not be able to assist them via the Remote Assist application.
| Bright Pattern Remote Assist requires macOS 11 (Big Sur) or later to run. | ||
- In a session with a macOS customer, provide the user with an RA link by clicking on the Remote Assist icon
 and pressing Enter.
- If you are on a call with a macOS user, rather than a chat, after you press the RA button you must read aloud the Session URL and PIN to the macOS user for them to enter.
- On the Remote Assist page, have the macOS user click the Remote Assist for Mac button.
- Have your macOS customer locate the downloaded .DMG file in the Dock's Downloads folder at the bottom of the screen and click the "RAClientMac.dmg" file.
- The RAClient window with the RemoteAssistClient application will open. Have your macOS customer double-click the RemoteAssistClient application icon.
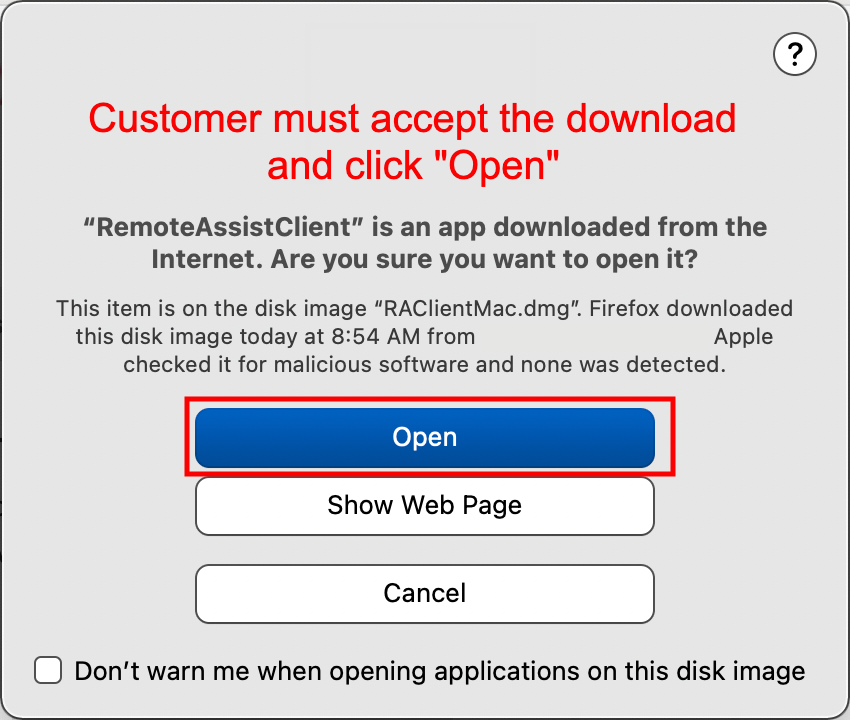
- The RemoteAssistClient application will open. Have your macOS customer click the Open
 button to accept and open the download.
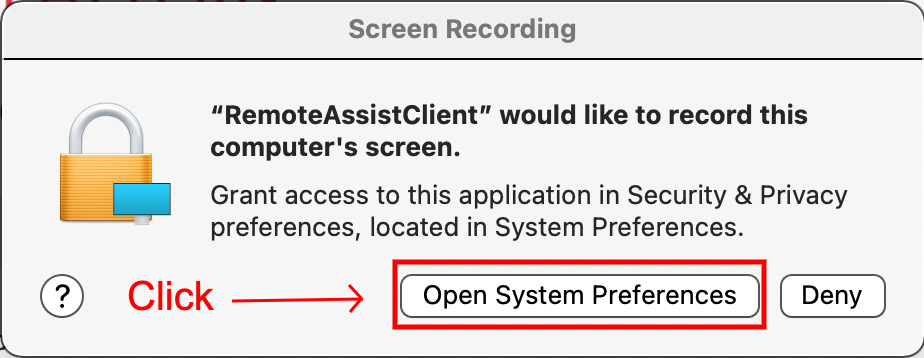
 - The Screen Recording permissions window will open with two options: Open System Preferences and Deny. The macOS customer must click Open System Preferences.
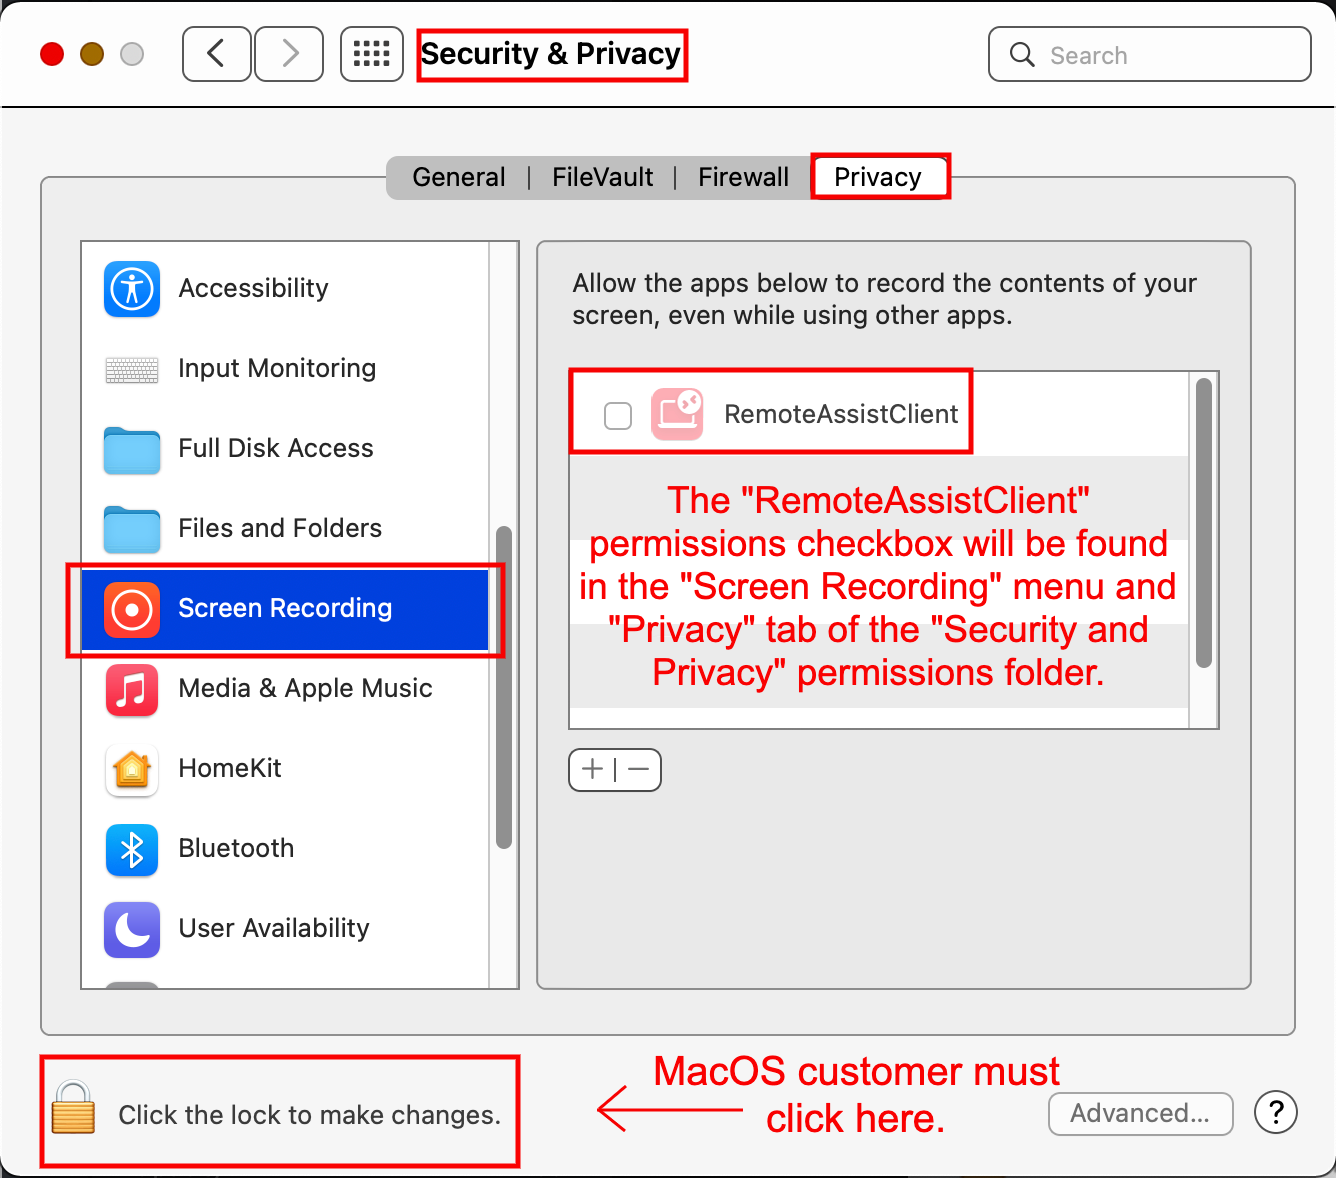
- The Security and Privacy permissions window will open. If it does not open automatically to the Screen Recording section in the Privacy tab, have the macOS customer navigate there.
- Tell the macOS customer to click the permissions lock
 in the lower left corner of the window to grant permissions access.
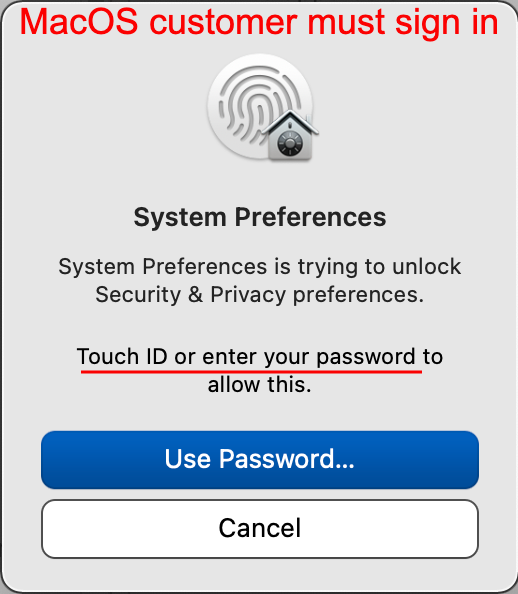
 - The System Preferences window will open and request that your macOS customer sign in with either Touch ID or their password to grant permissions access.
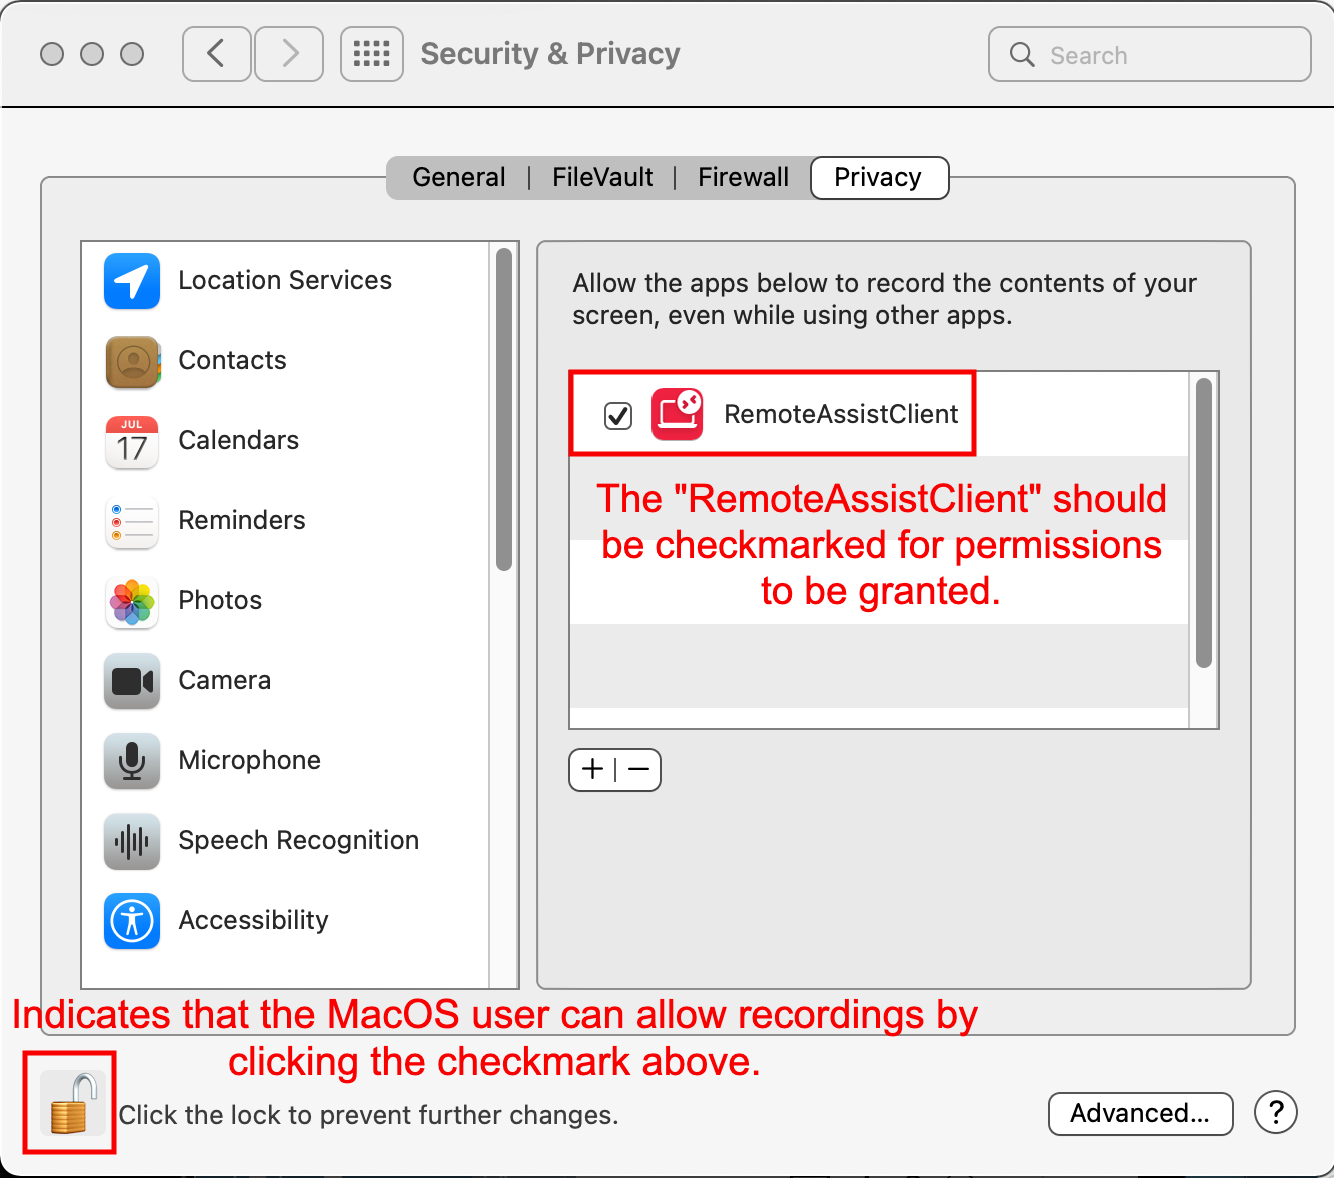
- Your customer will know that sign in is successful because the lock in the lower-left corner of the permissions window will appear to be open
 and they can now click the checkbox to the left of the RemoteAssistClient application icon.
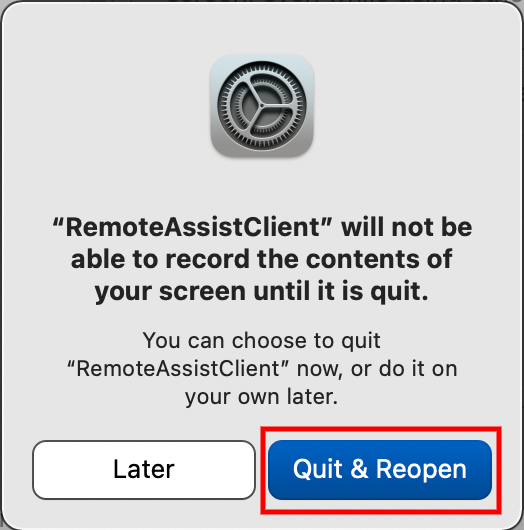
 - macOS will now offer to restart the client application so that it can use the granted privileges.
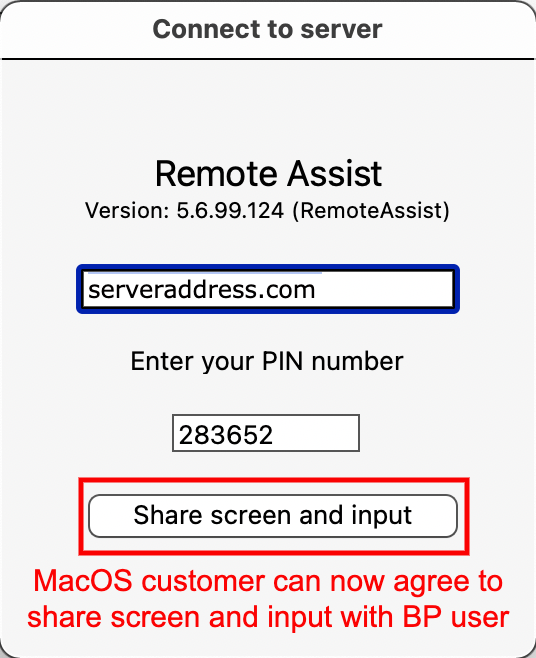
- Have your macOS click the Quit & Reopen button. The macOS customer will now be presented with a standard Connect to server Remote Assist window. It should already have the server address and PIN entered.
- Tell your customer to click the Share screen and input button, which will now open the RA session.
Note: Now that permissions have been granted, your customer will not have to repeat this process; the permissions will remain granted.

