Contents
- Contact Center Administrator Guide Introduction
- Contact Center Administrator IntroductionUser Interface
- Contact Center Administrator User InterfaceTutorials
- About TutorialsConcepts
- About ConceptsUsers and Teams
- Users & Teams SectionsDirectory
- Directory SectionsScenario Entries
- Scenario Entries SectionsScenarios
- About ScenariosWorkflows
- WorkflowsServices and Campaigns
- About Services & CampaignsLists
- ListsDo Not Call Lists
- Do Not Call ListsTasks
- Tasks SectionsCase & Contact Management
- Case & Contact Management SectionsCall Center Configuration
- Call Center Configuration Sections
- Call Center Configuration Overview
- General Settings
- Custom Not Ready Reasons
- Integration Accounts
- Overview
- AI Provider
- AWS
- Bot / Chat suggestions engine
- Co-browsing
- External Knowledge Base
- Loxysoft WFM
- Messenger
- Microsoft Dynamics 365
- Microsoft Teams
- Natural Language Understanding
- Next Caller
- NICE
- OneCloude UCaaS
- Remote Assistance
- RightNow
- Salesforce.com
- SCIM
- ServiceNow
- Single Sign-On
- Speech To Text
- Statistics Data Receiver
- Teleopti WFM
- Text To Speech
- The Data Group (TDG)
- WFM{{NavLink | Contact Center Administrator > Call Center Configuration > Integration Accounts > ''select type WFM''}}Bright Pattern's workforce management (WFM) integration enables call centers to manage operations through advanced forecasting, dynamic scheduling, real-time adherence, and intelligent automation as well as granting employee flexible autonomy and performance management. Every integration account update includes three tabs:*General *Historical Data Feed*Real-Time Data Feed[[File:2022.08.15_Calabrio_Admin.Integrations.01.png | 650px | center | thumb]]{{Note | At this time Calabrio is the only non-legacy WFM integration account available. The properties and integration information listed below may change for future integrations.}}To integrate with Calabrio, visit BPCC's ''[[Contact-center-administrator-guide/CallCenterConfiguration/IntegrationAccounts/WFM/Tutorials/CalabrioWFMIntegration| Calabrio Integration Tutorial.]]''To integrate with Verint, visit the ''[[Contact-center-administrator-guide/CallCenterConfiguration/IntegrationAccounts/WFM/Tutorials/VerintWFMIntegration | Verint Integration Tutorial.]]''Locate these properties in the Calabrio integration's ''General'' tab.The WFM application vendor or brand. This information is read-only. The name of the account. This name is unique within the contact center tenant.All timestamps of the transmitted data are reported in this time zone. The default dropdown setting is the default contact center [[Contact-center-administrator-guide/CallCenterConfiguration/GeneralSettings#Default_time_zone | time zone]]. Time zones that differ from the default contact center time zone are highlighted.Types of services reported through this integration account. Services include:*Inbound Voice*Outbound Voice*Chat*Email[[File:2022.08.15_Calabrio_GeneralTab.png | 650px | thumb | center | Calabrio's General tab]]Locate these integration properties in the Calabrio integration's ''Historical Data Feed'' tab.Select this checkbox to enable historical data transfer according to the vendor-specific requirements. Deselecting this checkbox on an active account stops the information transfer immediately. Enter a time range between 30 minutes and 2,800 minutes to send the historical data after that set amount of time (relative to the end of the reporting interval) for regular forecasting Data will not be transmitted when this field is empty.Enter a time range between 30 minutes and 120 minutes to send the same historical data after that set amount of time (relative to the end of the reporting interval) for intraday WFM functions. Data will not be transmitted when this field is empty.Type of reports to be included in the account. Report types include:*Agent Stat*Agent Queue Stat*Queue StatPopulate this field with information from the Calabrio application integration instance that is specific for the contact center.Populate this field with information from the Calabrio application integration instance that is specific for the contact center.Populate this field with information from the Calabrio application integration instance that is specific for the contact center. Test the capability to connect to the Calabrio application instance using the above values by clicking this button.[[File:2022.08.15_Calabrio_HistoricalDataFeed.png | 650px | center | thumb | Calabrio's Historical Data Feed]]Locate these integration properties in the Calabrio integration's ''Real-Time Data Feed'' tab. Select this checkbox to enable the Calabrio WFM real-time data account integration according to vendor-specific requirements. Stop the data transfer of a previously active data account by deselecting this checkbox; the transfer will stop immediately.Enter a number of seconds to define the time between real-time updates about agents who changed their state within the previous update interval. Default: 10 secondsEnter a number of hours that defines the time between “global” updates. Global updates include information about all agents, no matter if an agent has changed their state within the previous update interval or not. Default: 4 hoursPopulate this field with information from the Calabrio application integration instance that is specific for the contact center. Populate this field with information from the Calabrio application integration instance that is specific for the contact center. Populate this field with information from the Calabrio application integration instance that is specific for the contact center. Test the connection capability to connect to the Calabrio application instance using the above values by clicking this button.[[File:2022.08.15_Calabrio_RealTimeTab.png | 650px | thumb | center | Calabrio's Real-time Data Feed]]Locate these properties in the Verint integration's ''General'' tab.The WFM application vendor or brand. This information is read-only.The name of the account. This name is unique within the contact center tenant. In this case, it is Verint.All timestamps of the transmitted data are reported in this time zone. The default dropdown setting is the default contact center time zone. Time zones that differ from the default contact center time zone are highlighted.Types of services reported through this integration include:*Inbound Voice*Outbound Voice*Chat*Email[[File:2022.09.09_Verint_VerintWFM.General.png | 650px | center | thumb | General tab of the BP Verint WFM Integration]]Locate these integration properties in the Verint integration's ''Historical Data Feed'' tab.[[File:Verint-wfm-int-202310311537.png | 650px | center | thumb | Historical feed tab of the BP Verint Integration]] Select this checkbox to enable historical data transfer according to the vendor-specific requirements. Deselecting this checkbox on an active account stops the information transfer immediately.Enter a time range between 30 minutes and 2,800 minutes to send the historical data after that set amount of time (relative to the end of the reporting interval.) Forecasting data will not be transmitted when this field is empty.Enter a time range between 30 minutes and 120 minutes to send the same historical data after that set amount of time (relative to the end of the reporting interval) for intraday WFM functions. Data will not be transmitted when this field is empty.Selecting this checkbox triggers the transmission of a file containing aggregated Agent Scorecard Metrics (ASCM) to an FTP or SFTP server every 24 hours. The BPCC transfers a text file to the specified SFTP or FTP account, containing a collection of aggregated data related to the activity of agents. The data encompasses various metrics as described below, and information is sent for all agents who have been logged in within the last 24 hours. Agent Scorecard Metrics are as follows:{| class="wikitable"|+ Agent Metrics Definition|-! Field Name !! Sample Value !! Description|-| AGENT_ID || Super || Agent login|-| DATE || 06/15/2022 || Date in Format: MM/DD/YYYY|-| ORGANIZATION_ID || N/A || Not used|-| STAFF_TIME || 23000 || Total time (in seconds) the agent was logged on to the ACD system.|-| TALK_TIME || 16000 || Total time in seconds spent by the agent on the interaction in focus (talk tame referenced in BP reporting). Does not include hold time. |-| ACW_TIME || 12000 || After Call Work time|-| HOLD_TIME || 8000 || Hold time as defined in BP reporting|-| ACDCALLS || 344 || The number of ACD interactions answered by the agent (including calls, chats, emails). Similar to IN Handled (in BP)|-| ABANDONS || 43 || The number of ACD interactions rejected/not answered by the agent (including calls, chats, emails). Similar to IN Rejected (in BP)|-| AUX_ALL_TIME || 5678 || Total time agent spent in Not Ready |-| AUX_IN_TIME || 0 || Not used (always 0)|-| AUX_OUT_TIME || 0 || Not used (always 0)|-| IDLE_TIME || 56 || Total Ready time in seconds|-| ACTUAL_CALLS || 5435 || Total Interactions (calls/chats/emails) received by the agent, similar to IN Received|}Select a radio button to define the transport protocol: FTP or SFTP.Enter the FTP/SFTP server hostname. Define the destination folder; reports are sent over FTP/SFTP in CSV format. The initial default value this field is the subdomain of the access URL (e.g., “demo” for the tenant “demo.brightpattern.com.”)Enter the FTP username.Enter the FTP password.Click this button to test the FTP availability.Locate these integration properties in the Verint integration's ''Real-Time Data Feed'' tab.Select this checkbox to enable the Verint real-time data account integration according to vendor-specific requirements. Stop the data transfer of a previously active data account by deselecting this checkbox; the transfer will stop immediately.Select FTCI or STCI.Enter the TCP/IP socket port number on which the server listens. The default value is 12000.Enter the allowed IP address of the client. The client address must be a static IP address.Enter the SFTP server hostname, destination folder, and FTP username and password.{{Image650 | Real Time tab.PNG | Real-time data feed tab of the BP Verint Integration}}Integration with the legacy Aspect WFM workforce management applications provides managers with the ability to automatically generate a number of reports used to monitor in real-time an agent's adherence to work schedules. Set up a Legacy Aspect WFM integration account only if you plan to use Aspect WFM for real-time adherence monitoring - it is not necessary, otherwise.Set up a Aspect WFM integration legacy account only if you plan to use Aspect WFM for real-time adherence monitoring; For more information, please contact Alvaria customer care to configure the Real-Time Adherence server (RTA) Universal interface to receive a data feed. The Unicode checkbox of the Universal interface must be selected (the ASCII option is not supported.)Call centers are allowed one legacy workforce management integration account. New integrations have larger account limits.You can only have one WFM integration account in your contact center.Configure these parameters within Bright Pattern Contact Center Administrator to enable the real-time adherence data feed:''Name'' is the name of the integration account.''Periodic update interval'' is the period (in seconds) with which real-time metrics will be updated.''Protocol'' refers to the communication protocol, which is read-only. Two options are available: TCP (Aspect WFM) and HTTP POST.If TCP (Aspect WFM) is selected, the following options appear:* '''Host name''' - The name or IP address of the host where the Aspect Real-Time Adherence server (RTA) is run* '''Port''' - The TCP port assigned to the Aspect RTA server on the above host; it must correspond to the port configured on the RTA side* '''Record field sizes''' - The property that specifies the lengths of the data fields communicated to Aspect RTA; the default values correspond to the default settings of the same fields on the RTA side; if values of these fields are changed on the RTA side, they must be changed accordingly in this property* '''Reason codes mapping''' (optional) - Aspect WFM only accepts reason codes as numbers; however, Bright Pattern Contact Center software defines reason codes as text. The ''Reason codes mapping'' field allows you to configure ''Not Ready'' reasons text with numerical reason codes for Aspect WFM reports and real-time reporting within the Aspect WFM configuration.[[File:Integrations-WFM-Not-Ready-Reasons-5399DID.PNG|450px|thumbnail|center|WFM TCP protocol settings]]If HTTP POST is selected, the following options appear:* '''URL''' - The unique URL of your Aspect WFM account* '''Token''' (optional) - The access token for your Aspect WFM account* '''Test connection''' - This button sends POST with an empty agent and services list* '''Reason codes mapping''' (optional) - This box allows you to configure [[Contact-center-administrator-guide/GeneralSettings#System_Not_Ready_reason_names_for|Not Ready]] reasons as numerical codes for [[Contact-center-administrator-guide/WFMReports| Aspect WFM reports]].[[File:Integrations-WFM-Not-Ready-Reasons-HTTP-5399DID.PNG|450px|thumbnail|center|HTTP POST protocol settings]]When enabled, POST is sent to the provided URL. Errors are ignored, and the next request is done after the defined interval.#REDIRECT [[Contact-center-administrator-guide/CallCenterConfiguration/IntegrationAccounts/Tutorials]]
- Web Client Credentials
- Zapier
- Zendesk
- Identification
- Knowledge Base
- Calendars
- Hours of Operation
- State Calling Hours
- Auxiliary Skills
- Language Skills
- Audio Treatments
- Shared Voice Segments
- Voicemail
- Phone Devices
- Omni-Channel Routing
- Chat Settings
- Email Settings
- STT Configuration
- Direct Chat Invite Quality Management
- Quality Management SectionsReporting
- Reporting SectionsCustom
- Custom SectionsSecurity
- Security SectionsApplication Notes
- Application NotesAppendices
- Appendices
Bright Pattern内でのVerint Workforce Management統合の設定方法
Bright PatternのVerintワークフォースマネジメント統合は、Bright PatternとVerintソフトウェア間のデータ転送機能を作成し、管理者が複雑なデータ入力をスケジューリングに使用したり、効率的なプロセスを開始できるようにします。
ワークフロー
このチュートリアルで説明するステップを開始する前に、以下のタスクが完了していることを確認してください:
- ベリントのカスタマーケアに連絡し、ベリントアカウントを作成して有効にしてください。
- サービスプロバイダがコンタクトセンターのWFM統合機能を有効にしている。
- システム管理者に連絡し、RTDataProviders を実行しているホストの対応するポートが、着信 TCP/IP 接続を許可し、承認するよう要請する。
ステップ
Bright Patternのコールセンター管理者(BPCC)で以下のステップに従い、コールセンターのVerint統合アカウントを設定します:
1. 設定 >> コールセンター設定 >> 統合アカウントで「アカウントの追加」(「+」)ボタンを選択します。
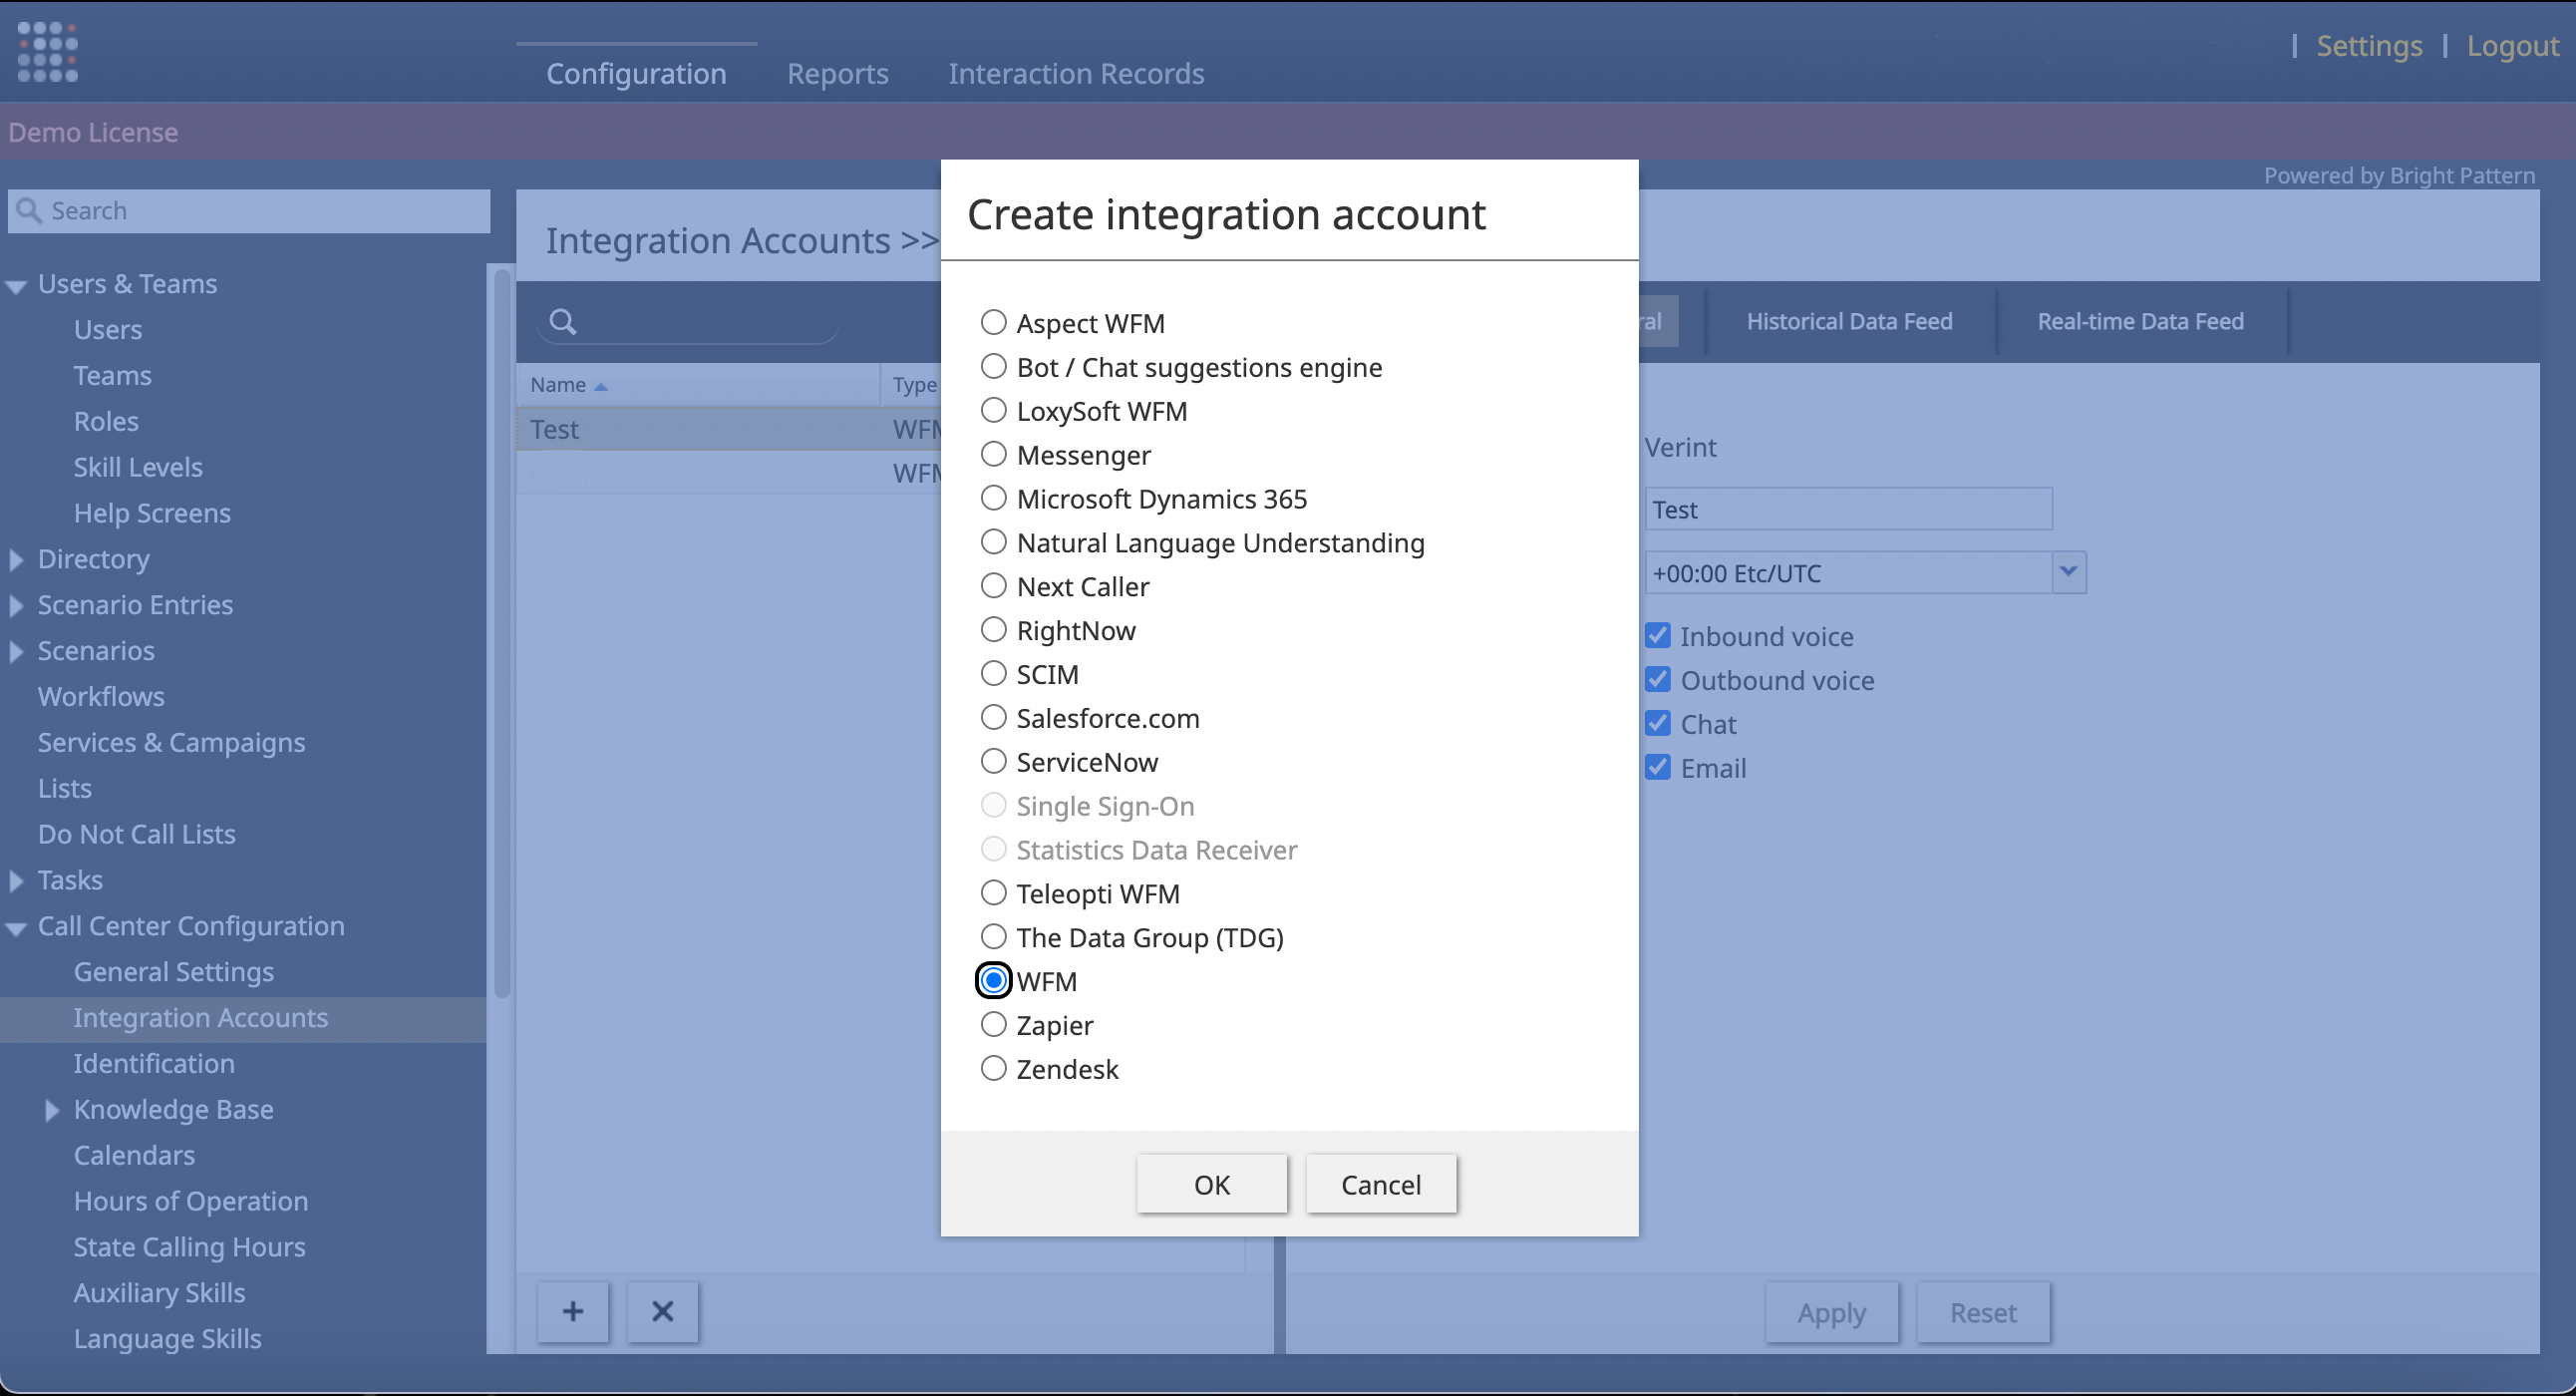
2.Create integration account "選択メニューでWFMを選択し、"Ok "を選択する。
3.Select WFM integration type "メニューで "Verint "を選択し、"Ok "を選択します。
一般
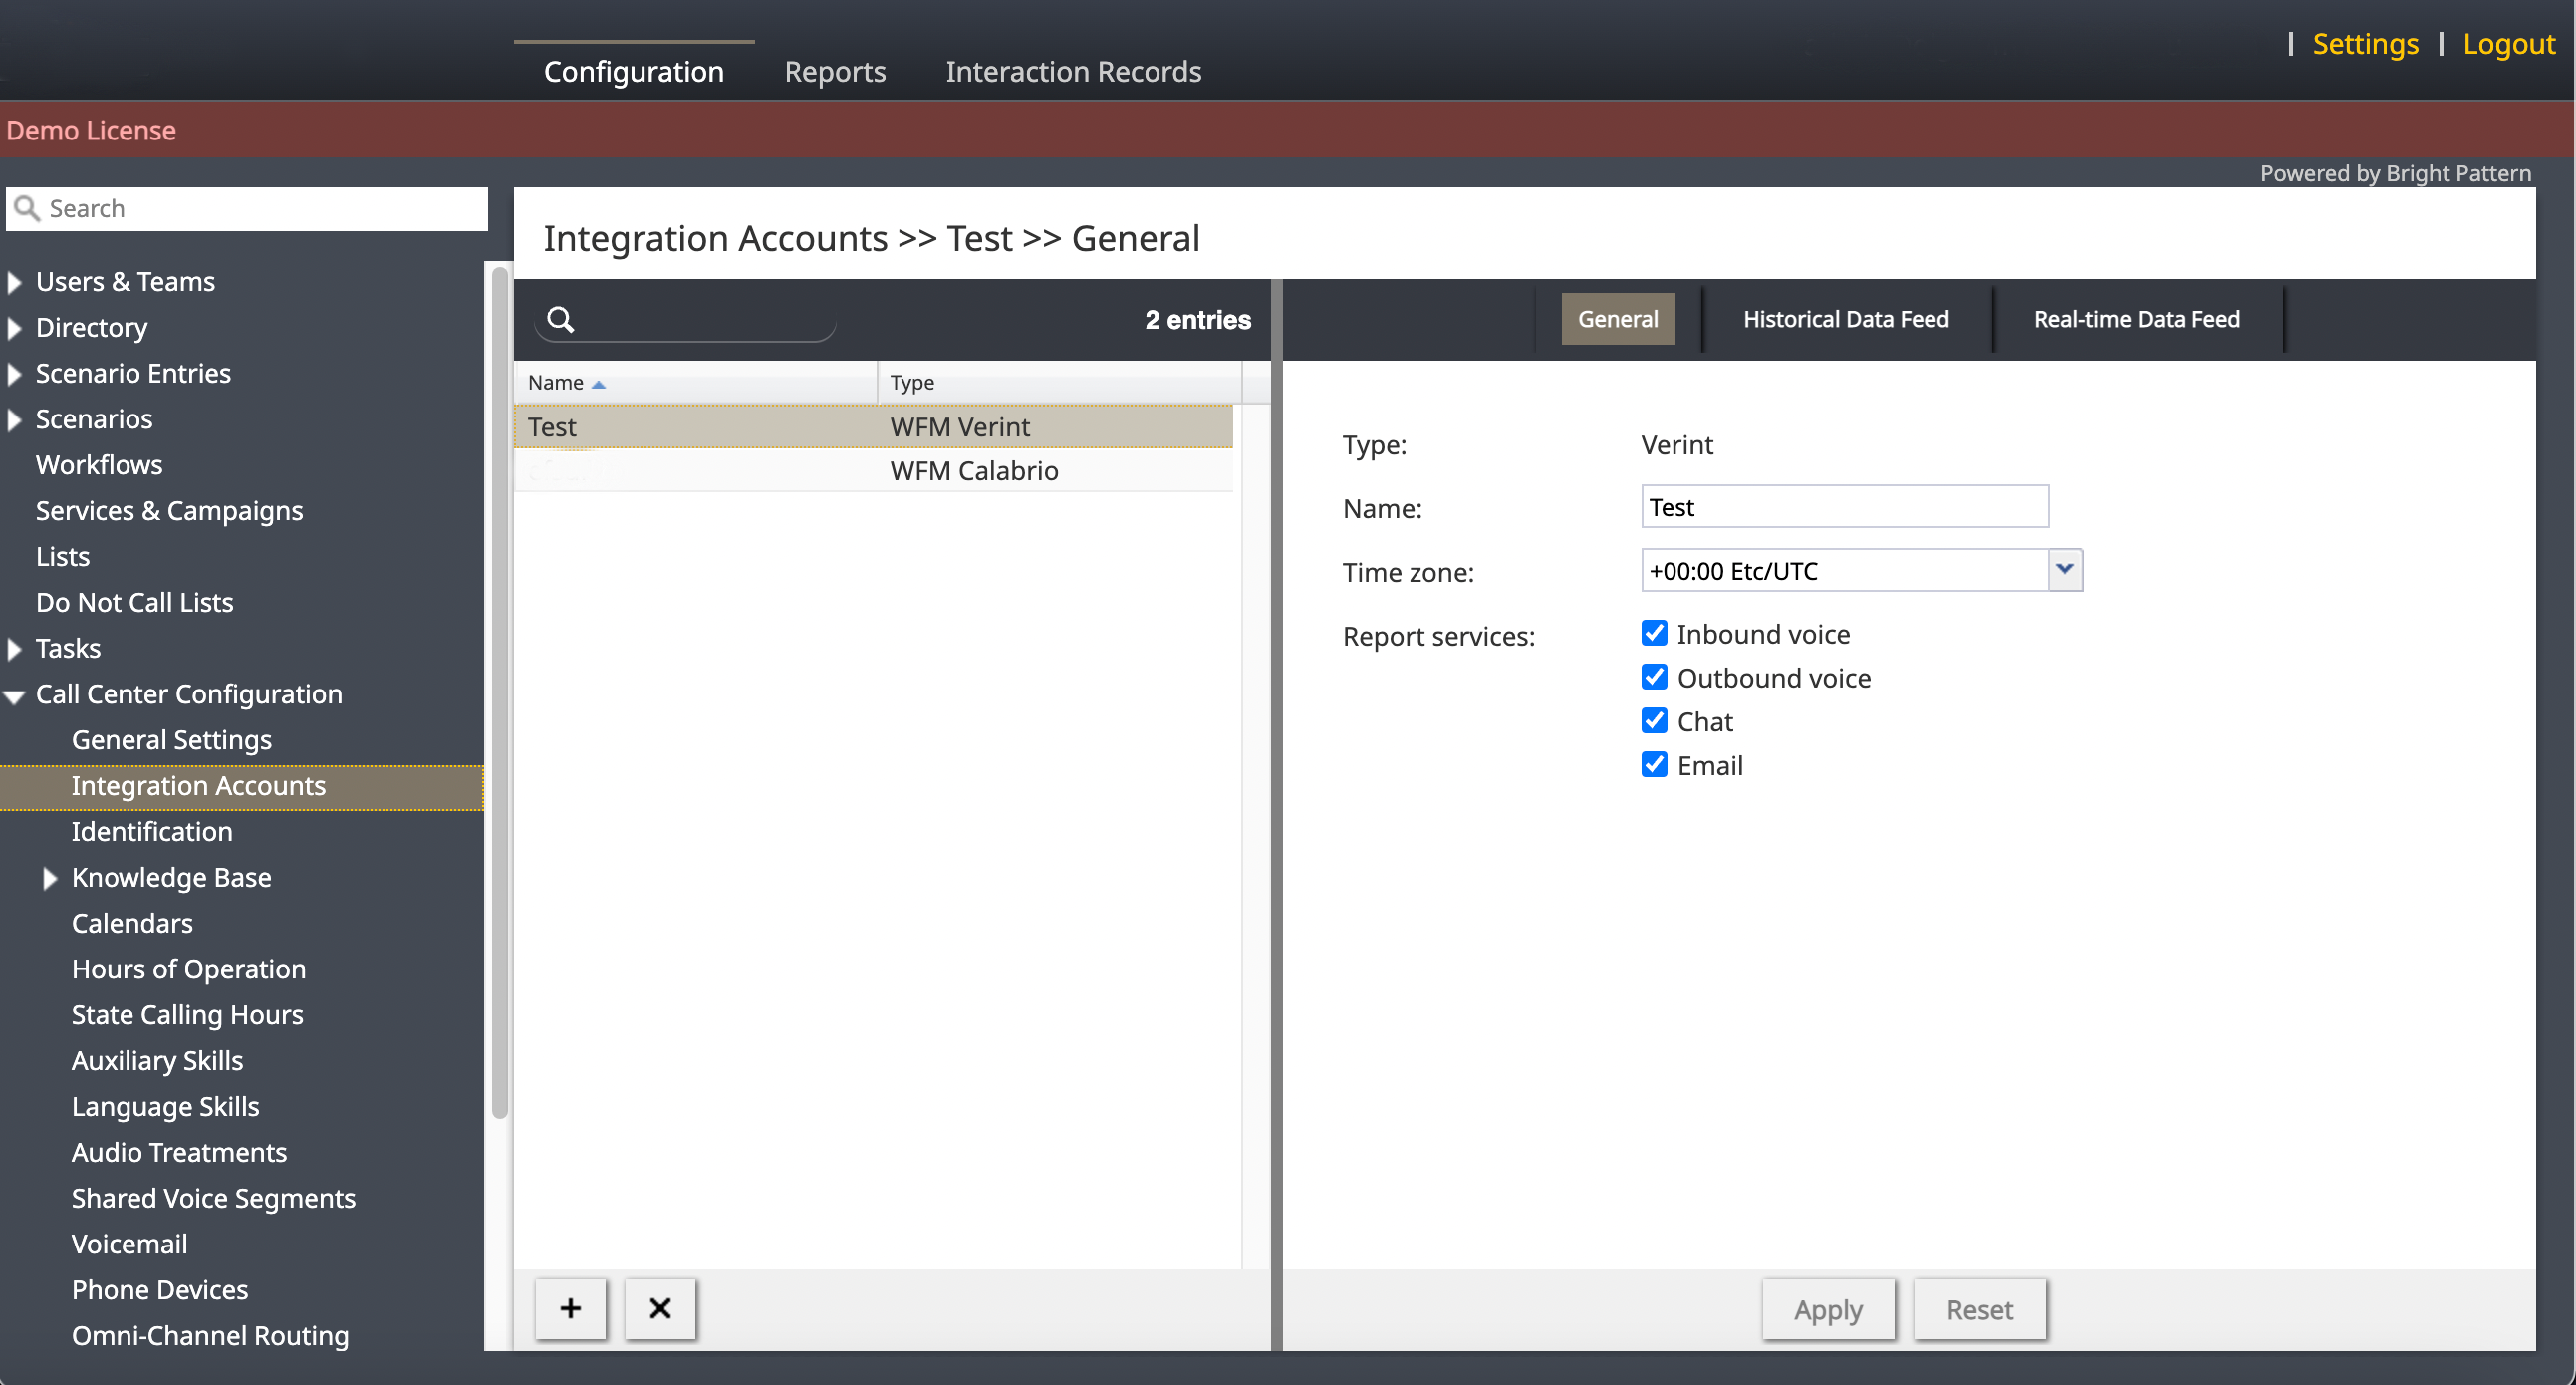
1.全般」タブで、名前と タイムゾーンを完了し、報告するメディアを選択します:
- インバウンド音声
- アウトバンド音声
- チャット
- メール
2.適用を選択します。
履歴データフィード
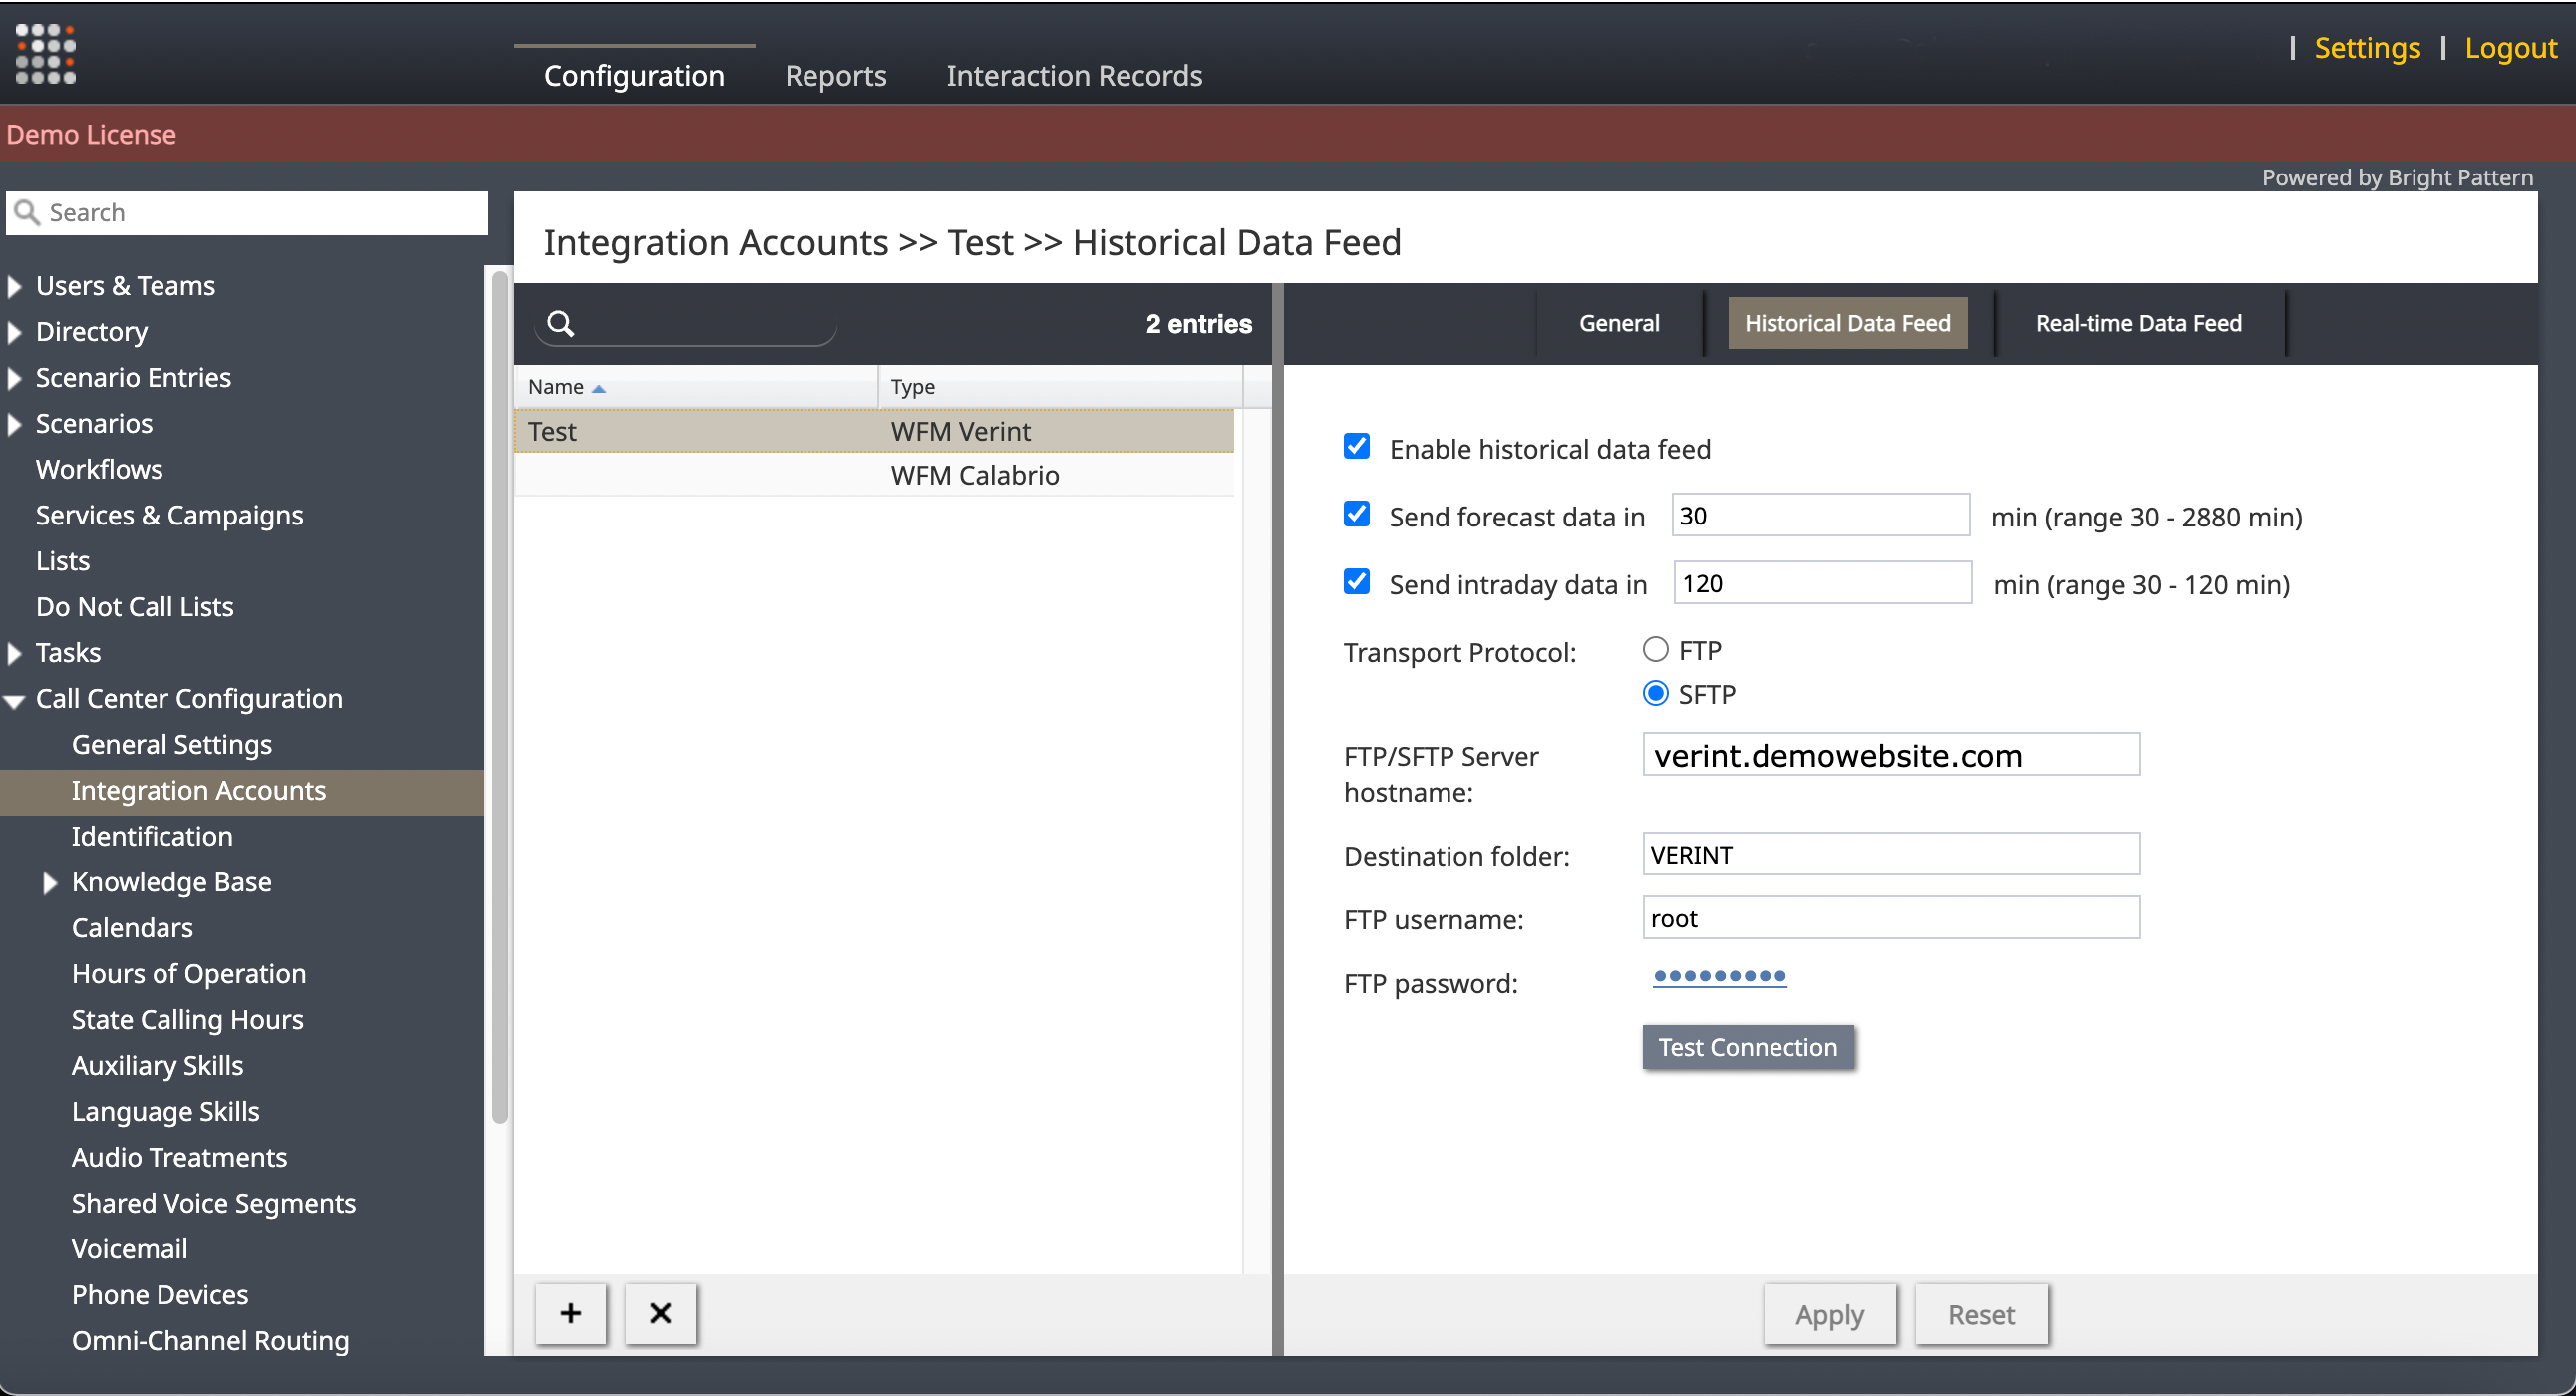
1.ヒストリカルデータフィードタブで、"ヒストリカルデータフィードを有効にする "をチェックする。
2.チェックボックスを選択して範囲を定義し、予測データまたは日中データを Verint 統合アプリケーションに送信します。それ以外は既定(デフォルト)設定のままにしておきます。
3.報告書を送信するプロトコルをFTPまたはSFTPから選択し、FTP/SFTPサーバーのホスト名を入力します。
4.送信先フォルダーを定義します。報告者はCSVフォーマットでFTP/SFTP経由で送信されます。
5.既定(デフォルト)値は、アクセスURLのサブドメインです(例:テナント "demo.brightpattern.com "の場合は "demo")。
6.FTPユーザー名とパスワードを入力し、"Test Connection "ボタンをクリックしてフィードが正しく設定されているか確認します。
7.適用を選択済。
既読データフィード
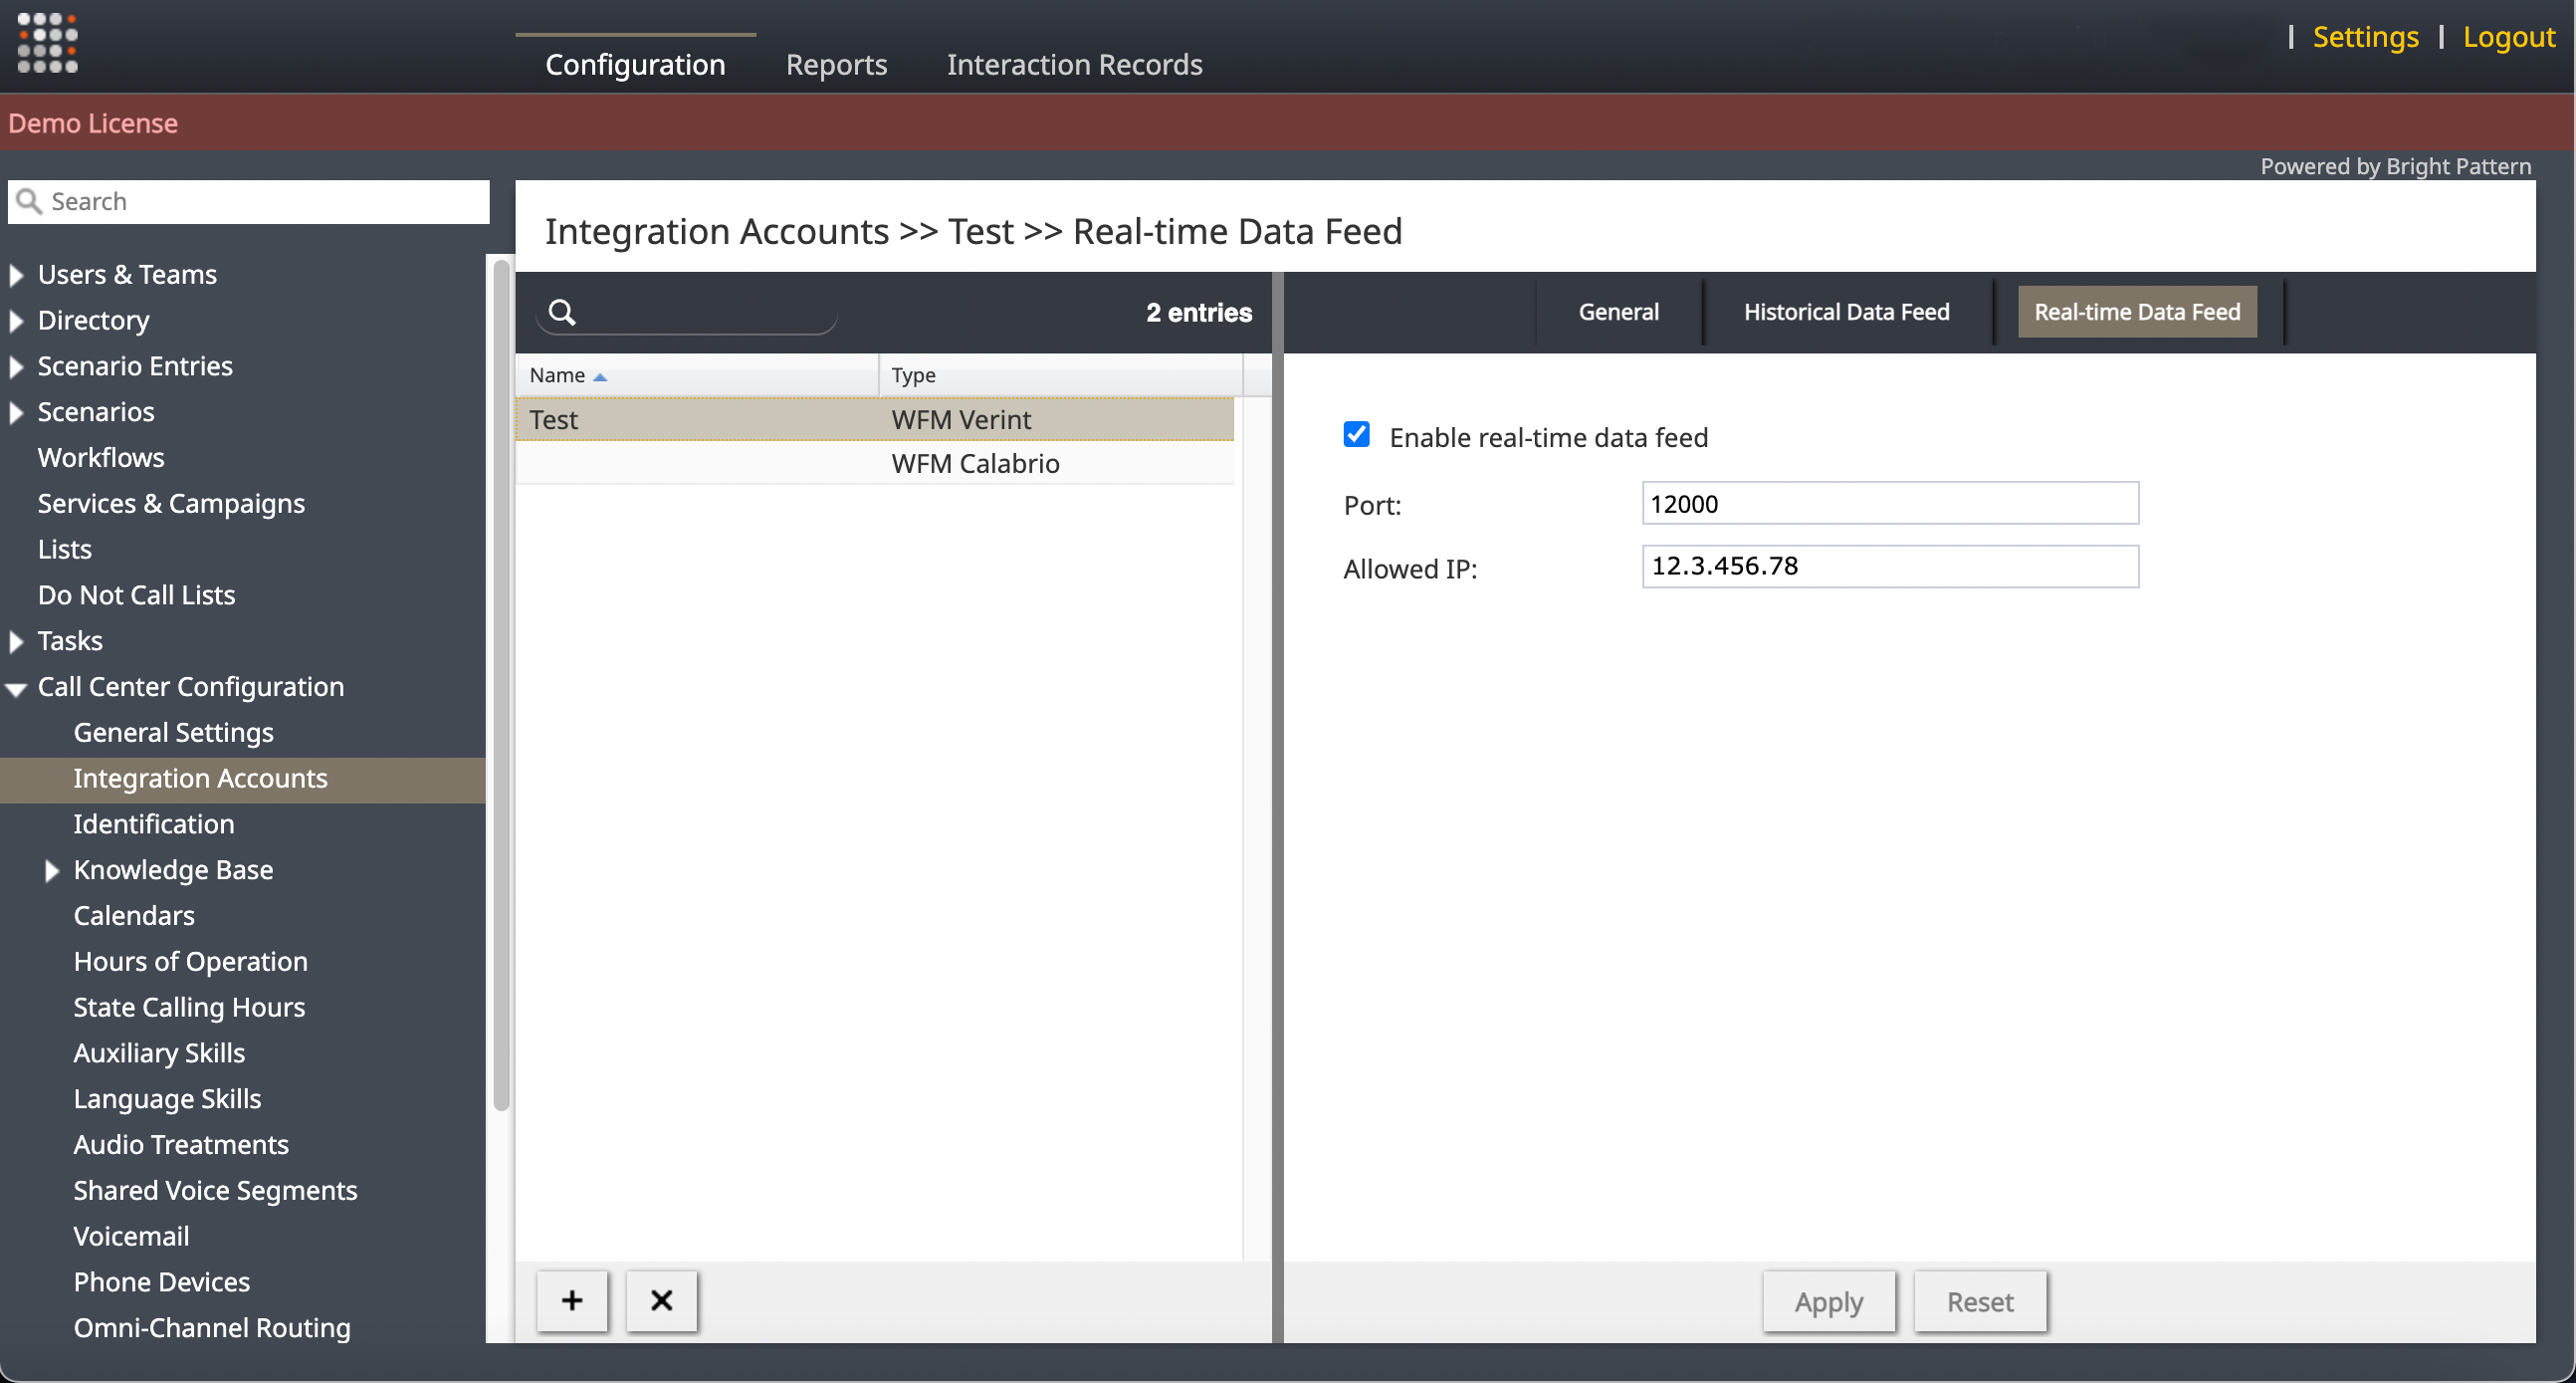
1.リアルタイム・データ・フィード」タブで「リアルタイム・データ・フィードを必須にする」を選択し、 Verint のベンダー固有の要件に従って Verint のリアルタイム・データ・アカウント統合を有効にします。
2.サーバーがリッスンするTCP/IPソケットポート番号を入力します。既定(デフォルト)値は12000です。
3.サーバーの許可IPアドレスを入力します。サーバー・アドレスは静的IPアドレスでなければなりません。
4.適用を選択します。
メモ
無効の Bright Pattern ユーザーは、Bright Pattern Contact Center の Verint インテグレーションに履歴データまたはリアルタイムデータを送信しません。
この統合のBPCC部分は完了です。Verintとの統合を完了するには、Verintカスタマーサクセスに連絡してください。


