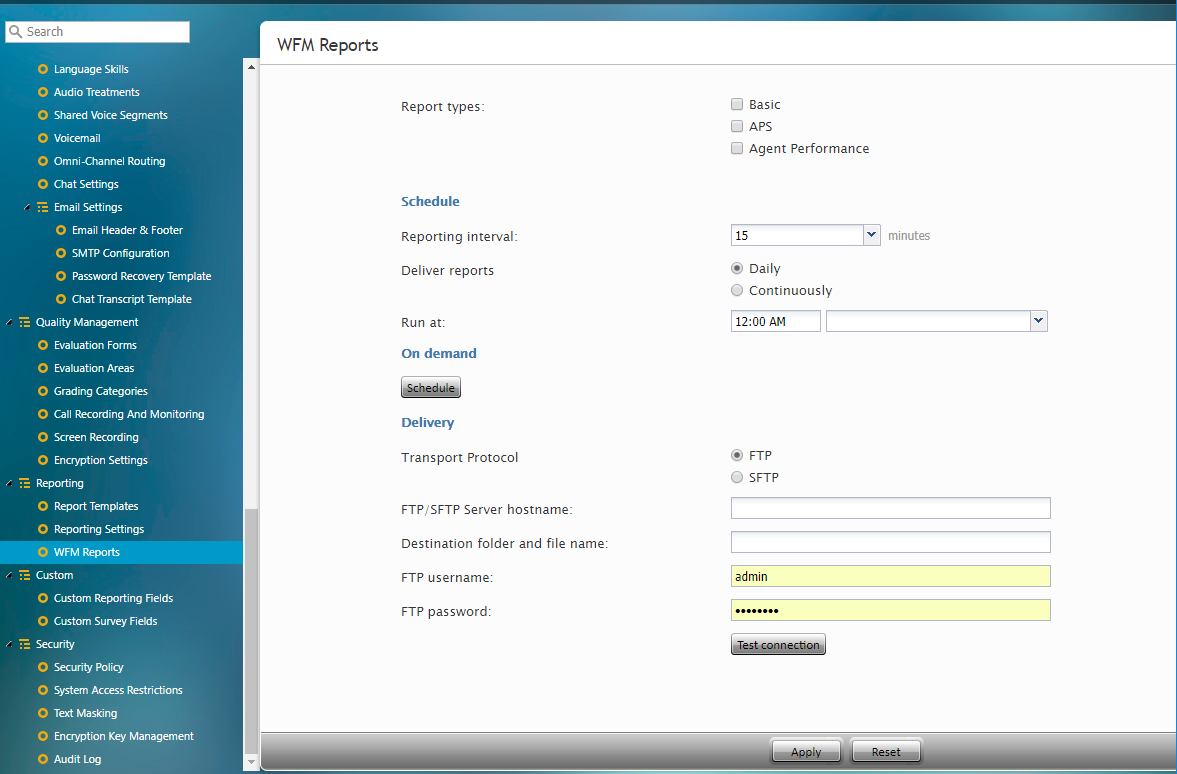
WFM Reports
Bright Pattern Contact Center supports integrations with the Aspect WFM (workforce management) application. These applications provide a number of automatically generated reports for workforce scheduling and real-time monitoring of agents’ adherence to work schedules. WFM reports may be scheduled on a set interval or on an as-needed basis.
For more information regarding integrating a WFM account, see section Integration Accounts.
Note: In order to generate WFM reports, the privilege must be enabled for your contact center by the system administrator.
Report types
Report types allows selection of the following: Basic, APS, and Agent Performance (daily)
Schedule
Schedule settings allow you to configure automatic WFM report generation. Their settings are as follows.
Reporting interval
Reporting interval is the frequency, in minutes, that reports will be delivered to your WFM account; the default setting is 15 minutes. Note: This interval does not apply to Agent Performance (daily) reports.
Deliver reports
Choose between Daily or Continuously.
Note if the Agent Performance (daily) report is enabled, it will be run/delivered only daily; continuous delivery applies to Basic and APS reports.
Run time
Run time allows you configure what time you want the report generated at. To do this, enter a time and select from a drop-down menu the time zone that applies. The default time is "Midnight UTC."
On Demand
On Demand settings allow you to generate WFM reports on an as-needed basis. Their settings are as follows.
Time frame
Time frame allows you to select a date range which you would like the report to cover. You may choose from either a pre-determined period of time or a custom period. After you have selected the date range, you may configure an hour range in From/To. The time frame options are as follows:
- Today
- Yesterday
- This week
- Last week
- This month
- Last month
- Custom
Note: Weeks run from Sunday to Saturday.
From/To
From/To displays the date range selected in Time frame. If you change the dates manually, the time frame will change to Custom; you may also configure an hour range using the drop-down menus.
Run at
Run at allows you to schedule the reporting period configured here for a later time; select the date on the calendar and the hour on the drop-down menu.
Delivery
Delivery is where you configure the destination of either the scheduled or on-demand reports.
Transport Protocol
Select FTP or SFTP. Note that the corresponding SMTP settings are configured on the Email Settings > SMTP Configuration page.
FTP/SFTP Server hostname
Enter the FTP/SFTP Server hostname (e.g., "cust.anyftp.com").
Destination and file folder name
Specify the address of the destination folder and file name (e.g., 50Reports/Report_%d_%t.csv where 50Reports is the destination folder and Report_%d_%t.csv is the file name).
Note that in your scheduled report, you can add date (%d) and time (%t) placeholders to the specified filename. For example, specifying filename Report_%d_%t.csv results in a scheduled report with a filename such as Report_20180521_113000 where 20180521 represents the date "May 21, 2018" and 113000 represents the time "11:30:00" that the report was generated.
FTP Username
Specify the FTP username (e.g., "1250bayhill@gmail.com").
FTP Password
Specify the FTP password.
Test connection
Test connection tests the connection of the FTP username and password.


