(Updated via BpDeleteTranslateTags script) |
|||
| (15 intermediate revisions by 3 users not shown) | |||
| Line 1: | Line 1: | ||
| − | + | = Integration Accounts= | |
Integration accounts specify parameters required for interoperability of your contact center solution with third-party systems, such as customer relationship management (CRM) and workforce management (WFM) applications. | Integration accounts specify parameters required for interoperability of your contact center solution with third-party systems, such as customer relationship management (CRM) and workforce management (WFM) applications. | ||
| Line 20: | Line 20: | ||
* Bot / Chat suggestions engine | * Bot / Chat suggestions engine | ||
* External Knowledge Base | * External Knowledge Base | ||
| + | * Loxysoft WFM | ||
* Messenger | * Messenger | ||
* NICE | * NICE | ||
| Line 44: | Line 45: | ||
To support BPO operations, multiple integration accounts are possible. | To support BPO operations, multiple integration accounts are possible. | ||
| + | '''Note the following:''' | ||
| + | * This integration option must be enabled for your contact center by the service provider. | ||
| − | === Properties === | + | * Export of recordings is configured for specific services. For more information see [[Contact-center-administrator-guide/ResultsTab#Periodic_Recording_Export_Jobs|Periodic Recording Export Jobs]]. |
| − | [[File:AWS- | + | |
| + | * Recordings exported to Amazon AWS will be accessible via Bright Pattern on demand for the detailed records storage time agreed upon with your service provider. | ||
| + | |||
| + | * Instead of using AWS, you can use this integration account to set up an S3-compatible local storage. | ||
| + | |||
| + | === Properties === | ||
| + | [[File:Amazon-AWS-Gen-52.PNG|650px|thumbnail|center|Amazon AWS integration account properties]] | ||
| Line 54: | Line 63: | ||
==== Name ==== | ==== Name ==== | ||
''Name'' is the Unique name of this integration account. It is helpful to have a descriptive name if your tenant uses multiple integration accounts of the same type. | ''Name'' is the Unique name of this integration account. It is helpful to have a descriptive name if your tenant uses multiple integration accounts of the same type. | ||
| + | |||
| + | ==== Use private S3 storage ==== | ||
| + | You can use this option to set up an S3-compatible private storage. For more information see [[Contact-center-administrator-guide/SettingUpPrivateS3Storage | Appendix: Setting up Private S3 Storage]]. | ||
| + | |||
| + | ==== Url ==== | ||
| + | This is the URL path to your private S3 storage. The URL must be specified if '''Use private S3 storage''' is enabled. | ||
==== Access Key ID ==== | ==== Access Key ID ==== | ||
| Line 60: | Line 75: | ||
AWS access keys always consist of an access key ID and a secret access key. | AWS access keys always consist of an access key ID and a secret access key. | ||
| − | ==== Secret | + | ==== Secret Key ==== |
| − | The ''Secret | + | The ''Secret Key'' (e.g., wJalrXUtnFEMI/K7MDENG/bPxRfiCYEXAMPLEKEY) is the other part of your AWS access key. Referred to as a secret access key, the ''Secret ID'' is a security credential that allows you to sign programmatic requests that you make to AWS if you use the AWS SDKs, REST, or Query API operations. The AWS SDKs use your access keys to sign requests for you. |
AWS access keys always consist of an access key ID and a secret access key. | AWS access keys always consist of an access key ID and a secret access key. | ||
| Line 91: | Line 106: | ||
''Name'' is the unique name of this integration account. It is helpful to have a descriptive name if your tenant uses multiple integration accounts of the same type. | ''Name'' is the unique name of this integration account. It is helpful to have a descriptive name if your tenant uses multiple integration accounts of the same type. | ||
| − | ==== Type ==== | + | ==== Type ==== |
''Type'' is the type of integration account. | ''Type'' is the type of integration account. | ||
| Line 100: | Line 115: | ||
The default HTTP method is POST, and the drop-down selector is disabled. | The default HTTP method is POST, and the drop-down selector is disabled. | ||
| − | ==== API key ==== | + | ==== API key ==== |
This is the ''API key'' required to access the service (optional). There is no default value. | This is the ''API key'' required to access the service (optional). There is no default value. | ||
| Line 106: | Line 121: | ||
For Alterra, the URL encode is 0 and the checkbox is disabled. | For Alterra, the URL encode is 0 and the checkbox is disabled. | ||
| − | ==== Maximum suggestions ==== | + | ==== Maximum suggestions ==== |
''Maximum suggestions'' is the maximum number of suggestions (e.g., 1, 2, or 3) that can be delivered to the Agent Desktop. For Alterra, the maximum number of suggestions is 1. | ''Maximum suggestions'' is the maximum number of suggestions (e.g., 1, 2, or 3) that can be delivered to the Agent Desktop. For Alterra, the maximum number of suggestions is 1. | ||
| − | === Watson Conversation Properties === | + | === Watson Conversation Properties === |
Bot / Chat suggestions engine integration account properties of the Watson type are as follows. Note that the properties shown depend on the type of bot/chat suggestions engine selected. | Bot / Chat suggestions engine integration account properties of the Watson type are as follows. Note that the properties shown depend on the type of bot/chat suggestions engine selected. | ||
| Line 126: | Line 141: | ||
For Watson integrations, you should specify the URL prefix (string). The full URL is created within the provider (e.g., https://gateway.watsonplatform.net/conversation/api/v1/workspaces/) | For Watson integrations, you should specify the URL prefix (string). The full URL is created within the provider (e.g., https://gateway.watsonplatform.net/conversation/api/v1/workspaces/) | ||
| − | ==== Workspace ID ==== | + | ==== Workspace ID ==== |
The ''Workspace ID'' (string) is the ID of the Watson Conversation workspace associated with the service instance. | The ''Workspace ID'' (string) is the ID of the Watson Conversation workspace associated with the service instance. | ||
| − | ==== Username ==== | + | ==== Username ==== |
The ''username'' (string) is the username used to authenticate the Watson Conversation API. The username is provided in the service credentials for the service instance that you want to use. | The ''username'' (string) is the username used to authenticate the Watson Conversation API. The username is provided in the service credentials for the service instance that you want to use. | ||
| Line 138: | Line 153: | ||
''Max API calls per day'' is the maximum number of calls per day. | ''Max API calls per day'' is the maximum number of calls per day. | ||
| − | ==== Maximum suggestions ==== | + | ==== Maximum suggestions ==== |
''Maximum suggestions'' is the maximum number of suggestions (e.g., 3) that can be delivered to the Agent Desktop. | ''Maximum suggestions'' is the maximum number of suggestions (e.g., 3) that can be delivered to the Agent Desktop. | ||
| + | |||
| + | |||
| + | == Loxysoft WFM == | ||
| + | Integration with the Loxysoft WFM application provides a number of automatically generated reports for workforce scheduling and real-time monitoring of agents’ adherence to work schedules. Setup of the WFM integration account is only necessary if you plan to use WFM for real-time adherence monitoring. | ||
| + | |||
| + | Note that you can only have one WFM integration account in your contact center. | ||
| + | |||
| + | |||
| + | [[File:Loxysoft.png|450px|thumb|center|Loxysoft WFM integration account properties]] | ||
| + | |||
| + | |||
| + | === Properties === | ||
| + | The properties of Loxysoft type integration are as follows. | ||
| + | |||
| + | ==== Name ==== | ||
| + | ''Name'' is the name of the integration account. | ||
| + | |||
| + | ==== Periodic update interval ==== | ||
| + | ''Periodic update interval'' is the period (in seconds) with which real-time metrics will be updated; the default interval is 10 seconds. | ||
| + | |||
| + | ==== URL ==== | ||
| + | The ''URL'' field is the unique URL field of your Loxysoft account and the place where the call flow data is submitted to. | ||
| + | |||
| + | ==== Token ==== | ||
| + | This is the authorization token for your Loxysoft account. | ||
| + | |||
| + | ==== Test connection ==== | ||
| + | This button tests the credentials and confirms whether the connection is valid. | ||
| + | |||
| + | ==== Skills Mapping ==== | ||
| + | This box allows you to map [[Contact-center-administrator-guide/ServicesandCampaignsOverview|service names]] to corresponding Loxysoft codes. | ||
| Line 162: | Line 208: | ||
==== Page Username ==== | ==== Page Username ==== | ||
| − | + | The exact username of your Facebook Page | |
==== Type ==== | ==== Type ==== | ||
| − | + | Select Facebook as the ''type'' of messenger integration account. | |
==== Page ID ==== | ==== Page ID ==== | ||
| − | + | The exact page ID for your Facebook Page | |
==== Token ==== | ==== Token ==== | ||
| − | + | The Page Access Token for your Facebook Page | |
==== Webhook Verify Token ==== | ==== Webhook Verify Token ==== | ||
| − | + | The token used to confirm that Facebook is the real server, which is needed for Facebook to send you a message from the customer. If you do not have a token, click the Generate random token below. | |
==== Generate random token ==== | ==== Generate random token ==== | ||
| − | + | Creates a random webhook token that you can copy and paste into your Facebook App management page in ''Webhooks > Edit Page Subscription > Verify Token'' | |
==== Test Connection ==== | ==== Test Connection ==== | ||
| − | + | Tests the credentials and confirms whether the connection is valid | |
| − | |||
=== LINE Properties === | === LINE Properties === | ||
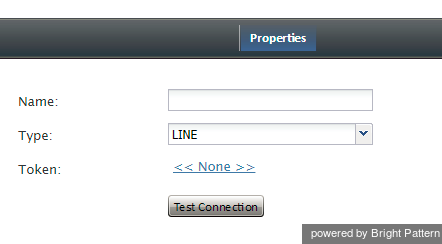
| Line 191: | Line 236: | ||
==== Name ==== | ==== Name ==== | ||
| − | + | The name of your integration account (this does not need to be your LINE@ account name) | |
==== Type ==== | ==== Type ==== | ||
| Line 197: | Line 242: | ||
==== Token ==== | ==== Token ==== | ||
| − | + | The access token for your LINE@ account | |
==== Test Connection ==== | ==== Test Connection ==== | ||
| − | + | Tests the credentials and confirms whether the connection is valid | |
| + | |||
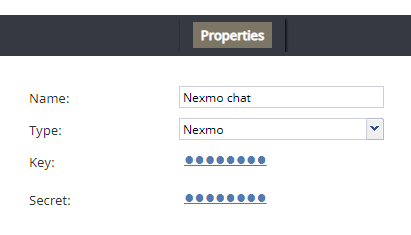
| + | === Nexmo Properties === | ||
| + | The properties of the Nexmo type of integration account are described as follows. | ||
| + | |||
| + | |||
| + | [[File:Nexmo-Properties-53.PNG|450px|thumbnail|center|Nexmo integration account properties]] | ||
| + | |||
| + | |||
| + | ==== Name ==== | ||
| + | The name of your integration account (can be any name of your choosing) | ||
| + | |||
| + | ==== Type ==== | ||
| + | "Nexmo" by default because you already selected this type of messenger integration account | ||
| + | |||
| + | ==== Key ==== | ||
| + | The API key that was created when you created a Nexmo account. You can find the API key and secret in your Nexmo Dashboard account settings. | ||
| + | ==== Secret ==== | ||
| + | The API secret that was created when you created a Nexmo account. You can find the API key and secret in your Nexmo Dashboard account settings. | ||
=== Telegram Properties === | === Telegram Properties === | ||
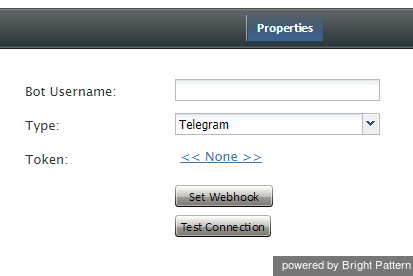
| Line 211: | Line 274: | ||
==== Bot Username ==== | ==== Bot Username ==== | ||
| − | + | The exact username of your Telegram bot | |
==== Type ==== | ==== Type ==== | ||
| Line 217: | Line 280: | ||
==== Token ==== | ==== Token ==== | ||
| − | + | The API token for your Telegram bot | |
==== Set Webhook ==== | ==== Set Webhook ==== | ||
| Line 223: | Line 286: | ||
==== Test Connection ==== | ==== Test Connection ==== | ||
| − | + | Tests the credentials and confirms whether the connection is valid | |
| Line 234: | Line 297: | ||
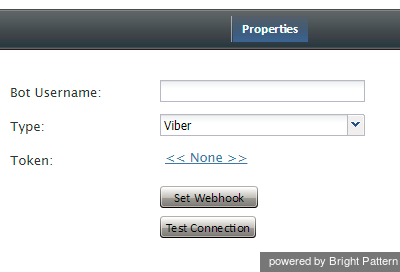
==== Bot Username ==== | ==== Bot Username ==== | ||
| − | + | The exact name of your Viber Public Account username. | |
==== Type ==== | ==== Type ==== | ||
| Line 240: | Line 303: | ||
==== Token ==== | ==== Token ==== | ||
| − | + | The password that is given to you after your Public Account application is approved | |
==== Set Webhook ==== | ==== Set Webhook ==== | ||
| Line 246: | Line 309: | ||
==== Webhook url (host and port) ==== | ==== Webhook url (host and port) ==== | ||
| − | The | + | The address of your server and port number (e.g., “office.yourcompany.com:1234”). If you do not know the server URL or port number, ask your system administrator. |
==== Test Connection ==== | ==== Test Connection ==== | ||
| − | + | Tests the credentials and confirms whether the connection is valid. | |
| − | == NICE == | + | == NICE == |
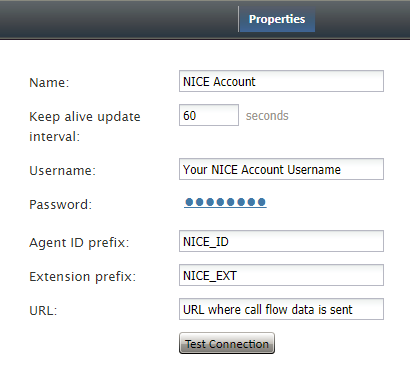
Bright Pattern offers NICE recording integration to provide quality management (QM) of your call center by allowing reporting on call state and agent messages. | Bright Pattern offers NICE recording integration to provide quality management (QM) of your call center by allowing reporting on call state and agent messages. | ||
| + | |||
| + | Note that this integration option must be enabled for your contact center by the service provider. | ||
| Line 259: | Line 324: | ||
| − | === Properties === | + | === Properties === |
The properties of the NICE type of integration account are described as follows. | The properties of the NICE type of integration account are described as follows. | ||
| − | ==== Name ==== | + | ==== Name ==== |
''Name'' is the name of the integration account. | ''Name'' is the name of the integration account. | ||
| − | ==== Keep alive update interval ==== | + | ==== Keep alive update interval ==== |
''Keep alive update interval'' sends periodic messages back to NICE servers to ensure the pathway stays open; the default interval is 60 seconds. | ''Keep alive update interval'' sends periodic messages back to NICE servers to ensure the pathway stays open; the default interval is 60 seconds. | ||
| Line 277: | Line 342: | ||
The ''agent ID prefix'' field is where you may specify a prefix for agent ID data. The default values are empty, but if you specify them, Bright Pattern's Real-Time Data Provider server component will add corresponding these prefixes to user IDs whenever it reports them to you. | The ''agent ID prefix'' field is where you may specify a prefix for agent ID data. The default values are empty, but if you specify them, Bright Pattern's Real-Time Data Provider server component will add corresponding these prefixes to user IDs whenever it reports them to you. | ||
| − | ==== Extension prefix ==== | + | ==== Extension prefix ==== |
The ''extension prefix'' field is where you may specify a prefix for phone extension data. The default values are empty, but if you specify them, Bright Pattern's Real-Time Data Provider server component will add corresponding these prefixes to extensions whenever it reports them to you. | The ''extension prefix'' field is where you may specify a prefix for phone extension data. The default values are empty, but if you specify them, Bright Pattern's Real-Time Data Provider server component will add corresponding these prefixes to extensions whenever it reports them to you. | ||
| − | ==== URL ==== | + | ==== URL ==== |
The ''URL'' field is the URL the call flow data is submitted to. | The ''URL'' field is the URL the call flow data is submitted to. | ||
| Line 338: | Line 403: | ||
The ''password'' (string) is the username used to authenticate the Next Caller API. The password is provided when you create an account. | The ''password'' (string) is the username used to authenticate the Next Caller API. The password is provided when you create an account. | ||
| − | ==== Test Connection ==== | + | ==== Test Connection ==== |
The ''Test Connection'' button tests the credentials and confirms whether the connection is valid. | The ''Test Connection'' button tests the credentials and confirms whether the connection is valid. | ||
| − | === Field Mapping === | + | === Field Mapping === |
Use the Field Mapping tab to add internal fields or external fields to contact data forms. Next Caller will populate these fields with suggested data found on the cloud. | Use the Field Mapping tab to add internal fields or external fields to contact data forms. Next Caller will populate these fields with suggested data found on the cloud. | ||
| Line 348: | Line 413: | ||
| − | + | ==== How to Add an Internal Field ==== | |
# Click '''add'''. | # Click '''add'''. | ||
# Click '''<none>''' to review the ''Select Mapping'' drop-down selector. | # Click '''<none>''' to review the ''Select Mapping'' drop-down selector. | ||
# Open the Contact folder, and select the desired type of field to add. | # Open the Contact folder, and select the desired type of field to add. | ||
| − | Note that only one field can be added at a time. You can select fields from categories (addresses, phone by type, phones by order, social links by order, emails by type, emails by order) or by basic type (Title, First | + | |
| + | Note that only one field can be added at a time. You can select fields from categories (addresses, phone by type, phones by order, social links by order, emails by type, emails by order) or by basic type (Title, First name, Last name, Position, Segment, Summary, Date of birth, Messengers, Status, my_custom_field). | ||
| Line 410: | Line 476: | ||
==== Use Template ==== | ==== Use Template ==== | ||
SSO templates are disabled. | SSO templates are disabled. | ||
| + | |||
== Speech To Text Integration (STT) == | == Speech To Text Integration (STT) == | ||
| Line 426: | Line 493: | ||
The default ''URL'' is ''wss://stream.watsonplatform.net''. Note that only the ''wss://'' prefix is allowed. | The default ''URL'' is ''wss://stream.watsonplatform.net''. Note that only the ''wss://'' prefix is allowed. | ||
| − | ==== Username ==== | + | ==== Username ==== |
''Username'' is the Watson account username. | ''Username'' is the Watson account username. | ||
| Line 456: | Line 523: | ||
[[File:Integration-Account-GoVivace-Properties-51.PNG|450px|thumbnail|center|GoVivace integration account properties]] | [[File:Integration-Account-GoVivace-Properties-51.PNG|450px|thumbnail|center|GoVivace integration account properties]] | ||
| + | |||
== Statistics Data Receiver Integration == | == Statistics Data Receiver Integration == | ||
| Line 485: | Line 553: | ||
The properties of the Watson integration account are described as follows. | The properties of the Watson integration account are described as follows. | ||
| − | ==== URL ==== | + | ==== URL ==== |
https://stream.watsonplatform.net/text-to-speech/api/v1/ | https://stream.watsonplatform.net/text-to-speech/api/v1/ | ||
| Line 497: | Line 565: | ||
''Load Voices'' allows you to choose a voice type from a pre-configured list of voices. | ''Load Voices'' allows you to choose a voice type from a pre-configured list of voices. | ||
| − | ==== Test Connection ==== | + | ==== Test Connection ==== |
''Test Connection'' tests the connection between the integration account and the Contact Center Administrator. When testing the connection, if the account has been configured correctly, you will see the message, "Account credentials appear to be valid." | ''Test Connection'' tests the connection between the integration account and the Contact Center Administrator. When testing the connection, if the account has been configured correctly, you will see the message, "Account credentials appear to be valid." | ||
| Line 507: | Line 575: | ||
The properties of the Google Cloud integration account are described as follows. | The properties of the Google Cloud integration account are described as follows. | ||
| − | ==== URL ==== | + | ==== URL ==== |
https://www.googleapis.com/auth/cloud-platform | https://www.googleapis.com/auth/cloud-platform | ||
| − | ==== API Key ==== | + | ==== API Key ==== |
''API Key'' is the Google Cloud Service API Key. | ''API Key'' is the Google Cloud Service API Key. | ||
| Line 516: | Line 584: | ||
''Load Voices'' allows you to choose a voice type from a pre-configured list of voices. | ''Load Voices'' allows you to choose a voice type from a pre-configured list of voices. | ||
| − | ==== Test Connection ==== | + | ==== Test Connection ==== |
''Test Connection'' tests the connection between the integration account and the Contact Center Administrator. When testing the connection, if the account has been configured correctly, you will see the message, "Account credentials appear to be valid." | ''Test Connection'' tests the connection between the integration account and the Contact Center Administrator. When testing the connection, if the account has been configured correctly, you will see the message, "Account credentials appear to be valid." | ||
| Line 551: | Line 619: | ||
| − | + | ==== How to Add an Internal Field ==== | |
# Click '''add'''. | # Click '''add'''. | ||
# Click '''<none>''' to review the ''Select Mapping'' drop-down selector. | # Click '''<none>''' to review the ''Select Mapping'' drop-down selector. | ||
# Open the Contact folder, and select the desired type of field to add. | # Open the Contact folder, and select the desired type of field to add. | ||
| − | Note that only one field can be added at a time. You can select fields from categories (addresses, phone by type, phones by order, social links by order, emails by type, emails by order) or by basic type (Title, First | + | |
| + | Note that only one field can be added at a time. You can select fields from categories (addresses, phone by type, phones by order, social links by order, emails by type, emails by order) or by basic type (Title, First name, Last name, Position, Segment, Summary, Date of birth, Messengers, Status, my_custom_field). | ||
| Line 584: | Line 653: | ||
* '''Port''' - The TCP port assigned to the Aspect RTA server on the above host; it must correspond to the port configured on the RTA side | * '''Port''' - The TCP port assigned to the Aspect RTA server on the above host; it must correspond to the port configured on the RTA side | ||
* '''Record field sizes''' - The property that specifies the lengths of the data fields communicated to Aspect RTA; the default values correspond to the default settings of the same fields on the RTA side; if values of these fields are changed on the RTA side, they must be changed accordingly in this property | * '''Record field sizes''' - The property that specifies the lengths of the data fields communicated to Aspect RTA; the default values correspond to the default settings of the same fields on the RTA side; if values of these fields are changed on the RTA side, they must be changed accordingly in this property | ||
| + | * '''Reason codes mapping''' (optional) - This box allows you to configure [[Contact-center-administrator-guide/GeneralSettings#System_Not_Ready_reason_names_for|Not Ready]] reasons as numerical codes in real-time data. In Bright Pattern Contact Center software, reason codes are defined as text. Aspect WFM only accepts reason codes as numbers. If you need to account for reason codes in your real-time reporting on the WFM side, this box allows you to define a numerical code corresponding to each ''Not Ready'' reason code, as shown in the picture. | ||
| − | [[File:WFM- | + | [[File:WFM-Aspect-Reason-Codes-Mapping-523.PNG|450px|thumbnail|center|WFM TCP protocol settings]] |
| Line 594: | Line 664: | ||
* '''Token''' (optional) - The access token for your WFM account | * '''Token''' (optional) - The access token for your WFM account | ||
* '''Test connection''' - This button sends POST with an empty agent and services list | * '''Test connection''' - This button sends POST with an empty agent and services list | ||
| + | * '''Reason codes mapping''' (optional) - This box allows you to configure [[Contact-center-administrator-guide/GeneralSettings#System_Not_Ready_reason_names_for|Not Ready]] reasons as numerical codes in real-time data. | ||
| − | [[File:WFM- | + | [[File:WFM-Aspect-HTTP-523.PNG|450px|thumbnail|center|HTTP POST protocol settings]] |
| Line 656: | Line 727: | ||
==== Test Connection ==== | ==== Test Connection ==== | ||
When the ''Test Connection'' button is clicked, the Test Connection Portal executes GET <URL>/external/views as described at https://www.synthetix.com/api/documentation. | When the ''Test Connection'' button is clicked, the Test Connection Portal executes GET <URL>/external/views as described at https://www.synthetix.com/api/documentation. | ||
| − | |||
| − | |||
| − | |||
| − | |||
| − | |||
| − | |||
Latest revision as of 04:31, 29 May 2024
Integration Accounts
Integration accounts specify parameters required for interoperability of your contact center solution with third-party systems, such as customer relationship management (CRM) and workforce management (WFM) applications.
To define, view, and edit integration accounts, select the Integration Accounts option from the Call Center Configuration menu.
Select the add "+" button at the bottom of the screen to add a new integration account.
Version 1.1 and later of the Transport Layer Security (TLS) encryption protocol is used to ensure security of the data passed between Bright Pattern and the CRM applications.
The reports required for workforce scheduling are configured for automatic generation and delivery via the Scheduled Reports screen of the Contact Center Administrator application.
Types of Integration Accounts
The current version of the Bright Pattern Contact Center solution supports out-of-the-box integration with the following solutions:
- Amazon AWS
- Bot / Chat suggestions engine
- External Knowledge Base
- Loxysoft WFM
- Messenger
- NICE
- Natural Language Understanding
- Next Caller
- Oracle Service Cloud
- RightNow
- Salesforce.com
- ServiceNow
- Single Sign-On
- Speech To Text
- Statistics Data Receiver
- Text To Speech
- The Data Group (TDG)
- WFM
- Zapier
- Zendesk
Amazon AWS Integration
Amazon Web Services (AWS) S3 can be used for storing audio recordings, where files are uploaded to or downloaded from an Amazon S3 account for storage or playback. S3 access credentials are stored in integration accounts in order to enable Interaction Records Search playback for recordings stored in S3.
To support BPO operations, multiple integration accounts are possible.
Note the following:
- This integration option must be enabled for your contact center by the service provider.
- Export of recordings is configured for specific services. For more information see Periodic Recording Export Jobs.
- Recordings exported to Amazon AWS will be accessible via Bright Pattern on demand for the detailed records storage time agreed upon with your service provider.
- Instead of using AWS, you can use this integration account to set up an S3-compatible local storage.
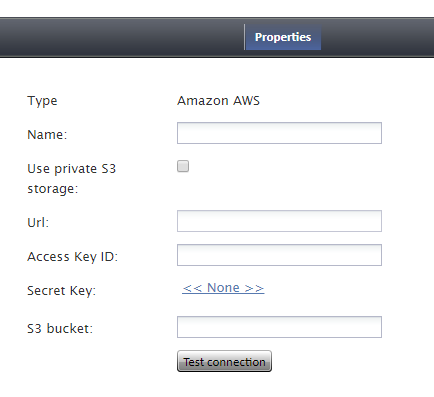
Properties
Type
Type is the type of integration account.
Name
Name is the Unique name of this integration account. It is helpful to have a descriptive name if your tenant uses multiple integration accounts of the same type.
Use private S3 storage
You can use this option to set up an S3-compatible private storage. For more information see Appendix: Setting up Private S3 Storage.
Url
This is the URL path to your private S3 storage. The URL must be specified if Use private S3 storage is enabled.
Access Key ID
The Access Key ID (e.g., AKIAIOSFODNN7EXAMPLE) is part of your AWS access key, a security credential that allows you to sign programmatic requests that you make to AWS if you use the AWS SDKs, REST, or Query API operations. The AWS SDKs use your access keys to sign requests for you.
AWS access keys always consist of an access key ID and a secret access key.
Secret Key
The Secret Key (e.g., wJalrXUtnFEMI/K7MDENG/bPxRfiCYEXAMPLEKEY) is the other part of your AWS access key. Referred to as a secret access key, the Secret ID is a security credential that allows you to sign programmatic requests that you make to AWS if you use the AWS SDKs, REST, or Query API operations. The AWS SDKs use your access keys to sign requests for you.
AWS access keys always consist of an access key ID and a secret access key.
S3 bucket
The S3 bucket is the unique name of the Amazon S3 bucket that stores your data (e.g., photos, videos, documents, etc.) on the cloud. In order to upload or download audio recordings to Amazon AWS S3, you must specify the S3 bucket which will be used to hold your data.
Test connection
This button tests the credentials and confirms whether the connection is valid.
Bot / Chat Suggestions Engine Integration
Bright Pattern integrates with chat bots to provide meaningful suggestions to an agent during a chat session and to provide pure bot functionality, in which customers can complete self-service tasks without the help of a live agent. This functionality is enabled through integration with a bot/chat suggestions engine. This version of Bright Pattern Contact Center supports two types of bot/chat integration: Alterra and Watson Conversation.
In Contact Center Administrator, you can select one bot/chat suggestion engine integration account as the suggestion engine per service. You can also select one bot/chat suggestion engine integration account as a chat bot on the chat service launch point. In scenarios, you can select any configured bot/chat suggestion engine integration account with the Chat Bot Select block within the scenario.
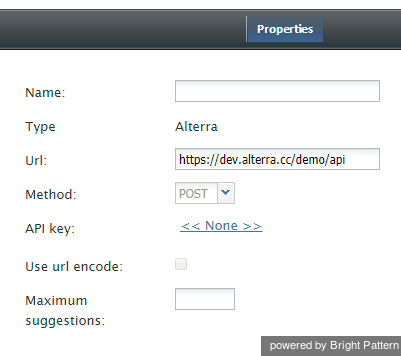
Alterra Properties
Bot / Chat suggestions engine integration account properties of the Alterra type are as follows. Note that the properties shown depend on the type of bot/chat suggestions engine selected.
Name
Name is the unique name of this integration account. It is helpful to have a descriptive name if your tenant uses multiple integration accounts of the same type.
Type
Type is the type of integration account.
Url
For Alterra, the default Url value is https://dev.alterra.cc/demo/api.
Method
The default HTTP method is POST, and the drop-down selector is disabled.
API key
This is the API key required to access the service (optional). There is no default value.
Use url encode
For Alterra, the URL encode is 0 and the checkbox is disabled.
Maximum suggestions
Maximum suggestions is the maximum number of suggestions (e.g., 1, 2, or 3) that can be delivered to the Agent Desktop. For Alterra, the maximum number of suggestions is 1.
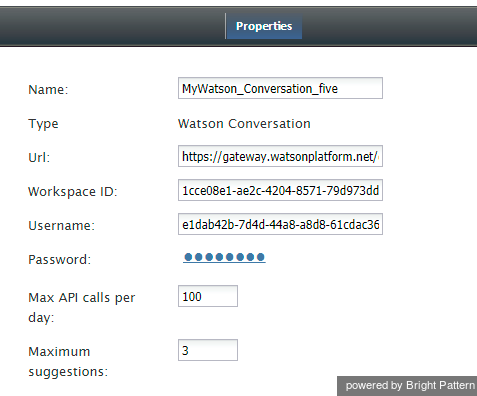
Watson Conversation Properties
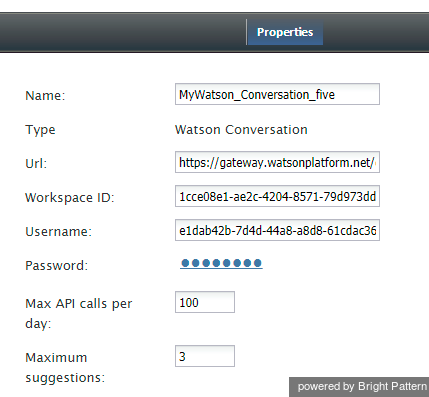
Bot / Chat suggestions engine integration account properties of the Watson type are as follows. Note that the properties shown depend on the type of bot/chat suggestions engine selected.
Name
Name is the Unique name of this integration account.
Type
Type is the type of integration account.
Url
For Watson integrations, you should specify the URL prefix (string). The full URL is created within the provider (e.g., https://gateway.watsonplatform.net/conversation/api/v1/workspaces/)
Workspace ID
The Workspace ID (string) is the ID of the Watson Conversation workspace associated with the service instance.
Username
The username (string) is the username used to authenticate the Watson Conversation API. The username is provided in the service credentials for the service instance that you want to use.
Password
The password (string) is the password used to authenticate the Watson Conversation API. The password is provided in the service credentials for the service instance that you want to use.
Max API calls per day
Max API calls per day is the maximum number of calls per day.
Maximum suggestions
Maximum suggestions is the maximum number of suggestions (e.g., 3) that can be delivered to the Agent Desktop.
Loxysoft WFM
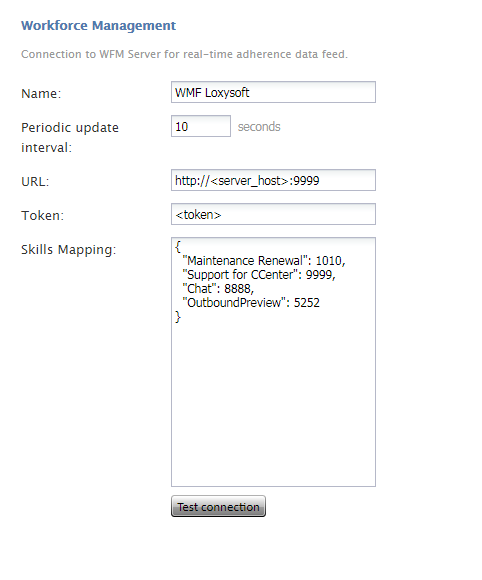
Integration with the Loxysoft WFM application provides a number of automatically generated reports for workforce scheduling and real-time monitoring of agents’ adherence to work schedules. Setup of the WFM integration account is only necessary if you plan to use WFM for real-time adherence monitoring.
Note that you can only have one WFM integration account in your contact center.
Properties
The properties of Loxysoft type integration are as follows.
Name
Name is the name of the integration account.
Periodic update interval
Periodic update interval is the period (in seconds) with which real-time metrics will be updated; the default interval is 10 seconds.
URL
The URL field is the unique URL field of your Loxysoft account and the place where the call flow data is submitted to.
Token
This is the authorization token for your Loxysoft account.
Test connection
This button tests the credentials and confirms whether the connection is valid.
Skills Mapping
This box allows you to map service names to corresponding Loxysoft codes.
Messenger Integration
When Bright Pattern Contact Center is integrated with messengers (e.g., Facebook Messenger, LINE, Telegram, Viber, etc.), your Bright Pattern Agent Desktop environment is equipped to handle customer-initiated interactions from the Messenger application or the application on a customer’s mobile phone, tablet, or computer. Incoming chat interactions are routed to the integrated Agent Desktop environment, where agents also have direct access to the phone, live chat, email, SMS text, various other mobile messenger apps, customer and agent records, interaction details, and more. Integration configuration involves linking your organization's messenger account to your Bright Pattern Contact Center tenant.
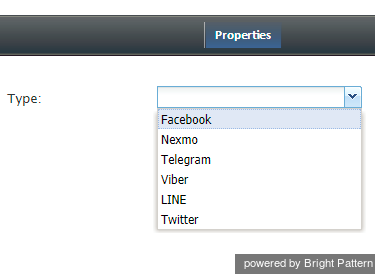
To add a messenger integration account, click the add "+" button and select the desired type of messenger.
The properties of each type of messenger integration account are described as follows. For more information about each type, see the corresponding integration guide.
Facebook Messenger Properties
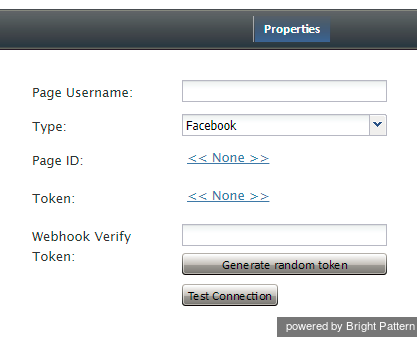
The properties of the Facebook Messenger type of integration account are described as follows. For complete integration instructions and configuration, see the Facebook Messenger Integration Guide.
Page Username
The exact username of your Facebook Page
Type
Select Facebook as the type of messenger integration account.
Page ID
The exact page ID for your Facebook Page
Token
The Page Access Token for your Facebook Page
Webhook Verify Token
The token used to confirm that Facebook is the real server, which is needed for Facebook to send you a message from the customer. If you do not have a token, click the Generate random token below.
Generate random token
Creates a random webhook token that you can copy and paste into your Facebook App management page in Webhooks > Edit Page Subscription > Verify Token
Test Connection
Tests the credentials and confirms whether the connection is valid
LINE Properties
The properties of the LINE type of integration account are described as follows. For complete integration instructions and configuration, see the LINE Integration Guide.
Name
The name of your integration account (this does not need to be your LINE@ account name)
Type
For this integration account, select LINE as the type of integration.
Token
The access token for your LINE@ account
Test Connection
Tests the credentials and confirms whether the connection is valid
Nexmo Properties
The properties of the Nexmo type of integration account are described as follows.
Name
The name of your integration account (can be any name of your choosing)
Type
"Nexmo" by default because you already selected this type of messenger integration account
Key
The API key that was created when you created a Nexmo account. You can find the API key and secret in your Nexmo Dashboard account settings.
Secret
The API secret that was created when you created a Nexmo account. You can find the API key and secret in your Nexmo Dashboard account settings.
Telegram Properties
The properties of the Facebook Messenger type of integration account are described as follows. For complete integration instructions and configuration, see the Telegram Integration Guide.
Bot Username
The exact username of your Telegram bot
Type
For this integration account, select Telegram as the type of integration.
Token
The API token for your Telegram bot
Set Webhook
Click the Set Webhook button to confirm that Telegram is the real server, which is needed for Telegram to send you a message from the customer. Note that you must get the token/webhook from Telegram; you cannot generate one here.
Test Connection
Tests the credentials and confirms whether the connection is valid
Viber Properties
The properties of the Viber type of integration account are described as follows. For complete integration instructions and configuration, see the Viber Integration Guide.
Bot Username
The exact name of your Viber Public Account username.
Type
For this integration account, select Viber as the type of integration.
Token
The password that is given to you after your Public Account application is approved
Set Webhook
Set Webhook is necessary for Viber to send you a message from the customer. Clicking the Set Webhook button opens the Set Webhook window, where the Webhook URL is entered.
Webhook url (host and port)
The address of your server and port number (e.g., “office.yourcompany.com:1234”). If you do not know the server URL or port number, ask your system administrator.
Test Connection
Tests the credentials and confirms whether the connection is valid.
NICE
Bright Pattern offers NICE recording integration to provide quality management (QM) of your call center by allowing reporting on call state and agent messages.
Note that this integration option must be enabled for your contact center by the service provider.
Properties
The properties of the NICE type of integration account are described as follows.
Name
Name is the name of the integration account.
Keep alive update interval
Keep alive update interval sends periodic messages back to NICE servers to ensure the pathway stays open; the default interval is 60 seconds.
Username
The username (string) is the username used to authenticate the NICE account. The username is provided when you sign up for NICE and create an account.
Password
The password (string) is the password used to authenticate the NICE account. The password is provided when you sign up for NICE and create an account.
Agent ID prefix
The agent ID prefix field is where you may specify a prefix for agent ID data. The default values are empty, but if you specify them, Bright Pattern's Real-Time Data Provider server component will add corresponding these prefixes to user IDs whenever it reports them to you.
Extension prefix
The extension prefix field is where you may specify a prefix for phone extension data. The default values are empty, but if you specify them, Bright Pattern's Real-Time Data Provider server component will add corresponding these prefixes to extensions whenever it reports them to you.
URL
The URL field is the URL the call flow data is submitted to.
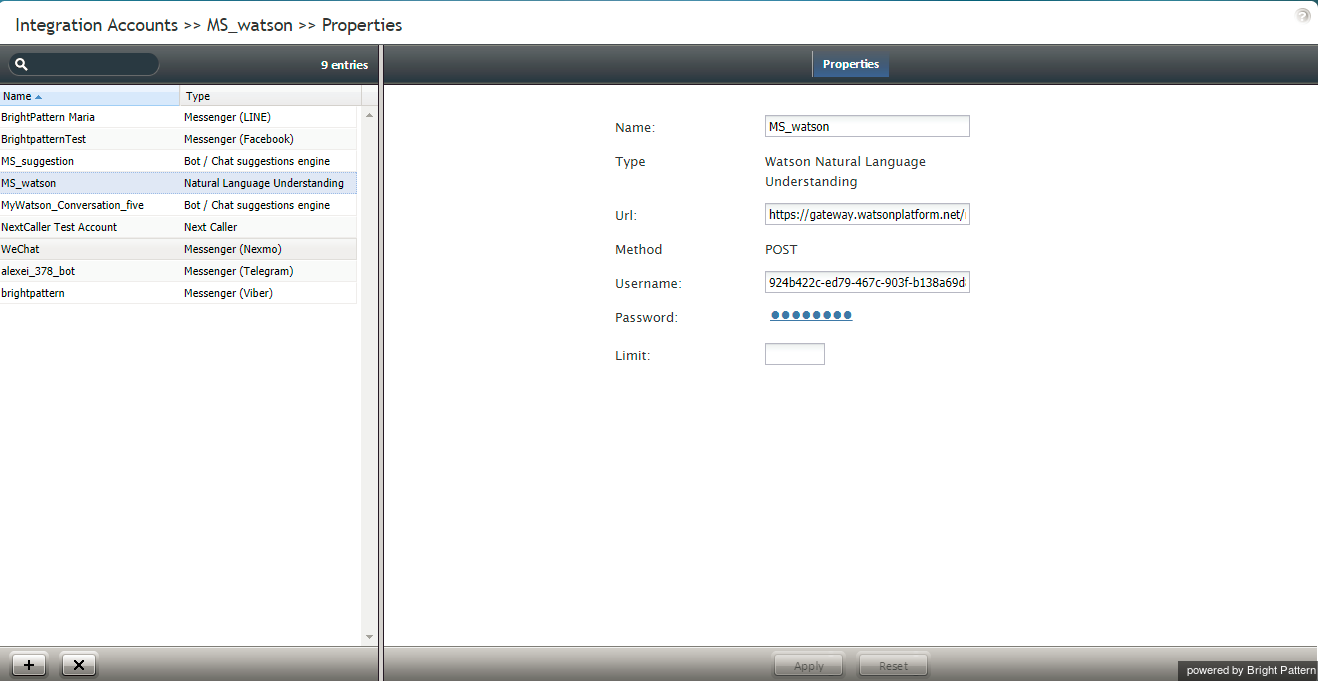
Natural Language Understanding Integration
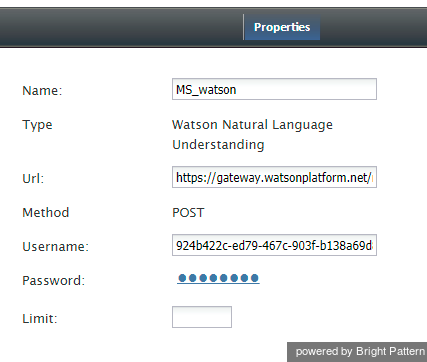
Bright Pattern offers IBM Watson Natural Language Understanding integration to provide sentiment analysis for services.
Properties
The properties of the Natural Language Understanding type of integration account are described as follows.
Name
Name is the name of the integration account.
Type
For this integration account, select Watson Natural Language Understanding as the type of integration.
Url
The default Url for this integration is https://gateway.watsonplatform.net/natural-language-understanding/api/v1/analyze?version=2017-02-27.
Method
For this integration account, the HTTP method is POST.
Username
The username (string) is the username used to authenticate the Watson Natural Language Understanding API with Basic Authentication. The username is provided when you sign up for IBM Bluemix and create an account.
Password
The password (string) is the password used to authenticate the Watson Natural Language Understanding API with Basic Authentication. The password is provided when you sign up for IBM Bluemix and create an account.
Limit
The limit is 100.
Next Caller Integration
Bright Pattern integrates with Next Caller to identify unknown callers from incoming chats, as well as to augment contact data with new information available on the cloud.
Properties
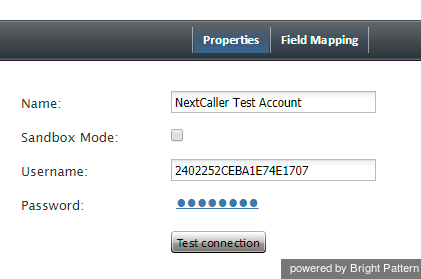
The properties of the Next Caller type of integration account are described as follows.
Name
Name is the name of the integration account.
Sandbox Mode
Select the Sandbox Mode checkbox if this account is to be used in Sandbox mode.
Username
The username (string) is the username used to authenticate the Next Caller API with via Basic Access authentication. The username is provided when you create an account.
Password
The password (string) is the username used to authenticate the Next Caller API. The password is provided when you create an account.
Test Connection
The Test Connection button tests the credentials and confirms whether the connection is valid.
Field Mapping
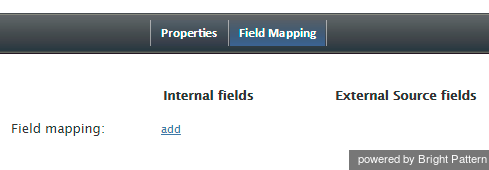
Use the Field Mapping tab to add internal fields or external fields to contact data forms. Next Caller will populate these fields with suggested data found on the cloud.
How to Add an Internal Field
- Click add.
- Click <none> to review the Select Mapping drop-down selector.
- Open the Contact folder, and select the desired type of field to add.
Note that only one field can be added at a time. You can select fields from categories (addresses, phone by type, phones by order, social links by order, emails by type, emails by order) or by basic type (Title, First name, Last name, Position, Segment, Summary, Date of birth, Messengers, Status, my_custom_field).
Oracle Service Cloud Integration
Integration with Oracle Service Cloud customer relationship management applications provides the integrated Agent Desktop, access to CRM data from scenarios, screen-pop, and activity history functions. You can configure multiple Oracle Service Cloud integration accounts for access to different Oracle Service Cloud systems.
For detailed integration instructions, including specification of the Oracle Service Cloud integration account properties, see Oracle Service Cloud Integration Guide.
Salesforce.com Integration
Integration with Salesforce.com (SFDC) customer relationship management applications provides the integrated Agent Desktop, single sign-on, access to CRM data from scenarios, screen pop, activity history, and click-to-dial functions.
You can also create calling lists using contact records imported from SFDC and export the corresponding campaign results directly to SFDC. You can define more than one Salesforce.com integration account.
For detailed integration instructions, including specification of the Salesforce.com integration account properties, see Salesforce.com Integration Guide.
ServiceNow Integration
Integration with ServiceNow IT service management applications provides the integrated Agent Desktop, softphone and click-to-call, access to CRM data from scenarios, screen-pop, and activity stream functions. You can configure multiple ServiceNow integration accounts for access to different ServiceNow systems.
For detailed integration instructions, including specification of the ServiceNow integration account properties, see the ServiceNow Integration Guide.
Single Sign-On Integration
Bright Pattern integrates with Security Assertion Markup Language (SAML) 2.0 identity providers Okta and ForgeRock, allowing you to configure single sign-on (SSO) functionality for Agent Desktop (AD) or Contact Center Administrator (Admin).
Just-in-time (JIT) user provisioning automatically creates call center users on the first SSO login attempt authorized by the identity provider. JIT can be enabled for both AD SSO and Admin SSO configuration in Integration Accounts.
Note that only one instance can be created per tenant.
Properties
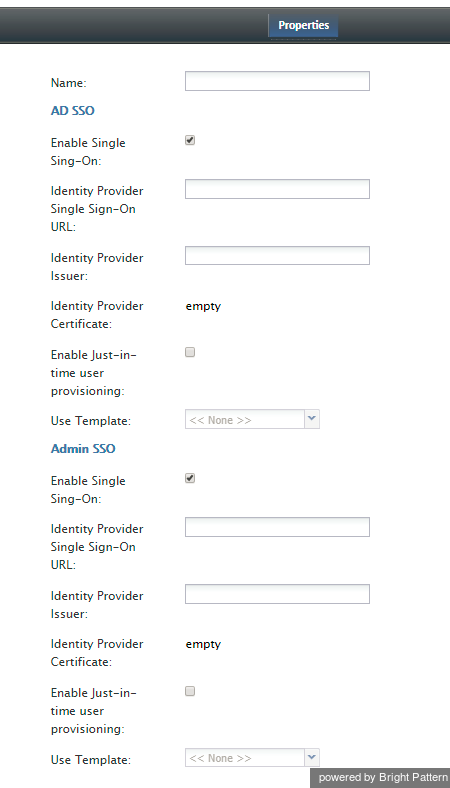
The properties of Single Sign-On integration accounts are described as follows. The properties are the same for both AD SSO and Admin SSO.
Name
Name is the name of the integration account.
Enable Single Sign-On
Select the checkbox to enable single sign-on functionality.
Identity Provider Single Sign-On URL
Identity Provider Single Sign-On URL is the URL of your provider.
Identity Provider Issuer
Identity Provider Issuer is the issuer of your identity provider.
Identity Provider Certificate
Identity Provider Certificate is a link to the certificate of your identity provider.
Enable Just-in-time user provisioning
Select this checkbox to enable Just-in-time user provisioning (JIT). JIT user provisioning automatically creates call center users on the first SSO login attempt authorized by the identity provider.
Use Template
SSO templates are disabled.
Speech To Text Integration (STT)
Speech To Text (STT) integration allows your tenant to use speech-to-text functionality to transcribe voice calls and save the transcriptions to interaction records. Full-text transcripts are searchable and include sentiment attributes (if Natural Language Understanding is enabled).
Watson Properties
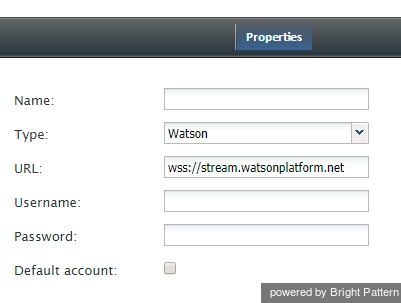
The properties of the Watson integration are described as follows.
Name
Name is the name of the integration account.
Type
For this integration account, Watson is the type of account.
URL
The default URL is wss://stream.watsonplatform.net. Note that only the wss:// prefix is allowed.
Username
Username is the Watson account username.
Password
Password is the Watson account password.
Default account
Select the Default account checkbox if this integration account is to be the default STT integration account.
GoVivace Properties
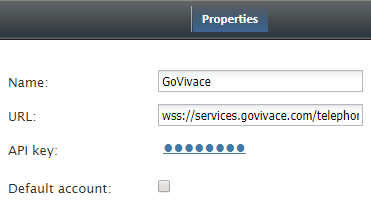
The properties of the GoVivace integration are described as follows.
Name
Name is the name of the integration account.
URL
The default URL is wss://services.govivace.com/telephony. Note that only the wss:// prefix is allowed.
API Key
The API Key is the GoVivace API key.
Default account
Select the Default account checkbox if this integration account is to be the default STT integration account.
Statistics Data Receiver Integration
Properties
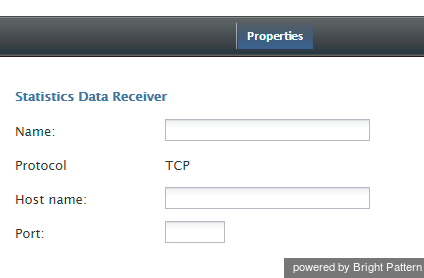
The properties of Statistics Data Receiver integration accounts are described as follows.
Name
Name is the name of the integration account.
Protocol
The protocol is TCP.
Host name
Host name is the host name.
Port
Port is the port number.
Text To Speech Integration (TTS)
Bright Pattern integrates with text-to-speech (TTS) providers IBM Watson and Google Cloud for creating voice prompts. When text-to-speech functionality is enabled, call prompts may use a variety of pre-recorded voices, accents, and languages to automate responses.
Watson Properties
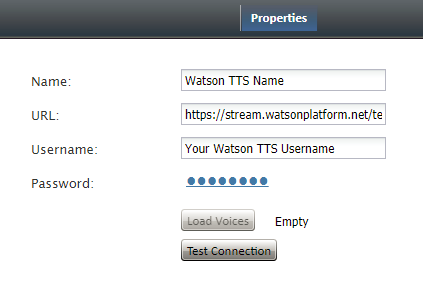
The properties of the Watson integration account are described as follows.
URL
https://stream.watsonplatform.net/text-to-speech/api/v1/
User name
Username is the Watson account username.
Password
Password is the Watson account password.
Load Voices
Load Voices allows you to choose a voice type from a pre-configured list of voices.
Test Connection
Test Connection tests the connection between the integration account and the Contact Center Administrator. When testing the connection, if the account has been configured correctly, you will see the message, "Account credentials appear to be valid."
Google Cloud Properties
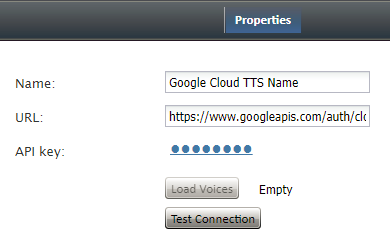
The properties of the Google Cloud integration account are described as follows.
URL
https://www.googleapis.com/auth/cloud-platform
API Key
API Key is the Google Cloud Service API Key.
Load Voices
Load Voices allows you to choose a voice type from a pre-configured list of voices.
Test Connection
Test Connection tests the connection between the integration account and the Contact Center Administrator. When testing the connection, if the account has been configured correctly, you will see the message, "Account credentials appear to be valid."
The Data Group (TDG) Integration
Bright Pattern integrates with The Data Group (TDG) to identify unknown callers from incoming chats, as well as to augment contact data with new information available on the cloud.
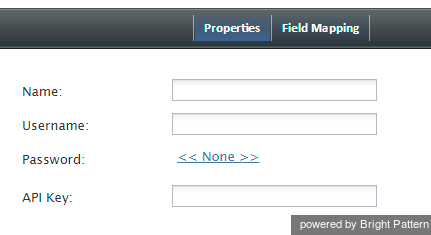
Properties
The properties of the The Data Group type of integration account are described as follows.
Name
Name is the name of the integration account.
Username
The username (string) is the username used to authenticate The Data Group REST API. The username is provided when you register for an API key.
Password
The password (string) is the username used to authenticate The Data Group REST API. The password is provided when you register for an API key.
API Key
The API Key is needed to access The Data Group REST API. The API key is provided after registration.
Field Mapping
Use the Field Mapping tab to add internal fields or external fields to contact data forms. The Data Group will populate these fields with suggested data found on the cloud.
How to Add an Internal Field
- Click add.
- Click <none> to review the Select Mapping drop-down selector.
- Open the Contact folder, and select the desired type of field to add.
Note that only one field can be added at a time. You can select fields from categories (addresses, phone by type, phones by order, social links by order, emails by type, emails by order) or by basic type (Title, First name, Last name, Position, Segment, Summary, Date of birth, Messengers, Status, my_custom_field).
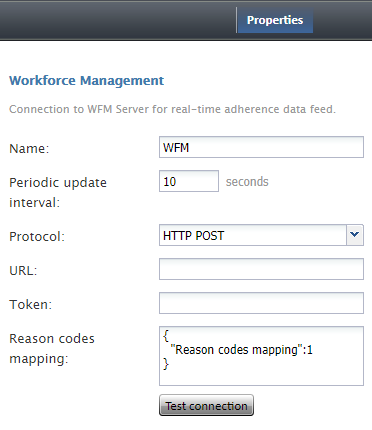
WFM Integration
Integration with the WFM workforce management application provides a number of automatically generated reports for workforce scheduling and real-time monitoring of agents’ adherence to work schedules.
Setup of the WFM integration account is only necessary if you plan to use WFM for real-time adherence monitoring. Typically in this case, the Universal interface of the Aspect Real-Time Adherence server (RTA) must be configured to be ready to receive a data feed. For more information, please refer to the Aspect Workforce Management 7.5 Installation Guide, chapter Configuring ACD Instances, section Universal ACD. Note that the Unicode checkbox of the Universal interface must be selected (the ASCII option is not supported).
Note that you can only have one WFM integration account in your contact center.
WFM Integration Account Properties
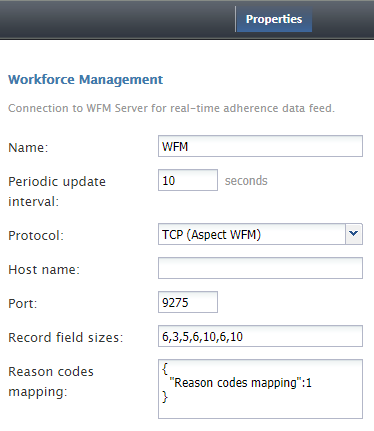
The parameters that must be configured on the Bright Pattern side to enable the real-time adherence data feed are described as follows.
Name
Name is the name of the integration account.
Periodic update interval
Periodic update interval is the period (in seconds) with which real-time metrics will be updated.
Protocol
Protocol refers to the communication protocol, which is read-only. Two options are available: TCP (Aspect WFM) and HTTP POST.
TCP (Aspect WFM)
If TCP (Aspect WFM) is selected, the following options appear:
- Host name - The name or IP address of the host where the Aspect Real-Time Adherence server (RTA) is run
- Port - The TCP port assigned to the Aspect RTA server on the above host; it must correspond to the port configured on the RTA side
- Record field sizes - The property that specifies the lengths of the data fields communicated to Aspect RTA; the default values correspond to the default settings of the same fields on the RTA side; if values of these fields are changed on the RTA side, they must be changed accordingly in this property
- Reason codes mapping (optional) - This box allows you to configure Not Ready reasons as numerical codes in real-time data. In Bright Pattern Contact Center software, reason codes are defined as text. Aspect WFM only accepts reason codes as numbers. If you need to account for reason codes in your real-time reporting on the WFM side, this box allows you to define a numerical code corresponding to each Not Ready reason code, as shown in the picture.
HTTP POST
If HTTP POST is selected, the following options appear:
- URL - The unique URL of your WFM account
- Token (optional) - The access token for your WFM account
- Test connection - This button sends POST with an empty agent and services list
- Reason codes mapping (optional) - This box allows you to configure Not Ready reasons as numerical codes in real-time data.
When enabled, POST is sent to the provided URL. Errors are ignored, and the next request is done after the defined interval.
Zapier Integration
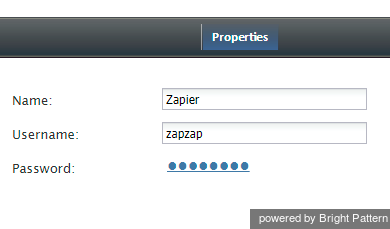
Integration of the BrightPattern workflow engine with Zapier lets Zapier use your contact center's data to automate workflow events called "zaps." Zapier integration configuration involves adding a Zapier integration account and defining how data is retrieved in scenarios.
Properties
The properties of the Zapier type of integration account are described as follows.
Name
Name is the name of the integration account.
Username
The username (string) specifies a username that Zapier will use to access data.
Password
The password (string) specifies a password that Zapier will use to access data.
Zendesk Integration
Integration with the Zendesk customer relationship management application provides the integrated Agent Desktop, single sign-on, access to CRM data from scenarios, screen pop, activity history, and click-to-dial functions. You can configure multiple Zendesk integration accounts for access to different Zendesk systems.
For detailed integration instructions, including specification of the Zendesk integration account properties, see Zendesk Integration Guide.
External Knowledge Base Integration
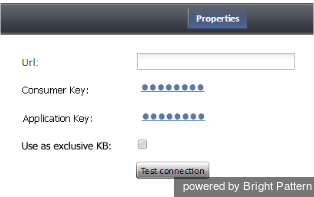
Integration an external knowledge base (KB) enables your Agent Desktop application to use and search a third-party KB such as Synthetix. You can search external KB topics, submit new topics, and so forth. The external KB can be enabled as the exclusive KB for Agent Desktop or as a supplementary provider only.
When you add integration account type External Knowledge Base, you will be prompted to select a provider. The only possible selection is Synthetix KB.
Note that integration accounts of this type are only available to your contact center if they are enabled for your contact center by your system administrator. If External Knowledge Base is not listed as an integration account type, the feature is not enabled for your contact center.
Properties
The properties of the External Knowledge Base type of integration account are described as follows.
Url
The default value for Url is https://api.syn-finity.com/1.1/.
Consumer Key
The Consumer Key is the consumer key for Synthetix.
Application Key
The Application Key is the application key for Synthetix.
Use as exclusive KB
Select the checkbox for Use as exclusive KB if you wish the corresponding API to search KB topics, submit new topics, and so forth. If Use as exclusive KB is not checked, the external KB will be used as a supplementary provider only (i.e., Agent Desktop will try to use the native KB first and search the external KB if nothing is found in the native KB).
Test Connection
When the Test Connection button is clicked, the Test Connection Portal executes GET <URL>/external/views as described at < Previous | Next >">https://www.synthetix.com/api/documentation.

